Multithreading and Optimization Implementation
|
This section describes the implementation of the optimization and multithreading feature. First we discuss the optimization of the contrast plugin, and then we move on to show how the multithreading feature is implemented to improve GUI responsiveness. |
10.5.1 Prototyping Solutions for Performance Optimization
To prototype various optimizations and to try out various implementations, we create a Windows Forms application. We add a new Visual Studio C++ project of type Windows Forms Application (.NET) to the Photo Editor solution. Give the new project the name Performance Tests, and create the project.
We do not change the output path for the assemblies of this project because the application is not part of the deliverables, and the application is not dependent on the photo editor application at all. The goal of this prototype application is to implement and time possible optimizations. Based on the results of the prototype implementations, we will choose a concrete optimization and then implement it in the photo editor application. The performance test GUI that we want to develop is shown in Figure 10.8. Change the form of the created application to match the GUI shown in Figure 10.8.
Figure 10.8. Performance Test GUI
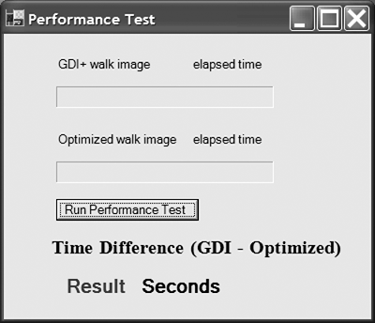
Table 10.2 shows the elements that are used in the Performance Test GUI.
After we have defined the GUI, we implement the button click event handler, which is used to start and run the performance test. While the test is executing, the progress bars shown on the GUI are updated to reflect the progress of the calculation. In addition, the text "elapsed time" is replaced with the actual execution time of the corresponding execution. The Result value then shows the difference in execution time between using the GDI+-provided pixel get/set methods and the optimized pixel accessor method.
The calculation assumes that the optimized method executes faster. Therefore, the result is calculated by subtracting the optimized execution time from the GDI+ execution time.
|
Element |
Value/Text |
|---|---|
|
Label |
Label1/GDI+ walk image |
|
Label |
Label2/Optimized walk image |
|
Label |
Label3/Result |
|
Label |
Label4/Time difference (GDI Optimized): |
|
Label |
Label5/Seconds |
|
Label |
Label6/elapsed time |
|
Label |
Label7/elapsed time |
|
ProgressBar |
progressBar1 |
|
ProgressBar |
progressBar2 |
|
Button |
Button1/Run Performance Test |
Listing 10.1 shows a sample solution. An interesting detail is that the progress bar is not updated after each pixel calculation but rather after a whole line is calculated. This avoids flickering of the progress bar in case too many updates are called.
Listing 10.1 Performance Tests
///
/// At button click some tests are done and timed. /// The result is displayed in the window and gives /// the time difference between optimized and unoptimized /// calculation. The calculation is based on the /// difference = GDI+ - Optimized /// Assuming the optimized version runs faster /// so the value is positive. ///
private: System::Void button1_Click(System::Object * sender, System::EventArgs * e) { // Load the image to access it with GDI+ Bitmap* myImage = new Bitmap(Image::FromFile("..\..\..\..\bin\Hawaii.jpg")); // create region, the size of the image System::Drawing::Rectangle imageSize; imageSize.X = 0; imageSize.Y = 0; imageSize.Width = myImage->Width; imageSize.Height = myImage->Height; // Copy the image Bitmap __gc* myClone = myImage->Clone( imageSize, Imaging::PixelFormat::Format24bppRgb); // Lock the image for read write access with pointer // arithmetic. Imaging::BitmapData* imageData = myClone->LockBits( imageSize, Imaging::ImageLockMode::ReadWrite, Imaging::PixelFormat::Format24bppRgb); // Get the pointer to first element char* imagePtr = (char*) imageData->Scan0.ToPointer(); const int zero = 0; // initialize progress bar to 0 progressBar1->set_Value(zero); progressBar2->set_Value(zero); // two clock values to // measure execution time clock_t start, finish; double duration, duration2; Color pixColor; int numPixels = myImage->Height*myImage->Width; /* Start time measure. */ start = clock(); // Do GDI+ calculation. for(int i = 0; i < myImage->Height; ++i) { for(int j = 0; j < myImage->Width; ++j) { // Just get and set the pixels pixColor = myImage->GetPixel(j, i); myImage->SetPixel(j, i, pixColor); } progressBar1->set_Value((i*j*100)/numPixels); } // Stop the time finish = clock(); // Get the elapsed time duration = (double)(finish - start) / CLOCKS_PER_SEC; // Display duration of execution label6->set_Text(duration.ToString()); // Start the time start = clock(); // Walk over image using pointers. for( int i = 0; i < myImage->Height; ++i) { for(int j = 0; j < (myImage->Width*3) ; j += 3) { // Set RGB values, each of // which is one char long imagePtr[imageData->Stride*i + j]= (unsigned char)100; imagePtr[imageData->Stride*i + j + 1]= (unsigned char)150; imagePtr[imageData->Stride*i + j + 2]= (unsigned char)200; } // Update progress bar progressBar2->set_Value((i*100)/myImage->Height); } // Stop the clock. finish = clock(); // Calculate elapsed time. duration2 = (double)(finish - start) / CLOCKS_PER_SEC; // Display time needed for execution label7->set_Text(duration2.ToString()); // Calculate difference between execution times. double diff = duration - duration2; // free allocated memory. myImage->Dispose(); //Unlock data myClone->UnlockBits(imageData); // display time difference between executions label3->set_Text(diff.ToString()); }
Before you can compile the new project, you must add an include statement for #include in the PerformaceTests.h header file right after the #pragma definition. You can execute the project from within the solution by right-clicking on the PerformanceTests project and selecting Debug | Start New Instance (or Step into New Instance). Make sure to run the test in release mode.
The execution of the test application confirms our suspicion that accessing pixel data using pointer arithmetic is much faster than using the accessor methods provided by GDI+. Figure 10.9 shows a sample output of a release-mode compiled PerformanceTests run.
Figure 10.9. Performance Test Result
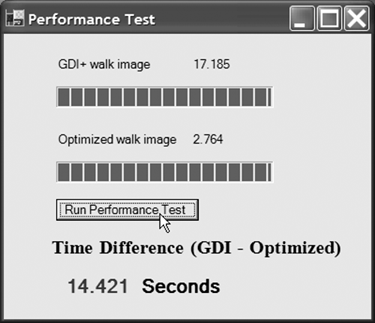
The result of the test is very encouraging. The performance gain that we achieved by accessing pixels through pointer arithmetic is tremendous. With this knowledge, the next step is to change the implementation of the contrast plugin to use the optimized pixel access method shown in the performance test.
Because the performance gain was achieved so easily, you may wonder why we used a profiler. The answer is that, in general, a profiler is very useful in identifying bottlenecks, whereas for prototype testing it is more efficient to use a small test program that can easily be changed and sometimes can be added to the validation test suite as a test program.
10.5.2 Implementing the Contrast Plugin Using Pointer Arithmetic for Pixel Access
Based on the prototype, we now implement the contrast plugin. The task of the implementation is to walk through the entire image using pointer arithmetic rather than the set and get methods provided by GDI+. The implementation shown in this example is based on the implementation of the existing contrast plugin. The alternative would be to start a new project, in which case we would have two projects that build a plugin with the same name. We would have to make sure that the optimized plugin was not overwritten by a build of the original plugin, and so on. By changing the implementation of the existing contrast component, we avoid this extra work. If we want to build the old component, then we will just build the plugin with the sample solution of Chapter 8 or 9.
To start the implementation, open the ContrastPlugIn.cpp file. Add the following line to the beginning of the file:
using namespace Imaging;
Then, after the image width and height are set to the maximum x and y values, we create a rectangle the size of the image with the origin in x = 0 and y = 0. Next, we define a pointer to an unsigned char with the name imagePtr. Then we create a pointer to BitmapData, which we name imageData.
Before we can get a pointer to the source image data, we lock the data by calling sourceImage->LockBits. The parameters passed are the rectangle (with the size of the image that we created before), ImageLockMode::ReadWrite to indicate that we want to read and write to the image data, and the pixel format of the image that we want a pointer to. Now we can get the pointer to the image data by calling imageData->Scan0.ToPointer(). This part of the implementation is shown in Listing 10.2.
Listing 10.2 Optimized Contrast Plugin
void Contrast::ProcessImage(Bitmap& image,
 int param, int unused1, int unused2)
{
 // Image dimensions.
 unsigned int maxX = image.Width;
 unsigned int maxY = image.Height;
 // Rectangle the size of the image
 Rectangle imageRect;
 imageRect.X = 0;
 imageRect.Y = 0;
 imageRect.Width = maxX;
 imageRect.Height = maxY;
 Rectangle rect(0, 0, maxX, maxY);
 // 8-bit pointer to image data
 unsigned char* imagePtr;

 //image data
 BitmapData* imageData;
 // Lock the image data before asking for a pointer;
 imageData = image.LockBits(
 rect,
 ImageLockMode::ReadWrite,
 PixelFormat::Format24bppRgb);
 // Scan0.ToPointer returns a pointer to the image data
 // as void*, which is cast to 8 bpp or unsigned char *.
 imagePtr = (unsigned char*)imageData->Scan0.ToPointer();

 // Pixel count initialized with 0.
 unsigned long totNumPixels = 0;
The next change that we implement has to do with walking through the image to calculate the histogram. Within the nested for loop, we delete the following line:
Color myColor = image.GetPixel(j, i);
In its place we use a mechanism that gets the pointer values via pointer arithmetic. When using pointer arithmetic we must extract each color component from the image separately. In addition, we change the loop so that we can get all three color values of each pixel by multiplying the pixels in x direction by 3 (that is because we have three color components per pixel, so we have three times as many color values as number of pixels in a row). Then we exchange the line that gets a single color value of the current pixel with the lines shown in Listing 10.3.
Listing 10.3 Extracting the Color Values of the Image Pixels
// Walk through the whole image
// and calculate histogram.
for(unsigned int i = 0; i < maxY; ++i)
{
 for(unsigned int j = 0; j < maxX*3; j += 3)
 {
 // Calculate the luminance value
 red = imagePtr[imageData->Stride * i + j];
 green = imagePtr[imageData->Stride * i + j + 1];
 blue = imagePtr[imageData->Stride * i + j + 2];
 // Calculate luminance value of current pixel
 pixVal = (int)(((double)(red) * rFactor) +
 ((double)(green) * gFactor) +
 ((double)(blue) * bFactor));
 // Add the pixel to the histogram
 histogram[pixVal] += 1;
 // Count number of pixels in
 // the histogram.
 totNumPixels++;
 }
}
The current position of the pointer for the red color component is calculated by multiplying the number of pixels in each row (which is also called stride) by the current position in the y direction plus the current position in the x direction (plus 1 for the green color component, plus 2 for the blue color component). The calculation of the lookup table stays as it is.
The next change takes place in the nested for loop where we calculate the new pixel value based on pointer operations. We extract the three color components from each pixel as shown before. The calculation of the new red and green value must change accordingly. These changes are shown in Listing 10.4. After the calculation of the image is finished and before the method is exited, we unlock the bitmap.
Listing 10.4 Calculation of the New Pixel Value Using Pointers
 // Walk through the whole image
 // and calculate the new value of each pixel.
 for(unsigned int i = 0; i < maxY; ++i)
 {
 // Three values for each pixel (RGB).
 for(unsigned int j = 0; j < maxX*3; j += 3)
 {
 red = imagePtr[imageData->Stride * i + j];
 green = imagePtr[imageData->Stride * i + j + 1 ];
 blue = imagePtr[imageData->Stride * i + j + 2];
 // Calculate luminance value of current pixel.
 pixVal = (int)(((double)red * rFactor) +
 ((double)green * gFactor) +
 ((double)blue * bFactor));
 // Get the lookup table value for the current pixel.
 lutVal = (double)lut[pixVal];
 // Calculate the new red, green, and blue values.
 imagePtr[imageData->Stride * i + j ] =
 calcNewValue(red, rFactor, pixVal, factor,
 maxPixValue, lutVal);
 imagePtr[imageData->Stride * i + j + 1] =
 calcNewValue(green, gFactor, pixVal, factor,
 maxPixValue, lutVal);
 imagePtr[imageData->Stride * i + j + 2] =
 calcNewValue(blue, bFactor, pixVal, factor, maxPixValue,
 lutVal);
 }
 }
 // Unlock the image in order
 // to copy the new data into the bitmap.
 image.UnlockBits(imageData);

}
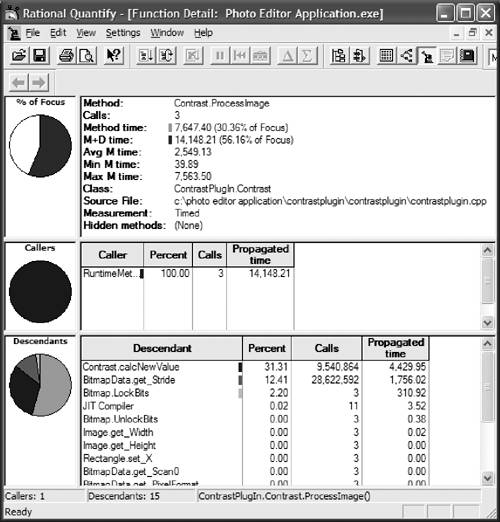
After the implementation of the optimized plugin is finished, run the application in the profiler. The contrast calculation should show a considerable performance improvement. If the improvement does not meet the requirements for speed-up, then further optimizations must be made.
Figure 10.10 shows that the implemented optimizations resulted in a considerable performance gain. This performance improvement is better than expected, and no further improvements are made at this time.
Figure 10.10. Profiling Result of the Optimized Plugin
10.5.3 Multithreading Implementation to Increase GUI Responsiveness
Additional threads that are created by the developer to perform a certain task are often referred to as worker threads. The .NET Framework defines the namespace System.Threading, which provides classes and interfaces to support multithreaded programming.
There are two basic techniques for working with threads. The first one is to use worker threads that are created on-the-fly, and the second one is to use the thread pool classes of the .NET Framework. Before we implement multithreading, let's look at the differences between the two approaches.
You define a worker thread by creating a new instance of Thread (). Merely creating the thread does not make it do anything. To start a thread, you call the Thread.Start() method. The details of its entry point are provided as a parameter. The entry point details are actually the details of a method that is used as the entry point when a thread is started. The .NET Framework defines the following delegate declaration, which is used to provide the method used as the entry point:
public delegate void ThreadStart()
A thread pool is a .NET Framework-managed collection of worker threads. This collection of threads enables a more efficient use of threads by letting the developer post work items to the thread pool. The command to add a work item to the list is ThreadPool.QueueUserWorkItem(...). This call takes a method or delegate as a parameter that is used as the entry point for the thread. The work item is then scheduled to be executed by the next thread that becomes available. After a work item is posted, you cannot delete the item.
The thread pool is allocated the first time an instance of the thread pool is created. By default, the maximum number of threads is limited to 25 threads per processor, although this default can be changed if necessary. The example shown in this section uses the thread pool functionality for the optimized implementation of the photo editor.
For more detail on threading and synchronization possibilities, please consult the MSDN documentation provided with .NET.
10.5.4 Using Thread Pools and Locks
The thread that will do the calculation of the image-processing operation will run in parallel to the application, so we use a delegate to call the application at the time the ApplyImageProcessing method finishes. When the application is called, we update the display and some properties. The delegate is declared in the PhotoEditor.cs file as the first statement after the namespace Photo_Editor_Application is defined:
///
/// Declaration of event used to indicate the completion of /// an image calculation. Signature uses .NET provided /// delegate definition. ///
public delegate void EventHandler(object sender, EventArgs args);
We use a Mutex in the PlugInInterface to ensure that only one image-processing calculation is run at a time. Therefore, we declare a private property of type Mutex and name it lockImageProcessing in the PlugInInterface class. In addition, we define a public get accessor to get a reference to the Mutex from the photo editor application. Then we add the following line and create a new instance of a Mutex in the constructor of PlugInInterface:
using System.Threading;
Using a Mutex for Synchronization
In the photo editor application, we use a Mutex to ensure that only one thread accesses the image data at a time for writing. Therefore, before we start the actual calculation, a Mutex must be acquired by the thread. If the Mutex has already been acquired by another thread, then the current thread must wait until the first thread releases the Mutex. The Mutex class defines the method WaitOne to accommodate this common scenario. The WaitOne method acquires the Mutex if it is not in use; otherwise, the method waits for the Mutex to be released and then acquires it. To prevent the application from hanging, we can provide an optional parameter that defines a maximum time to wait before the acquisition is considered failed and an exception is thrown.
After the Mutex is acquired, the calculation can be performed. At the end of the calculation the Mutex is released so that other threads can work on the new image data. If the lock is not released, the application might hang forever (at least if no timeout was specified in the WaitOne method).
Mutex and Delegate Implementation
There are a few changes that we have to make in PlugInInterface to make this work. First, we add the following line to the constructor:
lockImageProcessing = new Mutex();
Then we add the following line to lock the image as soon as we enter the ApplyImageProcessing method:
lockImageProcessing.WaitOne();
Then we release the lock as soon as the Invoke method returns:
lockImageProcessing.ReleaseMutex();
After that, we specify the event handler delegate and invoke the registered event handler methods. The implementation for that is shown in Listing 10.5.
Listing 10.5 Delegate Implementation
///
/// Specification of the event handler delegate. ///
public event EventHandler Notify; ///
/// Invokes all registered event handler methods. ///
protected virtual void OnNotify(EventArgs e) { Notify(this, e); }
Our next task is to hook the application up to post a work item that is then executed in parallel. To use the ApplyImageProcessing method as entry point for the posted work package, we change its definition to
public void ApplyImageProcessing(Object stat)
ThreadPool Implementation and Application Adaptation
In the PhotoEditorForm class we add a new property of type Mutex that we call lockImage. This property will hold a reference to the Mutex created by the PlugInInterface class and is used to check whether another thread is already using the image data for another image-processing calculation.
After that, we define an event handler method. The event handler is called ThreadFinished, and its signature is the same as the default delegate definition, which takes a sender object and EventArgs as parameters. In the constructor of PhotoEditorForm we assign the lockImage mutex to a reference to lockImageProcessing, which is one of the properties we added to the PlugInInterface class. After that, we register the event handler method ThreadFinished so that it is called as a delegate when the calculation in the ApplyImageProcessing method is finished. We also define a Boolean flag, fromApply, which will be true if the call came from the ApplyImageProcessing method.
The implementation of this part is shown in Listing 10.6.
Listing 10.6 Application Adaptation
using System;
using System.Drawing;
using System.Collections;
using System.Windows.Forms;
using Microsoft.ApplicationBlocks.ExceptionManagement;
using System.Threading;

namespace Photo_Editor_Application
{
 ///
/// Declaration of event used to indicate the completion of /// an image calculation. Signature uses .NET provided /// delegate definition. ///
public delegate void EventHandler(object sender, EventArgs args); * * * ///
/// Constructor of the application class. /// PhotoEditorForm provides the GUI for the photo /// editor project. ///
public PhotoEditorForm() { * * * plugInInterface = new PlugInInterface(); lockImage = plugInInterface.LockImageProcessing; plugInInterface.Notify += new EventHandler(this.ThreadFinished); picturePreView.Image = thumbImage; // Calls helper method to draw the image DisplayImage(); } ///
/// This method is called when a worker /// thread is finished with /// the calculation. If Apply was the reason for execution /// then update the loaded image and the thumbnail. ///
///Object that sent the event. ///The event arguments. Not used /// F:editor_optimization public void ThreadFinished(object sender, EventArgs e) { if(fromApply) { //PictureObject.LoadedImage.Dispose(); PictureObject.LoadedImage = (Bitmap)plugInInterface.TmpBitmap.Clone(); thumbImage = plugInInterface.TmpBitmap.GetThumbnailImage( picturePreView.Width, picturePreView.Height,null, IntPtr.Zero); // picturePreView.Image = (Image)thumbImage.Clone(); fromApply = false; DisplayImage(); } } ///
/// Flag used to indicate whether Apply button /// was reason for calculation of new image. ///
private bool fromApply = false; ///
/// Holds a reference to the plugInInterface Mutex. ///
private Mutex lockImage;
According to the requirements, we use multiple threads to enable interactivity of the application even when an image-processing calculation is executed. This means that if a new thumbnail calculation is done, no improvement is necessary.
This leads us to implement another applyImageProcessing method, which is called by the trackBar event handlers to set up PlugInInterface for calculation of the thumbnail. Therefore, we add a private applyImageProcessing method to the PhotoEditorForm class. This method is called from all the trackBar event handlers. Within the method, a copy of the thumbnail is stored in plugInInterface.tempImage for calculation. Then we check whether the Mutex was acquired by another thread, and, if it was, the method waits until it can acquire the Mutex.
Note: A Mutex can be acquired multiple times by the same thread without locking. For each acquisition of a Mutex, a corresponding release must be called so that other threads are not locked out.
The next step is to call ApplyImageProcessing of plugInInterface to execute the actual calculation. The parameter null must be provided but is not used. After the calculation is done, the lock is released. This is possible because the image processing is executed sequentially (that is, in the same thread) if the execution was done on a thumbnail image. Now we update the preview image. A sample implementation is shown in Listing 10.7.
Listing 10.7 The private applyImageProcessing Method
///
/// This method is called when a new thumbnail is /// calculated for previewing a transformation. ///
private void applyImageProcessing() { // Copy the current thumbnail to the tmpBitmap, // which is used as the image on which the // image-processing calculation is performed. plugInInterface.TmpBitmap = (Bitmap)thumbImage.Clone(); // Wait until Mutex is released and acquire it. lockImage.WaitOne(); // Call the PlugInInterface method to do the magic. plugInInterface.ApplyImageProcessing(null); // Release the acquired lock lockImage.ReleaseMutex(); // Set the preview image to a copy of the calculated tmpImage. picturePreView.Image = (Image)plugInInterface.TmpBitmap.Clone(); }
The next task is to actually implement the ApplyProcessingButton_Click event handler. When the image-processing functionality is applied to the entire image, a new work item is posted to a new thread, which will do the calculation and call the application when the processing is finished. Therefore, we copy the loaded image first and set tmpBitmap of plugInInterface to contain the created copy. This avoids access violations in case customScrollableControl tries to repaint the loaded image and the image is locked because a calculation is being performed.
Next, we send the work item to the queue to be processed by a thread in the thread pool. Then the flag indicating that the calculation was done on the entire image is set to true. The implementation of this functionality can be seen in Listing 10.8.
Listing 10.8 Using the Thread Pool
///
/// Applies the current image-processing /// operation to the currently loaded image /// using the thread pool functionality. ///
private void ApplyProcessingButton_Click(object sender, System.EventArgs e) { try { // Store a copy of the loaded image on which the // image-processing calculation is performed. plugInInterface.TmpBitmap = (Bitmap)PictureObject.LoadedImage.Clone(); // Use a thread pool and add a work item to the list of items // that need to be calculated. ThreadPool.QueueUserWorkItem( new WaitCallback(plugInInterface.ApplyImageProcessing)); // Set flag to indicate that this calculation was done // on the entire image. fromApply = true; } catch(Exception exception) { ExceptionManager.Publish(exception); } }
The implementation is almost complete except for the callback method that is called when a thread finishes the calculation to let the application know that the data can be used. Therefore, we implement the method ThreadFinished.
In the new method we first check whether the preceding calculation was done on the entire image. If it was, then we set the loaded image to the newly calculated image, create a new thumbnail, and store it in the thumbImage property. Then we reset the flag that shows whether the calculation was done on the entire image to false. We do this before the DisplayImage() method is called to propagate the changes. Listing 10.9 shows the implementation of the ThreadFinished method.
Listing 10.9 The ThreadFinished Method
///
/// This method is called when a worker thread is finished with /// the calculation. If Apply was the reason for execution, /// then update the loaded image and the thumbnail. ///
///Object that sent the event. ///The event arguments. Not used /// F:editor_optimization public void ThreadFinished(object sender, EventArgs e) { // If calculation was done on entire image... if(fromApply) { // ...get a copy of the bitmap calculated and store it as // the loaded image in order to display it. PictureObject.LoadedImage = (Bitmap)plugInInterface.TmpBitmap.Clone(); // Set the thumbnail image to the newly calculated image. thumbImage = plugInInterface.TmpBitmap.GetThumbnailImage( picturePreView.Width, picturePreView.Height,null, IntPtr.Zero); // Reset the flag. fromApply = false; // Show the world the new image. DisplayImage(); } }
For this change to work, we must add the following line in the ApplyImageProcessing method just before the method returns:
OnNotify(new EventArgs());
Without this line, the event handler will not be called and the Apply button will not work.
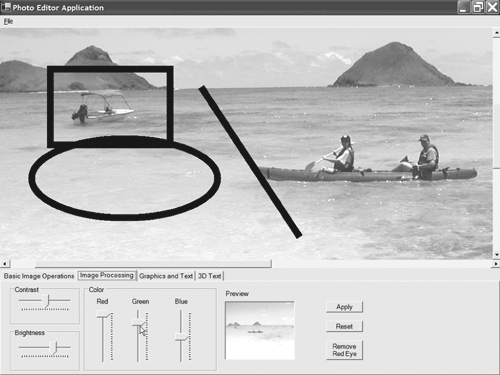
The complete solution is provided as sample solutions on the accompanying CD. To test the implementation, load a large image into the photo editor application, and apply an image-processing calculation to the entire image. Then try to switch to another tab control to see whether the application is still responding to user inputs. If it is, then the goal of this iteration has been achieved. Figure 10.11 shows a snapshot of the application.
Figure 10.11. The Photo Editor Application
Introducing .NET
- Introducing .NET
- The Need for .NET
- The .NET Framework
- The C# Language
- Debugging and the IDE
- References for Further Reading
Introducing Software Engineering
- Introducing Software Engineering
- Introducing Software Engineering Practices
- Choosing a Software Development Model
- Commonly Used Software Development Models
- Conclusion
- References for Further Reading
A .NET Prototype
- Getting Started
- Evaluating .NET for Windows Client Applications
- Our First .NET Application
- Prototyping
- Implementing the SmartNotes Application
- Visual Studio.NET: Platform of Choice
- References for Further Reading
Project Planning
- Project Planning
- The Project Vision and Business Case
- The Initial Use Case Model
- Project Requirements
- Initial Project Planning
- Initial Risk Analysis
- Initial Requirements Analysis and Design
- Conclusion
- References for Further Reading
The Photo Editor Application
- The Photo Editor Application
- The Refined Project Vision and Business Case
- Refined Requirements for Online Photo Shop
- Analysis of the Photo Editor Requirements
- Design of the Photo Editor Application
- The Detailed Project Schedule
- Implementation of the Photo Editor Application
- Unit Tests
- Conclusion
- References for Further Reading
GDI+ Graphics Extensions
- GDI+ Graphics Extensions
- Requirements for the GDI+ Extensions
- Analysis of the GDI+ Extensions Requirements
- Design of the GDI+ Extensions
- Project Management Issues
- GDI+ Programming
- Drawing GDI+ Primitives
- Unit Tests
- Conclusion
- References for Further Reading
Advanced GDI+ Operations
- Advanced GDI+ Operations
- Advanced GDI+ Extensions
- Analysis of the Advanced GDI+ Extensions Requirements
- Design of the Advanced GDI+ Extensions
- Project Management Issues
- Using Pens and Brushes in GDI+
- Implementation of Regions, Pens, and Brushes
- Unit Tests
- Conclusion
Dynamic Loading of Components
- Dynamic Loading of Components
- Requirements for Image Postprocessing Components
- Analysis of the Image Postprocessing Requirements
- Design of the Image-Processing Components Using Late Binding
- Project Management Issues
- Implementing Dynamically Loadable Image Postprocessing Plugins
- Unit Tests
- Conclusion
- References for Further Reading
Accessing System Resources
- Accessing System Resources
- Refining Requirements for 3D Text Display
- Three-Dimensional Rendering Technologies
- Analyzing User Interface Needs
- Using OpenGL.NET
- Adding 3D Text to the Photo Editor Application
- Conclusion: Dont Reinvent the Wheel
- References for Further Reading
Performance Optimization, Multithreading, and Profiling
- Performance Optimization, Multithreading, and Profiling
- Requirements for Performance Optimization
- Analysis of the Editor Optimization Requirement
- Design of the Optimizations
- Project Management Issues
- Multithreading and Optimization Implementation
- Unit Tests
- Conclusion
- References for Further Reading
Building the Web Application with ASP.NET
- Building the Web Application with ASP.NET
- Online Store Requirements
- Analyzing Interfaces and Activities
- Breakdown of the Code Modules
- Implementation of Online Photo Shop
- Conclusion
Security and Database Access
- Security and Database Access
- Secure Checkout
- Integrating Externally Supplied Software
- E-mail, Password, Credit Card: Creating a Customer Profile
- Secure Web Applications
- Database Access with ADO.NET
- Putting It All Together
- No Longer under Construction
- References for Further Reading
Product Release
EAN: 2147483647
Pages: 123
