Loading Data into the ODS Object
Now we can load data into the ODS object.
Work Instructions
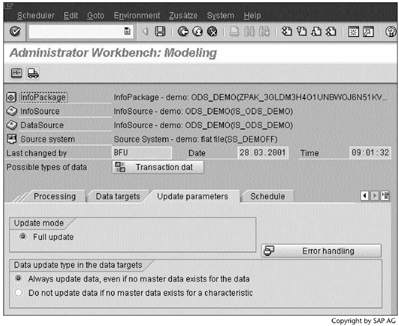
Step 1. Repeat the procedure outlined in Section 3.9 to create an InfoPackage. Select the Only PSA option in the InfoPackage.
Note
As of BW 2 releases, when loading data into ODS objects BW requires us to select the Only PSA option because ODS objects do not support parallel loads.
A load request can be processed in parallel when the data are sent in multiple packets from the source system. Each packet will use one SAP work process. This parallel processing generates an ORA-54 error when multiple processes compete for the same table lock on the ODS tables. This table lock is essential so that the Overwrite option selected in Screen 9.12 will not cause data consistency problems when the data load executes. Loading data from PSA to an ODS object or an InfoCube is handled by a single SAP work process, which prevents the table locking problem.
BW release 3.0A removes this restriction. Data can now be loaded into an ODS object in multiple packets, through parallel processing. The new release achieves this goal via a queuing mechanism. Data requests are identified uniquely by a combination of several key fields.
SCREEN 9.22

Step 2. Under the Update parameters tab, we see another difference between ODS objects and InfoCubes: We do not have the delta load option. In Section 9.5, we will see how to perform delta data loading into the ODS object using 0RECORDMODE.
SCREEN 9.23
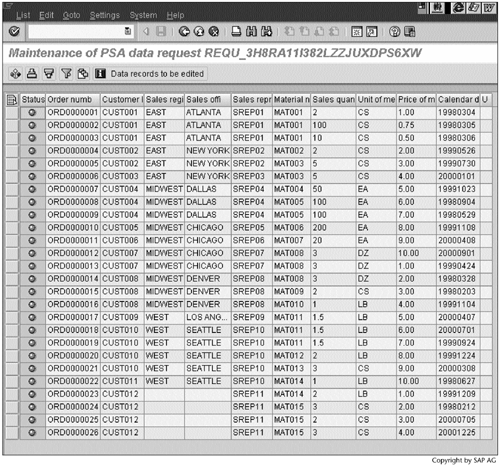
Step 3. After loading the data, go to PSA to check its contents using the procedure outlined in Section 4.3.
SCREEN 9.24
Step 4. After checking the data in PSA, load it into the ODS object following the step shown in Screen 4.16.
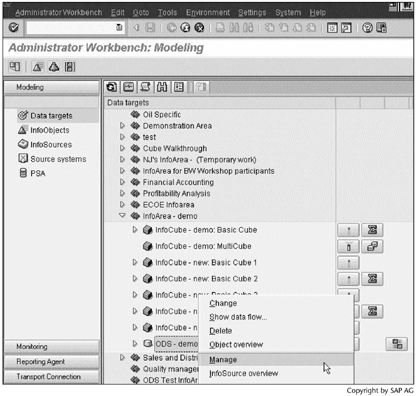
Next, we need to check and set the data quality status. To do so, right-click the ODS and select Manage.
SCREEN 9.25
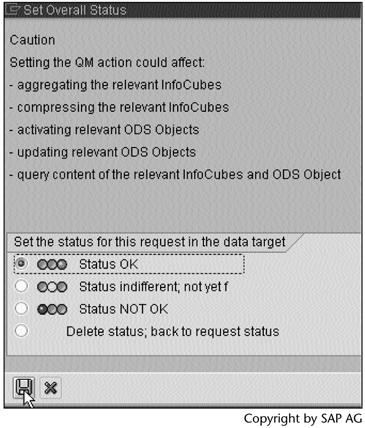
Step 5. Click  in the QM…column.
Note
QM stands for "quality management." Before the loaded data will be available for reporting, the QM status must be set to "OK," as indicated by the green light on the right.
We could have skipped Step 5 if we had selected the option Set quality status to 'OK' automatically in Screen 9.3.
SCREEN 9.26

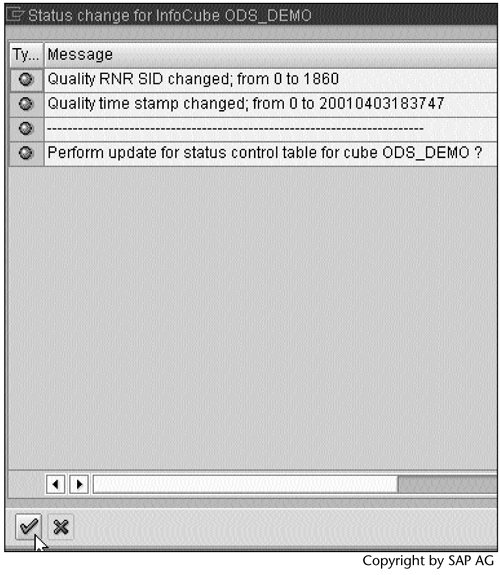
Step 6. Change the status from Status indifferent; not yet f to Status OK, and then click  to save the change.
SCREEN 9.27
Step 7. Click  to pass the message.
SCREEN 9.28
Note
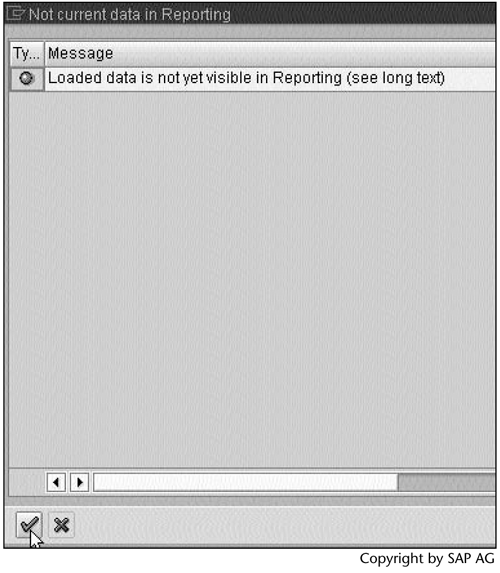
The loaded data are available for reporting only after being activated, which takes place in Step 10.
Step 8. Click to pass the message.
SCREEN 9.29
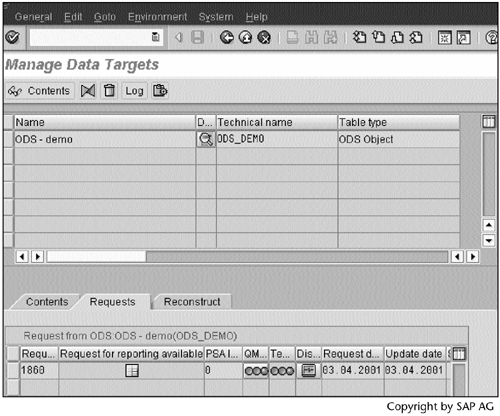
Step 9. The icon  in the Request for reporting available column indicates that the loaded data are available for reporting, which is not correct. Screen 9.28 indicated that the data were not ready for reporting yet. As mentioned earlier, to make the data ready for reporting, we need to activate it.
SCREEN 9.30
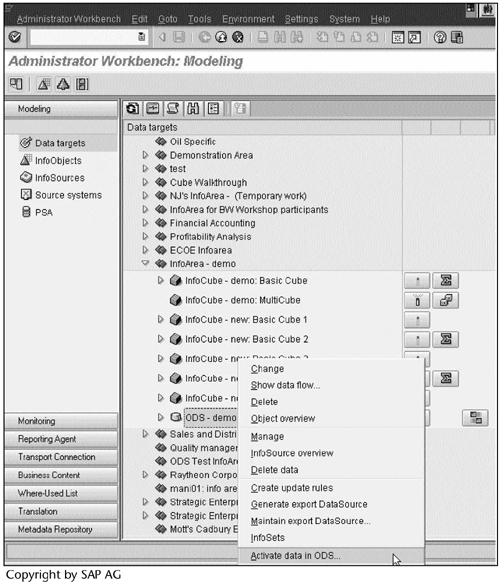
Step 10. To make the data ready for reporting, right-click the ODS object, and then select Activate data in ODS….
SCREEN 9.31
Note
We could have skipped Step 10 if we had selected the option Activate ODS object data automatically in Screen 9.3.
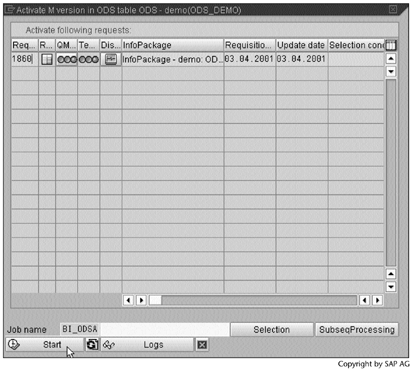
Step 11. Select the data load request, and then click . A background job is launched, which will move the data from one ODS table into another ODS table, from which we can display data using a BEx query.
SCREEN 9.32
Result
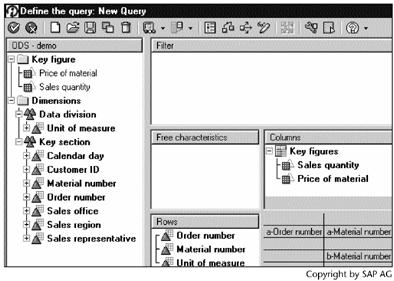
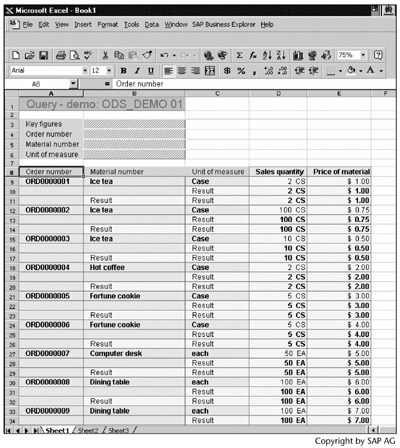
You have loaded data into the ODS object and made it ready for reporting. Repeating the Section 5.1 procedure, you can define a query as shown in Screen 9.33. Screen 9.34 shows the result of this query.
SCREEN 9.33
SCREEN 9.34
Note
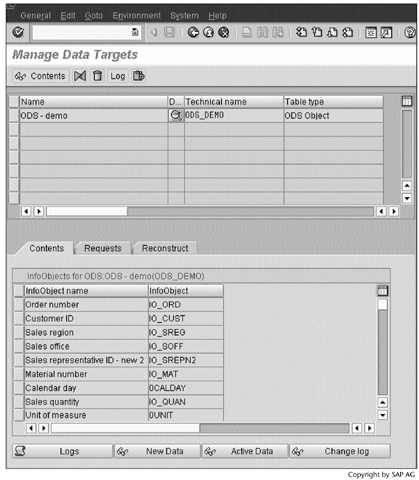
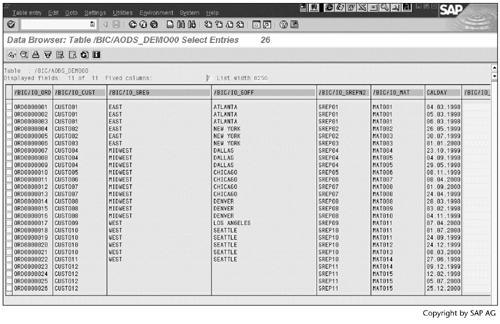
Each ODS object has three database tables. In our case, they are /BIC/AODS_DEMO10 for the new data, /BIC/AODS_DEMO00 for the active data, and /BIC/B0000842000 for the change log. You can display each table's contents by clicking the appropriate button under the Contents tab in Screen 9.35.
SCREEN 9.35
Before the ODS data were activated in Screen 9.30, only /BIC/AODS_DEMO10 had data. Clicking  , we can see its contents (Screen 9.36).
SCREEN 9.36

After the ODS data were activated (see Screen 9.30), /BIC/AODS_DEMO10 no longer had data; the data had been moved into /BIC/B0000842000 and /BIC/AODS_DEMO00. Clicking  on Screen 9.35, we see the /BIC/B0000842000 contents (Screen 9.37). Clicking
 , we see the /BIC/AODS_DEMO00 contents (Screen 9.38).
SCREEN 9.37

SCREEN 9.38
In BW release 3.0A, an ODS object will have an active table and a change log. The data are loaded directly to the change log and arrive in the active table when it becomes activated. This change shortens data loading time and makes data available for reporting more quickly.
Part I. Guided Tours
Business Scenario and SAP BW
- Business Scenario and SAP BW
- Sales Analysis A Business Scenario
- Basic Concept of Data Warehousing
- BW An SAP Data Warehousing Solution
- Summary
Creating an InfoCube
- Creating an InfoCube
- Creating an InfoArea
- Creating InfoObject Catalogs
- Creating InfoObjects Characteristics
- Creating InfoObjects Key Figures
- Creating an InfoCube
- Summary
Loading Data into the InfoCube
- Loading Data into the InfoCube
- Creating a Source System
- Creating an Application Component
- Creating an InfoSource for Characteristic Data
- Creating InfoPackages to Load Characteristic Data
- Checking Loaded Characteristic Data
- Entering the Master Data, Text, and Hierarchy Manually
- Creating an InfoSource for Transaction Data
- Creating Update Rules for the InfoCube
- Create an InfoPackage to Load Transaction Data
- Summary
Checking Data Quality
- Checking Data Quality
- Checking InfoCube Contents
- Using BW Monitor
- Using the Persistent Staging Area (PSA)
- Summary
Creating Queries and Workbooks
- Creating Queries and Workbooks
- Creating a Query Using BEx Analyzer
- Organizing Workbooks Using BEx Browser
- Using a Variable to Access a Hierarchy Node Directly
- Summary
Managing User Authorization
- Managing User Authorization
- Creating an Authorization Profile Using Profile Generator
- Creating an Authorization Object to Control User Access to the InfoCube Data
- Integrating Profile Generator and BEx Browser
- Summary
Part II. Advanced Topics
InfoCube Design
- InfoCube Design
- BW Star Schema
- InfoCube Design Alternative I Time-Dependent Navigational Attributes
- InfoCube Design Alternative II-Dimension Characteristics
- InfoCube Design Alternative III Time-Dependent Entire Hierarchies
- Other InfoCube Design Techniques
- Summary
Aggregates and Multi-Cubes
Operational Data Store (ODS)
- Operational Data Store (ODS)
- Creating an ODS Object
- Preparing to Load Data into the ODS Object, Then into an InfoCube
- Loading Data into the ODS Object
- Loading Data into the InfoCube
- Using 0RECORDMODE for Delta Load
- Summary
Business Content
- Business Content
- Creating an R/3 Source System
- Transferring R/3 Global Settings
- Replicating R/3 DataSources
- Installing Business Content Objects and Loading R/3 Data
- Summary
Generic R/3 Data Extraction
- Generic R/3 Data Extraction
- Creating Views in R/3
- Creating DataSources in R/3 and Replicating Them to BW
- Creating a Characteristic in BW
- Loading Data from R/3 into BW
- Summary
Data Maintenance
Performance Tuning
- Performance Tuning
- BW Statistics
- System Administration Assistant
- Tuning Query Performance
- Tuning Load Performance
- Summary
Object Transport
Appendix A. BW Implementation Methodology
Object Transport
Appendix B. SAP Basis Overview
Object Transport
- Object Transport
- Section B.1. SAP Basis 3-Tier Architecture
- Section B.2. Dispatcher, Work Processes, and Services
- Section B.3. Memory Management
Appendix C. Glossary
Appendix D. Bibliography
EAN: N/A
Pages: 106
