Maintaining InfoCube Data
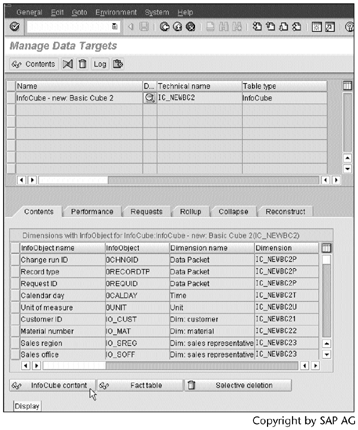
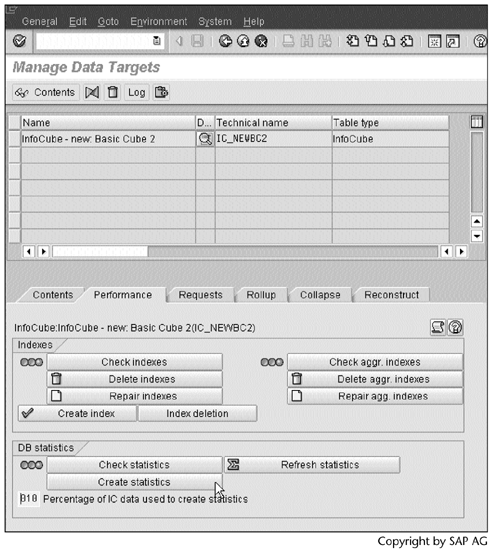
To answer the other questions raised at the beginning of this chapter, from Administrator Workbench right-click the concerned InfoCube (IC_NEWBC2 in our example), and then select Manage. Screen 12.12 appears.
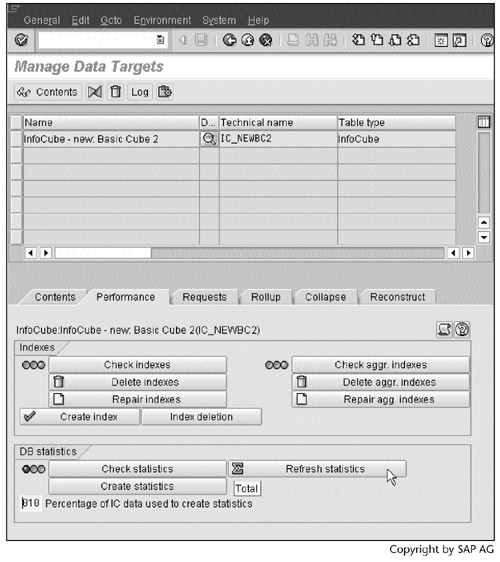
Screen 12.12 contains six areas:
- Contents, where we can display and delete InfoCube data
- Performance, where we can check, delete, and create indices and statistics
- Requests, where we can manage individual data load requests
- Rollup, where we can roll up data per load requests into aggregates
- Collapse, where we can compress data in multiple load requests into a single request
- Reconstruct, where we can reconstruct the InfoCube using load requests in PSA
We will discuss each of these topics in turn.
12.2.1 InfoCube Contents
The first tab in Screen 12.12 is Contents. Here we can display and delete the InfoCube's contents.
Work Instructions
Step 1. To display the InfoCube contents, click  .
.
SCREEN 12.12
Step 2. In Screen 12.13, we specify conditions regarding what contents to be displayed. Here are some options:
- Choose Do not use any conversion to display the data in the database formats.
- Choose Use mat. aggregates to display the data from an aggregate instead of the fact table if an appropriate aggregate exists.
- Choose Use DB aggregation to allow aggregation on the fields that are not the selection conditions.
- Choose Output number of hits to add a new column in the display to show how many records in the fact table are used to produce each display row.
- Choose Display modified structures to display the M version master data. Use this option to check how the result would look in BEx should the characteristic data be activated.
SCREEN 12.13

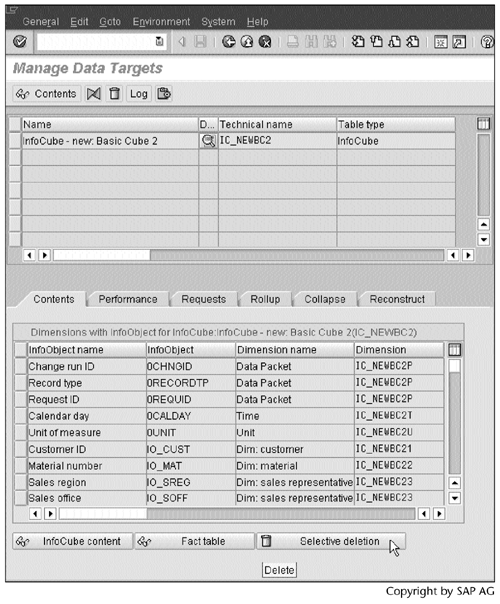
Step 3. To delete data from the InfoCube, click  .
.
SCREEN 12.14
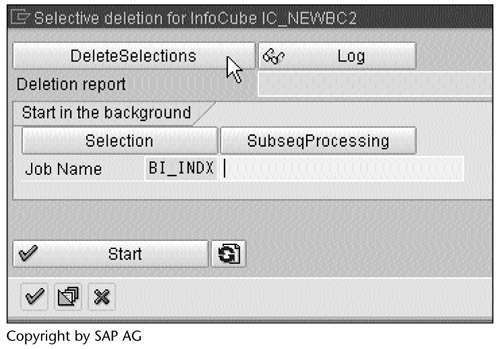
Step 4. In this pop-up window, we can specify the data to be deleted and how to delete them by clicking  .
.
SCREEN 12.15
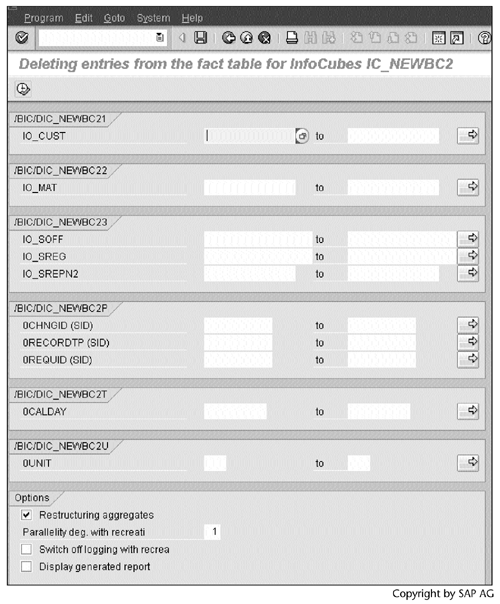
Step 5. Besides the conditions used to specify the data to be deleted, in this window, we can also do the following:
- Select Restructuring aggregates to rebuild aggregates after the data are deleted.
- Select Parallelity deg. with recreati field to enter the number of parallel processes to be used in reconstructing the table.
- Select Switch off logging when recrea to improve performance without logging the changes.
- Select Display generated report to display the ABAP program used to delete the data.
SCREEN 12.16
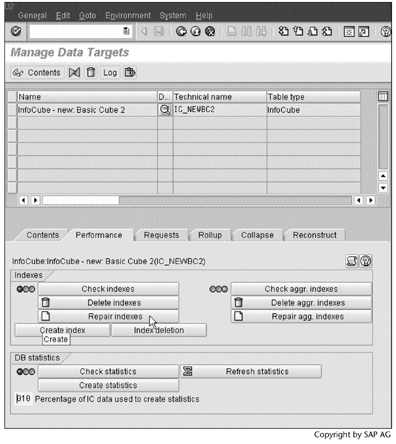
12.2.2 Indices and Statistics
The second tab in Screen 12.12 is related to performance. Here we can check, delete, and create indices and statistics.
Work Instructions
Step 1. The status lights on the right  should be green. If no index/ statistics data exist, the status lights will be red.
To delete indices from the fact table, click  .
.
SCREEN 12.17

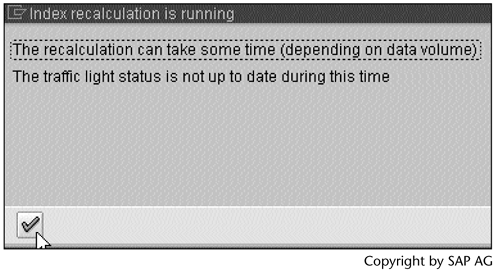
Step 2. Now the left status light turns red. To create the indices, click  .
.
SCREEN 12.18
Step 3. Click  to continue.
SCREEN 12.19
Step 4. Click to continue.
SCREEN 12.20
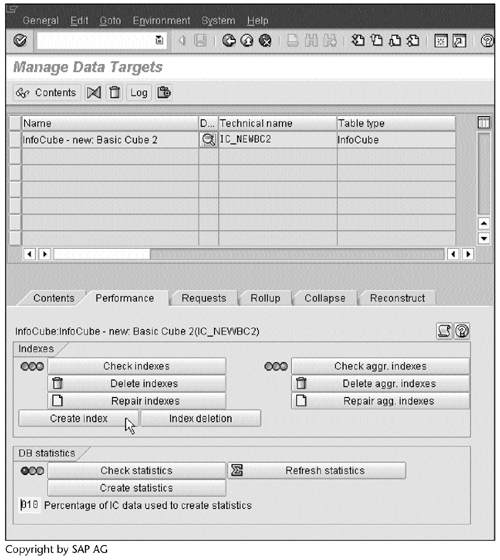
Step 5. Depending on the size of the InfoCube, it may take a while for the status light to turn green.
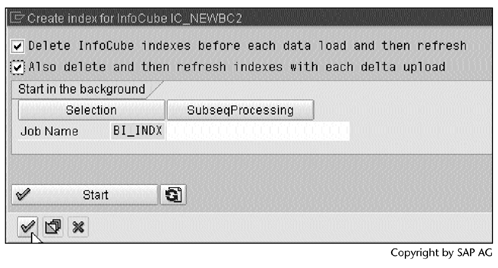
To improve data loading performance, it is a good practice to delete the indices, load the data, and then recreate the indices. To automate this job, click  .
.
SCREEN 12.21
Note
Rolling up aggregates will automatically repair the aggregates' indices.
Step 6. Check all options, and then click to save the settings and continue.
SCREEN 12.22
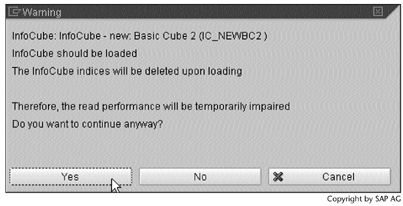
Result
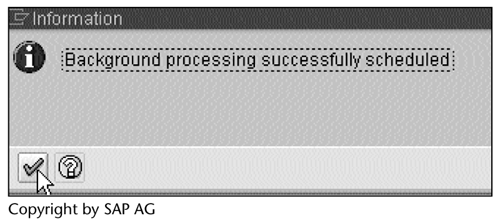
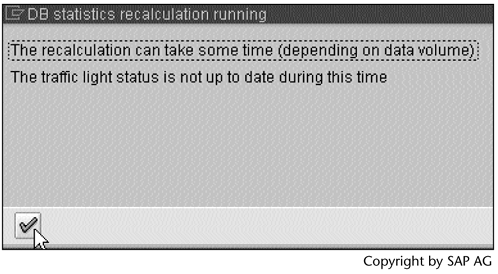
The next time when we load data into this InfoCube, we will receive a message like the one in Screen 12.23. To continue the data loading operation, click  .
.
SCREEN 12.23
In the same way, we can check, delete, and create the BW statistics.
Step 7. If the DB statistics status light is red, click  .
.
SCREEN 12.24
Step 8. Click to continue.
SCREEN 12.25
Step 9. Click to continue.
SCREEN 12.26
Step 10. Depending on the size of the InfoCube, it may take a while for the status light to turn green.
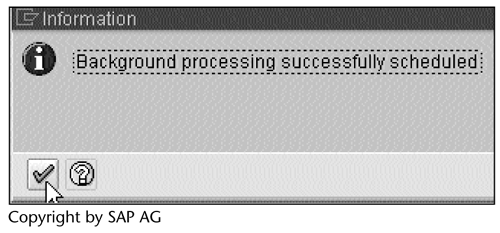
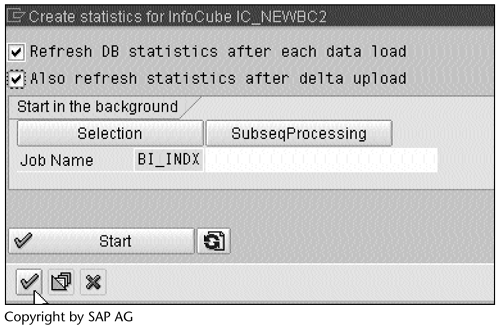
Each time when new data are loaded into the fact table, statistics should be refreshed. To automate this process, click  .
.
SCREEN 12.27
Step 11. Check both options, and then click to save the settings and continue.
From now on, the DB statistics will be refreshed after each data load and each delta load.
SCREEN 12.28
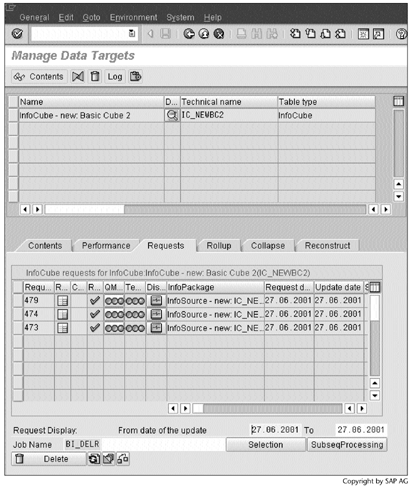
12.2.3 Data Load Requests
The third tab in Screen 12.12, Requests, allows us to manage individual data load requests.
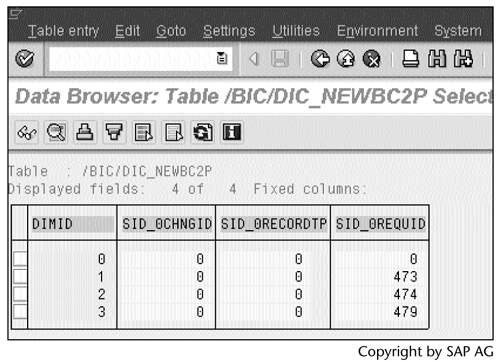
In BW, each data load from BW Scheduler counts as a request and is assigned a unique request number consisting of 30 characters. This request number is stored as an integer value called a request ID, in the data packet dimension of the InfoCube.
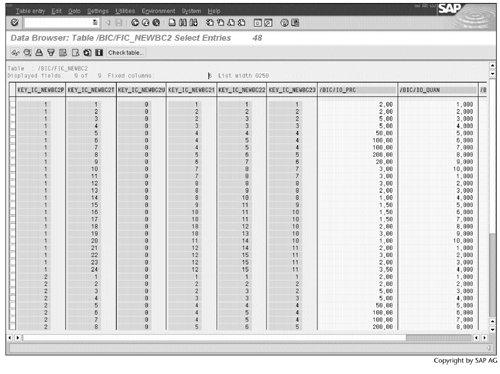
As an example, Screen 12.29 displays the contents of the data packet dimension table, /BIC/DIC_NEWBC2P. It shows the relationships among the request IDs (473, 474, and 479) and DIMIDs (1, 2, and 3).
SCREEN 12.29
The DIMIDs (41, 42, and 43) are used in the fact table /BIC/FIC_NEWBC2 for the request IDs (Screen 12.30).
SCREEN 12.30
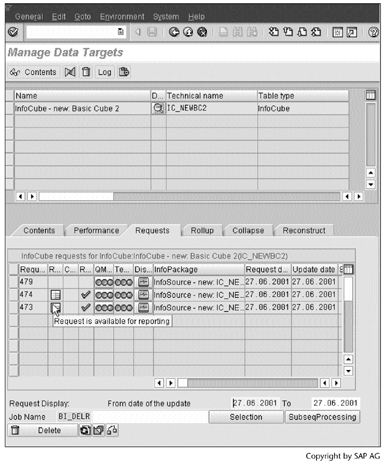
As shown in Screen 12.31, if an InfoCube has aggregates, then a request is not available for reporting until it is rolled up into the aggregates.
To delete a request from the InfoCube, click  . If the request has been rolled up into an aggregate or compressed, however, then you cannot delete it. If it has been rolled up, then the aggregate must be deactivated first. If it has been compressed, then all data in the fact table must be deleted first.
SCREEN 12.31
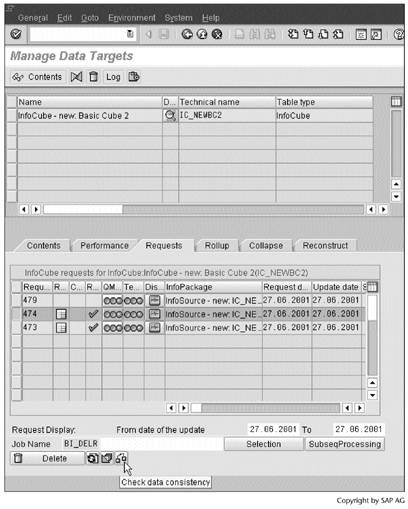
BW provides a useful function that allows us to check whether one data load request overlaps with another. The following is an example for request 474.
Work Instructions
Step 1. Select request 474, and then click  .
.
SCREEN 12.32
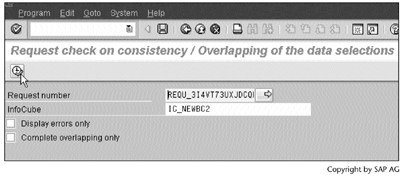
Step 2. A new session window opens and displays the request's 30-character request number,REQU_3I4VT73UXJDCQIO47YE4Q4QAI.
Click  to check the overlapping.
SCREEN 12.33
Result
The result contains information about the overlapping. If overlapping is present, the result also tells us whether we can delete the request (Screen 12.34).
SCREEN 12.34

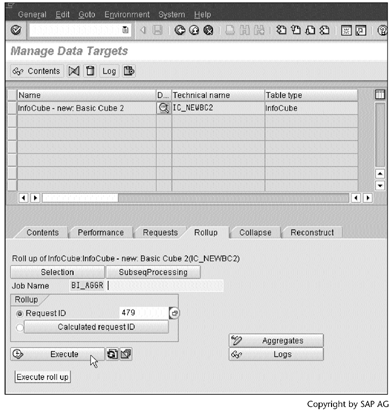
12.2.4 Aggregate Rollup
The fourth tab, Rollup, in Screen 12.12 deals with the aggregate rollup. When we roll up data load requests, we roll them up into all the aggregates of the InfoCube.
Work Instructions
Step 1. To roll up request 479, enter 479 into the Request ID and then click  . BW will roll up request 479 and other requests below 479 into the aggregates.
SCREEN 12.35
Result
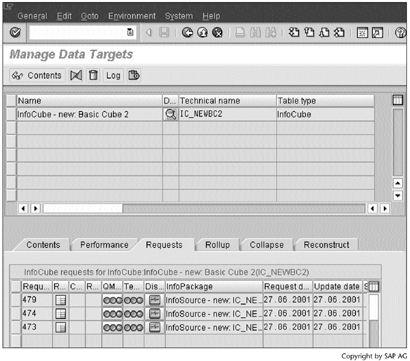
Returning to the Requests tab and clicking  to refresh the screen, notice that request 479 has been rolled up. Now it is available for reporting (Screen 12.36).
SCREEN 12.36
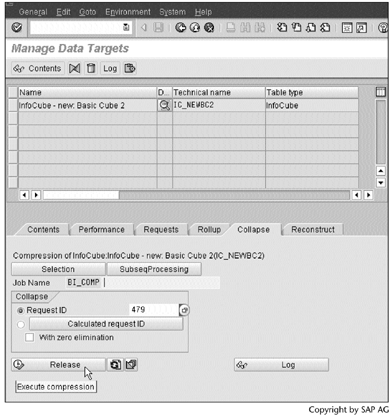
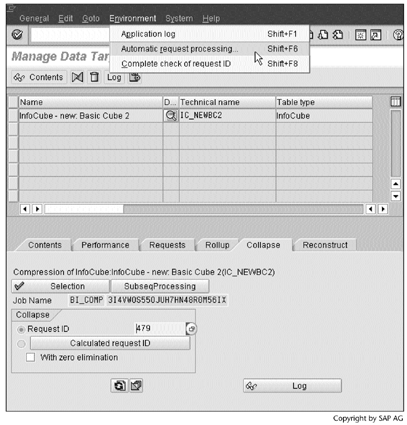
12.2.5 InfoCube Compression
The fifth tab in Screen 12.12, Collapse, focuses on the InfoCube compression.
Each InfoCube has two fact tables: the F fact table and the E fact table. We load data into the F fact table, where the data are grouped according to the individual load among requests. The F table allows us to check for overlapping requests and to delete unnecessary requests.
The F fact table degrades query performance, however. When executing a query, the OLAP processor must aggregate key figures to eliminate the request information in the data packet dimension.
To overcome this drawback, BW allows us to aggregate the F fact table and save the aggregated data in the E fact table in a process called the InfoCube compression. After the InfoCube compression, the OLAP processor will go to the E fact table to retrieve data. The procedure for performing this compression appears next.
Work Instructions
Step 1. To compress request 479, enter 479 into the Request ID and then click  . BW will compress request 479 and other requests below 479.
Note
To delete records whose key figures are all 0, select the With zero elimination option.
SCREEN 12.37
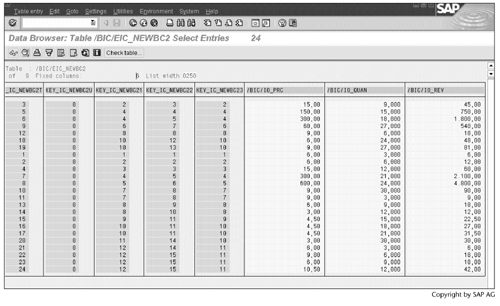
Result
After the compression, the F fact table /BIC/FIC_NEWBC2 contains no more data. Instead, the compressed data now appear in the E fact table, /BIC/EIC_NEWBC2. The E fact table has only 24 records of data, instead of 72 as shown in Screen 12.30. The data packet dimension column KEY_IC_NEWBC2P contains only zeros.
SCREEN 12.38
Note
For performance and disk space reasons, it is recommended that you roll up a request as soon as possible and then compress the InfoCube.
To roll up or compress a request automatically when data are loaded into an InfoCube, select the Automatic request processing… item from the Environment menu on the InfoCube definition screen (see Screen 12.39).
SCREEN 12.39
In the pop-up window (Screen 12.40), check all options and click  .
.
Caution
The order in which requests are rolled up and compressed is very important. After their compression into the E table, requests are no longer available in the F fact table and therefore cannot be rolled up into the aggregates. If we roll up requests after compressing them, the status under the Requests tab will indicate these requests are now in the aggregates – that is not true.
To delete a compressed request, we must either delete all of the E fact table data or use the request reverse posting function in Screen 4.8 by clicking  .
.
SCREEN 12.40

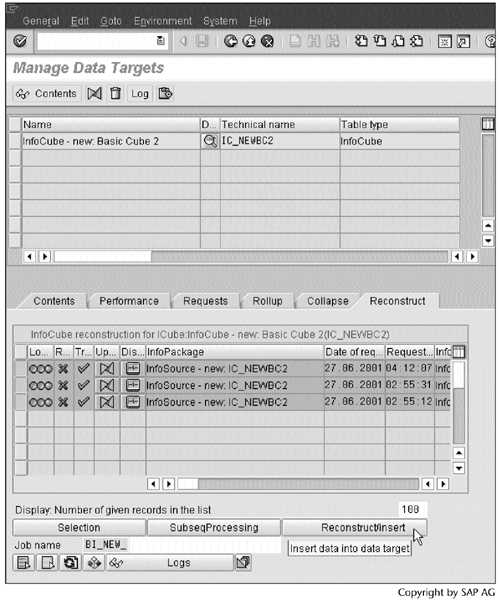
12.2.6 InfoCube Reconstruction
The last tab in Screen 12.12, Reconstruct, allows us to reconstruct InfoCubes. Here we can reinsert the requests in PSA back into the InfoCube. The procedure follows.
Note
Using this feature, we can also fill other InfoCubes with the requests, as long as the requests remain in PSA. This feature is particularly useful when the requests call for delta loads because we cannot request the same delta loads again from the source system.
Work Instructions
Step 1. Repeat the Screen 8.14 step to delete the IC_NEWBC2 data. BW removes all three requests (473, 474, and 479) from Screen 12.36.To reconstruct the InfoCube using the requests (473, 474, and 479) that remain in PSA, select the requests and click
 .
.
SCREEN 12.41
Result
Returning to the Requests tab and clicking to refresh the view, we see that the three requests have returned to the InfoCube. They are not rolled up and compressed, but are available for reporting.
SCREEN 12.42
Part I. Guided Tours
Business Scenario and SAP BW
- Business Scenario and SAP BW
- Sales Analysis A Business Scenario
- Basic Concept of Data Warehousing
- BW An SAP Data Warehousing Solution
- Summary
Creating an InfoCube
- Creating an InfoCube
- Creating an InfoArea
- Creating InfoObject Catalogs
- Creating InfoObjects Characteristics
- Creating InfoObjects Key Figures
- Creating an InfoCube
- Summary
Loading Data into the InfoCube
- Loading Data into the InfoCube
- Creating a Source System
- Creating an Application Component
- Creating an InfoSource for Characteristic Data
- Creating InfoPackages to Load Characteristic Data
- Checking Loaded Characteristic Data
- Entering the Master Data, Text, and Hierarchy Manually
- Creating an InfoSource for Transaction Data
- Creating Update Rules for the InfoCube
- Create an InfoPackage to Load Transaction Data
- Summary
Checking Data Quality
- Checking Data Quality
- Checking InfoCube Contents
- Using BW Monitor
- Using the Persistent Staging Area (PSA)
- Summary
Creating Queries and Workbooks
- Creating Queries and Workbooks
- Creating a Query Using BEx Analyzer
- Organizing Workbooks Using BEx Browser
- Using a Variable to Access a Hierarchy Node Directly
- Summary
Managing User Authorization
- Managing User Authorization
- Creating an Authorization Profile Using Profile Generator
- Creating an Authorization Object to Control User Access to the InfoCube Data
- Integrating Profile Generator and BEx Browser
- Summary
Part II. Advanced Topics
InfoCube Design
- InfoCube Design
- BW Star Schema
- InfoCube Design Alternative I Time-Dependent Navigational Attributes
- InfoCube Design Alternative II-Dimension Characteristics
- InfoCube Design Alternative III Time-Dependent Entire Hierarchies
- Other InfoCube Design Techniques
- Summary
Aggregates and Multi-Cubes
Operational Data Store (ODS)
- Operational Data Store (ODS)
- Creating an ODS Object
- Preparing to Load Data into the ODS Object, Then into an InfoCube
- Loading Data into the ODS Object
- Loading Data into the InfoCube
- Using 0RECORDMODE for Delta Load
- Summary
Business Content
- Business Content
- Creating an R/3 Source System
- Transferring R/3 Global Settings
- Replicating R/3 DataSources
- Installing Business Content Objects and Loading R/3 Data
- Summary
Generic R/3 Data Extraction
- Generic R/3 Data Extraction
- Creating Views in R/3
- Creating DataSources in R/3 and Replicating Them to BW
- Creating a Characteristic in BW
- Loading Data from R/3 into BW
- Summary
Data Maintenance
- Data Maintenance
- Maintaining Characteristic Data
- Maintaining InfoCube Data
- Summary
Performance Tuning
- Performance Tuning
- BW Statistics
- System Administration Assistant
- Tuning Query Performance
- Tuning Load Performance
- Summary
Object Transport
Appendix A. BW Implementation Methodology
Object Transport
Appendix B. SAP Basis Overview
Object Transport
- Object Transport
- Section B.1. SAP Basis 3-Tier Architecture
- Section B.2. Dispatcher, Work Processes, and Services
- Section B.3. Memory Management
Appendix C. Glossary
Appendix D. Bibliography
EAN: N/A
Pages: 106
