Particulate Matter
Particulate matter in the air influences how objects appear at different depths. What is it? Fundamentally, it is water, and other gas, dust, or visible particulate usually known as pollution. Even an ideal, pristine, pollution-free environment has water in the aireven in the dry desert. The amount of haze in the air offers clues as to
- The distance to the horizon and of objects in relation to it
- The basic type of climate; the aridness or heaviness of the weather
- The time of year and the day's conditions
- The air's stagnancy (think Blade Runner)
- The sun's location (when it's not visible in shot)
Notes
Particulate matter does not occur in outer space, save perhaps when the occasional cloud of interstellar dust drifts through the shot. Look at photos of the moon landscape, and you'll see that the blacks in the distance look just as dark as those in the foreground.
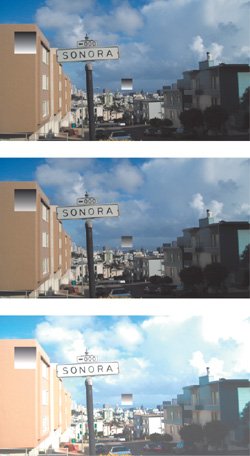
The color of the particulate matter offers clues to how much pollution is present and what it is, even how it feels: dust, smog, dark smoke from a fire, and so on (Figure 13.1). Essentially, particulate matter in the air lowers the apparent contrast of visible objects; secondarily, objects take on the color of the atmosphere around them and become slightly diffuse (Figure 13.2). This is a subtle yet omnipresent depth cue: With any particulate matter in the air at all, objects lose contrast further from camera; the apparent color can change quite a bit, and detail is softened. As a compositor, you use this to your advantage, not only to re-create reality, but to provide dramatic information.
Figure 13.1. The same location under varied weather conditions. This type of study reveals environmental subtleties, such as how backlighting emphasizes even low levels of haze and reduces overall saturation, or how more diffuse conditions desaturate and obscure the horizon while emphasizing foreground color.
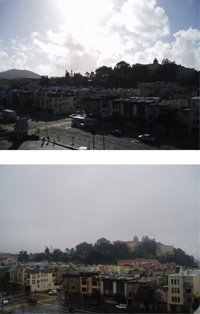
Figure 13.2. This shot was taken with a long lens. The structures one block away retain a good deal in the black of their shadows; buildings a mile or two away, far less; and the foothills ten miles away are so desaturated they begin to fade right into the skyat first you don't even notice them.
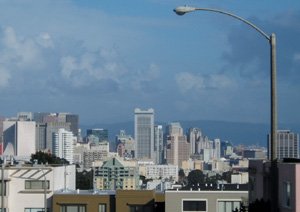
As an example, consider Figure 13.2, shot with a long lens. Long (or telephoto) lenses bring background elements more prominently into the frame; and a long lens is sometimes employed when a background element is meant to loom large or seem menacing. Anything far away that appears not only large but crystal clear, however, will simply look wrong. With the right amount of haze for the weather conditions, even a shot highly compressed with a very long lens will be something the viewer simply believes.
Match an Existing Shot
Figure 13.3 features the results of an exercise that is also included on the book's disc (as 13_planePlanes.aep). Imagine the same aircraft flying through the scene as a toy model in the near foreground, a low-flying daredevil in a full size airplane a block or two away, and high in the sky, miles away.
Figure 13.3. The difference between a toy model airplane flying close, a real airplane flying nearby, and the same plane in the distant sky, is conveyed with the use of Scale, but just as importantly, with Levels that show the influence of atmospheric haze.
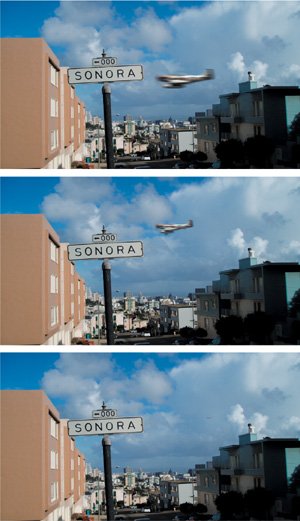
In this case, each plane of depth has pretty good reference to gauge how much atmospheric haze is in play. The street sign in the foreground has no haze (and as an additional bonus, contains little color) making it a basic reference for black, white, and gray levels. Buildings a block or two away, particularly those in neutral colors, show the black and white levels become muted, but only slightly. Out on the horizon, nothing is even close to pure black; the blacks and whites take on some of the blue color of the sky, as well.
Tip
If an added object is meant to be further than one object in the plate but closer than another, you can directly match each and average the values.
The example file contains a pass at setting Levels for each aircraft layer that is subjective, not definitive; you are encouraged to try resetting them and creating them yourself. For more of a challenge, try replicating the same principles (greater contrast in the foreground, much less in the far distance) with the image shown in Figure 13.4, which contains only midground reference.
Figure 13.4. The dome provides a great grayscale reference. But what about placing an item in immediate foreground, or in the background sky, where no reference is visible? The same approach as in Figure 13.3 applies, but you must adjust according to an understanding of the phenomena rather than by checking reference right in the shot.
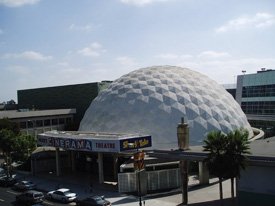
The technique used here is the same as outlined in Chapter 5, "Color Correction," with the additional twist of understanding how atmospheric haze influences the color of the scene. Knowing how this works from studying a scene like Figure 13.3's helps you create it from scratch without good reference in a scene like Figure 13.4's.
The plane as a foreground element seems to make life easier by containing a full range of monochrome colors. When matching a more colorful or monochrome element, you can always create a small solid and add the default Ramp effect. With this element, it is simpler to set Levels to add the proper depth cueing, and then apply those levels to the final element (Figures 13.5a, b, and c).
Figures 13.5a, b, and c. If a foreground element does not contain enough of a range of values to make matching easy (for example, it is monochrome), you can use stand-ins (a) and apply the Levels adjustments to these (b), matching contrast channel by channel (as in Chapter 5). Slam the result to check the accuracy of Levels settings (c).
Creating a New Shot
What about creating a new background from scratch, as with a matte painting or 3D rendered background? In either case there is no longer reference built into the shot, but that doesn't mean you can't still use reference if you need it; a photo containing the necessary conditions will get you started.
To recreate depth cues in a shot, you must somehow separate the shot into planes of distance. If the source imagery is computer-generated, the 3D program that created it can also generate a depth map for you to use (Figure 13.6). If not, you can slice the image into planes of distance, or you can make your own depth map to weight the distance of the objects in frame.
Figure 13.6. A depth map of a cartoonish 3D city. This map can be applied directly to an adjustment layer as a Luma Inverted Matte (inverted in this example because the most distant objects should be most affected), and then dial in any contrast (via Levels) and softening (via Fast Blur) effects; they are weighted to affect the background more than the foreground, and the contrast of the map itself can be adjusted to change the relative weighting. (Image courtesy Fred Lewis/Moving Media.)

Tip
Getting reference is easy for anyone with an Internet connection these days, thanks to such sites as flickr.com for browsing, not to mention Google image search when you need something specific.
There are several ways in which a depth map can be used, but the simplest is probably to apply it to an adjustment layer as a Luma (or Luma Inverted) Matte, and then add a Levels or other color correction adjustment to the adjustment layer. With the depth matte in Figure 13.6, the heaviest level adjustments for depth cueing would be applied to the furthest elements, so applying this matte as a Luma Inverted Matte and then by flashing the blacks (raising the Output Black level in Levels), you would instantly add the effect of atmosphere on the scene.
Notes
A basic 3D render of a scene is often useful with a matte painting, even when most of the detail will be created with Photoshop. Not only are perspective and lens angle included in the render, and adjustable thereafter, but a depth map is also easy to generate which remains valid as the 2D work evolves.
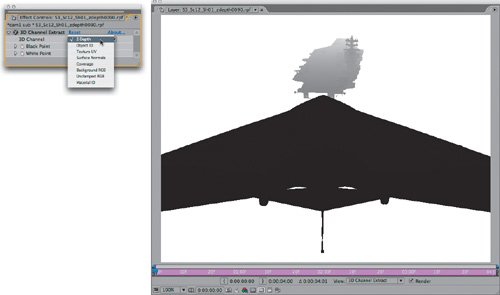
Depth data may also be rendered and stored in an RPF file, as in Figure 13.7 (which is taken from an example included on the disc as part of 13_multipass.aep). RPF files are in some ways crude, lacking even thresholding in the edges (let alone higher bit depths), but they can contain several types of 3D data, as are listed in the 3D Channel menu. This data can be used directly by a few effects to simulate 3D, including Particle Playground, which accepts RPF data as an influence map.
Figure 13.7. Look closely at the edges of RPF data and you will see jagged pixels along the diagonals, but a depth map does not always have to be perfectly pristine. The 3D Channel Extract effect allows After Effects to work with RPF data. (Created by Fred Lewis; used with permission from Inhance Digital, Boeing, and the Navy UCAV program.)
More extreme conditions may demand actual particles, and the phenomena that accompany them. These conditions are examined in the following sections of this chapter.
Sky Replacement |
Section I. Working Foundations
The 7.0 Workflow
- The 7.0 Workflow
- Workspaces and Panels
- Making the Most of the UI
- Settings: Project, Footage, Composition
- Previews and OpenGL
- Effects & Presets
- Output: The Render Queue
- Study a Shot like an Effects Artist
The Timeline
- The Timeline
- Organization
- Animation Methods
- Keyframes and The Graph Editor
- Uber-mastery
- Transform Offsets
- Motion Blur
- Manipulating Time Itself
- In Conclusion
Selections: The Key to Compositing
- Selections: The Key to Compositing
- The Many Ways to Create Selections
- Compositing: Science and Nature
- Alpha Channels and Premultiplication
- Masks
- Combining Multiple Masks
- Putting Masks in Motion
- Blending Modes: The Real Deal
- Track Mattes
Optimizing Your Projects
- Optimizing Your Projects
- Navigating Multiple Compositions
- Precomposing and Nesting
- Adjustment and Guide Layers
- Understanding Rendering Order
- Optimizing After Effects
- Onward to Effects
Section II. Effects Compositing Essentials
Color Correction
Color Keying
- Color Keying
- Good Habits and Best Practices
- Linear Keyers and Hi-Con Mattes
- Blue-Screen and Green-Screen Keying
- Understanding and Optimizing Keylight
- Fixing Typical Problems
- Conclusion
Rotoscoping and Paint
- Rotoscoping and Paint
- Articulated Mattes
- Working Around Limitations
- Morphing
- Paint and Cloning
- Conclusion
Effective Motion Tracking
- Effective Motion Tracking
- The Essentials
- Optimizing Tracking Using 3D
- Extending a Track with Expressions
- Tracking for Rotoscoping
- Using 3D Tracking Data
- Conclusion
Virtual Cinematography
- Virtual Cinematography
- 5D: Pick Up the Camera
- Storytelling and the Camera
- Camera Blur
- The Role of Grain
- Film and Video Looks
- Conclusion
Expressions
- Expressions
- Logic and Grammar
- Muting Keyframes
- Linking Animation Data
- Looping Animations
- Smoothing and Destabilizing
- Offsetting Layers and Time
- Conditionals and Triggers
- Tell Me More
Film, HDR, and 32 Bit Compositing
- Film, HDR, and 32 Bit Compositing
- Details
- Film 101
- Dynamic Range
- Cineon Log Space
- Video Gamma Space
- Battle of the Color Spaces
- Floating Point
- 32 Bits per Channel
- Conclusion
Section III. Creative Explorations
Working with Light
- Working with Light
- Light Source and Direction
- Creating a Look with Color
- Backlighting, Flares, Light Volume
- Shadows and Reflected Light
- HDR Lighting
- Conclusion
Climate: Air, Water, Smoke, Clouds
- Climate: Air, Water, Smoke, Clouds
- Particulate Matter
- Sky Replacement
- The Fog, Smoke, or Mist Rolls In
- Billowing Smoke
- Wind
- Water
- Conclusion
Pyrotechnics: Fire, Explosions, Energy Phenomena
- Pyrotechnics: Fire, Explosions, Energy Phenomena
- Firearms
- Sci-Fi Weaponry
- Heat Distortion
- Fire
- Explosions
- In a Blaze of Glory
Learning to See
Index
EAN: 2147483647
Pages: 157
