Working Around Limitations
At the opening of the chapter I came right out and identified that After Effects is not most artists' first choice as a dedicated rotoscoping tool. This is not a generalized complaint or simply a matter of taste: Other programs' masking tools perform useful functions that are impossible to do with After Effects 7.0. This section will identify some of those holes and focus on the strategies that can help you make the best of the situation. For example
- There is no way to apply a tracker directly to an After Effects mask, let alone track individual mask points. That doesn't mean there's no way to track in a mask selection, however.
- You can't translate a mask the way you would a layer, by selecting all of the keyframes you want to translate and performing the move; After Effects applies the move to the current frame only. The workarounds are similar to those for tracking.
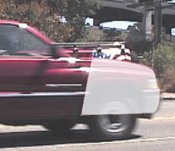
- After Effects lacks the ability to specify whether a feather is applied to the inside or outside of a mask, nor can you vary feather settings on a per-vertex basis (Figure 7.10).
Figure 7.10. All of the motion blur on the truck is left to right, so the ideal mask for the hood would employ heavy feathering on the right edge and none on top; this mask is not feathered and does not match. After Effects lacks per-vertex mask feather settings, so you can either combine multiple masks or animate the mask to match the motion of the truck and enable motion blur, creating the feathering effect automatically (Figure 7.13).
- Adding points to an animated mask has no adverse effect on other keyframes applying to that mask; the mask retains its shape. Deleting points, however, deforms the other keyframed versions of the mask. Avoid deleting points on a mask animation at all costs. Always start by keyframing the simplest shape, with the fewest points, and work your way up to the most complex.
- There is no dedicated morphing tool in After Effects. The elements to do a morph, however, exist in the program.
Tip
Preferences > General includes a preference, on by default, to preserve a constant vertex count when editing masks. Leaving it on prevents inadvertent popping of added vertices or awkward tweening around deleted vertices. But in cases where in-betweening is not an issue (presumably because you're creating a mask on every frame), you can consider turning this off.
The following sections elaborate upon the above points in depth.
Tracking and Translating
If you cannot apply a tracker directly to a mask, even using expressions, what are your alternatives? The next chapter will concentrate on successful tracking, so here I'll focus on simply getting set up.
One workaround (effective in limited cases) is to stabilize the layer, precompose it, and mask the stabilized element (which is now held in place); the motion is reapplied by linking Position keyframes to the stabilized anchor point (either via expressions or a simple copy and paste). This may simplify matters when the element being rotoscoped is itself relatively static but the camera is moving; however, it will not work so well if the element is moving around enough to generate substantial motion blur or shape changes, or if it doesn't stabilize properly.
More likely, you will have luck tracking a mask when articulating it isn't so important; for example, an element with a solid surface that doesn't change shape. The workaround in this case is to use the masked layer as a track matte and track the transforms of the track matte layer, which carries the mask with it (Figure 7.11).
Figure 7.11. The green holdout area is a corner-pinned mask to which a track can be applied (and a corner-pin track can even track the deformation as it moves across frame). The same idea works in any case where a simple mask shape can be tracked without need to deform drastically over the course of the shot.

This same not-very-pretty workaround can also get you out of a tight spot. Suppose you have dozens of mask keyframes that simply need to be offset, scaled, or rotated. Duplicate the masked layer and set it as an alpha track matte, translating the entire track matte layer instead of each individual mask keyframe. If, however, only one (or some subset) of the points of your mask needs to be offset, there is simply no way to ripple that edit through all instances of that mask point. Features for future versions, perhaps.
Auto-trace
Wouldn't it be great if there was a tool in After Effects that would track masks for you? The good news is there is. The even better news is that it has been further optimized for version 7.0. The bad news (you knew this was coming) is the cases in which it is useful are cases in which you should be creating high-contrast luminance mattes instead. The even worse news is that the process is much slower and more cumbersome than using the techniques from Chapter 6 to create that hi-con matte.
Here's the problem: Auto-trace is a threshold tool that looks either at overall luminance or a specific color channel. You set the threshold (which you can guess reasonably intelligently by sampling pixels using your cursor and the Info palette) in Percent 0-100 mode. Next, add a pixel tolerance setting (whole values only), and then let Layer > Auto-trace work its magic (Figure 7.12). The result is an arbitrary number of masks, each describing a single area that meets the criteria. Over the course of the shot, some of these masks will reshape, some will disappear, and some new ones will appear.
Figure 7.12. Auto-trace is applied to the alpha channel of a matte created for the previous chapter. Over two dozen masks appear to outline and hold out areas of detail, but clearly this amount of detail presents a challenge; more useful results can be attained using simpler, higher-contrast source images.
It ends up being a rather unwieldy result for precise work, albeit cool for the motion graphics designers who want to play with those masks. For effects work, however, it's largely pointless compared to trackable mask points, which would be fabulous if only After Effects had them.
Masking Motion Blur
Motion blur happens. That's a good thing; it's a natural artifact of seeing an object in motion captured over a short period of time, and on moving footage it reinforces the persistence of vision required to make a series of still frames look like a moving image (when in fact, a "moving image" is always just an illusion created by a series of still images). Masking motion blur would seem to be something of a nightmare, as its edges defy careful observation.
True, it's not easy by any means, particularly if the mask is also articulateda rotoscope of a bird flying through frame, for example. Remember to carefully evaluate whether you can pull any kind of key or hi-con matte on a blurred element to get all of those lovely edges before you get out the masking tools.
You can even evaluate whether the blurred element is really enhancing your scene. (Hopefully, we're not talking about the starring element of your shot, but that happens all the time, too.) Consider whether you'd be better off eliminating the element from your scene.
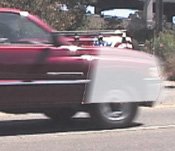
Otherwise, there is one thing to think about. Masks respect the motion blur settings of the composition; a masked element in motion will have motion blurred edges. That means you have a chance of matching the motion blur with a mask whose contours would fit the shape of the object if it were stationary (Figure 7.13). To make the mask work with the moving element is a matter of getting the composition's Shutter Angle and Shutter Phase settings to match. (For details, see Chapter 2, "The Timeline.")
Figure 7.13. Putting a rotoscope mask in motion via keyframes allows motion blur to come along for the ride, simplifying the seemingly challenging masking situation shown in Figure 7.10.
This will probably leave you with edge problems that you must work to cleverly conceal, whether by choking, further blurring the edges, forcing them to the background color, and so on.
Morphing |
Section I. Working Foundations
The 7.0 Workflow
- The 7.0 Workflow
- Workspaces and Panels
- Making the Most of the UI
- Settings: Project, Footage, Composition
- Previews and OpenGL
- Effects & Presets
- Output: The Render Queue
- Study a Shot like an Effects Artist
The Timeline
- The Timeline
- Organization
- Animation Methods
- Keyframes and The Graph Editor
- Uber-mastery
- Transform Offsets
- Motion Blur
- Manipulating Time Itself
- In Conclusion
Selections: The Key to Compositing
- Selections: The Key to Compositing
- The Many Ways to Create Selections
- Compositing: Science and Nature
- Alpha Channels and Premultiplication
- Masks
- Combining Multiple Masks
- Putting Masks in Motion
- Blending Modes: The Real Deal
- Track Mattes
Optimizing Your Projects
- Optimizing Your Projects
- Navigating Multiple Compositions
- Precomposing and Nesting
- Adjustment and Guide Layers
- Understanding Rendering Order
- Optimizing After Effects
- Onward to Effects
Section II. Effects Compositing Essentials
Color Correction
Color Keying
- Color Keying
- Good Habits and Best Practices
- Linear Keyers and Hi-Con Mattes
- Blue-Screen and Green-Screen Keying
- Understanding and Optimizing Keylight
- Fixing Typical Problems
- Conclusion
Rotoscoping and Paint
- Rotoscoping and Paint
- Articulated Mattes
- Working Around Limitations
- Morphing
- Paint and Cloning
- Conclusion
Effective Motion Tracking
- Effective Motion Tracking
- The Essentials
- Optimizing Tracking Using 3D
- Extending a Track with Expressions
- Tracking for Rotoscoping
- Using 3D Tracking Data
- Conclusion
Virtual Cinematography
- Virtual Cinematography
- 5D: Pick Up the Camera
- Storytelling and the Camera
- Camera Blur
- The Role of Grain
- Film and Video Looks
- Conclusion
Expressions
- Expressions
- Logic and Grammar
- Muting Keyframes
- Linking Animation Data
- Looping Animations
- Smoothing and Destabilizing
- Offsetting Layers and Time
- Conditionals and Triggers
- Tell Me More
Film, HDR, and 32 Bit Compositing
- Film, HDR, and 32 Bit Compositing
- Details
- Film 101
- Dynamic Range
- Cineon Log Space
- Video Gamma Space
- Battle of the Color Spaces
- Floating Point
- 32 Bits per Channel
- Conclusion
Section III. Creative Explorations
Working with Light
- Working with Light
- Light Source and Direction
- Creating a Look with Color
- Backlighting, Flares, Light Volume
- Shadows and Reflected Light
- HDR Lighting
- Conclusion
Climate: Air, Water, Smoke, Clouds
- Climate: Air, Water, Smoke, Clouds
- Particulate Matter
- Sky Replacement
- The Fog, Smoke, or Mist Rolls In
- Billowing Smoke
- Wind
- Water
- Conclusion
Pyrotechnics: Fire, Explosions, Energy Phenomena
- Pyrotechnics: Fire, Explosions, Energy Phenomena
- Firearms
- Sci-Fi Weaponry
- Heat Distortion
- Fire
- Explosions
- In a Blaze of Glory
Learning to See
Index
EAN: 2147483647
Pages: 157
