Storytelling and the Camera
A decision as simple as creeping the camera slowly forward can change the whole dramatic feel of a shot. The main limitation you face is the two-dimensionality of After Effects layers, but that's a huge step forward from the bad old days of optical compositing, when it was scarcely possible to move the camera at all.
Nowadays, most directors aren't satisfied with a locked-off camera for effects shots, yet sometimes the decision to move the camera won't be made until the post-production phase. That's no big deal, as long as you don't completely break the rules for what you can get away with.
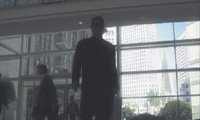
Specifically, don't worry about planes of motion and parallax for elements that are lost in the background, that are at the edges of the frame, that appear for a few frames only, or that otherwise won't ever be noticed. The "Sky Replacement" section in Chapter 13, "Climate Control: Air, Water, Smoke, and Clouds," contains just such an example, in which a flat card stands in for a fully dimensional skyline; people aren't watching the skyline for shifts in perspective, they're watching the lead character walk through the lobby and wondering what he's got in his briefcase (Figure 9.13).
Figure 9.13. Prominent though it may appear in this still image, the audience is only subliminally aware of what is going on with that skyline outside the window. As the camera pans and tracks to the right, the pyramid building should creep out from behind the foreground skyscraper. It doesn't, because the background skyline is a still image; no one notices because the focus is on the foreground character. (Image courtesy The Orphanage.)
Moving the Camera
You may have worked with a 3D camera in other applications, but the After Effects implementation is unique. For example, the After Effects camera contains Transform options that are unique from all other types of layers (Figure 9.14), as well as a couple of hidden features.
Figure 9.14. Just in case you've never taken a close look, a camera layer contains no Anchor Point, but includes two sets of rotation data: the Orientation (its basic angle), as well as separate X, Y, and Z rotation values (to avoid problems with complex 3D rotations). The point of interest appears only when the default Orient Towards Point of Interest option is active (Figure 9.15).
![]()
Camera Orientation
The most common confusion about the After Effects camera stems from the fact that by default, it includes a point of interest, a point in 3D space at which the camera always points, for auto-orientation. To clarify:
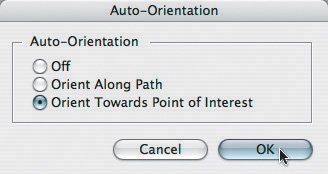
- Auto-orientation via a point of interest is fully optional. You can turn it off (making the camera a free camera) or change it to orient automatically along the path of camera motion. To do so, context-click on the camera, then choose Transform > Auto-Orient or use Ctrl+Alt+O (Cmd+Option+O) to access the menu of settings (Figure 9.15).
Figure 9.15. So many 3D camera tragedies could have been avoided if more users knew about this dialog box (Ctrl+Alt+O or Cmd+Option+O). By disabling auto-orientation, you are free to move the camera anywhere without changing its direction.
- To move the camera and its point of interest in sync, don't attempt to match keyframes for the two propertiesthis is sheer madness! You can parent the camera to a null and translate that instead.
- Orientation works differently depending on whether auto-orientation is on (causing it to revolve around the point of interest) or not (in which case it rotates around its center).
- The auto-oriented camera flips to remain upright when crossing the X/Y plane while orbiting the center; the free camera does not. The auto-oriented behavior is helpful for beginners positioning a camera, but not for camera animationdon't let it surprise and frustrate you.
Tip
Cycle through the camera animation tools using the C key to orbit, track XY, and track Z in the active view. Remember, however, that you cannot orbit in isometric views (Top, Front, and so on).
Thus the default camera in After Effects includes a point of interest that often must be disabled to maintain or control the direction of the camera as it is translated. This will not come up all the time given that the camera is often put to more modest uses, such as a simple camera push.
Notes
The Y axis is upside down in After Effects 3D, just as in 2D; increasing the Y value moves a layer downward. The 0,0 point in After Effects space was placed at the upper-left corner of the frame when it was 2D only, and it was left this way with the addition of 3D for consistency's sake.
Push versus Zoom
Knowledgeable effects artists understand the huge distinction between a camera push, in which the camera moves closer to the subject, and a zoom, in which the camera stays in place and the lens lengthens.
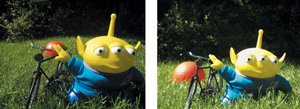
Figures 9.16a and b demonstrate the difference between pushing and zooming a real camera. Zooming changes the actual lens angle, and has more of an effect on the immediate foreground and faraway background framing than a push.
Figures 9.16a and b. The difference between a push in (a) with a wide angle lens and a zoom (b) from a distance is evident particularly by what happens to the placement of the orange ball in the background. Zooming makes its apparent scale much greater; it looms larger in this shot than in an image shot with a wider lens, but close-up.
Notes
Is the zoom merely out of fashion, or is it truly inferior to the camera push? Keep in mind that a push mimics the human perspective as we move through space; the naked eye has no means to zoom in on anything, so that effect makes us aware we're looking through a camera. You decide.
Most of the time, you will animate a push; zooming in, generally speaking, had its heyday in the era of Sergio Leone. That's a good thing for you, because it is easier to work with a static lens angle. The relationship and perspective of objects close-up do not change with a push the way they do with a zoom.
Push It Good
Suppose a shot calls for a push in on a 2D composition. Is it worth adding a 3D camera, or can you simply scale the 2D layers?
Notes
Animation > Keyframe Assistant > Exponential Scale is the old-school, pre-3D way to fake the illusion of a camera move in on a 2D layer. There is no good reason to employ this feature when you can instead animate a 3D camera.
A scale is too linear to achieve the illusion of moving in Z space with anything but the smallest move; as you draw closer to an object, its rate of scaling must increase logarithmically. Moreover, a 3D camera lets you add eases, stops and starts, a little bit of destabilizationwhatever works for the shot.
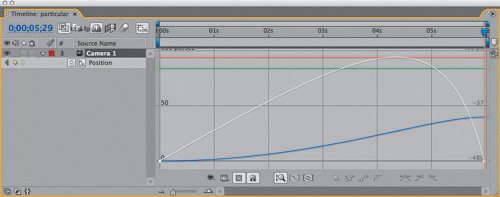
Camera motion will appear more natural with keyframe eases (Chapter 2), which can add the impression that there was a human camera operator behind the lens. You may choose to augment the default eases with a little extra hesitation or irregularity to lend that feeling of a camera operator's individual personality (Figure 9.17).
Figure 9.17. A simple camera animation can be finessed simply by applying Easy Ease (highlight keyframes and press F9), but why stop there? Lengthening the curve of the first keyframe gives the camera added (realistic) inertia transitioning from a static position.
Tip
When pushing in on multiple overlapping coplanar 3D layers, precompose before adding the camera animation. Coplanar 3D layers should respect layer order, but an animated camera can easily cause rounding errors in floating point position calculation.
A move in or out of a 2D shot can easily look wrong due to the lack of parallax, unless it's subtle or contains few depth cues. Tracking and panning shots, crane-ups, and other more elaborate camera moves will blow the 2.5D gag unless they remain rather minute. When in doubt, rough it in and ask a neutral observer (or supervisor) if it looks believable.
Notes
Enabling Collapse Transformations causes any 3D layers in a subcomposition to be positioned relative to the camera in the current comp, rather than in the subcomp.
You can get away with more layering soft, translucent organic shapes, such as clouds, fog, smoke, and the like. Staggering these in 3D space, you can fool the eye into seeing 3D volume where there are only planes (more on this in Chapter 13).
Camera Projection
Camera projection (or camera mapping) is the process of taking a still photo, projecting it onto 3D objects that match the dimensions and placement of objects in the photo, and then moving the cameratypically only along the Z axisproviding the illusion that the photo is fully dimensional (right up until the camera move goes too far, revealing some area of the image that wasn't part of the photograph).
Figures 9.18a, b, and c show a camera projection that ambitiously features two parked military vehicles in the foreground. A dozen separate white solids with masks were created to form a crude 3D model, ready to receive a projected image (Figure 9.19). This example shows both the magic of this techniquederiving perspective shifts from a flat, still imageand the associated problems of image tearing when an area of the frame is revealed that had previously been obscured in the source photo.
Figures 9.18a, b, and c. The progression from the source image (a) through the camera move. By the final frame(c), image warping and tearing are evident, but the perspective of the image is essentially correct for the new camera position. The tearing occurs simply because as the camera moves it reveals areas of the image that don't exist in the source.
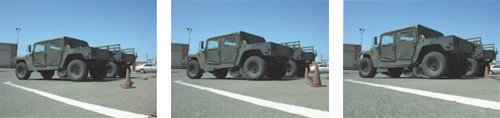
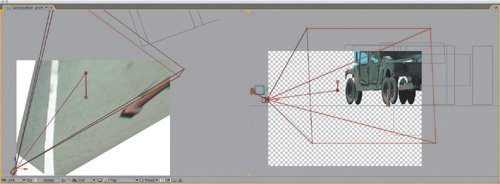
Figure 9.19. The rather complicated setup for this effect: from the top and side views you can see the planes that stand in for the vehicles and orange cone, which appears stretched along the ground plane.
The key to this effect is the setup: How is it that the one "texture" of the image (the photo) sticks to the 3D objects? The fundamental concept is actually relatively simple; getting it right is a question of managing details, and that part is fairly advanced and not for the faint of heart (which is why mention of a third-party option follows this description). The steps to projecting any still image into 3D space (an example of which, 09_cameraProjection.aep) can be found on the disc) are as follows:
|
1. |
Begin with an image that can be modeled as a series of planes. |
|
2. |
Create a white solid for each dimensional plane in the image. Enable 3D for each, and under Material Options, change the Accepts Lights option to Off. |
|
3. |
Add a camera named Projection Cam; if you know the Angle of View of your source image, add that value. |
|
4. |
Add a Point light called Projector Light. Set its position to that of Projection Cam, then parent it to Projection Cam. Set Casts Shadows to On. |
|
5. |
Duplicate the source image, naming this layer Slide. Enable 3D, and in Material Options, change Casts Shadows to Only and Light Transmission to 100%. |
|
6. |
Slide not located properly? Add a null object called Slide Repo; set its position to that of Projection Cam, and parent it to Projection Cam. Now parent Slide to it, and adjust its scale downward until the image is cast onto the white planes, as if projected. |
|
7. |
Now comes the painful part: masking, scaling, and repositioning those white solids to build the model, ground plane, and horizon onto which the slide is projected. Toggle on the reference layer and build your model to match that, checking it with the slide every so often. |
|
8. |
If planes that you know to be at perpendicular 90 degree angles don't line up, you need to adjust the Zoom value of the Projection Cam, scaling the model and slide as needed to match the new Zoom value. The example file includes an expression applied to the Scale value of the slide layer so that the slide scales up or down to match however you adjust the Zoom of the camera, which is not necessary but is helpful. |
|
9. |
Once everything is lined up, duplicate Projection Cam, and rename the duplicate (the one on the higher layer) Anim Cam. Freely move this camera to take advantage of the new dimensional reality of the scene. |
The best way to learn about this is probably to study the example file included on this book's disc; if it seems enticing rather than aggravating, feel free to give it a whirl.
Notes
Buena Software offers a set of plug-ins known as Depth Cue, which includes Camera Mapper, a plug-in controls this process and makes it easy to clean up such tearing and stretching errors as those seen in Figure 9.18c.
Camera Blur |
Section I. Working Foundations
The 7.0 Workflow
- The 7.0 Workflow
- Workspaces and Panels
- Making the Most of the UI
- Settings: Project, Footage, Composition
- Previews and OpenGL
- Effects & Presets
- Output: The Render Queue
- Study a Shot like an Effects Artist
The Timeline
- The Timeline
- Organization
- Animation Methods
- Keyframes and The Graph Editor
- Uber-mastery
- Transform Offsets
- Motion Blur
- Manipulating Time Itself
- In Conclusion
Selections: The Key to Compositing
- Selections: The Key to Compositing
- The Many Ways to Create Selections
- Compositing: Science and Nature
- Alpha Channels and Premultiplication
- Masks
- Combining Multiple Masks
- Putting Masks in Motion
- Blending Modes: The Real Deal
- Track Mattes
Optimizing Your Projects
- Optimizing Your Projects
- Navigating Multiple Compositions
- Precomposing and Nesting
- Adjustment and Guide Layers
- Understanding Rendering Order
- Optimizing After Effects
- Onward to Effects
Section II. Effects Compositing Essentials
Color Correction
Color Keying
- Color Keying
- Good Habits and Best Practices
- Linear Keyers and Hi-Con Mattes
- Blue-Screen and Green-Screen Keying
- Understanding and Optimizing Keylight
- Fixing Typical Problems
- Conclusion
Rotoscoping and Paint
- Rotoscoping and Paint
- Articulated Mattes
- Working Around Limitations
- Morphing
- Paint and Cloning
- Conclusion
Effective Motion Tracking
- Effective Motion Tracking
- The Essentials
- Optimizing Tracking Using 3D
- Extending a Track with Expressions
- Tracking for Rotoscoping
- Using 3D Tracking Data
- Conclusion
Virtual Cinematography
- Virtual Cinematography
- 5D: Pick Up the Camera
- Storytelling and the Camera
- Camera Blur
- The Role of Grain
- Film and Video Looks
- Conclusion
Expressions
- Expressions
- Logic and Grammar
- Muting Keyframes
- Linking Animation Data
- Looping Animations
- Smoothing and Destabilizing
- Offsetting Layers and Time
- Conditionals and Triggers
- Tell Me More
Film, HDR, and 32 Bit Compositing
- Film, HDR, and 32 Bit Compositing
- Details
- Film 101
- Dynamic Range
- Cineon Log Space
- Video Gamma Space
- Battle of the Color Spaces
- Floating Point
- 32 Bits per Channel
- Conclusion
Section III. Creative Explorations
Working with Light
- Working with Light
- Light Source and Direction
- Creating a Look with Color
- Backlighting, Flares, Light Volume
- Shadows and Reflected Light
- HDR Lighting
- Conclusion
Climate: Air, Water, Smoke, Clouds
- Climate: Air, Water, Smoke, Clouds
- Particulate Matter
- Sky Replacement
- The Fog, Smoke, or Mist Rolls In
- Billowing Smoke
- Wind
- Water
- Conclusion
Pyrotechnics: Fire, Explosions, Energy Phenomena
- Pyrotechnics: Fire, Explosions, Energy Phenomena
- Firearms
- Sci-Fi Weaponry
- Heat Distortion
- Fire
- Explosions
- In a Blaze of Glory
Learning to See
Index
EAN: 2147483647
Pages: 157
