Conditionals and Triggers
Also called If/Then statements, conditionals open up extra possibilities by allowing you to use any circumstance that expressions can recognizepretty much any numerical or Boolean state anywhere in the Timelineas a condition for an event or a series of events to occur.
Triggers often use conditional statements; they wait for a specific event to occur and use this to trigger another event. The possible uses for triggers are seemingly endless.
Trigger a Dissolve
Here's a simple trigger that needs no conditonal statement: A composition marker triggers a one-second filmic dissolve (this will work equally well with layer markers). This expression could just as easily be set up to trigger a different operation, such as a simple opacity fade to black or white, but once you understand the basics, you can adapt it however you like.
Tip
A project containing a dissolve and a fade to black, each using the expression described here, can be found on your disc as 10_dissolve.aep.
A layer marker can be set by highlighting a layer and pressing * at the frame where the marker should appear. You can use this shortcut to set a marker interactively while looping a RAM Preview.
Add the Levels (Individual Controls) effect to the layer. Reveal controls for Input Black and Output White; you'll apply the same expression to each, with the variation that they will animate in opposition. The expression for Input Black is
mark = marker.key(1).time;
linear(time, mark, mark+1, 1, 0)
Close-Up: The Dissolve
A fade to black is typically accomplished either by reducing Opacity of a source layer (or layers) from 100% to 0% over time, or by fading up a single black solid layer from 0% to 100% over time. This very linear transition lacks the visual interest of a true film dissolve, which can have various characteristics depending on the type of film stock and so on, but which takes on more interest by fading in a nonlinear fashion. This section teaches you how to use an expression to do whatever you want, and for free throws in a simple technique to mimic the response of a film dissolve. As is shown beginning in the next chapter, lowering exposure in 32-bpc HDR naturally behaves like a film dissolve.
The inversion for Output White is
mark = marker.key(1).time;
linear(time, mark, mark+1, 0, 1)
Here's what's happening. This is the first example in this chapter of a variable. This one is called mark, named for the fact that it identifies a marker (and in expression of the author's vanity). How do you know it's a marker and which one it is? The variable's argument tells you; the marker portion signifies a layer marker, key(1) specifies the first one, and time specifies the time at which that marker occurs.
The linear(t, tMin, tMax, value1, value2) command is so compact and efficient that it's easy to forget it even exists. It has five (count 'em) arguments, all required, that identify, in order, the
- Time that the effect evaluates
- Time to start a linear transition
- Time to end a linear transition
- Value at the start
- Value at the end
Tip
You can apply an expression directly from the Effect Controls panel by Alt/Option-clicking on the stopwatch, the same way you would in the Timeline panel. This can be convenient because the property with the expression is revealed in the Timeline as well, where you can edit the expression.
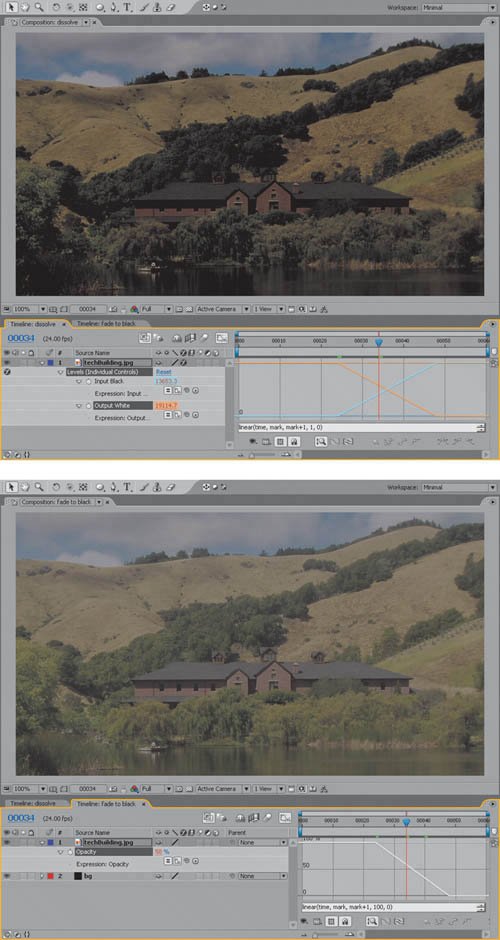
Each expression first evaluates the current time (time). When that time reaches mark (marker 1), After Effects performs a linear transition from 0 (0%) to 1 (100%), and the transition lasts one second (until mark + 1, or one second past marker 1). The result is visible in the Graph Editor and the composition itself (Figures 10.19a and b).
Figures 10.19a and b. Expressions are set for Input Black and Output White (a). Note how the look differs from a simple fade to black (b). Although it's difficult to spot in a printed figure, the highlights become richer while the blacks deepen, as opposed to the entire image turning gray.
Notes
Any time you use a unique name followed by an equals sign, you are telling After Effects to save you the trouble of having to repeatedly type whatever comes after that equals sign. That's all. Variables = no big deal.
Now, why go to all that trouble to do an effect that would only require a few keyframes? There are a couple of good reasons. You can set composition and layer markers as you preview footage, interactively, like an editor would, and see immediate feedback. You can also save this effect and expression as an Animation Preset and re-use it; no keyframes ever required.
This still seems like a lot to remember, but most of the components of this expression are available via the Expressions menu. Look in the Comp category for marker; you need to add the dot separation between them and the semi-colon at the end yourself. With all of its arguments, linear() interpolates and is found in the Interpolation category. (Two versions live there, one of which uses fewer arguments.)
Conditionals
As mentioned in the discussion of continue loops, setting up a set of keyframes to both loop in and loop out poses something of a challenge; it cannot be done without the use of a conditional statement (or a split layer). Splitting a layer is inelegant, and the conditional is simple.
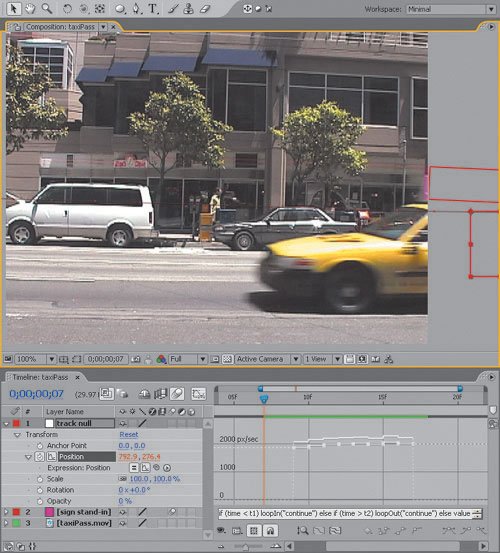
Suppose that you have an accurate track of an element's motion in the middle of its animation, but it needs to start from the beginning of the composition and extend to the end. The example of a sign attached to a passing vehicle from Chapter 8 contains just such a situation; the element is moving at just the right speed for the frames on which it's animated, and needs extending at the beginning and end (Figure 10.20).
Figure 10.20. The addition of a conditional statement to the loop expression used to track the sign on top of the taxi (from Chapter 8) allows the motion to be continued both in and out, extending right off the edge of the frame in both directions.
Here is the expression to apply in such a case:
t1 = key(1).time;
t2 = key(numKeys).time;
if (time < t1) loopIn("continue") else if (time > t2)loopOut("continue") else value
There are actually several different ways you could write this expression; this happens to be among the most compact. The first two lines set variables, and the third line contains the full conditional statement. Here's how it works.
The first variable corresponds to the time at which the first keyframe appears; key(1).time is how you say "the first keyframe's time" in expressions language.
Similarly, because there could be an arbitrary number of total keyframes, the final keyframe's number will be the same as the total number of keyframes, hence key(numKeys).time provides the point in time at which the expression must loop out.
The conditional itself can be written in a few different ways; the method shown uses the least amount of extra punctuation and no line breaks. The first condition is set by the word if; the condition itself, (time < t1), must appear in parentheses, followed by the action loopIn("continue"), which occurs under that condition. In other words, "If we haven't reached the first keyframe, loop in, continuing the vectordirection and speedof the first two keyframes."
There are two more conditions, the first of which is set by else if, setting the inverse condition from the first case; "Otherwise, if we've passed the final keyframe, loop out, continuing the vector of the final two keyframes."
Notes
There are other methods for writing conditional statements that are more suitable to complex, multi-step expressions that don't fit nicely on a few lines. See the end of this chapter for suggestions on how to learn more about scripting structure.
You can add additional else if statements as needed, but in this case we now move to the final condition, set by else, which simply returns value. "Between the first and final keyframes, proceed normally, using the current value of each keyframe."
Conditional Triggers
By combining these two concepts, of triggers and conditionals, you can set up events that occur at layer markers. The project 10_triggers.aep file was created by Dan Ebberts, whose Web site motionscript.com is mentioned as a resource for learning more about expressions at the end of this chapter. It contains four compositions, each of which uses an expression in the top layer to trigger an event at each layer marker.
These compositions contain comments to help elucidate what is going on, and I encourage you to try and deconstruct them; this is the very best way to learn to create expressions. Three of them contain a small subroutine that yields the number of the previous layer marker, or 0 if one hasn't yet been encountered, moving through time. Here it is with comments added to each line (after the // marks, which make it safe to type any text you want on the line):
n = 0; // by default, the variable n is zero, until the first marker
if (marker.numKeys > 0){ // if any markers exist
 n = marker.nearestKey(time).index; //n set to nearest marker number
if (marker.key(n).time > time){ //if that marker hasn't been reached
 n--; //subtract one from n (so that it's always the previous one)
}
}
The final line of the composition is then a simple conditional statement based on the result.
if (n > 0) time - marker.key(n).time else 0 //restart time at last marker
At the frame where a marker is encountered, the trigger occurs, and it continues either until it's done or until the next keyframe is encountered.
Tell Me More |
Section I. Working Foundations
The 7.0 Workflow
- The 7.0 Workflow
- Workspaces and Panels
- Making the Most of the UI
- Settings: Project, Footage, Composition
- Previews and OpenGL
- Effects & Presets
- Output: The Render Queue
- Study a Shot like an Effects Artist
The Timeline
- The Timeline
- Organization
- Animation Methods
- Keyframes and The Graph Editor
- Uber-mastery
- Transform Offsets
- Motion Blur
- Manipulating Time Itself
- In Conclusion
Selections: The Key to Compositing
- Selections: The Key to Compositing
- The Many Ways to Create Selections
- Compositing: Science and Nature
- Alpha Channels and Premultiplication
- Masks
- Combining Multiple Masks
- Putting Masks in Motion
- Blending Modes: The Real Deal
- Track Mattes
Optimizing Your Projects
- Optimizing Your Projects
- Navigating Multiple Compositions
- Precomposing and Nesting
- Adjustment and Guide Layers
- Understanding Rendering Order
- Optimizing After Effects
- Onward to Effects
Section II. Effects Compositing Essentials
Color Correction
Color Keying
- Color Keying
- Good Habits and Best Practices
- Linear Keyers and Hi-Con Mattes
- Blue-Screen and Green-Screen Keying
- Understanding and Optimizing Keylight
- Fixing Typical Problems
- Conclusion
Rotoscoping and Paint
- Rotoscoping and Paint
- Articulated Mattes
- Working Around Limitations
- Morphing
- Paint and Cloning
- Conclusion
Effective Motion Tracking
- Effective Motion Tracking
- The Essentials
- Optimizing Tracking Using 3D
- Extending a Track with Expressions
- Tracking for Rotoscoping
- Using 3D Tracking Data
- Conclusion
Virtual Cinematography
- Virtual Cinematography
- 5D: Pick Up the Camera
- Storytelling and the Camera
- Camera Blur
- The Role of Grain
- Film and Video Looks
- Conclusion
Expressions
- Expressions
- Logic and Grammar
- Muting Keyframes
- Linking Animation Data
- Looping Animations
- Smoothing and Destabilizing
- Offsetting Layers and Time
- Conditionals and Triggers
- Tell Me More
Film, HDR, and 32 Bit Compositing
- Film, HDR, and 32 Bit Compositing
- Details
- Film 101
- Dynamic Range
- Cineon Log Space
- Video Gamma Space
- Battle of the Color Spaces
- Floating Point
- 32 Bits per Channel
- Conclusion
Section III. Creative Explorations
Working with Light
- Working with Light
- Light Source and Direction
- Creating a Look with Color
- Backlighting, Flares, Light Volume
- Shadows and Reflected Light
- HDR Lighting
- Conclusion
Climate: Air, Water, Smoke, Clouds
- Climate: Air, Water, Smoke, Clouds
- Particulate Matter
- Sky Replacement
- The Fog, Smoke, or Mist Rolls In
- Billowing Smoke
- Wind
- Water
- Conclusion
Pyrotechnics: Fire, Explosions, Energy Phenomena
- Pyrotechnics: Fire, Explosions, Energy Phenomena
- Firearms
- Sci-Fi Weaponry
- Heat Distortion
- Fire
- Explosions
- In a Blaze of Glory
Learning to See
Index
EAN: 2147483647
Pages: 157
