Looping Animations
Perhaps the most useful feature unique to expressions (one that users who won't touch expressions beg for) is the ability to loop a set of keyframes. It's so easy to learn and powerful, however, that once expressions-phobes understand it, even they start to like it.
Close-Up: Saving Useful Expressions
Version 7.0 has made saving expressions for reuse easier than in the past via a very simple change; for cases in which the expression uses no keyframe data, you can now save an Animation Preset that contains only the expression, not the static value of the property.
All you have to do to take advantage of this feature is to choose Animation > Save Animation Preset for a property with no keyframes. Only the expression is saved.
In some cases, all you need to do to create a loop is to replace your source expression text with a default loop expression. These are found in the Property submenu of the Expressions menu (Figure 10.9).
Figure 10.9. Try not to be overwhelmedthe expressions menu is a well-organized cheat sheet of After Effects keywords. Once you understand its basic organization and most useful items, you can browse with confidence. The Property submenu, shown here, contains several essential functions.

The loop effects have two arguments, the settings found in parentheses after the command. The first one is mandatory; you must specify the type of loop you're requesting by choosing one of the three loop typesand here is the major flaw, as only one of them appears as an option in the menu, and it's not the most useful one of the three. The second argument, specifying how far the loop extends, is optional (and in some cases, unavailable).
An example in which you can use the default expression is a blinking light, animated via keyframes in its Opacity property. To blink, these keyframes animate from 100% to 0% and back, then repeat. 10_loop.aep contains a light layer set to blink.
Close-Up: Expressions Menu and Hierarchy
The Expressions menu is a bit overwhelming to the uninitiatednearly two dozen submenus with several entries each. How do you know where to find anything?
Two significant observations can make this menu less daunting:
- Most of the entries don't do anything, technically speaking, other than point to a value that you can sample.
- The menus are organized hierarchically, from most global to most local. So at the top is the Global submenu, which has shortcuts to areas of After Effects that are available on the broadest or most global level. At the other end of the menu are Property and Key, which work on an individual property of an individual effect applied to an individual layer in an individual comp. In other words, these are the most nested expressions.
So don't worry, it's not as gnarly as it first appears.
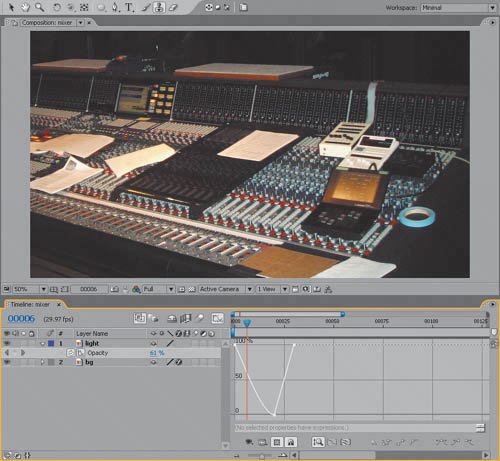
To begin, create one cycle of this animation, start to finish. You might start with a keyframe of 0%, then 100% a couple of frames later, and 0% again about a second after that (Figure 10.10).
Figure 10.10. A light is set to blink on the mixing panel, but only one cycle of on to off and back to on has been keyframed (with an offset and an ease to give it character). The rest will be done with expressions.
Now set an expression for Opacity, and with the default expression still highlighted, choose
loopOut(type = "cycle", numKeyframes = 0)
Press the Enter key or click outside the text area. The keyframes now loop, as can be seen in the Graph Editor (Figure 10.11).
Figure 10.11. A simple loop expression is applied. The pattern repeats in the dotted lines, where the expression has taken over. The default expression (chosen from the menu per the instructions) would work, but unnecessary arguments have been removed here to shorten it (see the sidebar, "Extraneous Verbiage").

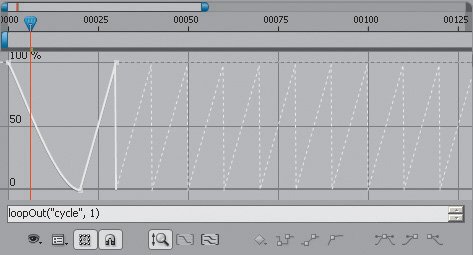
Before moving on to other looping options, check out the other arguments you can set for this expression. For example, numKeyframes specifies how many keyframes before the final one are used in the loop; set to the default of 0, it uses all keyframes. You can get rid of this argument altogether in such a case (see the sidebar, "Extraneous Verbiage"), leaving loopOut("cycle") to yield the same result. Set numKeyframes to a value of 1 and it uses the last two keyframes only (Figure 10.12).
Figure 10.12. Giving the second argument (numKeyframes) a value of 1 actually causes loopOut to use the last two keyframes only (because a one-frame loop is impossible, I suppose). This makes looping only a portion of a more complex animation possible.
Notes
For loopOut("cycle",0) to work properly, the last keyframe value must match that of the first keyframe, or the loop will be missing its first frame. This can be frustrating if you don't know the secret, and it only seems to be a problem with the "cycle" version of loopOut().
Close-Up: Extraneous Verbiage
How can two expressions
loopOut(type = "cycle", numKeyframes = 0)
loopOut("cycle")
achieve the exact same result? Here's a quick explanation: Expressions don't do a lot of hand-holding in terms of telling you what to enter and where, but the default settings sometimes come with extra keywords that are totally optional; their only purpose is to remind you what the values are for. In the case of this example, not only are the keywords "type =" and" numKeyframes =" optional, but the whole second argument will default to 0 if it's missing.
Now how the heck would you know this? After a while, you start to anticipate it because it's somewhat standard. As you begin, however, the only way to know it is to read it in a book like this one. Sad, but true.
Now, back to that fundamental flaw. There are, in fact, three types of loops, not just one, but the other two cannot be found in the expressions menus (they are hidden in the help documentation):
loopOut("cycle")
loopOut("pingpong")
loopOut("continue")
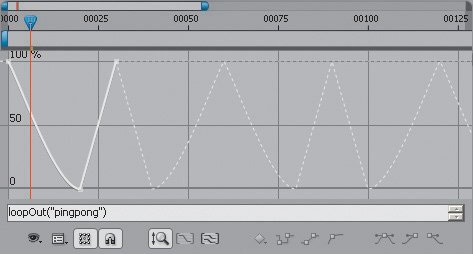
Of these three, continue is the one you are likely to use the most; in fact, continue loops are among the most useful expressions period, so they get special treatment in the next section. Meanwhile, the pingpong option is like cycle except that it alternates looping backward and forward (Figure 10.13).
Figure 10.13. The useful pingpong loop is applied here, causing the same pattern to loop backward and forward, alternately.
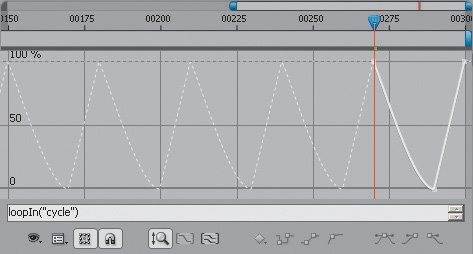
As for the other loop types available, loopIn("cycle") provides a method to create a loop that precedes the existing keyframes, rather than following them in time (Figure 10.14). Both loopOutDuration() and loopInDuration() enable you to specify an interval, in seconds, between loops. For example, loopOutDuration("cycle", 2) cycles a loop every two seconds.
Figure 10.14. A loopIn() expression works just like a loopOut with the simple difference that the loop precedes the keyframes.
Continue Loops
Although a cycle is intuitively a "loop" in the strictest sense of the worda repeat of what came beforethe continue loop is hands-down the most useful. Chapter 8 contained one use of a continue loop, to extend a motion track beyond the edges of the frame (where the tracker cannot go). Let's draw some clear boundaries around what is possible with continue loops.
There are essentially only two options with continue loops: loopIn("continue") or loopOut("continue"); the second argument is not accepted because continue is looking for two things only: the vector (direction) and velocity of the animation at the first (loopIn) or last (loopOut) keyframe. It causes the animation to proceed linearly along that vector at that velocity, and that's it. It has no understanding of Bezier handle influence, so any curve in the motion is not looped.
Nonetheless, it is useful in any case where you have the basic direction and rate of animation correct and wish to replicate those qualities. And what about a case in which you have the middle keyframes of an animation, but want to continue in and out of them? That situation is covered later in the "Conditionals" section.
Smoothing and Destabilizing |
Section I. Working Foundations
The 7.0 Workflow
- The 7.0 Workflow
- Workspaces and Panels
- Making the Most of the UI
- Settings: Project, Footage, Composition
- Previews and OpenGL
- Effects & Presets
- Output: The Render Queue
- Study a Shot like an Effects Artist
The Timeline
- The Timeline
- Organization
- Animation Methods
- Keyframes and The Graph Editor
- Uber-mastery
- Transform Offsets
- Motion Blur
- Manipulating Time Itself
- In Conclusion
Selections: The Key to Compositing
- Selections: The Key to Compositing
- The Many Ways to Create Selections
- Compositing: Science and Nature
- Alpha Channels and Premultiplication
- Masks
- Combining Multiple Masks
- Putting Masks in Motion
- Blending Modes: The Real Deal
- Track Mattes
Optimizing Your Projects
- Optimizing Your Projects
- Navigating Multiple Compositions
- Precomposing and Nesting
- Adjustment and Guide Layers
- Understanding Rendering Order
- Optimizing After Effects
- Onward to Effects
Section II. Effects Compositing Essentials
Color Correction
Color Keying
- Color Keying
- Good Habits and Best Practices
- Linear Keyers and Hi-Con Mattes
- Blue-Screen and Green-Screen Keying
- Understanding and Optimizing Keylight
- Fixing Typical Problems
- Conclusion
Rotoscoping and Paint
- Rotoscoping and Paint
- Articulated Mattes
- Working Around Limitations
- Morphing
- Paint and Cloning
- Conclusion
Effective Motion Tracking
- Effective Motion Tracking
- The Essentials
- Optimizing Tracking Using 3D
- Extending a Track with Expressions
- Tracking for Rotoscoping
- Using 3D Tracking Data
- Conclusion
Virtual Cinematography
- Virtual Cinematography
- 5D: Pick Up the Camera
- Storytelling and the Camera
- Camera Blur
- The Role of Grain
- Film and Video Looks
- Conclusion
Expressions
- Expressions
- Logic and Grammar
- Muting Keyframes
- Linking Animation Data
- Looping Animations
- Smoothing and Destabilizing
- Offsetting Layers and Time
- Conditionals and Triggers
- Tell Me More
Film, HDR, and 32 Bit Compositing
- Film, HDR, and 32 Bit Compositing
- Details
- Film 101
- Dynamic Range
- Cineon Log Space
- Video Gamma Space
- Battle of the Color Spaces
- Floating Point
- 32 Bits per Channel
- Conclusion
Section III. Creative Explorations
Working with Light
- Working with Light
- Light Source and Direction
- Creating a Look with Color
- Backlighting, Flares, Light Volume
- Shadows and Reflected Light
- HDR Lighting
- Conclusion
Climate: Air, Water, Smoke, Clouds
- Climate: Air, Water, Smoke, Clouds
- Particulate Matter
- Sky Replacement
- The Fog, Smoke, or Mist Rolls In
- Billowing Smoke
- Wind
- Water
- Conclusion
Pyrotechnics: Fire, Explosions, Energy Phenomena
- Pyrotechnics: Fire, Explosions, Energy Phenomena
- Firearms
- Sci-Fi Weaponry
- Heat Distortion
- Fire
- Explosions
- In a Blaze of Glory
Learning to See
Index
EAN: 2147483647
Pages: 157
