Settings: Project, Footage, Composition
Settings Project, Footage, Composition
Why devote a section to settings if After Effects does its best to automate them and keep them out of your direct attention? Because although automation is great, only you can get settings right every time. A misinterpreted alpha channel, nonsquare pixel footage interpreted as square, undetected scan lines, and similar issues will leave you fighting an uphill battle if you don't manage settings properly before you ever start assembling a composition. And new and changing formats merely increase the number of possible variables, some of which are completely new to version 7.0.
Project Settings
The Project Settings dialog (Ctrl+Alt+Shift+K/Cmd+Option+Shift+K) is easily overlooked by novice users. It controls the following within your project:
- The Timecode Base (default frames per second)
- How time is displayed (as timecode, frames, or the old-school filmic feet and frames option)
- Color Depth (8, 16, or 32 bits per channel), as well as new settings for the Working Space and handling of linear light (these are addressed in Chapter 11, "Film, HDR, and 32 Bit Compositing")
New to After Effects 7.0 is an Auto setting for Timecode Base; this is now the default setting. It used to be that you could choose only one Timecode Base setting for an entire project; if you imported 29.97 fps footage into a project set to 24 fps, the timelines would display 24 frames per second only, even in a 29.97 fps composition. This is no longer the case, and in this particular situation automation is a good thing.
Tip
Why set Timecode Base to anything but Auto? It could be useful in situations where you want to compare times or durations for items with differing frame rates. With the Auto setting, you don't know if 0:00:01:15 means 1.5 seconds or 1 15/24 seconds without knowing the underlying frame rate.
Besides the Color Settings options (which are the tip of a rather large iceberg whose depths are plumbed in Chapter 11), the option worth knowing about here is the choice of displaying Timecode or Frames (Feet + Frames we will leave to those few souls still working with reels of physical film, probably for Scorsese or Spielberg). Most film-based projects will choose frames, while video people tend to think in terms of timecode. Furthermore, with the Frames option, you can specify a number at which the frames begin (the default is 0 but some crews prefer 1).
Even when you choose the Frames option, the timecode base of your individual composition displays beside the frame counter in the Timeline (Figure 1.16).
Figure 1.16. The Timeline provides a constant reminder (in parentheses) of what frame rate is being used in the current project, regardless of how time is displayed (in this case, in frames, which tends to be standard for film work while timecode is more often used for video).

Interpret Footage
This book generally eschews the practice of taking you menu by menu through After Effects, but sometimes the UI perfectly encapsulates a given set of production challenges. The Interpret Footage dialog is one such case, a section-by-section checklist of all that can go wrong when you import footage: misinterpreted Alpha, incorrect frame rate, misadjusted Fields and Pulldown settings, incorrect Pixel Aspect Ratio, even misinterpreted ITU-R601 Luma Levels (which is quite a mouthful even on the printed page). To bring up the Interpret Footage dialog for a given clip, select it in the Project panel and press Ctrl+F/Cmd+F or context-click and select Interpret Footage > Main.
Alpha
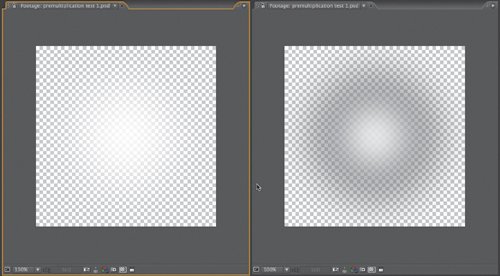
Alpha settings are more complicated than you might think when it comes to compositing; most After Effects users have no idea just how complicated, in fact. Figure 1.17 shows the most common symptom of a misinterpreted alpha channel, fringing. To try this example for yourself, import premultipliedAlpha.tif from the CH01 folder; try changing each from the correct "Premultiplied" setting to the incorrect (in this case) "Straight" setting.
Figure 1.17. It's typically easy to distinguish a properly interpreted (left) from an incorrect alpha channel (right). The giveaway is fringing, caused in this case by the failure to remove the background color from the edge pixels by unmultiplying them (with black). The left image is premultiplied, the right is straight.
For the time being, here are a couple pointers and reminders:
- If you're unclear about which type of alpha channel you're working with, click Guess in the Interpretation dialog that shows up when you import footage with alpha. This will often, but not always, get the setting right.
- Under Preferences > Import is a setting for how you want After Effects to handle footage that comes in with an alpha channel. Beware of setting this to anything besides Ask User until you are certain you know what you are doing with alpha channels and that circumstances aren't likely to change without you noticing.
For a more in-depth discussion of alpha channels and how they operate in the After Effects pipeline, see Chapter 3, "Selections: The Key to Compositing."
Frame Rate
The clearest symptom of an incorrectly set frame rate is footage that does not play smoothly in a composition with the target frame rate. Interpreting frame rate properly is an issue only when you import image sequences, which, of course, is the most common way that you will import moving footage in a visual effects setting. Image sequences are preferred to formats such as QuickTime (.mov) or Windows Media (.avi) in a production setting because
- If something goes wrong with a rendered image sequence, only the missing frames need to be replaced. With a movie file, the whole file typically has to be discarded and replaced, potentially costing hours of render time.
- Movie file formats are not as universally recognized and standardized across various platforms and programs as still image formats. QuickTime is the most robust and flexible of the moving image formats, yet many Windows-based programs do not even natively support it.
Therefore, when importing still image sequences to use as moving footage, remember
- Just because you've set your Project Settings to the proper frame rate (say, 24 fps for a feature film project), your image sequences may still import at 30 fps by default. You can change this default setting under Preferences > Import.
- You can assign whatever frame rate you like to a footage sequence if you determine the default setting is not correct.
- Just because an imported moving image file (such as QuickTime) has its own frame rate does not mean you cannot override this rate as needed by checking Assume This Frame Rate and entering a value. Be certain, however, that this is really what you want to do; typically, it is only a correction for outputs that were set incorrectly in another application.
Keep in mind that you can highlight any clip in your Project panel and see its current frame rate, along with other default settings, displayed at the top of the panel (Figure 1.18).
Figure 1.18. Useful information about any file can be found in the Project panel. Adjacent to the thumbnail image at the top, you'll find frame rate, duration, color depth, pixel aspect, and any sound info, as well as how many times the clip is used in the project. To see and select specific comps in which it is used, click the carat to the right of the file name. Below, the file listing itself also tells you the size, type and disk location of the source asset.

Fields, Pulldown, Pixel Aspect Ratio (PAR)
Most of the rest of the Interpret Footage dialog has to do with settings specific to broadcast video formats. Fields are the result of footage interlacing, which I wish I could say was going to be a thing of the past with high definition formats, but alas, it has evolved with them, as well.
Fields essentially allow a broadcast format to get two frames out of one, by interlacing the two frames together. The result is that each field has only half as many vertical pixels as it otherwise should, but there can be twice as much motion detail in the clip. Figure 1.19 shows a simplified version of how this works.
Figure 1.19. The ball is traveling horizontally, creating clear interlaced fields. This describes two frames' worth of motion via every other vertical pixel of a single frame.

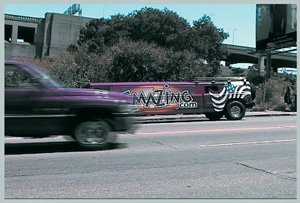
Therefore you must guard against symptoms such as those depicted in Figure 1.20. The best way to avoid field artifacts in moving footage is by making sure your Field setting matches that of your incoming footage; Separate Fields unweaves the two fields embedded in a single frame to be two separate frames (as far as After Effects is concerned), allowing you to add transforms and distortion effects without creating a complete mess. Furthermore, it can be vital to remove fields prior to masking and rotoscoping (covered further in Chapters 3 and 7).
Figure 1.20. The foreground pickup truck spells trouble if you're planning on doing much more than a simple color correction; fields were not removed for this clip. If you see a problem like this, check your Interpret Footage settings immediately.
Notes
Making a single frame out of a single field, which contains half the image data, involves interpolating missing pixels. Like scaling, this is an operation that can theoretically be done using several different algorithms. Also as with scaling, After Effects only offers one such method. Theoretically better interpolation algorithms are offered as part of the Fields Kit from RE:Vision Effects, Magic Bullet Suite from Red Giant Software, and Tinderbox 3 from The Foundry.
Related to fields is 3:2 pulldown, which uses fields to convert 24 fps film footage to 29.97 fps by repeating one field every five frames. The question of which field is repeated is determined by the patterns listed in the Remove Pulldown menu, and After Effects will accurately guess them for you (using the buttons labeled "Guess") if there is sufficient motion in the first few frames to make the pattern obvious. If not, you must use trial and error, trying each pattern in Remove Pulldown until the footage plays at 23.976 fps with no visible field artifacts.
Tip
Just because you deal with film footage does not mean you must deal with 3:2 pulldown, unless you must convert back and forth from standard definition video. A newer "advanced" type of pulldown is specified for footage generated by certain cameras, for which the Guess 24Pa Pulldown setting is designed.
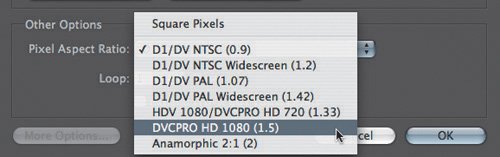
Pixel Aspect Ratio (PAR) is yet another compromise intended to improve the appearance of broadcast formats, and it has only proliferated with the advent of high definition video (Figure 1.21). The basic concept is to display video using pixels which are non-square, so that fewer of them are required along one axis where they are stretched upon display.
Figure 1.21. There are more non-square pixel video formats than ever these days; thankfully, After Effects 7.0 keeps up with them. All of the formats with values above 1.0 use pixels which are wider than they are tall, making the image appear anamorphica.k.a. too skinnywhen displayed using square pixels, without compensation.
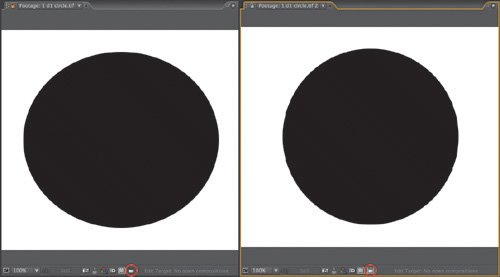
Any clip with a non-square PAR will look odd displayed via your monitor's square pixels; therefore After Effects includes a toggle along the bottom of the composition and footage panels to stretch the footage so that its proportions look correct (Figure 1.22). This introduces error into the image fidelity and can cause smooth diagonals to appear jaggy. To accustom yourself with non-square pixels and how they appear in After Effects, try opening d1circle.tif from the CH01 folder and experiment with the PAR toggle.
Figure 1.22. The same non-square pixel D1 aspect source, displayed with Pixel Aspect Ratio Correction toggled off (left) and on (right). The toggle for each is highlighted in red.
With standard digital formats such as DV, the process of setting field order and pixel aspect is standardized and automated; After Effects knows what to do by default if it sees. For other formats, you need to know not only whether your footage is coming in with fields but also whether the upper or lower field is first. Furthermore, with film footage you may have to deal with pulldown, which interleaves 24 fps footage into a 29.97 fps NTSC broadcast video-ready frame rate.
Digital Source Formats
Notes
One oddity about the PNG format is that, although it does permit saving an alpha channel, the alpha will always be saved and interpreted as Straight; the API of the format apparently does not allow for a premultiplied alpha.
After Effects is capable of importing and exporting a wide array of footage formats, yet only a small subset of these recur typically in visual effects production. Here are some of the most popular raster image formats and their advantages (for a summary, see Table 1.1):
- TIFF (.tif): In many ways the most flexible of formats, with the possible exception of PNG, TIFF is longstanding enough to be supported by most applications. It can be compressed effectively (and losslessly) by enabling LZW compression, which looks for recurring instances and patterns in the image and encodes them. New to After Effects 7.0 is native support for 16 bit per channel (bpc) and 32 bpc TIFF files; more on high bit depths can be found in Chapter 11.
- Targa (.tga): This format has the dual advantages of being universal to most computer graphics applications and offering lossless RLE (run length encoding) compression, which looks for sets of identical pixels that can be losslessly grouped together (such as a solid color in the background or alpha channel).
- PNG (.png): In many ways the most misunderstood of formats, PNG natively supports images of 8 or 16 bits per channel in Photoshop, and it often does the most effective job of losslessly keeping file sizes small. Because PNG has a reputation as a Web-oriented format, users sometimes mistakenly assume that it automatically adds lossy compression, as is the case with JPEG files.
- Cineon (.cin) and DPX (.dpx): Common formats for transferring digitized film images, these operate exclusively in nonlinear, 10-bit color and are examined in greater detail in Chapter 11.
- Photoshop (.psd): Although a universally supported format with many built-in extras, such as support for individual layer transparency, these files can be huge, as Photoshop offers no lossless compression options.
- Camera Raw (.crw): At this point only still (not video) cameras produce Camera Raw images, which contain all of the data that was captured from the camera with minimal processing. Camera Raw images allow you to adjust many characteristics of the image losslessly, as if you were making the adjustments (to exposure or light balance) directly in the camera.
- Open EXR (.exr): This is an advanced format for use solely with high dynamic range imaging (HDRI), source that has been taken in bit depths higher than linear 16 bit. With version 7.0, After Effects supports it natively, although specialized plug-ins take greater advantage of its extensible options, such as the ability to save Z depth data and motion vectors. If this all sounds like gobbledygook but you still want to learn more, have a look at Chapter 11 or www.openexr.com (where you can also download sample EXR files).
|
Format |
Bit Depth |
Lossless Compression |
Alpha Channel |
|---|---|---|---|
|
TIFF |
8, 16, or 32 bit |
Y |
Y (multiple via layers) |
|
TGA |
8 bit |
Y |
Y |
|
PNG |
8 or 16 bit |
Y |
Y (straight only) |
|
CIN/DPX |
10 bit |
||
|
PSD |
8, 16, or 32 bit |
Y (multiple via layers) |
|
|
CRW |
8 or 16 bit |
||
|
EXR (non-native) |
16 bit floating point, 32 bit (integer and floating point) |
Y |
Y |
Notes
In the case of Table 1.1, the term "8 bit" means 8 bits per channel, for a total 24 bits in an RGB image or 32 bits in an RGBA image. The Targa format includes a 16-bit option that actually means 16 bits total, or 5 per channel plus 1. Avoid this.
So which format should you use? TIFF is useful overall, but 16-bit PNG will save substantial file space. Cineon is the only choice for 10-bit log files, and there's nothing particularly wrong with Targa (except perhaps slow run length encoding) or Photoshop (except the huge file sizes). EXR is the wave of the future for high dynamic range imaging because it was designed from the ground up for twenty-first century imaging.
Close-Up: Moving Images
Moving image formats, such as QuickTime and Windows Media, almost never come into play in professional effects work, except perhaps as reference and dailies files transmitted to and from the editorial department.
These files can easily become huge at film resolution, and one corrupt frame can render an entire movie file unusable. Corrupt frames do, alas, occur, and being able to single them out for replacement is key; re-rendering an entire movie is simply not practical.
Camera Raw will only come into play if your shot includes source from a digital SLR camera; importing a .crw image into After Effects activates the Camera Raw application, which is also included with Adobe Photoshop; it allows you to adjust and pre-set the characteristics that remain variable in this format. Photoshop books typically dedicate an entire chapter (if not the whole book) to this format, and because it does not yet come up regularly in After Effects work, use of Camera Raw is beyond the scope of what can be thoroughly covered in this book (although related issues are discussed in depth in Chapter 11).
Adobe Formats
After Effects supports some special features for dealing with files created by other Adobe applications. For effects work, the most handy one is support for multilayer Photoshop images, including layer names, transfer modes, and transparency settings.
To take advantage of this feature, import the Photoshop source as a composition, which leaves all of the properties of each individual layer editable in After Effects. The alternative is to import only a single layer or to flatten all layers and import the entire file as one image.
The ability to import a Photoshop file as a composition means you can set up a shot as a Photoshop still and import it with everything already in place. This is particularly useful with matte paintings that include separate elements, such as multiple planes of depth.
If you don't need the elements ready to go as layers of a composition, however, I would forego this option because it makes editing and updating the source trickier. Each layer becomes a separate element that must be updated separately, and it's wasted effort if you never edit the associated composition.
Notes
Owners of the Adobe Production Studio will have noted the ability to maintain the 10-bit image pipeline when working directly with Adobe Premiere Pro, as well as the ability to initiate footage capture in After Effects. You can also preview unrendered compositions in the Premiere Pro timeline or in Adobe Encore DVD. These features are available on only Windows systems with the Production Studio installation.
New to After Effects 7.0 is the ability to create a Photoshop file directly from After Effects (File > New > Adobe Photoshop File). The file you create is a blank slate whose dimensions match that of the most recently opened composition, including title-safe and action-safe guides, and it automatically populates your After Effects project. In the context of a composition, you can create a new Photoshop layer by choosing Layer > New > Adobe Photoshop File.
Composition Settings
There are a couple of reliable methods for ensuring that your composition settings are exactly as they should be:
- Use a prebuilt project template that includes compositions whose settings are already correct
- Create new compositions by dragging a clip to the Create a New Composition icon and using only clips whose settings match the target output size and frame rate (Figure 1.23)
Figure 1.23. Dragging a source background clip to the highlighted icon at the bottom of the Project panel creates a new composition with the clip's duration, pixel dimensions, pixel aspect, and frame rate. It's a reasonably foolproof way to set up a new composition if you are working with a master background clip.

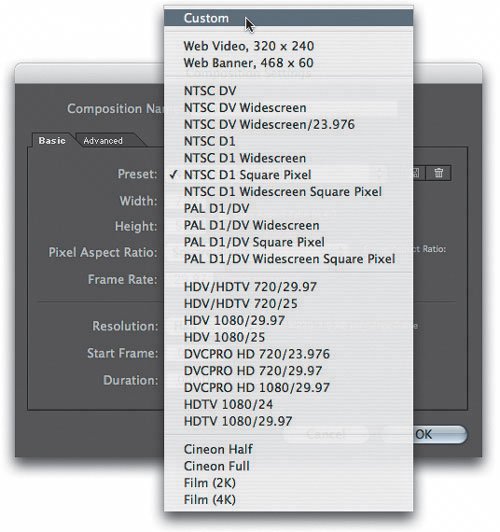
The crucial settings to get correct in the Composition Settings panel are the pixel dimensions, Pixel Aspect Ratio, Frame Rate, and Duration. (Actually, even Duration is negotiable so long as it is not too short.) If you're working with a footage format that isn't accurately described in any of the Preset options and you're going to be using this format again and again, then by all means create your own Preset setting by clicking on the small icon adjacent to the Preset pull-down menu, the icon that looks like a little floppy disk (Figure 1.24).
Figure 1.24. Feel free to create your own preset if none of the listed ones match one that you will be using continually for your project.
Notes
Several new presets have been added in After Effects 7.0 for increasingly common HD formats.
The Advanced tab in the Composition Settings dialog pertains to options for specifying composition temporal and spatial settings (Chapter 4) and for working with motion blur and 3D (Chapter 9).
Previews and OpenGL |
Section I. Working Foundations
The 7.0 Workflow
- The 7.0 Workflow
- Workspaces and Panels
- Making the Most of the UI
- Settings: Project, Footage, Composition
- Previews and OpenGL
- Effects & Presets
- Output: The Render Queue
- Study a Shot like an Effects Artist
The Timeline
- The Timeline
- Organization
- Animation Methods
- Keyframes and The Graph Editor
- Uber-mastery
- Transform Offsets
- Motion Blur
- Manipulating Time Itself
- In Conclusion
Selections: The Key to Compositing
- Selections: The Key to Compositing
- The Many Ways to Create Selections
- Compositing: Science and Nature
- Alpha Channels and Premultiplication
- Masks
- Combining Multiple Masks
- Putting Masks in Motion
- Blending Modes: The Real Deal
- Track Mattes
Optimizing Your Projects
- Optimizing Your Projects
- Navigating Multiple Compositions
- Precomposing and Nesting
- Adjustment and Guide Layers
- Understanding Rendering Order
- Optimizing After Effects
- Onward to Effects
Section II. Effects Compositing Essentials
Color Correction
Color Keying
- Color Keying
- Good Habits and Best Practices
- Linear Keyers and Hi-Con Mattes
- Blue-Screen and Green-Screen Keying
- Understanding and Optimizing Keylight
- Fixing Typical Problems
- Conclusion
Rotoscoping and Paint
- Rotoscoping and Paint
- Articulated Mattes
- Working Around Limitations
- Morphing
- Paint and Cloning
- Conclusion
Effective Motion Tracking
- Effective Motion Tracking
- The Essentials
- Optimizing Tracking Using 3D
- Extending a Track with Expressions
- Tracking for Rotoscoping
- Using 3D Tracking Data
- Conclusion
Virtual Cinematography
- Virtual Cinematography
- 5D: Pick Up the Camera
- Storytelling and the Camera
- Camera Blur
- The Role of Grain
- Film and Video Looks
- Conclusion
Expressions
- Expressions
- Logic and Grammar
- Muting Keyframes
- Linking Animation Data
- Looping Animations
- Smoothing and Destabilizing
- Offsetting Layers and Time
- Conditionals and Triggers
- Tell Me More
Film, HDR, and 32 Bit Compositing
- Film, HDR, and 32 Bit Compositing
- Details
- Film 101
- Dynamic Range
- Cineon Log Space
- Video Gamma Space
- Battle of the Color Spaces
- Floating Point
- 32 Bits per Channel
- Conclusion
Section III. Creative Explorations
Working with Light
- Working with Light
- Light Source and Direction
- Creating a Look with Color
- Backlighting, Flares, Light Volume
- Shadows and Reflected Light
- HDR Lighting
- Conclusion
Climate: Air, Water, Smoke, Clouds
- Climate: Air, Water, Smoke, Clouds
- Particulate Matter
- Sky Replacement
- The Fog, Smoke, or Mist Rolls In
- Billowing Smoke
- Wind
- Water
- Conclusion
Pyrotechnics: Fire, Explosions, Energy Phenomena
- Pyrotechnics: Fire, Explosions, Energy Phenomena
- Firearms
- Sci-Fi Weaponry
- Heat Distortion
- Fire
- Explosions
- In a Blaze of Glory
Learning to See
Index
EAN: 2147483647
Pages: 157
