Articulated Mattes
I've said it before, and I'm saying it again: When animating, or articulating, mattes, keep it simple. All of the strategies offered here are for setting up and animating your mattes with as few steps as possible. Not only will this save you time in setup, you'll have fewer elements to fix if something goes wrong. Each new edit you keyframe introduces the possibility for more error, and each new point you add to a mask has to be accounted for on every other frame.
The first question to decide when starting a roto job is whether you prefer to mask in the Composition panel or in the Layer panel. The advantages of the Composition panel are that you can see the layer in the composition and that it updates live as you work. This approach, however, does have several potential pitfalls:
- On a large scene you may have to wait for all elements to render and the screen to redraw each time you draw a point.
- If the layer you are masking has been transformed (and particularly, rotated in 3D, scaled down, or made transparent), you may find it difficult to edit a mask cleanly.
- You may need to select and lock other layers to be certain that you're editing the correct layer, particularly if you're creating more than one mask.
- The mask you draw in the composition viewer is live by default, causing masked areas to disappear as you work. This can make it impossible to draw complex shapes.
- You lose the use of selection tools that exist only in the Layer panel.
You may have guessed by now that the Layer panel is generally a preferable place to create masks. Tweaking mask points in the context of the entire comp is often useful, but I recommend this only as a secondary approach. If you start to create a mask in the Composition panel and realize you're in trouble, double-click the layer in the Timeline; your mask remains live in the Layer panel, ready for you to continue drawing and editing wherever you left off.
The Layer panel includes a couple of important pull-down menus you should be aware of: View and Target. You select your display mode from the View menu (Figure 7.1), choosing Masks, Anchor Point Path, or any effect you might have applied to this layer. Keep it set to Masks (the default) to edit masks in this panel. If Anchor Point Path is selected, you may be unable to edit your masks. If you choose None or any effect, masks will not be displayed.
Figure 7.1. The View menu specifies what is active in the Layer panel; the Render check box determines whether that particular step is displayed, or the source.
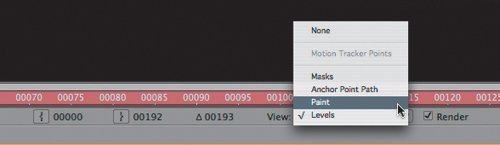
Beside the View menu is a Render check box; toggle it to see the full frame source of your footage and any masks.
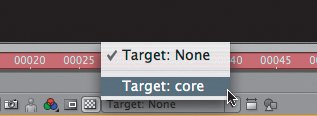
The Target menu resides along the bottom bar of the Layer panel (Figure 7.2) for one specific purpose. It enables you to select a target mask that is completely replaced if you draw (or paste in) a new mask. This would seem to be a boon for rotoscoping, allowing you to draw in a new mask at any time, but there's a gotcha: The First Vertex of the mask shape (which you can control) and the direction in which its points are numbered (which you can't) must match those of the target (see the "First Vertex" section).
Figure 7.2. Choose a mask from the Target menu and draw a new mask (or paste in a mask shape). The target mask shape will be replaced; this is predominantly useful with a keyframed Mask Shape.
RotoBeziers
An invention unique to After Effects among Adobe applications, RotoBezier shapes are effective for creating a mask that changes over time because they have fewer adjustable points than Bezier shapes (discussed in Chapter 3). Fewer controls, theoretically at least, mean less ability to inadvertently create the pops and bubbles (also known as matte boiling) that can send your rotoscoping job in the wrong direction (Figure 7.3).
Figure 7.3. Bezier handles are a bad mix with animation; for each point, three points must be managed for each vertex, and crimping inevitably results when handles cross.

Notes
The first vertex of the mask is identifiable as slightly larger than the others. If you're having trouble matching an animation between shapes and need to edit it, context-click a desired vertex and select Set First Vertex from the resulting menu. More on First Vertex in the "Morphing" section of this chapter.
Tip
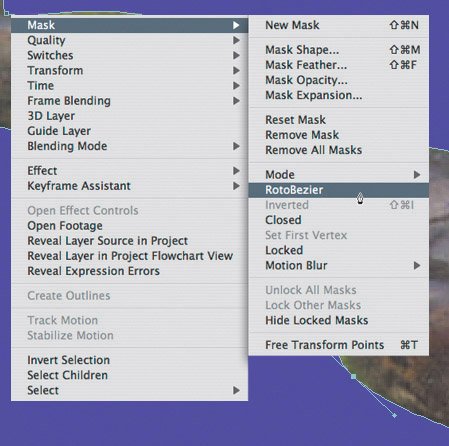
If setup alone is preventing you from using RotoBeziers, you can initially draw a mask using Beziers and convert it to RotoBeziers for animating. Context-click on the mask and choose RotoBezier from the menu to toggle it (Figure 7.4).
Figure 7.4. Many useful options are tucked away in the Mask context menu: Not only can you convert a Bezier shape to RotoBezier, you can lock and hide masks, close a shape, and set the first vertex for use with such features as Smart Mask Interpolation and the Reshape tool.
There's only one problem: RotoBeziers are never accurate during initial setup. To draw a RotoBezier, choose the Pen tool (G key) and check the RotoBezier box in the Tools menu. Pressing G repeatedly cycles through the other three mask editing tools; these do not include the RotoBezier check box, as they are for editing an existing mask, not drawing a new one.
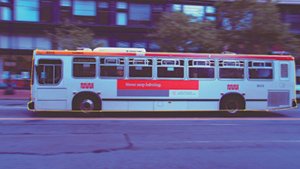
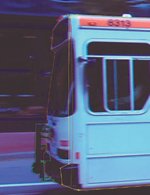
In RotoBezier mode, try drawing a basic mask around the bus in ext_busPassbyUncorrected_HD. For now, don't worry about how well the mask conforms to the edge, just try following this one instruction: Place a point at the center of any curve and on any corner you can perceive (Figure 7.5). As using Beziers probably did when you first used them, this takes practice, so don't sweat the result just yet. The mask won't look right until you adjust tension on the points.
Figure 7.5. Your first pass with RotoBeziers should just hit the key transitions quickly and won't look right when you're done. Place a point at the apex of each curve you find, as well as at each corner. The next step is to tighten or loosen individual points.
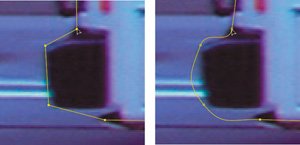
The literal key to your success when editing a RotoBezier shape is the Alt/Option key. After you've drawn your final point and closed the mask, with the Pen tool and all mask points still selected, hold down Alt/Option. A double-ended arrow icon appears. This is the Adjust Tension pointer. Dragging it to the left increases tension (counterintuitive if you ask me, but you get used to it). Do so with all mask points active, and they all become corners (Figure 7.6a and b), just as if you collapsed handles at a Bezier vertex. Now drag in the opposite direction, and all of the points act as if their (imaginary) Bezier handles are extended to the limits.
Figures 7.6a and b. Contrast all RotoBezier points at full tension (a) and no tension (b) to get an idea of the possible range, and how to drag and adjust. Generally you will adjust points one or two at a time, however, not all at once.
Tip
If the Selection tool (V) is active, use Ctrl+Alt (Cmd+Option) to activate the Adjust Tension pointer.
Although it does help dispel the myth that only Beziers are suitable for shapes with corners, dragging the Adjust Tension pointer with all points selected is not the typical method to edit RotoBeziers. Instead, after laying down the initial points of a RotoBezier mask, deselect it (Control+Shift+A/Cmd+Shift+A) and then Alt-drag (Option-drag) the Pen tool (temporarily enabling Adjust Tension) on each point that requires a tension adjustment.
You can freely add or subtract points as needed by toggling the Pen tool (G key; look for the cursor to change, adding a plus or minus sign beside it). With the Pen tool in Add mode you can also select a point simply by clicking on it, and deselect a point by Shift-clicking on it. This means that you don't have to continually switch tools (Figure 7.7).
Figure 7.7. The Add Vertex tool (one of the Pen tool's modes) will also select an existing point, without creating a new one. Thus the Pen tool lets you keep working without clicking outside the viewer; the G key cycles through its variations.
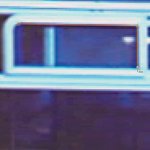
The hardest thing to accept about RotoBeziers is that the shape is inevitably so wrong when you first lay in your points, and each point you add changes the shape around adjacent points. Now that you're used to the basics of how RotoBeziers work, try drawing a new mask (say, around one window of the bus) this way: When you place a point on a corner, before moving on to the next point, Alt/Option-drag to the left on the vertex. Voila: It's already a corner, and your shape is much closer to final on the first pass (Figure 7.8).
Figure 7.8. Once you develop some facility with RotoBeziers, you can adjust point tension on the fly. Alt-drag (Option-drag) to the left to tighten a corner point; other points are unaffected.
Close-Up: Working Quickly
Here is a summary of tips for working efficiently with masks:
- The G key activates the Pen tool and cycles through its four modes to add and subtract mask points and collapse Bezier handles.
- Alt/Option activates the Adjust Tension slider, if the Pen tool is active.
- Ctrl+Shift+A deselects any active mask; Ctrl+A (with the layer selected and the viewer active) activates all masks.
- The V key activates the Selection pointer. To switch a mask to Translate mode, double-click it with this tool. Your mask will transition to Free Transfer mode and be outlined by a gray box with a center that you can offset for rotation and scaling.
- With the Selection tool active, context-click on a mask for quick access to most of its editable properties.
- If your mouse has a scroll wheel, scrolling with the Layer panel active zooms in and out of frame; holding the Alt/Option key as you do this zooms around your cursor. Holding down the spacebar activates the Hand tool for fast panning around the frame.
- To replace a Mask shape, select the shape from the Layer panel's Target menu and start drawing a new one; whatever you draw replaces the previous shape, creating a Mask Shape keyframe if the stopwatch is enabled. Beware: The first vertex point of the two shapes may not match, creating strange in-between frames. To set the first vertex point, context-click on the mask.
The real advantages of RotoBeziers become evident when you animate them, allowing you to resolve transitions with fewer variables than with Beziers.
Strategies for Complex Shapes
Whether you've been won over to RotoBeziers for creating animated masks or not, the strategies for masking a complex moving shape are largely the same. Here are the main points:
- Begin by creating whatever matte you can to preserve as much of the existing edge detail as you can. If no color key is possible, carefully examine all three channels of the footage for the one with the greatest contrast and create a hi-con matte.
- Narrow down the work area to just the section you need for your shot. Try not to rotoscope even one frame more than you need.
- Use multiple overlapping masks instead of a single mask on a complex, moving shape (Figure 7.9). Even a hard-bodied object, such as the bus driving by, benefits from being rotoscoped with several masks instead of one.
Figure 7.9. One key to working quickly is to intentionally create overlapping, separate mask shapes for different parts of your masked area that you know will move independently, or be revealed and concealed (in this case, because of a simple perspective shift). A shape with 20 or more points will be difficult to manage over time.
- Go through the clip, and block in the major keyframes for a given shape. This will be the point at which a change of direction, speed, or shape begins or ends.
- Begin with the frame in which a mask outline can be drawn using the fewest points, and add points (or masks) as needed to progressively more complex frames. Be prepared to break down the shot as much as necessary so that each of your masks describes only one part of the shape, and each shape stays simple. Stay under a dozen points if you can.
Tip
Although each new mask by default retains the color of its predecessor, your life will be made easier with overlapping mattes if each one has its own color, and the colors are easy to see against the source. As mentioned earlier, you can enable Cycle Mask Colors in Preferences > User Interface Colors to generate a unique mask color with each new mask. Also in the Timeline panel, select the masked layer and press M to reveal masks, then click on the colored square beside each mask to edit its color.
Block in and refine the first shape, then refine as necessary. Check the result at full speed against a contrasting background, just as you do with color keys. Then move on to the next shape.
In some cases, you can finish the matte this way. In other cases, you'll be left with a few stray holes in your matte here and there that you can go back and clean up with paint strokes. The process for working with paint is detailed in the next section; first, take a look at some of the other strategies at your disposal for masking, to evaluate their relative effectiveness.
Working Around Limitations |
Section I. Working Foundations
The 7.0 Workflow
- The 7.0 Workflow
- Workspaces and Panels
- Making the Most of the UI
- Settings: Project, Footage, Composition
- Previews and OpenGL
- Effects & Presets
- Output: The Render Queue
- Study a Shot like an Effects Artist
The Timeline
- The Timeline
- Organization
- Animation Methods
- Keyframes and The Graph Editor
- Uber-mastery
- Transform Offsets
- Motion Blur
- Manipulating Time Itself
- In Conclusion
Selections: The Key to Compositing
- Selections: The Key to Compositing
- The Many Ways to Create Selections
- Compositing: Science and Nature
- Alpha Channels and Premultiplication
- Masks
- Combining Multiple Masks
- Putting Masks in Motion
- Blending Modes: The Real Deal
- Track Mattes
Optimizing Your Projects
- Optimizing Your Projects
- Navigating Multiple Compositions
- Precomposing and Nesting
- Adjustment and Guide Layers
- Understanding Rendering Order
- Optimizing After Effects
- Onward to Effects
Section II. Effects Compositing Essentials
Color Correction
Color Keying
- Color Keying
- Good Habits and Best Practices
- Linear Keyers and Hi-Con Mattes
- Blue-Screen and Green-Screen Keying
- Understanding and Optimizing Keylight
- Fixing Typical Problems
- Conclusion
Rotoscoping and Paint
- Rotoscoping and Paint
- Articulated Mattes
- Working Around Limitations
- Morphing
- Paint and Cloning
- Conclusion
Effective Motion Tracking
- Effective Motion Tracking
- The Essentials
- Optimizing Tracking Using 3D
- Extending a Track with Expressions
- Tracking for Rotoscoping
- Using 3D Tracking Data
- Conclusion
Virtual Cinematography
- Virtual Cinematography
- 5D: Pick Up the Camera
- Storytelling and the Camera
- Camera Blur
- The Role of Grain
- Film and Video Looks
- Conclusion
Expressions
- Expressions
- Logic and Grammar
- Muting Keyframes
- Linking Animation Data
- Looping Animations
- Smoothing and Destabilizing
- Offsetting Layers and Time
- Conditionals and Triggers
- Tell Me More
Film, HDR, and 32 Bit Compositing
- Film, HDR, and 32 Bit Compositing
- Details
- Film 101
- Dynamic Range
- Cineon Log Space
- Video Gamma Space
- Battle of the Color Spaces
- Floating Point
- 32 Bits per Channel
- Conclusion
Section III. Creative Explorations
Working with Light
- Working with Light
- Light Source and Direction
- Creating a Look with Color
- Backlighting, Flares, Light Volume
- Shadows and Reflected Light
- HDR Lighting
- Conclusion
Climate: Air, Water, Smoke, Clouds
- Climate: Air, Water, Smoke, Clouds
- Particulate Matter
- Sky Replacement
- The Fog, Smoke, or Mist Rolls In
- Billowing Smoke
- Wind
- Water
- Conclusion
Pyrotechnics: Fire, Explosions, Energy Phenomena
- Pyrotechnics: Fire, Explosions, Energy Phenomena
- Firearms
- Sci-Fi Weaponry
- Heat Distortion
- Fire
- Explosions
- In a Blaze of Glory
Learning to See
Index
EAN: 2147483647
Pages: 157
