Using Images and Sound
So far in this book, all the Swing applications have been pretty boring. They've had plenty of labels, text fields, combo boxes, and the like, but no pictures!
This chapter remedies that. You find out how to incorporate graphic images (that is, pictures-not necessarily images of a graphic nature) into your Swing applications. And just to make things interesting, I show you how to throw in sound effects and music, too.
| TECHNICAL STAUFF |
Java's support for images and sound is designed assuming that you're going to use them in applets that run over a slow Internet connection. As a result, they go to great lengths to accommodate large files that can take a long time to download. They include a special class called MediaTracker that's designed to let you monitor the progress of a long download so you can either display a progress bar or display the image or play the sound piece by piece as it arrives. Fortunately, they also include some shortcut methods that let you just load an image or sound file and use it without worrying about the MediaTracker details. |
I'm a big believer in shortcuts, except on family vacations. I took a shortcut once on a family trip to see Mt. Lassen. It turned out the shortcut involved about five miles on a windy dirt road that took about an hour. We would have arrived one-half hour sooner had we gone the long way. But trust me: This isn't that kind of shortcut. You really get there faster if you skip the MediaTracker details until the end.
Using Images
An image is a file that contains a picture. Java supports pictures in several different formats, including
- GIF: This is the Graphics Interchange Format, commonly used for small images such as those used for button icons and such.
- JPEG: The Joint Photographic Experts Group (hence the name JPEG) devised this format to store photographic images in a compressed form. JPEG is the preferred form for larger images.
- PNG: This is the Portable Network Graphics format, which was designed specifically for portability and network access. You'd think this would be the most common format for Java applications because Java, too, was designed for portability and network access. Although Java does indeed support PNG, GIF and JPEG are the more popular choices.
| TECHNICAL STAUFF |
Java does not directly support other common graphics file formats, such as BMP (Windows bitmap), PCX (PC Paintbrush bitmap), or WMF (Windows Media Format). The easiest way to deal with this limitation is to simply convert your images to GIF, JPEG, or PNG. Programs that can do that conversion are readily available. If you insist on using images in those formats, you can get third-party packages that do it. Hop on the Internet, cruise to your favorite search service, and look for "Java" and the format you want to support. |
Using the ImageIcon Class
The easiest way to work with images is to use the ImageIcon class. This class lets you load an image from a file using a filename or URL. Then, you can display it by attaching it to a label or button component or by painting it directly. The ImageIcon class shelters you from the details of using the MediaTracker class by automatically waiting for the entire image to load.
| Tip |
Icons are typically small images used to provide visual cues for what a button does. However, the ImageIcon class isn't just for small images. You can use it to display large images as well, as long as you're willing to hold up your program while the image loads. For Swing applications, that's not usually a problem. For applets, you may want to consider alternatives for large image files. |
Table 3-1 lists the most important constructors and methods of the classes that you use to work with ImageIcon objects. I describe these constructors and methods in the following sections.
Table 3-1: Classes for Working with ImageIcon Objects
 Open table as spreadsheet
|
ImageIcon Constructors and Method |
Description |
|---|---|
|
ImageIcon(String filename) |
Creates an ImageIcon object from the file indicated by the specified filename. |
|
ImageIcon(URL url) |
Creates an ImageIcon object from the file indicated by the specified URL. |
|
Image getImage() |
Gets the Image object associated with this ImageIcon. |
Open table as spreadsheet
|
JLabel and JButton Constructors |
Description |
|---|---|
|
JLabel (Icon image) |
Creates a label with the specified image. (Note that ImageIcon implements the Icon interface.) |
|
JButton(Icon image) |
Creates a button with the specified image. |
|
JButton(String text, Icon image) |
Creates a button with the specified text and image. |
Using ImageIcon in a Swing application
In a Swing application, you can load an image directly into an ImageIcon object by specifying the filename in the ImageIcon constructor, like this:
ImageIcon pic = new ImageIcon("HalfDome.jpg");
Here, an ImageIcon object is created from a file named HalfDome.jpg. This file must live in the same directory as the class file. However, you can just as easily provide a path in the String parameter, like this:
ImageIcon pic = new ImageIcon("c:\HalfDome.jpg");
Here, the file is in the root directory of the C: drive. (Remember that you have to use two backslashes to get a single backslash in a Java string literal.)
You can then attach the image to a Swing component, such as a label or button, to display the image. Many Swing components can display icons directly, including JLabel, JButton, JCheckBox, and JRadioButton. If you simply want to display the image, use a JLabel component and specify the ImageIcon object in its constructor, like this:
JLabel picLabel = new JLabel(pic);
Here, a label is created from the previously created ImageIcon object named pic. Then, when you add this label to a panel or frame, the image is displayed.
Putting this all together, here's a complete application that displays the HalfDome.jpg image in a frame; Figure 3-1 shows the frame displayed when this program is run.
import javax.swing.*;

public class PictureApp extends JFrame
{
 public static void main(String [] args)
 {
 new PictureApp();
 }

 public PictureApp()
 {
 this.setTitle("Picture Application");
 this.setDefaultCloseOperation(
 JFrame.EXIT_ON_CLOSE);
 JPanel panel1 = new JPanel();
 ImageIcon pic = new ImageIcon("HalfDome.jpg");
 panel1.add(new JLabel(pic));
 this.add(panel1);
 this.pack();
 this.setVisible(true);
 }
}
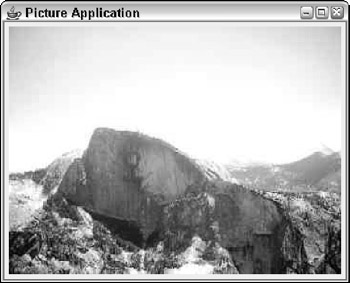
Figure 3-1: Displaying an image in a Swing application.
Although this example shows how to display a large JPEG file, the ImageIcon class is also commonly used to attach smaller GIF images as icons for various types of buttons. To do that, you simply pass the ImageIcon object to the button constructor.
 For example, the following code produces the button shown in the margin:
JButton openButton;
ImageIcon openIcon = new ImageIcon("OpenIcon.gif");
openButton = new JButton(openIcon);
 You can also create buttons with both text and an icon. For example, I created the button shown in the margin with this code:
openButton = new JButton("Open", openIcon);
Using ImageIcon in an applet
If the program is an applet, use a URL instead of a filename to identify the image file. The only trick is figuring out how to get a URL for a file that lives in the same location as the applet itself. To do that, you can use this strange but functional incantation:
URL url = PictureApplet.class.getResource("HalfDome.jpg");
Here, you use the class property of the class that defines your applet (in this case, PictureApplet) to get its Class object, and then call the getResource method, which returns a URL object for the specified file. After you have the URL of the image file, you can create an ImageIcon from it like this:
pic = new ImageIcon(url);
Then, you can use the ImageIcon object in a label or button component, or you can use the getImage method to get the underlying Image object so you can paint it directly to the screen.
Using the Image Class
If you want to paint an image directly to a graphics context (for example, from the paintComponent method of a panel), you need to use the Image class to represent the image. You want to create the Image object in the panel constructor but paint it in the paintComponent method. As a result, you need to declare the variable that references the image as an instance variable so you can refer to it from both the constructor and the paintComponent method. The declaration for the instance variable looks something like this:
Image img;
Table 3-2 lists the most important constructors and methods of the classes that you use to work with Image objects. I describe these constructors and methods in the following sections.
Table 3-2: Classes for Working with Image Objects
Open table as spreadsheet
|
Image Class Methods and Field |
Description |
|---|---|
|
Image getScaledInstance (int x, int x, int hints) |
Gets an Image object that has been scaled according to the x and y parameters. If either x or y is negative, the aspect ratio of the image is preserved. The hint parameter can be one of these fields: DEFAULT, SPEED, or SMOOTH. |
|
int DEFAULT |
The default scaling method. |
|
int SPEED |
A scaling method that favors speed over smoothness. |
|
int SMOOTH |
A scaling method that favors smoothness over speed. |
Open table as spreadsheet
|
Toolkit Class Methods |
Description |
|---|---|
|
static Toolkit getDefaultToolkit() |
Gets a Toolkit object. |
|
Image getImage (String filename) |
Gets an Image object from the specified filename. |
Open table as spreadsheet
|
Graphics Class Methods |
Description |
|---|---|
|
void drawImage(Image img, int x, int y, ImageObserver observer) |
Draws the specified image at the position indicated by the x and y parameters. The observer parameter specifies the object that listens for image update events. |
|
void drawImage(Image img, int x, int y, int width,int height, ImageObserver observer) |
Draws the specified image at the position indicated by the x and y parameters using the size specified by the width and height parameters. The observer parameter specifies the object that listens for image update events. |
Creating an Image object
Image is an abstract class, so it doesn't have a handy constructor you can use to create an image from a file or URL. However, you can create an Image object from a file two fairly simple ways: with the ImageIcon class, as described in the preceding section, or with the Toolkit class.
To create an image from an ImageIcon object, you first create an ImageIcon object as described in the preceding section. Then, you can use the getImage method to extract the Image from the ImageIcon. For example:
ImageIcon picIcon = new ImageIcon("c:\HalfDome.jpg");
Image picImage = picIcon.getImage();
You want to put this code in the panel constructor so that it's executed only once.
The other way is to use the getImage method of the Toolkit class. First, you use the static getDefaultToolkit method to get a Toolkit object. Then, you call getImage to load an image from a file. For example:
Toolkit kit = Toolkit.getDefaultToolkit();
img = kit.getImage("HalfDome.jpg");
Again, this code goes in the panel constructor to avoid reloading the image every time it needs to be painted.
If you're just loading a single image and the image is small, either technique is suitable. If you're loading a lot of images or if the image is large, the Toolkit technique is a better choice for two reasons. First, it avoids creating a bunch of unnecessary ImageIcon objects. And second, it doesn't tie up the application until the entire image is loaded.
Drawing an Image object
After you load an image and create an Image object, you can draw it by adding code in the paint method:
g.drawImage(img, 0, 0, this);
The drawImage method takes four parameters. The first three are easy enough to understand: They are the image to be painted and the x and y coordinates where you want the image to appear. The fourth parameter is an object that implements the ImageObserver interface. This interface includes a method called imageUpdate that's called whenever the status of the image has changed. For small images or for applications that load the image from a local file, this method is probably called only once, when the image has finished loading. However, if you load a large image over the Internet (for example, in an applet), the imageUpdate method is likely called several times as each chunk of the image is received.
Fortunately, it turns out that all Swing components including JPanel implement the ImageObserver interface, and their default implementation of the imageUpdate method is to simply call repaint. This method, in turn, calls the paint method, so the image is automatically drawn again.
Note another form of the drawImage method that lets you set the size you want the image drawn. For example:
g.drawImage(img, 0, 0, 200, 200, this);
Here, the image is drawn in a 200 × 200 rectangle starting at the top-left corner of the panel.
| TECHNICAL STAUFF |
Depending on the size of the original image, this may result in some distortion. For example, if the original image was 400 x 600, displaying it at 200 x 200 shows the image at one-half of its original width but one-third of its original height, making everyone look short and fat. A better way to scale the image is to call the image's getScaledInstance method: img = img.getScaledInstance(200, -1, Image.SCALE_DEFAULT); |
The first two parameters of this method specify the desired width and height. If you set one of these parameters to a negative value, the getScaledInstance method calculates the appropriate value while preserving the original image's aspect ratio. The third parameter is a constant that indicates what scaling method to use. The three choices you use most are SCALE_DEFAULT, which uses the default method; SCALE_SPEED, which favors speed over smoothness; and SCALE_SMOOTH, which favors smoothness over speed.
An Image example
To show how the elements presented in the last two sections work together, Listing 3-1 shows a complete program that uses the Image class to display an image in a panel.
To add a little interest, this application uses a JFileChooser dialog box to let the user select the image to be displayed, as shown in Figure 3-2. The file chooser includes a filter so only JPEG, GIF, and PNG files are listed. For more information about the JFileChooser class, see Book VIII, Chapter 1.
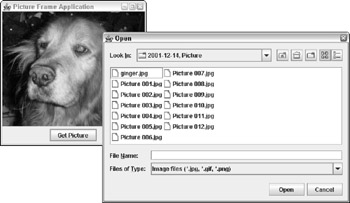
Figure 3-2: The Picture-Frame application in action.
Listing 3-1: The Picture Frame Application
import javax.swing.*;
import java.awt.event.*;
import java.awt.*;
import java.io.*;

public class PictureFrame extends JFrame
 implements ActionListener
{
 Image img; → 9
 JButton getPictureButton;

 public static void main(String [] args)
 {
 new PictureFrame();
 }

 public PictureFrame()
 {
 this.setSize(300, 300);
 this.setTitle("Picture Frame Application");
 this.setDefaultCloseOperation(JFrame.EXIT_ON_CLOSE);

 JPanel picPanel = new PicturePanel(); → 23
 this.add(picPanel, BorderLayout.CENTER);

 JPanel buttonPanel = new JPanel(); → 26
 getPictureButton = new JButton("Get Picture");
 getPictureButton.addActionListener(this);
 buttonPanel.add(getPictureButton);
 this.add(buttonPanel, BorderLayout.SOUTH);

 this.setVisible(true);
 }

 public void actionPerformed(ActionEvent e) → 35
 {
 String file = getImageFile();
 if (file != null)
 {
 Toolkit kit = Toolkit.getDefaultToolkit();
 img = kit.getImage(file);
 img = img.getScaledInstance(
 300, -1, Image.SCALE_SMOOTH);
 this.repaint();
 }
 }

 private String getImageFile() → 48
 {
 JFileChooser fc = new JFileChooser();
 fc.setFileFilter(new ImageFilter());
 int result = fc.showOpenDialog(null);
 File file = null;
 if (result == JFileChooser.APPROVE_OPTION)
 {
 file = fc.getSelectedFile();
 return file.getPath();
 }
 else
 return null;

 }
 private class PicturePanel extends JPanel → 63
 {
 public void paint(Graphics g)
 {
 g.drawImage(img, 0, 0, this);
 }
 }
 private class ImageFilter → 71
 extends javax.swing.filechooser.FileFilter
 {
 public boolean accept(File f)
 {
 if (f.isDirectory())
 return true;
 String name = f.getName();
 if (name.matches(".*((.jpg)|(.gif)|(.png))"))
 return true;
 else
 return false;
 }

 public String getDescription()
 {
 return "Image files (*.jpg, *.gif, *.png)";
 }
 }
}
The following paragraphs hit the highlights of this program:
|
→ 9 |
The img variable is declared here so the class can access it. |
|
→ 23 |
In the frame class constructor, a new instance of the PicturePanel class is created and added to the center of the frame. |
|
→ 26 |
Next, a panel is created to hold the button the user clicks to open an image file. The button specifies this for the action listener, and the panel is added to the South region of the frame. |
|
→ 35 |
The actionPerformed method is invoked when the user clicks the Get Picture button. It calls the getImageFile method, which displays the file chooser and returns the filename of the file selected by the user. Then, assuming the filename returned is not null, the Toolkit class is used to load the image. The image is then scaled so it is 300 pixels wide while preserving the aspect ratio, and the frame is repainted. |
|
→ 48 |
The getImageFile method creates and displays a file chooser dialog box that shows only JPG, GIF, and PNG files. If the user selected a file, the complete path of the file chosen by the user is returned. Otherwise, null is returned. |
|
→ 63 |
The PicturePanel class defines the panel that displays the picture. It consists of just one method-paint, which uses the drawImage method to draw the image. |
|
→ 71 |
The ImageFilter class is used to limit the file chooser display to just JPG, GIf, and PNG files. It uses the following regular expression to do so: .*((.jpg)|(.gif)|(.png)) For more information about file filters, refer to Book VIII, Chapter 1. And for more information about regular expressions, turn to Book V, Chapter 3. |
Playing Sounds and Making Music
Java provides built-in support for playing sound and music files. You can play sound and music files in a variety of formats, including wave files in several formats (WAV, AU, RMF, and AIFF as well as MIDI files). Wave files are usually used to add specific sound effects to your application, such as chimes, explosions, or drum rolls. MIDI files let you play music while your application is running.
An audio file is represented by an object that implements the AudioClip interface, whose methods are listed in Table 3-3. As you can see, this interface is simple: You can play a sound once, play it in a loop, and stop playing the sound. Note that when you play or loop a sound, your program doesn't wait for the sound to finish playing. Instead, the sound is played in a separate thread so your program can continue with its other chores.
|
Method |
Description |
|---|---|
|
void play() |
Plays the clip once. |
|
void loop() |
Plays the clip in a loop. |
|
void stop() |
Stops playing the clip. |
Interestingly enough, the easiest way to create an AudioClip object is to use a static method of the Applet class called newAudioClip. This is a little confusing; because it's a static method, you can use it in non-applet programs as easily as applets. Go figure. Anyway, the newAudioClip method requires a URL, not a simple filename, so you must first figure out how to get a URL for the sound file you want to play.
Here's a snippet of code that creates an AudioClip from a file named hit.wav and plays it:
URL url = MyApp.class.getResource("hit.wav");
click = Applet.newAudioClip(url);
click.play();
The first line gets the Class object for the current class (assumed here to be MyApp), and then uses the getResource method to get a URL object for the specified file, which must be in the same directory as the MyApp class. Then, the newAudioClip method is called to create an AudioClip object. Finally, the play method is called to play it.
To make things a little more interesting, Listing 3-2 shows a program that plays the hit.wav sound every time you click the mouse in the program's frame. This program displays an empty frame that has a MouseListener installed. Then, each time the mouseClicked method is called, the sound is played.
Listing 3-2: The MouseClicker Program
import javax.swing.*;
import java.awt.event.*;
import java.awt.*;
import java.applet.*;
import java.net.URL;

public class MouseClicker extends JFrame
{
 AudioClip click;

 public static void main(String [] args)
 {
 new MouseClicker();
 }

 public MouseClicker()
 {
 this.setSize(400, 400);
 this.setTitle("Mouse Clicker");
 this.addMouseListener(new Clicker());

 URL urlClick = MouseClicker.class.getResource("hit.wav");
 click = Applet.newAudioClip(urlClick);

 this.setVisible(true);
 }

 private class Clicker extends MouseAdapter
 {
 public void mouseClicked(MouseEvent e)
 {
 click.play();
 }
 }
}
Book I - Java Basics
Book II - Programming Basics
- Book II - Programming Basics
- Java Programming Basics
- Working with Variables and Data Types
- Working with Numbers and Expressions
- Making Choices
- Going Around in Circles (Or, Using Loops)
- Pulling a Switcheroo
- Adding Some Methods to Your Madness
- Handling Exceptions
Book III - Object-Oriented Programming
- Book III - Object-Oriented Programming
- Understanding Object-Oriented Programming
- Making Your Own Classes
- Working with Statics
- Using Subclasses and Inheritance
- Using Abstract Classes and Interfaces
- Using the Object and Class Classes
- Using Inner Classes
- Packaging and Documenting Your Classes
Book IV - Strings, Arrays, and Collections
- Book IV - Strings, Arrays, and Collections
- Working with Strings
- Using Arrays
- Using the ArrayList Class
- Using the LinkedList Class
- Creating Generic Collection Classes
Book V - Programming Techniques
Book VI - Swing
- Book VI - Swing
- Swinging into Swing
- Handling Events
- Getting Input from the User
- Choosing from a List
- Using Layout Managers
Book VII - Web Programming
Book VIII - Files and Databases
- Book VIII - Files and Databases
- Working with Files
- Using File Streams
- Database for $100, Please
- Using JDBC to Connect to a Database
- Working with XML
Book IX - Fun and Games
EAN: 2147483647
Pages: 332
