Using Eclipse
Overview
Eclipse is a development environment that includes many powerful features for creating Java programs. Because Eclipse is free and very powerful, it has become popular among Java developers. In this chapter, you discover the basics of using Eclipse for simple Java development.
| REMEMBER |
Because Eclipse is such a powerful tool, it has a steep learning curve. If you're brand new to Java, I suggest you start out using a simpler environment, such as TextPad (described in Book I, Chapter 3) and turn to Eclipse only after you have your mind around some of Java's programming fundamentals. That way you start out by concentrating on Java programming rather than on learning Eclipse. |
When you're ready to get started with Eclipse, go to the Eclipse Web site (http://www.eclipse.org), click the Download Eclipse button, and download the current version of Eclipse. Unlike most programs, Eclipse doesn't have a complicated setup program. You just download the Eclipse Zip file, extract all the files, and then run the Eclipse executable file (eclipse.exe) directly from the folder you extracted it to.
| Tip |
If you're using Windows, you may want to add a desktop shortcut for Eclipse to make it more convenient to start. To do that, open the folder that contains the eclipse.exe file. Then, right-click the file and drag it to the desktop. Release the mouse button and choose Create Shortcut from the menu that appears. You can then start Eclipse by double-clicking this desktop shortcut. |
Note that many of the techniques I describe in this chapter won't make much sense to you until you learn how to use the Java programming features they apply to. For example, the information about how to create a new Java class file won't make much sense until you learn about creating Java classes in Book III. As you learn about Java programming features in later chapters, you may want to refer back to this chapter to learn about related Eclipse features.
If you plan on using Eclipse, I suggest you pick up a copy of Eclipse For Dummies by Barry Burd (Wiley Publishing, Inc.).
Getting Some Perspective on Eclipse
Eclipse is designed to be a general-purpose development environment, which means that it isn't specifically designed for Java. It's like the Seinfeld of IDEs: As its own designers put it, Eclipse is "an IDE for anything and nothing in particular." You can easily customize Eclipse with plug-in components called features that make it useful for specific types of development tasks. And because Eclipse is most commonly used for Java program development, it comes pre-configured with features designed for developing Java programs.
Eclipse uses some unusual terminology to describe its basic operation. These terms, in particular, are worth a look:
- Workbench: The Workbench is the basic Eclipse desktop environment. When you run Eclipse, the Workbench opens in a window, as shown in Figure 4-1.
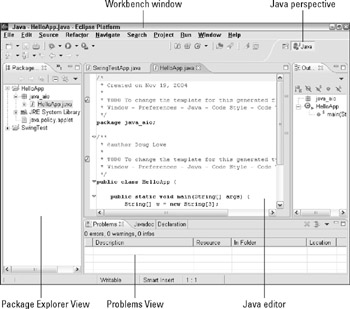
Figure 4-1: The Eclipse Workbench window.Tip If you can juggle and chew gum at the same time, you may want to open two Workbench windows to work on two different projects at once. However, those of us with less-than-superhero abilities of concentration can work with just one Workbench window at a time.
- Editor: An editor is a Workbench window pane that's designed for editing a certain type of file. Eclipse comes with a standard text editor that can edit any kind of text file and a special Java editor that's specifically designed for editing Java programs. In Figure 4-1, the Java editor is in the middle portion of the Workbench window.
Tip The Java editor in this figure looks small because I captured this screen image with the computer's monitor set to 800 x 600 pixels. Because Eclipse puts so much information on the screen at once, however, running it on a large monitor (preferably 19 inches or larger) at a resolution of at least 1,024 × 768 is best. That way, the editor window is large enough to let you comfortably work with your program's text, while leaving ample room for the other elements displayed in the Eclipse Workbench window.
- Views: A view is a pane of the Workbench window that displays other information that's useful while you're working with Eclipse. Figure 4-1 displays several additional views in addition to the editor. For example, the Package Explorer View lets you navigate through the various files that make up an Eclipse project, and the Problems View displays error messages.
You can display a view in its own pane, or combine it with other views in a single pane. Then, the views in the pane are indicated with tabbed dividers you can click to call up each view in the pane. For example, the Problems View in Figure 4-1 shares its pane with two other views, called JavaDoc and Declaration.
TECHNICAL STAUFF Strictly speaking, an editor is a type of view.
- Perspective: A perspective is a collection of views that's designed to help you with a specific type of programming task. For example, the Workbench window pictured in Figure 4-1 shows the Java perspective, designed for working with Java program files. Figure 4-2 shows a different perspective, called the Debug perspective. In this perspective, the Java editor is still present, but a different set of views that are useful while testing and debugging Java programs is shown. For example, a Console View appears at the bottom of the window so you can see the output created by the program, and a Variables View lets you monitor the contents of variables as the program executes. (For more information about the Debug perspective, see the section "Debugging a Java Program" later in this chapter.)
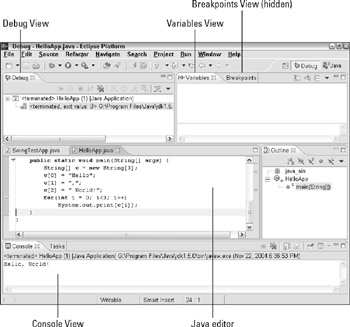
Figure 4-2: Debugging a program in Eclipse.
Understanding Projects
An Eclipse project is a set of Java files that together build a single Java program. Although some simple Java programs consist of just one file, most real-world Java programs are made up of more than one Java program file. In fact, a complicated Java program may require hundreds of Java program files. When you work on programs that require more than one file, Eclipse lets you treat those files together as a project.
A project consists not just of Java source files, but also the class files that are created when you compile the project and any other files that the program requires. That might include data files or configuration files, as well as other files such as readme files, program documentation, image files, sound files, and so on.
All the files for a project are stored together in a project folder, which may include subfolders if necessary. In addition to the files required by the program, the project folder also includes files that are created by Eclipse to store information about the project itself. For example, a file named .project stores descriptive information about the project, and a file named .classpath stores the locations of the classes used by the project.
All your project folders are stored in a folder called the workspace. Each time you start Eclipse, a dialog box appears asking for the location of the workspace folder. If you want to change to a different workspace, use File  Switch Workspace.
Eclipse lets you create two types of projects:
- For simple projects that have just a few Java source files, you can create a project that stores all the project's Java files in a single folder. Then, when those files are compiled, the resulting class files are stored in this same folder. This type of project is the easiest to work with, and it's ideal for small and medium-size projects.
- For large projects-those that involve dozens or even hundreds of Java source files-you can create a project that uses one or more subfolders to store source files. You are then free to create whatever subfolders you want to help you organize your files. For example, you might create one subfolder for user interface classes, another for database access classes, and a third for image files displayed by the application.
| Tip |
Eclipse has a File |
 Open File command, but this command isn't very useful. Instead, the Package Explorer View (on the left side of the Java perspective; refer to Figure 4-1) displays a list of all the Java projects in your workspace. When you start Eclipse, the project you were last working on appears on-screen automatically. You can switch to a different project by right-clicking the project in the Package Explorer, and then choosing Open Project. And you can open an individual file in a project by double-clicking the file in the Package Explorer.
Creating a Simple Project
The following procedure takes you step by step through the process of creating a simple project based on a slightly more complicated version of the Hello, World! program from Book I, Chapter 1. Follow these steps to create this application:
- Start Eclipse and click OK when the Workspace Launcher dialog box appears.
The Workspace Launcher dialog box asks for the location of your workspace folder; in most cases, the default location is acceptable. When you click OK, Eclipse opens with the Java perspective, with no projects or files displayed, as shown in Figure 4-3.
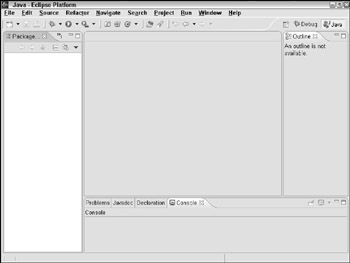
Figure 4-3: Eclipse waits for you to create a project. - Choose File
 New
New  Project.
The New Project dialog box comes up, shown in Figure 4-4. This dialog box lists several wizards you can use to create various types of Eclipse projects.
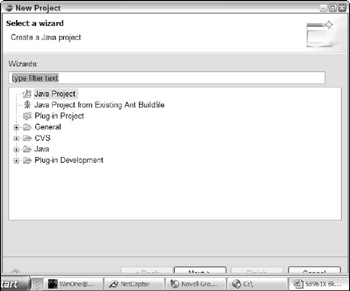
Figure 4-4: The New Project dialog box. - Select Java Project from the list of wizards, and then click Next.
The New Java Project dialog box appears on-screen, shown in Figure 4-5.
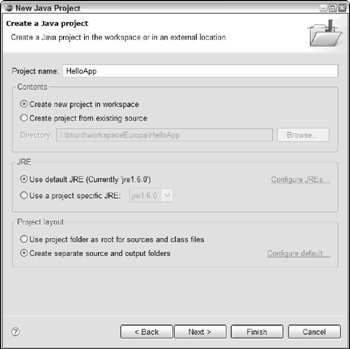
Figure 4-5: The New Java Project dialog box. - Type HelloApp in the text box, and then click Finish.
HelloApp is the project name. The other options in this dialog box let you specify whether the project should be stored in the workspace folder or some other folder and whether the project should use the project folder for source files or create separate subfolders for source files. The default settings for both of these options is fine for the HelloApp application.
When you click Finish, you return to the Java perspective. But now HelloApp appears in the Package Explorer View to indicate that you've added a project by that name to your workspace.
- Right-click HelloApp in the Package Explorer View, and then choose New
 Class from the shortcut menu that appears.
The New Java Class dialog box opens, as shown in Figure 4-6.
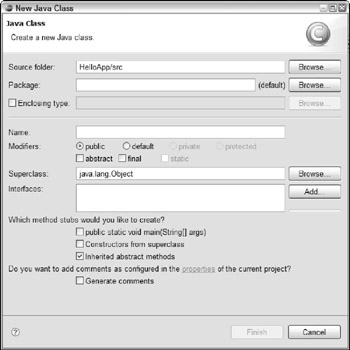
Figure 4-6: The New Java Class dialog box. - Set the options for the new class.
In particular:
- Set the Package text field to JavaAIO.
- Set the Name text field to HelloApp.
- Select the Public Static Void main(String[] args) check box.
- Click Finish.
The HelloApp.java file is created and Eclipse displays it in the Java editor, as shown in Figure 4-7.
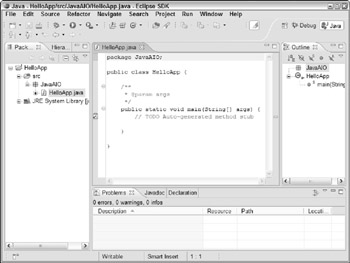
Figure 4-7: The newly created HelloApp class. - Edit the main method.
Move the insertion point to the empty block for the main method, and then edit it to look exactly like this:
public static void main(String[] args) { String[] w = new String[3]; w[0] = "Hello"; w[1] = ", "; w[2] = "world!"; for (int i = 0; i<3; i++) System.out.print(w[i]); } - Choose Run Run As Java Application.
The program is compiled and run. A console window with the program's output appears at the bottom of the Eclipse window, as shown in Figure 4-8.

Figure 4-8: The HelloApp program in Eclipse.Note If a Save Resources dialog box appears before the program runs, click OK. The program then runs.
Adding a Class File
In this section, I walk you through the process of adding a second class file to the HelloApp application to demonstrate some of Eclipse's most useful features for speeding up Java program development by generating code for commonly used class features.
| Warning |
Unless you've already read Book III, you may get bewildered early on by the code that's presented in this procedure. Don't worry; this code will make complete sense once you read about creating your own classes. |
So follow these steps to add a second class to the HelloApp application:
- Right-click the JavaAIO branch of the HelloApp project in the Package Explorer and choose New
 Class.
The New Java Class dialog box opens (refer to Figure 4-6).
- Set the options for the new class.
For this class, set the options as follows:
- Leave the Package text field to JavaAIO.
- Set the Name text field to HelloSayer.
- Uncheck the Public Static Void main(String[] args) check box.
- Click Finish.
A new class file named HelloSayer is created and Eclipse opens it in a Java editor.
- Add declarations for two public fields named greeting and addressee.
Add these lines immediately after the line that declares the HelloSayer class. Then, other than the comments and the package statement that appears at the beginning of the class, the class looks like this:
public class HelloSayer { private String greeting; private String addressee; } - Use a wizard to add a constructor to the class.
To do that, choose Source
 Generate Constructor Using Fields. The Generate Constructor Using Fields dialog box appears, shown in Figure 4-9.
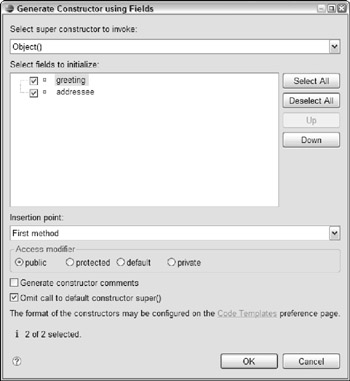
Figure 4-9: Eclipse can create constructors for you.Check both greeting and addressee in the list of fields to initialize, select First Method in the Insertion Point drop-down list, and check the Omit Call to Default Constructor Super() check box. Then click OK. The following code is inserted into the class:
public HelloSayer(String greeting, String addressee) { this.greeting = greeting; this.addressee = addressee; } - Add the code for a method named sayHello.
Add the following code after the constructor created in Step 5, immediately before the closing brace (}) in the last line of the program:
public void sayHello() { System.out.println(greeting + ", " + addressee + "!"); } - Click the HelloApp.java tab at the top of the Java editor pane.
The HelloApp.java file comes to the front so you can edit it.
- Edit the main method so that it uses the new HelloSayer class.
Delete the code that was in the main method and replace it with this code:
public static void main(String[] args) {
 HelloSayer h =
 new HelloSayer("Hello", "World!");
 h.sayHello();
}
The entire HelloApp.java class now looks like Listing 4-2. Eclipse generated all the code except the two lines within the main method.
The entire HelloSayer class file is shown in Listing 4-1.
Listing 4-1: The HelloSayer Class
package JavaAIO;

public class HelloSayer {

 private String greeting;
 private String addressee;

 public HelloSayer(String greeting, String addressee) {
 this.greeting = greeting;
 this.addressee = addressee;
 }

 public void sayHello()
 {
 System.out.println(greeting + ", " + addressee
 + "!");
 }

}
Listing 4-2: The HelloApp Class
package JavaAIO;

public class HelloApp {

 /**
 * @param args
 */
 public static void main(String[] args) {
 HelloSayer h =
 new HelloSayer("Hello", "World");
 h.sayHello();
 }

}
Running a Program
After you enter the source code for your Eclipse project, you can run it to see if it works as expected. Eclipse has several ways to run a Java program:
- In the Package Explorer, select the source file for the class you want to run. Then, choose Run
 Run As
  Java Application.
 - Right-click the source file for the class you want to run, then choose Run
 Java Application from the shortcut menu that appears.
  Select the source file in the Package Explorer, and then click the Run button (shown in the margin) and choose Run As
  Java Application from the menu that appears. (If you recently ran the program, you can also choose the program from the list of recently run programs that appears in this menu.)
When the program runs, its console output is displayed in a Console View that appears beneath the Java Editor pane, as shown in Figure 4-10.
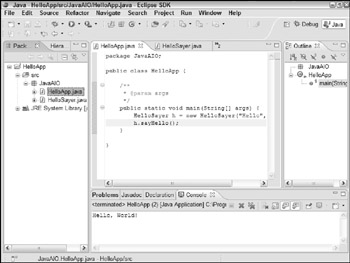
Figure 4-10: The Console View displays the program's console output.
| Note |
If the program uses Swing to create a window, that window is displayed separately, not within the Eclipse Workbench window. (See Book VI for more on Swing.) |
| Tip |
Eclipse is designed so that it automatically compiles Java programs as you work on them. Every time you save a Java source file in Eclipse, the file is automatically compiled to create a class file. As a result, you don't usually have to compile as a separate step before you can run a program. If the project contains large source files, this feature can become annoying. To disable automatic compilation, choose Project |
 Build Automatically. Then you must manually build the project by choosing Project
  Build All before you can run it. (To switch back to automatic builds, choose Project
  Build Automatically again.)
Debugging a Java Program
No matter how carefully you plan your programs, sooner or later you encounter bugs. You need to watch out for basically two kinds of bugs:
- Incorrect results, such as a program that's supposed to calculate test scores but gives you a C when you score 99 out of 100 or a program that's supposed to calculate sales tax of 5% but that says the sales tax on a $29.95 purchase is $149.75 instead of $1.50.
- Program crashes, such as when a program that's supposed to divide one number into another and print the answer instead prints out this message:
 Exception in thread "main" java.lang.ArithmeticException: / by zero
 at BugApp.main(BugApp.java:19)
Then the program abruptly stops.
Fortunately, Eclipse has a powerful debugger that can help you find the cause of either type of bug and fix it. To start the debugger, run your program by choosing Project
 Debug As Java Application instead of Project Run As
  Java Application. Or, click the Debug button on the Workbench toolbar as shown in the margin. Eclipse switches to the Debug perspective, as shown in Figure 4-11, and runs the program in debug mode.
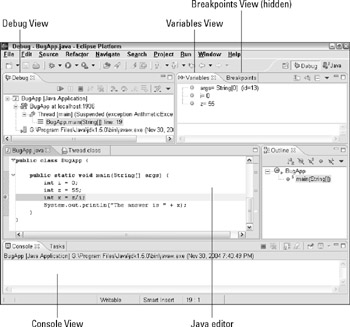
Figure 4-11: The Debug perspective lets you debug errant Java programs.
The following sections describe some of the key features of the Debug perspective that are useful for tracking down and correcting bugs in your Java programs.
Stepping through your programs
One of the most basic skills for debugging is executing program statements one at a time. This is called stepping, and it can be a very useful debugging technique. By stepping through your program one statement at a time, you can view the effects of each statement and identify the source of errors. Sometimes just knowing which statements are being executed is all you need to determine why your program isn't working.
In Eclipse, the Debug View section of the Debug perspective is where you control the execution of the program you're debugging. This view displays a tree that indicates each of the threads in your program. (If you don't know what threads are, don't worry about it. Most console-based programs, such as the BugApp program shown in Figure 4-11, use only one thread apiece anyway. You find out how to code programs that use more than one thread in Book V.)
Before you can control the execution of a thread, you must first suspend the thread so that its statements stop executing. In general, you can suspend a thread for debugging three ways:
- When an unhandled exception occurs, the thread is automatically suspended. In Figure 4-11, the BugApp program's main method is suspended because a divide-by-zero exception has occurred and the program didn't catch it. If your program is throwing an exception that you don't expect, you can simply debug the program and allow the exception to suspend the thread. Then you can try to track down the cause of the problem.
- Before you debug the program, you can set a breakpoint at any statement in the program. Then, when execution reaches that statement, the thread is suspended. To set a breakpoint, simply double-click the left margin of the Java editor next to the statement where you want the thread to be suspended.
If a long-running thread is in a loop, you can suspend it by clicking the thread in the Debug View window and clicking the Suspend button (shown in the margin).
When you suspend a thread, the statement that will be executed next is highlighted in the Java editor. Then, you can continue the thread's execution one or more statements at a time by clicking the buttons at the top of the Debug View. Table 4-1 describes the most commonly used buttons.
|
Button |
Name |
Description |
|---|---|---|
|
|
Resume |
Resumes execution with the next statement. The thread continues executing until it is suspended by an uncaught exception or a breakpoint. |
|
|
Terminate |
Terminates the thread. |
|
Step Into |
Executes the highlighted statement, and then suspends the thread. |
|
|
|
Step Over |
Skips the highlighted statement and executes the next statement, and then suspends the thread. |
|
|
Run to Return |
Executes the highlighted statement and continues executing statements until the end of the current method is reached. Then, the thread is suspended. |
 Open table as spreadsheet


Examining variables
When a thread is suspended, you can examine its variables to see if they're set to the values you expect. In many cases, you can discover programming errors. For example, if you think a variable named customerFirstName should contain a customer's first name and instead it contains the name of the state in which the customer lives, you can conclude that you didn't assign the variable's value properly. (Of course, this might be ambiguous if the customer happens to be named Indiana Jones.)
| Tip |
The easiest way to examine the value of a variable is to simply point the mouse at the variable in the Java editor. For example, Figure 4-12 shows how the value of the variable i appears when you hover the mouse pointer over it. Here, the pop-up message indicates that the variable i has a value of 0. (This message might be a clue as to why the program has thrown a divide by zero exception.) |
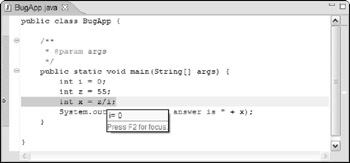
Figure 4-12: Displaying a variable value.
You can also inspect variables by using the Variables View, as shown in Figure 4-13. Each variable is listed on a separate line in the top part of the Variables View. In addition, the bottom part (called the Detail pane) displays the value of the currently selected variable. Note that as you step through the various statements in your program, variables appear in the Variables View as they are declared and they disappear from view when they go out of scope.

Figure 4-13: The Variables View shows the value of each variable.
Setting breakpoints
A breakpoint is a line in your program where you want the program to be suspended. Setting a breakpoint allows you to efficiently execute the portions of your program that are working properly, while stopping the program when it reaches the lines you believe to be in error.
All the breakpoints in your program are listed in Breakpoints View, as shown in Figure 4-14. The following paragraphs describe some of the ways you can work with breakpoints in this view:
- The check box next to each breakpoint indicates whether the breakpoint is enabled. Execution is suspended at a breakpoint only if the breakpoint is enabled.
- You can delete a checkpoint by clicking the breakpoint to select it, and then pressing the Delete key or clicking the Remove Selected button (shown in the margin).
 You can remove all the breakpoints you've set by clicking the Remove All Breakpoints button (shown in the margin).
- If you double-click a breakpoint in Breakpoint View, the Java Editor window scrolls to the line at which the breakpoint is set.
-
Tip If you want the program to be suspended only after it has hit the breakpoint a certain number of times, right-click the breakpoint and choose Hit Count from the shortcut menu that appears. Then enter the number of times you want the statement to execute before suspending the program, and click OK.
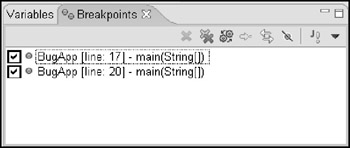
Figure 4-14: The Breakpoints View is where you control breakpoints.
Refactoring Your Code
Refactoring refers to the task of making mass changes to a project. For example, suppose you decide that a class name you created when you started the project doesn't really accurately describe the purpose of the class, so you want to change it. Simple text editors, such as TextPad, include a Replace command that lets you change occurrences of text strings within a file, but changing the name of a class requires that you change the name in all the files in a project.
Eclipse includes a whole menu of refactoring options-called, as you might guess, the Refactor menu. This menu contains more than 20 different types of refactoring commands. If you're just starting to learn Java, most of these commands won't make any sense to you. For example, the Refactor menu contains commands that let you change an anonymous inner class to a nested class, push members down to a subclass, or introduce a factory.
A few Refactor menu commands are especially useful as you work your way through the basics of learning Java. In particular, these:
- Rename: Lets you rename a variable, method, or other symbol. First, select the symbol you want to rename. Then, choose Refactor Rename, type the new name, and then click OK.
- Extract Method: This command lets you create a separate method from one or more statements. Select the statements you want to place in the method, and then choose Refactor
 Extract Method. In the dialog box that appears, type the name you want to use for the method. Eclipse creates a method with the statements you selected, and then replaces the original selection with a call to the new method.
 - Inline: This command is pretty much the opposite of the Extract Method command. It replaces a call to a method with the statements that are defined in the body of that method. This command is most useful in situations where you thought a method was going to be either more complicated than it turned out to be, or you thought you'd call it from more locations than you ended up calling it from.
- Extract Local Variable: This one is weird. Sometimes you discover that you have a whole string of statements in a row that use a particular expression (say, x + 1). Wouldn't it be better if you just created a separate variable to hold the value x + 1, and then used that variable instead of repeatedly recalculating the expression? The Extract Local Variable command can do this for you. Highlight the first occurrence of the expression and choose Refactor Extract Local Variable. Eclipse creates a local variable, adds an assignment statement that assigns the expression to the new local variable, and then replaces all occurrences of the expression with the local variable.
Book I - Java Basics
Book II - Programming Basics
- Book II - Programming Basics
- Java Programming Basics
- Working with Variables and Data Types
- Working with Numbers and Expressions
- Making Choices
- Going Around in Circles (Or, Using Loops)
- Pulling a Switcheroo
- Adding Some Methods to Your Madness
- Handling Exceptions
Book III - Object-Oriented Programming
- Book III - Object-Oriented Programming
- Understanding Object-Oriented Programming
- Making Your Own Classes
- Working with Statics
- Using Subclasses and Inheritance
- Using Abstract Classes and Interfaces
- Using the Object and Class Classes
- Using Inner Classes
- Packaging and Documenting Your Classes
Book IV - Strings, Arrays, and Collections
- Book IV - Strings, Arrays, and Collections
- Working with Strings
- Using Arrays
- Using the ArrayList Class
- Using the LinkedList Class
- Creating Generic Collection Classes
Book V - Programming Techniques
Book VI - Swing
- Book VI - Swing
- Swinging into Swing
- Handling Events
- Getting Input from the User
- Choosing from a List
- Using Layout Managers
Book VII - Web Programming
Book VIII - Files and Databases
- Book VIII - Files and Databases
- Working with Files
- Using File Streams
- Database for $100, Please
- Using JDBC to Connect to a Database
- Working with XML
Book IX - Fun and Games
EAN: 2147483647
Pages: 332
