Swinging into Swing
So far in this book, all the programs have been console based, like something right out of the 1980s. Console-based Java programs have their place, especially when you're first learning about Java. But eventually, you'll want to create programs that work with a Graphical User Interface, also known as a GUI.
This chapter gets you started in that direction. You create simple GUI applications that display simple buttons and text labels. Along the way, you find out about two key classes: JFrame and JPanel, which provide the visual containers that hold buttons, labels, and other components I discuss in later chapters.
Some Important Swing Concepts You Need to Know
Learning Swing is one of the most complicated tasks of learning Java. Complicated enough, in fact, that I have to go over some conceptual information before I get into the nitty-gritty of writing GUI code. So put on your thinking cap for the next few sections.
Understanding what Swing does
Swing is a package that lets you create applications that use a flashy Graphical User Interface (or GUI) instead of a dull console interface. Figure 1-1 shows a typical window created with Swing. As you can see, this window includes a variety of user-interface components, including labels, text fields, drop-down lists, and buttons.

Figure 1-1: A typical Swing window.
The Swing class hierarchy
The Swing API provides many different classes for creating various types of user-interface elements. In this chapter, I look at three of those classes: JFrame, JPanel, and JLabel. However, these three classes are part of a larger collection of classes that are all related through inheritance, as shown in Figure 1-2. The Swing family tree splits at the Component class into one group of classes that are derived from the JComponent class, and another branch that descends from the Window class.
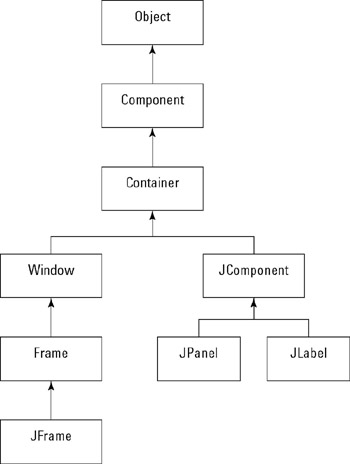
Figure 1-2: The Swing family tree.
The following paragraphs briefly describe each of the classes shown in this figure:
- Object: All classes ultimately derive from Object, so it's no surprise that this class is at the top of the tree.
- Component: The Component class represents an object that has a visual representation that can be shown on-screen and that can interact with users. This class defines some basic methods that are available to all Swing classes. For example, the setVisible method determines whether a component is visible or hidden. And the setBounds method sets the location and size of the component. This is an AWT class, not a Swing class.
- Container: The Container class builds on the basic visual capabilities of the Component class by adding the ability to hold other containers. This too is an AWT class rather than a Swing class. From this class, you get the add method, which lets you add components to a container. As you'll see, you use this method in almost all GUI programs.
- Window: This class defines a window: a specialized type of container object that has a border, a title bar, and buttons that minimize, maximize, and close it-and that the user can reposition (possibly even resize).
- Frame: A frame is a type of Window that serves as the basis for Java GUI applications. Frame is an AWT class that has been improved upon by the JFrame class.
- JFrame: The Swing version of the older Frame class. Most of your Swing applications include at least one JFrame object.
- JComponent: The JComponent class is a Swing class that is the basis for all other Swing components except for frames.
- JPanel: This class creates panels, which are containers used to organize and control the layout of other components such as labels, buttons, text fields, and so on. In most Swing applications, one or more panels are added to a frame. Then, when the frame is displayed, the components that were added to its panels are made visible.
- JLabel: This class creates a label that displays a simple text value.
| Tip |
As you work with Swing, you'll find that some of the classes you use are defined in the javax.swing package. So you need to start every Swing application with this line: import javax.swing.*; |
In addition, you'll find that some Swing features use classes in the java.awt and java.awt.event packages. So you may need to import those packages as well.
I ve Been Framed!
The top-level component for most Swing-based applications is called a frame and is defined by the JFrame class. By itself, a frame doesn't do much. But to do anything else in Swing, you must first create a frame. Figure 1-3 shows a frame that does nothing but display the message Hello, World! in its title bar.
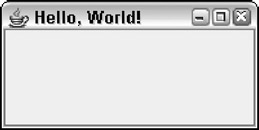
Figure 1-3: The frame displayed by the Hello, World! program.
The JFrame has about a bazillion methods, but only a few of them are useful in most programs. Table 1-1 lists the JFrame methods you use most, along with a couple of constructors.
Table 1-1: Useful JFrame Constructors and Methods
 Open table as spreadsheet
|
Constructor |
Description |
|---|---|
|
JFrame() |
Creates a new frame with no title. |
|
JFrame(String title ) |
Creates a new frame with the specified title. |
Open table as spreadsheet
|
Method |
Description |
|---|---|
|
void add(Component c ) |
Adds the specified component to the frame. |
|
JMenuBar getJMenuBar() |
Gets the menu for this frame. |
|
void pack() |
Adjusts the size of the frame to fit the components you've added to it. |
|
void remove(Component c) |
Removes the specified component from the frame. |
|
void setDefaultCloseOperation |
Sets the action taken when the user closes the frame. You should almost always specify JFrame.EXIT_ON_CLOSE. |
|
void setIconImage(Icon image) |
Sets the icon displayed when the frame is minimized. |
|
void setLayout(LayoutManagerlayout) |
Sets the layout manager used to control how components are arranged when the frame is displayed. The default is the BorderLayout manager. |
Open table as spreadsheet
|
Constructor |
Description |
|---|---|
|
void setLocation (int x, int y) |
Sets the x and y position of the frame on-screen. The top-left corner of the screen is 0, 0. |
|
void setLocationRelativeTo (Component c) |
Centers the frame on-screen if the parameter is null. |
|
void setResizeable (boolean value) |
Sets whether or not the size of the frame can be changed by the user. The default setting is true (the frame can be resized). |
|
void setSize(int width, int height) |
Sets the size of the frame to the specified width and height. |
|
void setJMenuBar (JMenuBar menu) |
Sets the menu for this trame. |
At the minimum, you want to set a title for a new frame, set the frame's size so it's large enough to see any components you add to it (by default, the frame is zero pixels wide and zero pixels high, so it isn't very useful), and call the setVisible method to make the frame visible. One way to do these three things is to create an instance of the JFrame class and set its properties using statements like this:
JFrame frame = new JFrame("This is the title");
frame.setSize(350, 260);
frame.setVisible(true);
A more common approach, however, is to create a frame by declaring a class that extends the JFrame class. Then you call these methods in the constructor, as I describe in the next section.
| Tip |
By default, the user can change the size of a frame. If you want to fix the size of your frame so the user can't change it, just call setResizeable(false). |
Hello, World! in Swing
To get you started with Swing, Listing 1-1 shows a Swing version of the classic Hello, World! program, using nothing but a frame. If you run this program, the frame shown in Figure 1-1 is displayed on-screen. As you can see, the frame's title bar contains the text “Hello, World!”
The purpose of this seemingly pointless little program is to illustrate one solution to the first problem you encounter when you work with Swing: The main method is a static method, but Swing frames are objects-so you have to figure out how to get your program out of a static context. This program does that by creating the application as a class that extends JFrame. Then, the main method calls the class constructor, in effect creating an instance of itself. That's all the main method does; the real work of this application is done by the constructor.
Listing 1-1: The Swing Version of the Hello, World! Program
import javax.swing.*; → 1
public class HelloFrame extends JFrame → 3
{
 public static void main(String[] args) → 5
 {
 new HelloFrame(); → 7
 }

 public HelloFrame() → 10
 {
 this.setSize(200,100); → 12
 this.setDefaultCloseOperation( → 13
 JFrame.EXIT_ON_CLOSE);
 this.setTitle("Hello World!"); → 15
 this.setVisible(true); → 16
 }
}
The following paragraphs describe most of the features of this program:
|
→ 1 |
The program starts with an import statement that imports all the classes in the javax.swing package. Most of the Swing classes are defined in this package. However, you may have to import other classes as well, depending on what GUI features your program uses. |
|
→ 3 |
The class for this application, named JFrame, extends a Swing class named JFrame. A class that extends JFrame is often called a frame class. The JFrame class defines a basic frame in which you can display GUI components, such as labels and text boxes. All Swing applications need at least one class that extends JFrame. |
|
→ 5 |
Swing applications are still Java applications, and all Java applications need a static main method that starts the application. So the first method listed in this class is the main method. |
|
→ 7 |
The first (and only) statement of the main method creates a new instance of the HelloFrame class. Unlike console applications, Swing applications can't run in a static context. As a result, the main purpose of the static main method in a Swing application is to create an instance of the application's frame class. |
|
→ 10 |
When an instance of the HelloFrame class is created in line 7, the constructor that starts on this line is executed. The main job of the constructor for a frame class is to set the options for the frame and create any GUI components that are displayed in the frame. |
|
→ 12 |
The first option that this constructor sets is the size of the frame. To do that, it calls the setSize method. The parameters specify that the frame should be 200 pixels wide and 100 pixels high. (A pixel is one of the little dots that makes up the image on a computer screen. Pixel is short for picture element, but that won't be on the test.) |
|
→ 13 |
The next option this constructor sets is what to do if the user closes the frame by clicking its Close button, which usually appears in the upper-right corner of the frame. By default, clicking the Close button hides the frame but doesn't terminate the application. As a result, the application's main thread (the one that's still running in a static context via the main method) keeps running for a while. Eventually, Java figures out that nothing's happening and shuts the application down. But the application exits more cleanly if you use the setDefaultCloseOperation to set the close operation to JFrame.EXIT_ON_CLOSE. That causes the program to terminate when the frame is closed. |
|
→ 15 |
The next statement uses the setTitle method to set the title of the frame. |
|
→ 16 |
The last statement in the constructor calls the setVisible method with a parameter value of true, which makes the frame visible on-screen. If you leave this statement out, the frame is created but the user never sees it. |
Open table as spreadsheet
That's all there is to this program. Granted, it's a little more complicated than the console-based Hello, World! program from Book I, Chapter 1. But not by much. Just to be sure its operation is clear, here's a recap of what happens when this program is run:
- Java runs the static main method for the HelloWorld class.
- The main method creates an instance of the HelloWorld class, which causes the constructor to be executed.
- The constructor sets the frame size, the default close operation, and the title.
- Now that the constructor is done, the program continues with the main method, where the setVisible method is called to display the frame.
Positioning the Frame On Screen
The JFrame class provides two methods that let you specify the position of the frame on-screen. If you want to place the frame at some arbitrary location on-screen, use the setLocation method. For example, to put the frame at the top-left corner of the screen, use this statement:
frame.setLocation(0,0);
| Tip |
If you want to center the frame on-screen, call the setLocationRelativeTo method and pass null as the parameter: frame.setLocationRelativeTo(null); |
This method is designed to let you position a frame relative to some other component that's already displayed. But if you pass null as the parameter, the method centers the frame on-screen.
If you want to position a window at some location other than the top-left corner or dead center on-screen, you may need to know the width and height of the user's screen so you can calculate a location for your frame. To determine the size of the user's screen, you can use a class named Toolkit. The Toolkit class has a bunch of methods, but you need to know two of them here:
- getDefaultToolkit: A static method that creates a Toolkit object. You must use this method before you can use the getScreenSize method.
- getScreenSize: Returns the size of the screen as a Dimension object.
The Dimension class has two public fields that represent the size of the screen: height and width. Both fields are of type int.
Suppose you want to position a frame so that its bottom-left corner is right at the center of the screen. The following code, placed in the frame's constructor, does the trick:
Toolkit tk = Toolkit.getDefaultToolkit();
Dimension d = tk.getScreenSize();
int x = d.width / 2;
int y = (d.height / 2) - this.getHeight();
this.setLocation(x, y);
This code first creates a Toolkit object and uses it to get the screen dimensions. It sets the x position to the horizontal center of the screen by dividing the screen width by 2. Then it sets the y position to the vertical center (the screen height divided by 2) less the width of the frame. That puts the bottom of the frame at the vertical midpoint.
Using the JPanel Class
A panel is a type of container that's designed to hold a group of components so they can be displayed on a frame. The normal way to display a group of controls such as text fields, labels, buttons, and other GUI widgets is to add those controls to a panel, and then add the panel to the frame. You can bypass the panel and add the controls directly to the frame if you want, but using a separate panel to hold the frame's control is almost always a good idea.
Panels are defined by the JPanel class. Like the JFrame class, the JPanel class has a bevy of methods. Table 1-2 lists the most commonly used constructors and methods for the JPanel class.
Table 1-2: Interesting JPanel Constructors and Methods
Open table as spreadsheet
|
Constructor |
Description |
|---|---|
|
JPanel() |
Creates a new panel. |
|
JPanel(boolean isDoubleBuffered) |
Creates a new panel. If the parameter is true, the panel uses a technique called double-buffering, which results in better display for graphics applications. This constructor is usually used for game programs or other panels that display animations. |
|
JPanel(LayoutManager layout) |
Creates a new panel with the specified layout manager. The default layout manager is FlowLayout. |
Open table as spreadsheet
|
Method |
Description |
|---|---|
|
void add(Component c) |
Adds the specified component to the panel. |
|
void remove (Component c) |
Removes the specified component from the panel. |
|
void setLayout (LayoutManager layout) |
Sets the layout manager used to control how components are arranged when the panel is displayed. The default is the FlowLayout manager. |
|
void setLocation (int x, int y) |
Sets the x and y position of the frame-screen. The top-left corner of the screen is 0, 0. |
|
void setSize(int width, int height) |
Sets the size of the frame to the specified width and height. |
|
void setToolTipText (String text) |
Sets the tooltip text that's displayed if the user rests the mouse over an empty part of the panel. |
You can use several different techniques to create a panel and add it to a frame. One is to simply create a JPanel object and assign it to a variable in the JFrame constructor. You can then add components to the panel, and then add the panel to the frame. For example
// HelloFrame constructor
public HelloFrame()
{

 this.setSize(200,100);

 this.setDefaultCloseOperation(JFrame.EXIT_ON_CLOSE);
 this.setTitle("Hello, World!");

 JPanel panel = new JPanel();

 // code to add components to the panel goes here

 this.setVisible(true);
}
Another commonly used technique is to create a separate class for the panel. This class should extend JPanel. Then you can add any components the panel needs in the constructor:
class HelloPanel extends JPanel
{
 public HelloPanel()
 {
 // code to add components to the panel goes here
 }
}
Then, in the frame class constructor, you create a new instance of the panel class and add it to the panel:
HelloPanel panel = new HelloPanel();
this.add(panel);
Or, just this statement does the trick:
this.add(new HelloPanel());
Using Labels
Now that you know how to create frames and panels, you can create a useful component to add to a panel: a label. A label is a component that simply displays text. Labels are used for a variety of purposes: to display captions for other controls such as text fields or combo boxes, to display informational messages, or to show the results of a calculation or a database lookup.
| Tip |
A label can also display an image-or it can display both an image and some text. And you have complete control over the appearance of the text: You can specify the font, size, whether the text is bold, italic, or underlined, what color the text is displayed as, and so on. In this chapter, I discuss how to work with basic labels. For more information about additional things you can do with labels, see Book IX, Chapters 1 and 2. |
To create a label, you use the JLabel class. Table 1-3 shows its most commonly used constructors and methods.
Table 1-3: Tolerable JLabel Constructors and Methods
Open table as spreadsheet
|
Constructor |
Description |
|---|---|
|
JLabel() |
Creates a new label with no initial text. |
|
JLabel(String text) |
Creates a new label with the specified text. |
Open table as spreadsheet
|
Method |
Description |
|---|---|
|
String getText() |
Returns the text displayed by the label. |
|
void setText(String text) |
Sets the text displayed by the label. |
|
void setToolTipText(String text) |
Sets the tooltip text that's displayed if the user rests the mouse over the label for a few moments. |
|
void setVisible(boolean value) |
Shows or hides the label. |
When you create a label, you can pass the text you want it to display to the constructor, like this:
JLabel label1 = new JLabel("Hello, World!");
Or, you can create the label first, and then set its text later:
JLabel label1 = new JLabel();
label1.setText("Hello, World!");
A label won't be displayed until you add it to a panel that is (in turn) added to a frame. Here's an example of a constructor for a frame class that creates a panel, creates a label, adds the label to the panel, and adds the panel to the frame:
// HelloFrame constructor
public HelloFrame()
{
 this.setSize(200,100);

 this.setDefaultCloseOperation(JFrame.EXIT_ON_CLOSE);
 this.setTitle("Hello, World!");

 JPanel panel1 = new JPanel();
 JLabel label1 = new JLabel("Hello, World!")
 panel1.add(label1);
 this.add(panel1);

 this.setVisible(true);
}
Figure 1-4 shows what this frame looks like when the program is run.
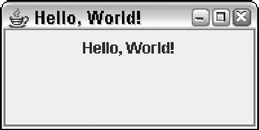
Figure 1-4: A frame with a panel, which has a label.
Creating Buttons
Next to labels, the Swing component you use most is the JButton component, which creates a button the user can click. Figure 1-5 shows a frame with a single button.
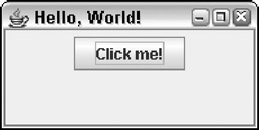
Figure 1-5: A frame with a panel, which includes a button.
In the next chapter, you find out how to write the code that responds when the user clicks a button. Here I just focus on how to create buttons and control their appearance. Table 1-4 lists the most commonly used constructors and methods that are available for the JButton class.
Table 1-4: Worthwhile JButton Constructors and Methods
Open table as spreadsheet
|
Constructor |
Description |
|---|---|
|
JButton() |
Creates a new button with no initial text. |
|
JButton(String text) |
Creates a new button with the specified text. |
Open table as spreadsheet
|
Method |
Description |
|---|---|
|
doClick() |
Triggers an action event for the button as if the user clicked it. (I tell you why this is sometimes useful in the next chapter.) |
|
String getText() |
Returns the text displayed by the button. |
|
void setBorderPainted)(boolean value |
Shows or hides the button's border. The default setting is true (the border is shown). |
Open table as spreadsheet
|
Constructor |
Description |
|---|---|
|
void setContentAreaFilled (boolean value) |
Specifies whether or not the button's background should be filled or left empty. The default setting is true (the background is filled in). |
|
void setEnabled (boolean value) |
Enables or disables the button. The default setting is true (enabled). |
|
void setRolloverEnabled (boolean value) |
Enables or disables the rollover effect, which causes the border to get thicker when the mouse moves over the button. The default setting is true (rollover effect enabled). |
|
void setText(String text) |
Sets the text displayed by the button. |
|
void setToolTipText (String text) |
Sets the tooltip text that's displayed if the user lets the mouse rest over the button. |
|
void setVisible (boolean value) |
Shows or hides the button. The default setting is true (the button is visible). |
As you can see, the constructors for the JButton class are similar to the constructors for the JLabel class: You can either create an empty button or a button with text. For example, here's the code that creates the button shown in Figure 1-5:
JButton button1 = new JButton("Click me!");
If you don't provide the button text when you call the constructor, you can supply it later via the setText method, like this:
JButton button1 = new JButton();
button1.setText("Click me!");
| Tip |
You might not think you'd ever do that, but sometimes the meaning of a button changes depending on what the user is doing. For example, a program that lets a user add, change, or delete records in a file might set the text of a button to Add Record, Change Record, or Delete Record depending on what the user happens to be doing at the time. In a program like that, you may need to use the getText method to find out what text is currently displayed by a button. |
Most of the other methods listed in Table 1-4 simply affect how a button looks. To disable a button so the user can't click it, call setEnabled(false). To remove the dark border from the edges of a button, call setBorderPainted (false). To remove the background from a button so all that's displayed is the text, call setContentAreaFilled(false). And to make a button disappear altogether, call setVisible(false).
A Word about the Layout of Components
Controlling the layout of components on a panel is one of the hardest things about using Swing. Hard enough, in fact, that I devote Book VI, Chapter 5 to it. Until then, you need to know a few key points:
- The layout of components on a panel (or frame) is controlled by a layout manager, which determines the final placement of each component. The layout manager takes the size of the component, the size of the panel, and the position of other nearby components into account when it makes its decisions.
- Swing provides several different layout managers you can choose from. Each has is own way of deciding where each component goes.
- The default layout manager for panels is called FlowLayout. It places components one after another in a row, and starts a new row only when it gets to the end of the panel (or the frame that contains it).
- With FlowLayout (and with the other layout managers too), the layout changes if the user changes the size of the frame. The size of the frame makes a big difference in how FlowLayout arranges controls.
-
REMEMBER You can always call the frame's setResizeable(false) method to prevent the user from resizing the frame.
- If you want to change the layout manager used for a panel, you call the panel's setLayout method.
-
Tip For many (if not most) Swing applications, you use more than one panel to display your components. Each panel can have a different layout manager. With this technique, you can create complex layouts with lots of components-all arranged just the way you want.
- If you need to, you can always turn off the layout manager altogether. To do that, you call the panel's setLayout method with null set as the parameter. Then, you use absolute positioning, which lets you set the x and y position and the size of each component by calling its setBounds method.
- This list could go on and on. For more information about controlling layout, refer to Book VI, Chapter 5.
Book I - Java Basics
Book II - Programming Basics
- Book II - Programming Basics
- Java Programming Basics
- Working with Variables and Data Types
- Working with Numbers and Expressions
- Making Choices
- Going Around in Circles (Or, Using Loops)
- Pulling a Switcheroo
- Adding Some Methods to Your Madness
- Handling Exceptions
Book III - Object-Oriented Programming
- Book III - Object-Oriented Programming
- Understanding Object-Oriented Programming
- Making Your Own Classes
- Working with Statics
- Using Subclasses and Inheritance
- Using Abstract Classes and Interfaces
- Using the Object and Class Classes
- Using Inner Classes
- Packaging and Documenting Your Classes
Book IV - Strings, Arrays, and Collections
- Book IV - Strings, Arrays, and Collections
- Working with Strings
- Using Arrays
- Using the ArrayList Class
- Using the LinkedList Class
- Creating Generic Collection Classes
Book V - Programming Techniques
Book VI - Swing
- Book VI - Swing
- Swinging into Swing
- Handling Events
- Getting Input from the User
- Choosing from a List
- Using Layout Managers
Book VII - Web Programming
Book VIII - Files and Databases
- Book VIII - Files and Databases
- Working with Files
- Using File Streams
- Database for $100, Please
- Using JDBC to Connect to a Database
- Working with XML
Book IX - Fun and Games
EAN: 2147483647
Pages: 332
- Assessing Business-IT Alignment Maturity
- Linking the IT Balanced Scorecard to the Business Objectives at a Major Canadian Financial Group
- Technical Issues Related to IT Governance Tactics: Product Metrics, Measurements and Process Control
- Governance in IT Outsourcing Partnerships
- The Evolution of IT Governance at NB Power
