Publishing Form Templates
Highlights
In this chapter, you will learn how to
- Describe InfoPath s built-in form security models
- Create security groups and user accounts for accessing shared templates
- Publish templates to a shared network folder
- Secure shared templates to prevent modification by users
- Publish secure production templates to a Web server
- Publish templates to a Windows SharePoint forms library and secure them from unauthorized modification
- Submit XML data documents to a Windows SharePoint Services forms library
- Create fully trusted forms by signing the template with a code signing certificate
- Create and deploy unsigned fully trusted templates with JScript or Windows Installer (.msi) installation files
For more information
- See the topic Understanding Fully Trusted Forms in the Technical Articles chapter of the documentation for the InfoPath 2003 SDK.
- See the topic Using the Forms Registration Tool in the Tools chapter of the documentation for the InfoPath 2003 SDK.
Overview
To work through this chapter
- You need to know how to add user accounts and security groups to a Microsoft Windows 2000 or later Active Directory domain or to a stand-alone computer that emulates a file server. You also need a basic understanding of Windows 2000 and later file server share, folder, and file security features.
- You should have installed in your C:Microsoft PressIntroducing InfoPath 2003Chapter12 folder the sample files from the CD that accompanies this book for creating custom-installed forms.
- You must have Microsoft Internet Information Services (IIS) version 5 or later installed for Web deployment of InfoPath templates, or a network administrator must create a remote IIS virtual directory for sharing templates from your intranet Web site.
- You must have Microsoft Windows SharePoint Services installed on a computer running Windows Server 2003, and you must be a member of a site s Web Designer or Administrator group .
- You need a code signing certificate from a commercial certificate authority (CA) or a Windows 2000 Server or later certificate server to publish digitally signed fully trusted forms.
- You must install the Microsoft Office InfoPath 2003 Software Development Kit (SDK) from the CD that accompanies this book to create unsigned fully trusted forms.
- You need Microsoft Visual Basic .NET 2003 Standard or Microsoft Visual Studio .NET 2003 Professional (or later) installed on your computer to create Microsoft Installer (.msi) packages for deploying unsigned fully trusted forms to users computers.
Publishing templates to shared folders, Web sites, or SharePoint form libraries requires a basic understanding of InfoPath s built-in form security features and file-system permissions that you assign to Active Directory security groups. Form security, which is based on Internet Explorer security zones, determines whether your form can access resources ”databases and Web services in another domain, for example ”that aren t part of the form template. If design mode wasn t disabled when InfoPath was installed on users computers or their registries haven t been modified to disable design mode, you must restrict users ability to save changes to template designs by restricting their file-system permissions to read-only template access.
| Note |
Understanding this chapter s network architecture |
Understanding InfoPath Form Security Models
SP-1 InfoPath s three form security models correspond to Internet Explorer s content zones , which appear on the Security tab of Internet Explorer s Internet Options dialog box You specify the security model for your form on the Security tab of the Form Options dialog box, as shown in Figure 12-1.
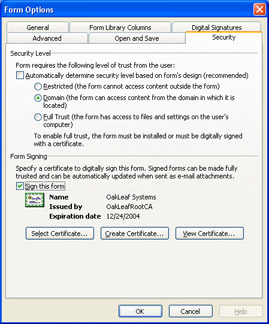
Figure 12-1: The Form Options dialog box s Security tab lets you specify the security level of the form and add a digital signature to create a fully trusted form.
Following are InfoPath s three form security level options and their corresponding Internet Explorer 6.0 content zones:
- Restricted Corresponds to Internet Explorer s Restricted Sites zone (high security). The form cannot access resources that are external to the form, such as ActiveX controls. Users can open and save forms, but script code can t access the file system or other computer resources. The Restricted model prevents use of custom task panes, data connections (except submission by e-mail), managed code (Visual Basic .NET or C#), and roles.
- Domain Corresponds to Internet Explorer s Local Intranet zone (medium-low security) or forms running on the local computer during development. Forms can access resources ”such as databases and Web services ”within a single domain. For example, a form running in the local oakleaf.org domain cannot access Web services provided by a server in the public oakleaf.ws domain. Templates deployed to server shares on a local area network (LAN) are considered to be in the same domain. ActiveX controls, custom task panes, roles, and managed code are enabled. The Domain model (also called sandboxed forms ) is the most common security scenario for published InfoPath forms.
- Full Trust Corresponds to Internet Explorer s Trusted Sites zone (low security). Fully trusted forms permit cross-domain data access, permit running ActiveX controls that aren t marked safe for scripting, provide added managed code flexibility, and eliminate some security-based prompts you receive at the Domain security level. You must sign the form with a code signing certificate, as described in the section Creating Fully Trusted Forms by Code Signing, later in this chapter, or deploy the fully trusted form to users computers using the techniques described in the section Distributing Custom-Installed Templates.
By default, InfoPath analyzes your form and its programming code to automatically assign the most restrictive security model. You can override automatic security model assignment by clearing the Automatically Determine Security Level (Recommended) check box and selecting one of the three security model options. None of the forms you ve created so far or this chapter s examples requires the Full Trust option.
| Note |
Identifying the security mode of a form |
Creating Test User Accounts and Security Groups
This chapter s template sharing examples require setting up three user accounts and two security groups for testing template security settings. Basing template access on security group membership makes it easy to add new InfoPath users and developers with common security privileges. The test user accounts play an important role in InfoPath form deployment to shared folders, intranet Web sites, and Windows SharePoint Services sites. Here are descriptions of the test accounts and their security group membership:
- IPUser An ordinary user of InfoPath forms who s a member of the InfoPathUsers security group and, by default, the file server s local Users group by virtue of membership in the Active Directory Domain Users group.
- IPDesigner A user who s permitted to add and modify template designs. IPDesigner is a member of the InfoPathDesigners, InfoPathUsers, and Users security groups. If you want IPDesigner to be able to create new file shares, the account must be a member of the file server s local Power Users group.
- AnyUser An account that s a member of the default Users group only. You use this account to verify that a user without InfoPathUsers or InfoPathDesigners group membership can t gain read access to the template or XML data documents.
If you re a member of the Domain Admins or higher security group for your Active Directory network, create these users and groups, and assign the IPUser and IPDesigner accounts to their security groups with the Active Directory Users And Computers tool. Otherwise, ask your network administrator to add the temporary accounts and groups for you. If you re not connected to a Windows 2000 or later domain, create local security groups and user accounts on your computer.
| Note |
Disabling design mode doesn t protect shared templates |
Sharing Templates from a Network Folder
Publishing templates to a shared file server folder is the simplest and most common scenario for sharing InfoPath template files. As mentioned in the section Enabling Form Protection, in Chapter 11, you must configure share, folder, and file security settings to allow members of designated security groups to open the template. You prevent ordinary network users from saving changes to InfoPath templates by granting them read-only permissions for the server share and its folders. If you want members of InfoPathUsers to store XML data documents in the shared template folder, they must have read-write permissions for the share and the folder. In this case, you must apply file-level security and omit write permission for the template file to prevent InfoPathUsers members from changing the template.
By default, members of Windows 2003 Server s Users group have read permissions for all folders, the ability to create files and folders, and the ability to write and append data. Users inherit these permissions from the root folder of the logical drive. You can remove these permissions from the root, but doing so might disrupt routine operations of a file server or your computer. (Network administrators usually remove default permissions for the Users group from production file servers.) All user accounts you add become members of the local Users group, either directly or by membership in Active Directory s default Domain Users security group. If your computer or the file server has default Users group permissions, you must remove the Users group permissions from the shared template folder.
Creating the Server Share and Setting Permissions
The first step in the file-share deployment process is to add the shared folder and set its share permissions. For this example, you store individual templates in subfolders of the shared folder. The subfolders inherit their permissions from the shared folder, which simplifies adding new shared templates. You can modify subfolder permissions to grant particular groups or users access to the template. To create the share and set its permissions, follow these steps.
Create and share the SharedInfoPath Templates folder
- In Windows Explorer, create a Shared folder on any logical drive, and add an InfoPath Templates subfolder.
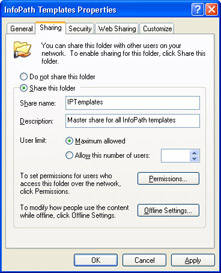
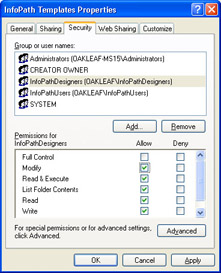
- Right-click the InfoPath Templates subfolder, choose Sharing And Security from the shortcut menu to open the InfoPath Templates Properties dialog box, and select the Share This Folder option.
- Type the share name ”IPTemplates for this example ”and a brief description of the share, as shown here:
- Click the Permissions button to open the Permissions For IPTemplates dialog box. If the Everyone group is present, select it, and click the Remove button.
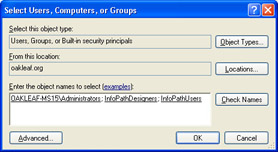
- Click Add to open the Select Users, Computers, Or Groups dialog box, which displays the default location for entries ”your Active Directory domain or local computer name. Click Locations if you need to change the location of the user and group accounts you created in the preceding section.
- Type ServerName Administrators; InfoPathDesigners; InfoPathUsers in the text box, and click Check Names to verify that the groups exist, which is indicated by an underline, as shown here:
- Click OK to close the dialog box and return to the Permissions For IPTemplates dialog box.
- With the InfoPathDesigners group selected, leave the default Read permission, and select the Allow Change check box, as shown here:
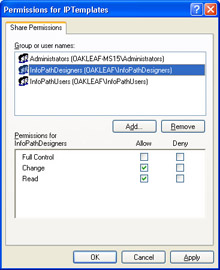
- Click Apply, and click the InfoPathUsers group to verify its Read permission. Grant the InfoPathUsers group Change permissions only if members must store XML data document in subfolders of the share.
- Finally, give the local Administrators group Full Control privileges.
- Click OK to close the dialog box and return to the InfoPath Templates Properties dialog box, click Offline Settings, select the Files Or Programs From The Share Will Not Be Available Offline option, and click OK. (Making files available offline reduces their security level.)
- Click Apply to apply the share permissions.
Setting Folder Permissions
The local Users ( ComputerName Users) group inherits default Read & Execute and special Create Files/Write Data and Create Folders/Append Data folder permissions from the root folder of the drive. You can t remove local members of the local Users group from the permissions list without removing the group s inherited permissions. Denying permissions doesn t work, because members of the InfoPathDesigners group are members of the local Users group, so they are locked out also.
Replace all inherited permissions with local permissions, remove the local Users group permissions, and add folder permissions for the InfoPathUsers and InfoPathDesigners groups by following these steps.
Set folder permissions and add a subfolder
- Click the Security tab of the InfoPath Templates Properties dialog box, and click Advanced to open the Advanced Security Settings For InfoPath Templates dialog box.
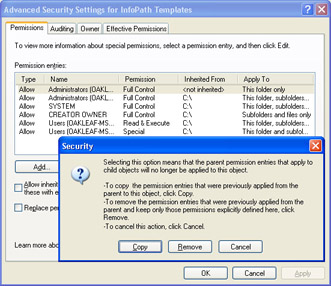
- On the Permissions tab, clear the Allow Inheritable Permissions check box, and click Copy in the Security message box to copy the inherited permissions as not-inherited to the folder and its subfolders, as shown here:
- Select the Users group s Special permission item, and click Remove.
- Repeat step 3 for the Users group s Read & Execute permissions, and click OK.
- Repeat steps 5 and 6 of the preceding procedure, without adding the ServerName Administrators group, to add the InfoPathDesigners and InfoPathUsers groups to the Group Or User Names list.
- Select the InfoPathDesigners group, and select the Allow column s Modify check box, as shown here:
- Verify that the InfoPathUsers group has Read & Execute permissions, select the CREATOR OWNER account, select the Allow column s Full Control check box, and click OK to apply the folder security settings and close the dialog box.
- In Windows Explorer, add a subfolder to SharedInfoPath Templates ”Rss2v4 for this example ”to contain the published template. Right-click the subfolder, choose Sharing and Security from the shortcut menu, click the Security tab, and verify inherited permissions for the InfoPathDesigners and InfoPathUsers groups.
- Select the CREATOR OWNER account, select the Allow column s Full Control check box, and click OK to apply the changes. Adding these privileges assures that you have full control of the files and folders you add, regardless of your security group membership.
Publishing and Testing the Shared Template
The final step in the shared-file deployment process is to use InfoPath s Publishing Wizard to copy the template to the file share with its Uniform Naming Convention (UNC) path embedded in the manifest.xsf file. All data documents that users create from the template include the UNC path in their processing instructions. After you publish the template, you must verify that the security settings you applied in the preceding two sections work as expected. This example uses the Rss2v4.xsn template, so you can test design mode restrictions easily, and assumes that you are emulating a file server on your local computer. A production installation would use a protected template, such as Rss2v4Prot.xsn.
Follow these steps to publish the sample template to the shared folder and test its security settings.
Publish the template
- Navigate to your C:Microsoft PressIntroducing InfoPath 2003Chapter11Rss2v4 folder, and open Rss2v4.xsn in design mode.
- Choose File, Publish to start the Publishing Wizard, click Next, accept the default To A Shared Folder option, and click Next .
- Click Browse, navigate to your C:SharedInfoPath TemplatesRss2v4 folder, and click OK, and changeRss2v4 to Rss2v4 (Shared) in the Form Name box, as shown here:

If you re publishing to a remote file server rather than your computer, type the UNC path to the share, which appears as the default location in the next step.
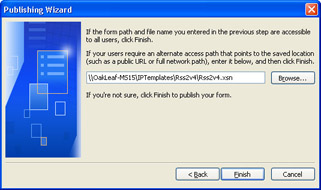
- Click Next, and replace the local path with the UNC path to the file ” \ ServerName IPTemplatesRss2v4Rss2v4.xsn for this example ”as shown here:
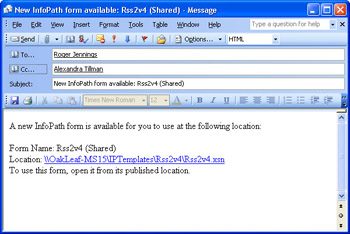
- Click Finish to display the final wizard screen, which lets you send e-mail messages to users and open the file from its new location:
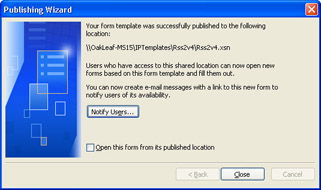
The Notify Users button is present if you have Microsoft Outlook 2003 installed on your computer.
- Click Notify Users to open a default Microsoft Outlook e-mail message that you can send to members of the authorized security groups, as shown here:
- Close Outlook, select the Open This Form From Its Published Location check box, and click Close to open a new Form1 and close the Publishing Wizard.
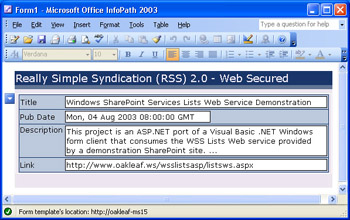
- Save the form with default values as Rss2v4.xml in the shared folder.
| Note |
Making it easy for users to open templates |
Deploying the template to a shared folder isn t complete until you ve verified that the security settings you applied in the preceding section work as expected. To test the shared template with logon accounts in the InfoPathUsers and InfoPathDesigners security groups, follow the steps on the next page:
Test group and user permissions
- Log on to your computer with the IPUser account, and launch InfoPath. Windows Installer runs briefly to configure InfoPath for the new user account.
- In the Fill Out A Form dialog, click Open under the Open A Form heading. Type the UNC path to the template in the Open dialog box s File Name box, and click Open to open Form1.
- Verify that you can save the form. If you re logged on to the file server, save the form in My Documents, which is the only server folder that permits the IPUser account write access.
- Click the Design This Form button. You receive the slightly misleading message shown here, stating that the file is currently in use:
- Click Yes. The template opens in design mode with a [Read-Only] suffix in the title bar.
- Make a minor modification to the form design, and press Ctrl+S to save the template, which displays a form is read-only error message:

- Click OK, choose File, Publish, and attempt to publish the template to the share. You ll see the same message stating that the form is read-only. Click OK.
- Log off as IPUser, log on as IPDesigner, save the form and its template to the shared folder, and republish the template, overwriting the original version.
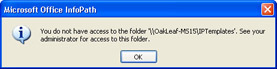
- Log off as IPDesigner, log on as AnyUser, and repeat step 2. You receive the following message that verifies that AnyUser can t open the Rss2v4.xsn template or the Rss2v4.xml data document:
- Click OK and log off as AnyUser, and log on with your administrative account for the file server.
At this point, you ve verified that no one but members of the local Administrators group, which includes Domain Admins, and the InfoPathDesigners group can modify the template. The form is ready for production use after you ve enabled protection, as described in the section Enabling Form Protection, in Chapter 11.
Publishing Templates to an Intranet Site
Access to InfoPath forms via HTTP is an alternative to using shared folders. From the user s perspective, there s little difference between the two methods : the URL to the template or file replaces the UNC path . Many large organizations provide off-site workers with virtual private network (VPN) remote access connections to the internal network, which permits secure access to templates in shared folders. Connecting via the Internet with secure HTTP (HTTPS, also called Secure Sockets Layer, or SSL) to a Web server that requires client authentication certificates provides somewhat less security at considerably lower overall cost than dedicated VPN remote access.
Publishing InfoPath templates to a Web server using the Publishing Wizard is almost identical to the procedure for shared folders, but requires more up-front work. This section s procedures use your test computer as the Web server and require that you log on as a member of the local Administrators group . Here are the basic requirements for publishing InfoPath templates to a Web server:
- The virtual directory (VDir) must not permit anonymous access, which is disabled by default in IIS 6. Integrated Windows authentication (the default) is required to support folder and file security for InfoPath templates.
- Write access must be enabled to permit publishing and modifying the template and saving forms to the VDir s folder.
- Web Distributed Authoring and Versioning (WebDAV) must be enabled. WebDAV is disabled in IIS 6 and enabled in IIS 5 by default. To enable WebDAV with IIS 6 s Internet Information Services (IIS) Manager, expand the ServerName node, click Web Service Extensions, select the WebDAV item in the Web Service Extension list, and click the Allow button, as shown in Figure 12-2.
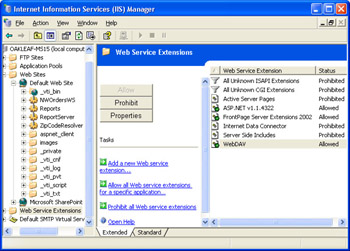
Figure 12-2: You must enable the WebDAV Web service extension to publish InfoPath templates to a Windows Server 2003 intranet site. - If Windows SharePoint Services are running on the Default Web Site, you must exclude the template s VDir from paths managed by SharePoint using the method described in the section Obtaining a Digital Signing Certificate, in Chapter 11.
- You can t publish a template to a Web server that s protected by Microsoft s Urlscan Internet Server Application Programming Interface (ISAPI) filter without explicitly permitting use of the HTTP OPTIONS , PUT , DELETE , LOCK , and UNLOCK verbs and inclusion of .exe extensions in the requested URL. It s not a common practice to install a Urlscan.dll filter on well-protected intranet Web sites, but permitting the extra HTTP verbs and .exe extensions in requesting URLs defeats much of the added site security provided by Urlscan.
- IIS 6 requires assigning a registered Multipurpose Internet Mail Extensions (MIME) type for each extension of files it serves, including .xsn for InfoPath templates. To verify that the .xsn extension is registered, right-click the ComputerName node in Internet Information Services (IIS) Manager, and choose Properties from the shortcut menu. Click the MIME Types button to open the MIME Types dialog box, scroll to the bottom of the list of registered MIME types, and verify that the MIME type for .xsn files is present, as shown in Figure 12-3. If not, click the New button to open the MIME Type input box, type .xsn in the Extension box, type application/octet- stream in the MIME Type box, and click OK three times.
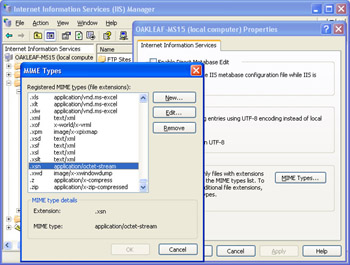
Figure 12-3: IIS 6 requires an application/octet-stream MIME type entry for .xsn files to permit sending template files to clients caches.
If any of the preceding requirements aren t met, you ll receive the message shown in Figure 12-4 when you attempt to publish your template.

Figure 12-4: This vague error message indicates a virtual directory configuration problem.
Creating an IIS Virtual Directory
After you ve taken care of the prerequisites, the next step is to create or specify a local folder to store the published template and an IIS VDir that specifies the local folder as its content source. For initial testing of Web site deployment, you create a new subfolder of the default Web site content folder ”Inetpub wwwroot . Creating a test VDir for an unsecured content folder minimizes the probability of errors when publishing your first form to a Web site. You ll apply share and folder security for the template in the section Publishing a Secured Template to the Web Site, later in this chapter.
To create a VDir to which you publish an InfoPath template, follow these steps.
Add a virtual directory and set its properties
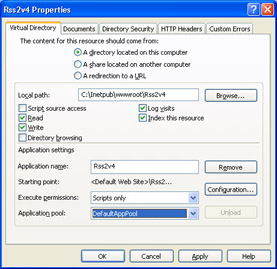
- Add to your Inetpubwwwroot folder a subfolder for your template ”Rss2v4 for this example.
- Launch IIS Manager, expand the ServerName and Web Sites nodes, right-click the Default Web Site node, and choose New, Virtual Directory to start the Virtual Directory Creation Wizard. Click Next.
- In the Virtual Directory Alias screen type the name of the virtual directory in the Alias box ” Rss2v4 for this example ”and click Next.
- In the Web Site Content Directory screen, click Browse, and navigate to the subfolder you added in step 1.
- In the Virtual Directory Access Permissions screen, select the Write Permissions check box, and click Next and then Finish to dismiss the wizard and return to IIS Manager.
- Right-click the virtual directory you added, and choose Properties from the shortcut menu to open the VDirName Properties dialog box.
- On the Virtual Directory tab, verify that the Write check box is selected, as shown here, and then select the Directory Security tab. If you have Windows SharePoint Services installed, select DefaultAppPool from the Application Pool drop-down list. (IIS 5 doesn t support multiple application pools.)
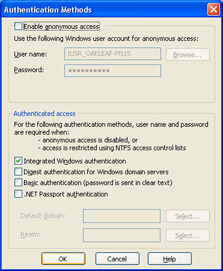
- Select the Directory Security tab, and click the Authentication And Access Control section s Edit button to open the Authentication Methods dialog box. Clear the Enable Anonymous Access check box, verify that the Integrated Windows Authentication check box is selected, as shown here, and then click OK:
- If your site has a server certificate to enable HTTPS, click the Secure Communications section s Edit button to open the Secure Communications dialog box, select the Require Secure Channel (SSL) check box, and specify options for 128-bit encryption and client certificates.
- Click OK to apply your changes, close the Properties dialog box, and return to IIS Manager.
Testing Web Publication of Unsecured Templates
As mentioned earlier, publishing a template to a Web site is very similar to publishing to a shared folder. One difference is that each template must have its own VDir. Follow these steps to publish Chapter 11 s Rss2v4.xsn template to the Rss2v4 VDir.
Publish and open a test template
- Navigate to your C:Microsoft PressIntroducing InfoPath 2003Chapter11Rss2v4 folder, and open Rss2v4.xsn in design mode.
- Choose File, Publish to start the Publishing Wizard, and click Next.
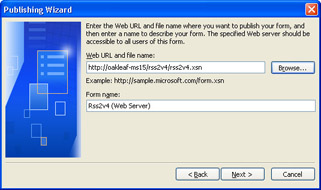
- In the second wizard screen, select the To A Web Server option, and click Next.
- Type the URL for the VDir as http:// servername/vdirname/template .xsn, and change (For Protection) to (Web Server), as shown here:
- Click Next, confirm the location, and click Finish and Close to publish the template. If you receive the error message shown earlier in Figure 12-4, double-check that your Web server and VDir meet the requirements listed earlier, in the section Publishing Templates to an Intranet Site. Otherwise, this File Download dialog box opens:
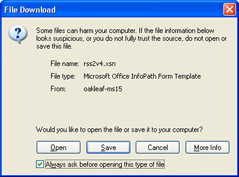
- Clear the Always Ask Before Opening This Type Of File check box to prevent the message from reappearing, and click Open to launch your local copy of InfoPath with Form1 active.
- Press Ctrl+S to open the Save As dialog box, type http:// servername/ rss2v4/rss2v4.xsn in File Name box, and click Save to verify that you can save data documents to the VDir s folder. (Existing files of the same name are overwritten without warning.)
- Click the Design This Form button, make a minor modification to the template, and press Ctrl+S to save the change...
At this point, you ve proven that your system configuration and VDir properties comply with InfoPath s requirements for publishing a template to a Web site, but the template is not yet fully secure.
Publishing a Secured Template to the Web Site
Selecting the Write check box on the Virtual Directory tab of the VDirName Properties dialog box enables any authenticated Windows user to write to the VDir. Thus, you must rely on file security to restrict ordinary users ability to make template changes. Fortunately, it s easy to change the VDir s content directory to a previously secured file share; the share can be on any accessible file server, including the computer running IIS for the Web site.
To take advantage of the security settings you applied earlier in this chapter to the \ ServerName IPTemplates share and its subfolders for Web deployment, follow these steps.
Publish and test the secure Rss2v4 template
- Navigate to your SharedInfoPath TemplatesRss2v4 folder, and make a backup copy of Rss2v4.xsn.
- Open IIS Manager, and open the Rss2v4 Properties dialog box.
- Select the Share Located On Another Computer option, type the UNC path to the Rss2v4 folder ”\ ServerName IPTemplatesRss2v4 for this example ”and click OK. If the files in the share don t appear in IIS Manager s file list pane, press F5 to refresh the display.
- Repeat steps 1 through 4 of the preceding procedure, but change (For Protection) to (Web Secured), and then click Next.
- Select Overwrite The Existing Form, click Next and Finish, select the Open This Form From Its Published Location check box, and click Close to republish the template and display Form1.
- Verify that you can save Form1 as Rss2v4.xml, make a minor design change, and save the template.
- Log off, and then log on as IPUser and open the template in Internet Explorer to verify that you can open Form1.
- Attempt to save Form1 as Rss2v4 (or any other name) to display an InfoPath cannot save the form message. You might be prompted for your user name and password during this process. Click OK.
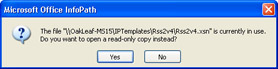
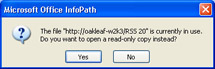
- Click the Design This Form button, and verify that InfoPath displays a Do you want to open a read-only copy instead? message.
- Log off, and then log on as IPDesigner. Verify that you can save Form1 as Rss2v4.xml, change to design mode, and save a design change.
- Log off and log on with your administrative account.
You ve now proven that file-share and folder security that you apply to a shared folder also works for Web site deployment with Windows integrated authentication. To reconfigure the Rss2v4.xsn template to file-share access, rename the Web-based template, and restore the copy you saved in step 1 of the preceding procedure.
Publishing Templates to SharePoint Form Libraries
Windows SharePoint Services is a Web-based portal application that enables collaboration among members of teams , workgroups, or small departments. Windows SharePoint Service s out-of-the-box features include document and form sharing libraries, announcements, image galleries, links, contact and task lists, discussion groups, and surveys. Windows SharePoint Services is a no-charge add-on to Windows Server 2003 and doesn t require client access licenses (CALs). Another Windows SharePoint Services selling point is management simplicity, which enables users to set up and administer their own sites.
Windows SharePoint Services has a site-based security system based on the following four groups:
- Administrator Members of this group have full control of the site and can add users to any group. Installing Windows SharePoint Services adds the server s Administrator account to this group .
- Web Designer Members can create, edit, and delete Windows SharePoint Services pages, such as document and form libraries. Members of the InfoPathDesigners test group belong here. You must be a member of the Web Designer or Administrator group to publish an InfoPath template to a Windows SharePoint Services forms library.
- Contributor Members can add content to libraries and lists. Windows SharePoint Services stores the XML data documents that users create, so this is where you add members of the InfoPathUsers test group.
- Reader Members have read-only access to the site. You can add the AnyUser test account to this group if you want to verify that ordinary users can t add data documents to the forms library.
You must add individual user accounts to Windows SharePoint Services sites; attempting to add a group, such as DOMAIN InfoPathDesigners, causes an error. You can add members to multiple site security groups, but there s no apparent advantage to doing this. Windows SharePoint Services stores the published template, so you can t apply file- share or folder security to templates in forms libraries. Fortunately, only members of the site s Administrator and Web Designer groups can save template changes.
Publishing a Template and Specifying Column Names
The Rss2v4Prot.xsn template that you modified in Chapter 11 is a good candidate for testing deployment to a SharePoint site because the template is protected. The Form Option dialog box s Form Library tab lets you specify the fields that appear in the columns of the form library list (also known as promoting columns ). You also can change the column name for any field. It s simpler, however, to specify and rename the columns to include during the publication process.
To publish the Rss2v4Prot.xsn template to a Windows SharePoint Services site, follow these steps.
Publish Rss2v4Prot with promoted columns
- Navigate to your C:Microsoft PressIntroducing InfoPath 2003Chapter11Rss2v4 folder, and open Rss2v4Prot.xsn in design mode.
- Choose File, Publish to start the Publishing Wizard, and click Next .
- Select the To A SharePoint Form Library option, and click Next.
- Accept the default Create A New Form Library option, and click Next.
- Type the URL for the default site as http:// servername / for intranet access, and click Next.
- Type the name of the form library ”RSS 2.0 for this example ” in the Name text box and a brief description in the Description text box. Click Next.
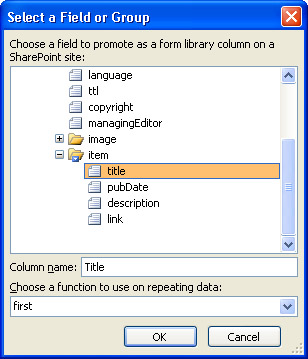
- Click the Add button to open the Select A Field Or Group dialog box.
- Expand the item node, if necessary, and select the item section s title field. When you select a repeating field, the dialog box enables the Choose A Function To Use On Repeating Data list.
- Change title to Title in the Column Name box, and leave the default first item, as shown here, because you add RSS 2 items in last-in-first-out (LIFO) sequence. Click OK to add the column.
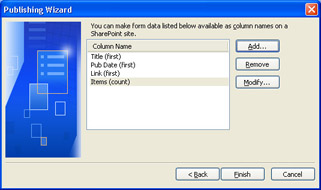
- Repeat steps 7, 8 and 9 for the pubDate and link fields, and change their names to Pub Date and Link.
- Repeat step 10 for the item group, and rename it Items. The only function applicable to groups is count . Your list appears as shown here:
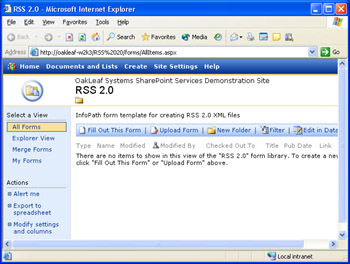
- Click Finish to open the last wizard screen, select the Open This Form From Its Published Location check box, write down the URL for the form library, and click Close to open this new form library page, shown here:
After you publish the form template to the SharePoint site, you should become familiar with the process of adding new data documents to the form library and modifying the form template. To add a new data document to the library and confirm that you can modify the library s template, follow these steps.
Test the template with an Administrator account
- On the form library page, click Fill Out This Form to open Form1 in your local copy of InfoPath.
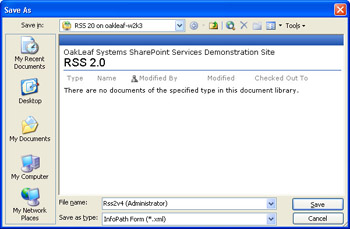
- Press Ctr+S to save the form, which opens a Windows SharePoint Services Save As dialog box. Save the form as Rss2v4 (Administrator) or the like, as shown here:
- Close the form, and click the library page s Edit In Datasheet View button to open an Office Web Components 11.0 Datasheet control to display the list in a grid. (The Edit In Datasheet View button displays an error message if you haven t installed Office System 2003 on the client computer.)
- Click the Task Pane button to display icons and links for actions that apply to the list only, as shown here:

- Click the form s Type icon or Name link to open it, choose File, Design A Form to activate the Design A Form task pane, and click the On A SharePoint site link to display the Open From SharePoint Site dialog box.
- Type the site URL drop-down list s text box, and click Next to open a list of form libraries on the site. Select the RSS 2.0 item, and click Open. Click OK in response to the This form is protected message. (If another user has the form open, you receive a This form is in use message, and design mode is read-only.)
- Make a minor design change to the template, press Ctrl+S to verify that you can save design changes, and then close the form.
| Note |
Removing unnecessary columns in a new default list view |
Assigning Test Users to Groups and Verifying Template Security
Your SharePoint template publishing project isn t complete until you ve verified that InfoPathUsers group members can save data documents but not template changes and InfoPathDesigners members can do both. To add the IPUser, IPDesigner, and the AnyUser accounts as site users, assign them to site security groups, and test their write privileges, follow these steps.
Add site users and assign them to groups
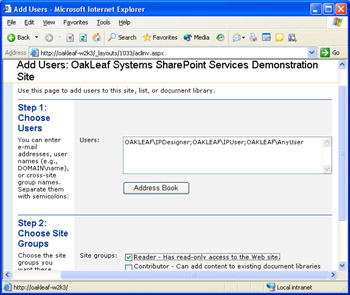
- Click the Site Settings menu button near the top of the page to open the page of the same name, click the Administration section s Manage Users link to open that page, and click the Add Users button to open the Add Users: SiteName page.
- In the Users box, type the user names to add in DomainUserName or ComputerNameUserName format, separated by semicolons, and select the Reader site group check box. For this example add, IPDesigner, IPUser, and AnyUser, as shown here:
- Scroll to the bottom of the page, and click Next. Assign fictitious e-mail addresses to the added users.
- Clear the Send The Following E-Mail check box, if it s selected, and click Finish to return to the Manage Users page.
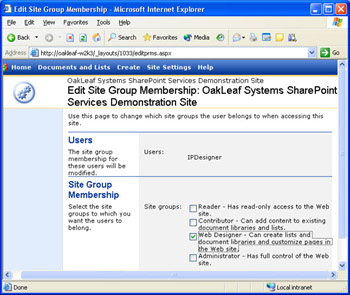
- Select the IPDesigner check box, click the Edit Site Groups Of Selected Users button to open the Edit Site Group Membership page, clear the Reader check box, and select the Web Designer check box, as shown on the next page.
- Click OK to return to the Manage Users page, and repeat step 5 for the IPUser account, but select the Contributor check box ”not the Web Designer check box. Click OK to return to the Manage Users page, which now looks like this:

Templates published to shared folders and Web sites required tests to confirm security settings, and you should verify SharePoint form library security. To confirm security settings for RSS 2.0 forms and the template, follow these steps.
Test users ability to save forms and template design changes
- Log off as an Administrator, log in as IPDesigner, click the Documents And Lists menu button, and click the RSS 2.0 link to activate the RSS 2.0 form library page.
- Repeat steps 1 through 3 and 6 through 8 from the procedure Test the Template with an Administrator Account, earlier in this chapter, to verify that Web Designer group members can save forms and template design changes. In this case, save Form1 as Rss2v4 (IPDesigner).
- Repeat steps 1 and 2, but log in as IPUser, and verify that you can save Form1 as Rss2v4 (IPUser). When you attempt to save a template modification, you receive this message:
- Repeat steps 1 and 2, but log in as AnyUser, and verify that you receive the following or a similar message when you attempt to save Form1 and that you receive the error message in step 4 when you attempt to open a template in design mode from the SharePoint site.

- If you re very concerned about form security, add AnyUser to the local Power Users group, and repeat step 4.
- Log off as AnyUser and log on with your administrative account.
The preceding procedure should be sufficient to demonstrate to the most security-conscious InfoPath designers that SharePoint s security groups are capable of protecting shared templates from unauthorized modification.
Submitting Documents to a SharePoint Forms Library
SP-1 Save As is the simplest method for adding a form to or updating a form in a SharePoint forms library. If you want to prevent users from saving copies of a data document to their local computer or elsewhere or sending forms by e-mail, you must disable features on the Form Options dialog box s Open and Save tab and change the design to submit the form to the SharePoint library. For this example, you replace the OakLeaf Web Site data connection with a data connection to the SharePoint site. You must be logged on with an Administrator account for the SharePoint site to be able to save the template design change.
To restrict the form to submission only and specify the SharePoint site as the data connection, follow these steps.
Change Open and Save features and the data connection
- In the form library, click Fill Out This Form to open a new Form1, and change to design mode as you did in the preceding examples.
- Choose Tools, Form Options to open the Form Options dialog box, click the Open and Save tab, clear all check boxes, and click OK to apply the restrictions.
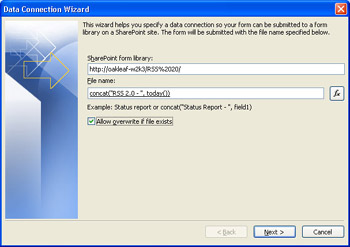
- Choose Tools, Submitting Forms to open the Submitting Forms dialog box, select Submit To A SharePoint site, and click Add to start the Data Connection Wizard.
- Type http:// servername /libraryname in the SharePoint Form Library box. For this example, the URL is http://oakleaf-ms2k3/RSS%2020 . (The URL is the first three elements of the URL you wrote down in step 11 of the Publish Rss2v4Prot with promoted columns procedure in the section Publish the Template and Specify Column Names. )
- If you want to add a date, time, or other identification to the data document s file name , click the Insert Formula ( f x) button to open the Insert Formula dialog box, type concat( FormName - , today()) or concat( FormName - , now()) in the Formula box, and optionally , select the Allow Overwrite If File Exists check box, as shown here:
- Click Next, and type a name for the data connection. Click Finish to return to the Data Connections dialog box, and click Close to return to the Submitting Forms dialog box. Change the caption to Su & bmit to SharePoint Site, and click OK.
- Close the template, save your changes, and close the form.
Test form submission to the site
- Click the Submit To SharePoint site button, and click OK to acknowledge the Form was submitted successfully message.
- Verify that the form name you specified in step 5 of the preceding exercise appears in the Name column, as shown here:
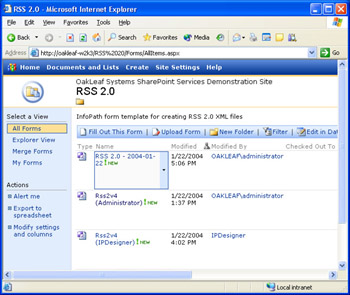
- Open the form to verify that the submission truly succeeded.
If you receive an error message when attempting to submit the form, you probably mistyped the URL in step 4 of the preceding exercise. Open the form in design mode, choose Tools, Data Connections to open the Data Connections dialog box, and click Modify to open the first Data Connection Wizard dialog box. Verify that the URL matches the URL in the Internet Explorer Address bar, up to but not including /Forms/ AllItems.aspx ... . Make any necessary changes, complete the wizard steps, save the changes, and try submitting again.
Creating Fully Trusted Forms by Code Signing
If you need to take advantage of any features that arent permitted by InfoPaths Domain security model, such as cross-domain data access, you must specify the Full Trust security model. When you specify Full Trust, you have two choices: adding a digital signature from a code signing certificate to the form or creating and deploying a custom-installed template. A code signing certificate differs from a client authentication certificate. Most commercial CAs provide code signing certificates. If you install a code signing certificate obtained from your organizations certificate server, users of your forms must trust the CA. If youve implemented digital signatures for data documents, users already trust the organization-wide CA.
Its far simpler to obtain a code signing certificate, if you dont have one, and apply a digital signature to the form than it is to deploy custom-installed templates. Another advantage of signed templates is that users automatically receive updates to cached templates. Custom-installed templates require reinstallation for each template change. Thus, you should use digitally signed templates unless you or your IT staff absolutely refuse to implement an X.509 public key infrastructure.
The following procedure makes the assumption that youve already obtained a client authentication certificate from your organizations certificate server and need to obtain a code signing certificate. If you already have a code signing certificate, skip this exercise.
Obtain a code signing certificate
- Follow the steps in the section Obtaining a Digital Signing Certificate, in Chapter 11, except in step 5, specify Code Signing Certificate in the Type Of Certificate list, and specify an appropriate friendly name. For this example, the friendly name is InfoPath Code Signing Cert.
- After you install the certificate, launch Internet Explorer, choose Tools, Internet Options, select the Content tab, and click the Certificates button.
- Verify in the Certificates dialog box that the certificate is present and that its intended purpose is Code Signing, as shown here:
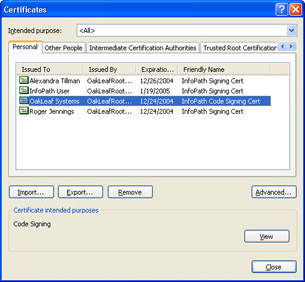
- Optionally, click View to view a detailed description of a typical code signing certificate.
- Close the dialog boxes and Internet Explorer.
Sign a form
- Open one of the forms you published to a shared folder or Web server in design mode. This procedure uses the Rss2v4.xsn form published to the \OakLeaf-MS15SharedIPTemplatesRss2v4 folder. When opening the form, type the UNC path or URL for the form.
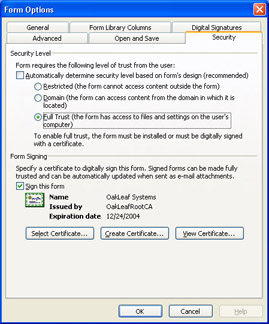
- Choose Tools, Form Options to open the Form Options dialog box, select the Security tab, and select the Sign With A Specific Certificate option, which enables the Select Certificate button.
- If your code-signing certificate doesnt appear as the default, click Select Certificate to open the Select Certificate dialog box, and with your code signing certificate selected in the list, click OK.
- Clear the Automatically Determine Security Level check box, and select the Full Trust option, as shown here:
- Click OK to apply the new security model, and save your template changes.
- Reopen the template, which displays a Security Warning dialog box if the certificate publisher isnt included in Internet Explorers Trusted Publishers list.
- Select the Always Trust Files From This Publisher And Open Them Automatically check box to enable the Open button, as shown here:
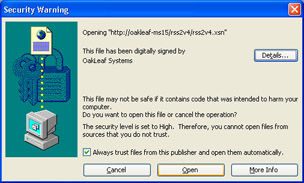
- Click Open to add the certificate to Internet Explorers Trusted Publishers list and open the form. The green check box in the forms lower left corner confirms the form is fully trusted, as shown here:
Distributing Custom Installed Templates
Custom-installed templates ”formerly called URN-based templates ”let you create fully trusted InfoPath templates that users install on their Windows 2000 or later workstations, which must have InfoPath 2003 installed to be useful. Custom-installing a template adds a registry entry, which includes the well- formed path to the template. The purpose of custom-installed forms is to create fully trusted forms that don t require the code to be signed.
The downside of custom-installed forms is the need for users to obtain and install templates with a JScript ( TemplateName .js) installation or Windows Installer ( TemplateName .msi) file. You need Visual Basic .NET Standard Edition 2003 or Visual Studio .NET Professional Edition 2003 installed on your computer to create a Windows Installer file.
| Note |
Simplifying installation of custom-installed forms for users |
You create the fully trusted template and the JScript or Windows Installer file with a command-line form registration tool named Regform.exe . Regform.exe is a part of the Microsoft InfoPath 2003 SDK, which you can download from http://msdn.microsoft.com/office/understanding/infopath/devdocs/ . If you install the SDK with InfoPathSDK.msi to the default location, you ll find Regform.exe in your Program FilesMicrosoft Office 2003 Developer ResourcesMicrosoft Office InfoPath 2003Tools folder.
| Note |
Making Regform.exe easier to use |
Using Regform for JScript Installation
If you don t have Visual Basic .NET Standard or Visual Studio Professional 2003 installed, you re stuck with the JScript installation process. The standard command-line syntax for a JScript installation, assuming that you have a copy of Regform.exe in your ...system32 folder, is shown here:
regform.exe /U urn:Template:Company /T Yes "d:full pathsource template.xsn"
The /U switch specifies the template s URN, which must begin with urn: and contain no spaces. /T Yes specifies a fully trusted form, and the final argument is the well-formed path to the template you re converting. The URN must be unique to each template. (If the full path or template name contain spaces, you must surround the argument with double quotation marks.)
Here s a sample command-line instruction to create a fully trusted version of the Rss2v4FtJs.xsn template in your C:Microsoft PressIntroducing InfoPath 2003Chapter12Rss2v4Js folder:
regform.exe /U urn:Rss2v4FtJs:OakLeaf /T Yes "C:Microsoft PressIntroducing InfoPath 2003Chapter12Rss2v4jsRss2v4FtJs.xs n"
Regform.txt, in your C:Microsoft PressIntroducing InfoPath 2003Chapter12 folder, contains the full syntax for Regform.exe instructions.
When you execute the preceding instruction from the Command Prompt window, either by typing it or running a .cmd (batch) file containing the instruction, Regform.exe performs the following operations:
- Creates a backup copy of the source template ” Rss2v4FtJs.bak for the preceding instruction example.
- Extracts the template files, modifies the manifest.xsf file to specify a fully trusted template, and uses Makecab.exe to re-create the .xsn file. (Makecab.exe is a utility for creating compressed cabinet files.)
- Generates a 4300-byte TemplateName .js file ”Rss2v4FtJs.js for this example ”to run on the client.
You ll probably find that fewer errors result if you create in Notepad a .cmd batch file to execute the preceding instruction. Your C:Microsoft PressIntroducing InfoPath 2003Chapter12Rss2v4Js folder contains a sample template source file and FtJs.cmd batch file, which you execute from the Command Prompt window, as shown in Figure 12-5.
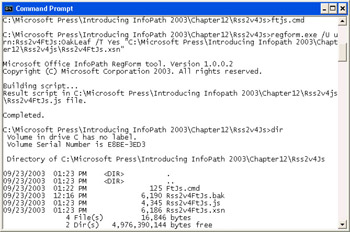
Figure 12-5: Executing the sample FtJs.cmd batch file creates these form backup, JScript installation, and modified .xsn files.
Installing the sample modified template creates the following registry key: HKEY_LOCAL_MACHINESOFTWAREMicrosoftOffice11.0InfoPath SolutionsCatalogurn:Rss2v4FtJs:OakLeaf .
| Note |
Making sure users can run fully trusted forms |
To emulate installing the .js and modified .xsn files on a client computer, follow these steps.
Use the JScript file to install the fully trusted template on a client
- In Windows Explorer, create a new folder for the template, Program FilesInfoPath Form TemplatesRss2v4FtJs for this example, on the same machine.
- Navigate to your C:Microsoft PressIntroducing InfoPath 2003Chapter12 Rss2v4Js folder, and double-click the FtJs.cmd file to create the fully trusted version of Rss2v4FtJs.xsn and generate the Rss2v4FtJs.js script.
- Copy TemplateName .xsn and TemplateName .js to the new folder. For this example, copy Rss2v4FtJs.xsn and Rss2v4FtJs.js from your C:Microsoft PressIntroducing InfoPath 2003Chapter 12 Rss2v4Js folder.
- Double-click the Rss2v4FtJs.js file, and click Yes and OK to acknowledge the two messages shown here:
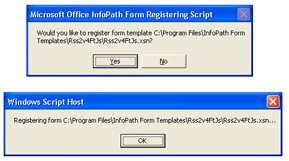
- After registration is complete, this confirmation message appears:
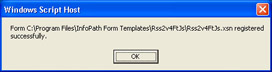
- Click OK, and double-click Rss2v4FtJs.xsn to open the fully trusted form and verify the registration, which is indicated by a trusted sites icon (green circle with a check mark) and the form s URN at the bottom left of the form.
To uninstall the Rss2v4FtJs.xsn file on your computer, follow these steps.
Uninstall the template from a client with the JScript file
- Choose Start, Run, and type the following path in the Open box: "C:Program FilesInfoPath TemplatesRss2v4FtJsRss2v4FtJs.js" /uninstall. The double quotation marks are required for paths or file names with spaces. Click OK, and acknowledge the three messages shown here:
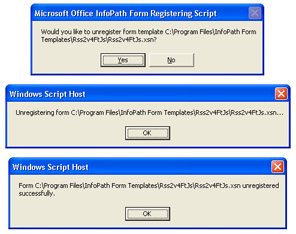
- Double-click Rss2v4FtJs.xsn. You ll receive an error message, which verifies that the form has been uninstalled .
- Repeat step 1 to verify that the JScript code reports an error if you attempt to uninstall a form more than once.
| Note |
Specifying silent installation or a different folder |
Creating a Windows Installer File with Regform
Creating a Windows Installer file is as easy as generating a JScript installation file; you don t even need to know how to launch Visual Basic .NET or Visual Studio .NET to create the .msi file. You add a /MSI command-line switch to the Regform.exe instruction (after the /T Yes switch) and execute the instruction from the folder containing the source template file. The Regform.exe instruction with /MSI does the following:
- Generates a temporary Visual Studio .NET Setup project, Setup.vdproj, in your Documents and Settings UserName Local SettingsTemp1Regform folder.
- Creates a modified copy of the TemplateName .xsn file, and adds the copy and a helper file named Caction.exe to the project.
- Compiles the project to
 Setup.exe and Setup.msi in the ...RegformRelease folder.
 - Copies Setup.msi as TemplateName.msi to the current folder.
Your C:Microsoft PressIntroducing InfoPath 2003Chapter12Rss2v4Msi folder contains a sample template source file (Rss2v4FtMsi.xsn) and FtMsi.cmd batch file with the /MSI switch, which you execute from the Command Prompt window, as shown in Figure 12-6. The folder includes Rss2v4FtMsi.msi installer file, which you can use if you don t have Visual Basic .NET 2003 Standard Edition or Visual Studio .NET installed.
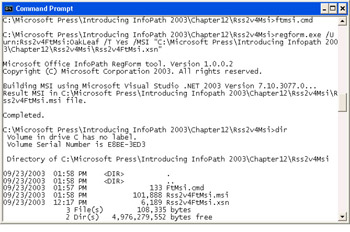
Figure 12-6: Adding the /MSI command-line switch generates the TemplateName.msi Windows Installer file.
To install the Rss2v4FtMsi.xsn template to a folder on your test computer by using the Rss2v4FtMsi.msi installer file in your C:Microsoft PressIntroducing InfoPath 2003Chapter12Rss2v4Msi folder, follow these steps.
Emulate client installation with a Windows Installer file
- Copy TemplateName .msi to any location on the client machine. For this exercise, copy Rss2v4FtMsi.msi.
- Double-click the Rss2v4FtMsi.msi file to start Windows Installer, and click Next .
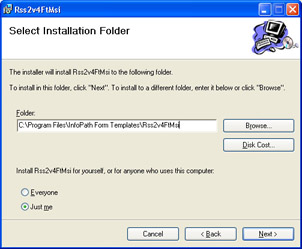
- Add the template name (without the extension) to the default destination folder, C:Program FilesInfoPath Form Templates, and accept the default Just Me option to install the template for the current user only, as shown on the next page.
- Click Next twice to complete the installation, and then click Close.
- Navigate to the destination folder, which contains the fully trusted template and a hidden ca TemplateName .exe helper file.
- Verify that the trusted sites icon appears at the bottom of the form, and that you can save forms and modify the template design.
- Run the installer again to uninstall the template by selecting the Remove TemplateName option and clicking Finish. Alternatively, users can uninstall the template by using Control Panel s Add Or Remove Programs tool.
Disabling Design Mode for Deployed Fully Trusted Forms
The only practical method for preventing users from modifying of custom-installed templates is to prevent users from entering design mode. The section Disabling InfoPath Design Mode, in Chapter 11, describes how to use the Custom Installation Wizard to disable design mode during InfoPath setup. If users already have InfoPath installed with design mode enabled, you can disable it by adding the following registry DWORD (32- bit) value name and data: HKEY_CURRENT_ USERSoftwareMicrosoftOffice11.0InfoPathDesignerDisableDesigner = 0x00000001 . You must have local Administrator privileges to change registry values. Disabling design mode removes InfoPath s Design This Form button, Design A Form task pane, and the File, Design A Form menu option.
| Warning |
Making changes to the Windows registry might cause serious problems that could require you to reinstall the operating system. Before making any change to the registry, use the Backup Utility to create a backup of the System State and your boot folder and be sure to have the system recovery disk available. On computers running Windows XP or Windows Server 2003, use the Automated System Recovery Wizard to create a recovery disk and a backup of your local system partition the hard drive. |
To disable design mode on a user s computer, follow these steps:
Add the DisableDesign DWORD value
- Close InfoPath, if it s open. Choose Start, Run, type regedit in the Open box, and click OK to open the Registry Editor.
- Expand the HKEY_CURRENT_USER node, and navigate to and select the HKEY_CURRENT_USERSoftwareMicrosoftOffice11.0InfoPathDesigner key.
- Choose Edit, New, DWORD Value to add a New Value #1 entry to the key with a default value of 0x00000000 (0).
- Change the entry s name to DisableDesigner, right-click the entry, and choose Modify from the shortcut menu to open the Edit DWORD Value dialog box.
- Type 1 in the Value Data box, as shown here:
- Click OK to set the value and close the dialog box. Your added value looks like the figure on the next page.
- Keep the Registry Editor open, launch InfoPath, and open any form. Verify that all design mode elements are gone.
- To reinstate design mode, close InfoPath, and return to the Registry Editor. Right-click the added key, choose Modify from the shortcut menu to open the Edit DWORD Value dialog box, type 0 in the Value Data box, and click OK. Alternatively, right-click the added key, choose Delete from the shortcut menu, and click Yes to confirm the deletion.
- Reopen InfoPath to verify that all original design mode elements are restored.
- Close the Registry Editor and InfoPath.
Summary
InfoPath lets you publish templates to shared folders, intranet Web sites, or Windows SharePoint Services sites. Publishing templates to shared folders and Web sites exposes your templates to accidental or malicious modification by ordinary users. Securing templates from unauthorized changes requires applying group -level or user -level security to server shares and folders. If authorized template users must store data documents to the folder containing the template, you must add file-level security to protect the template. The folder-level and, optionally , share-level security provisions are the same for templates shared by file and Web servers. Securing templates that you publish to a SharePoint site is simpler, because only members of the Web Designer and Administrator groups for the site can save template modifications.
Copies of conventional InfoPath templates cached on users machines are sandboxed, which means that code behind the forms cant access local system resources, create instances of Component Object Model (COM) objects, or run ActiveX controls that arent marked safe for scripting. Templates that require these capabilities must be installed and registered on users computers as fully trusted. The InfoPath 2003 SDK offers the Regform.exe command-line tool to create fully trusted templates, which users install with a JScript installation script or a Windows Installer file. You must have a license for Visual Basic .NET Standard 2003 or Visual Studio .NET Professional 2003 to create Windows Installer files.
Q A
|
1. |
How do I apply file-level security to further protect my shared templates? |
|
|
2. |
Can users of a template opened from a Windows SharePoint Services site s forms library save InfoPath data documents to a location other than the SharePoint library? |
|
|
3. |
Can users submit InfoPath data documents to a Web site from a SharePoint forms library? |
|
|
4. |
Why would I need to create a fully trusted form? |
|
|
5. |
Can a developer with Visual Studio .NET Professional 2003 create a Windows Installer file for me? |
|

Answers
|
1. |
Applying file-level security is identical to the process for applying folder-level security, with a few minor exceptions. You must remove permissions inherited from the folder security settings, copy them as not-inherited settings for the template file, and clear the Allow Modify and Allow Write check boxes. |
|
2. |
Yes. Choosing File, Save As defaults to the SharePoint forms library, but users can save the .xml file to any folder or Web site for which they have write permissions. |
|
3. |
Yes, but they receive a warning message that states: This page is accessing information that is not under its control. This poses a security risk. Do you want to continue? Clicking OK submits the form successfully. |
|
4. |
If your form doesn t include programming code that requires a fully trusted form, you might want to use a fully trusted form to avoid cross-domain warning messages for forms that access databases or Web services, which are the subject of Part III of this book, Working with Databases and Web Services. |
|
5. |
Yes, but the developer must have a licensed copy of InfoPath to run Regform.exe and test the installation files. |
On Your Own
Here are a few additional exercises that will increase your competence for sharing secure InfoPath templates:
- Create a shared folder named NWOrders that contains the NWOrdersFinal.xsn template from Chapter 10, Adding Views to a Template, and apply share and file permissions for the InfoPathDesigners and InfoPathUsers groups.
- Verify template security with the IPUser and IPDesigner accounts.
- Change the share and folder permissions to permit members of the InfoPathUsers group to save data documents to the folder but not modify the NWOrdersFinal.xsn template.
- Verify template security.
- Create a new IIS VDir that uses the NWOrders folder (not the share) as its content location.
- Verify template security.
- Add digital signatures to the other forms that are shared, including forms shared from a SharePoint forms library.
Part I - Introducing Microsoft Office InfoPath 2003 SP-1
Part II - Designing InfoPath Forms
- Creating Forms
- Laying Out Forms
- Adding Basic Controls and Lists
- Formatting Forms
- Validating Form Data
- Working with Advanced Form Elements
- Adding Views to a Template
- Setting Form Template and Digital Signing Options
- Publishing Form Templates
Part III - Working with Databases and Web Services
Part IV - Programming InfoPath Forms
EAN: 2147483647
Pages: 248
