Working with Advanced Form Elements
Highlights
In this chapter, you will learn how to
- Add a master/detail repeating table and section to a form
- Apply filters to repeating tables and sections
- Use data in the form to populate drop-down list boxes
- Add a drop-down list that s populated by a filtered drop-down list
- Work with event-based rules
- Establish user roles for workflow applications and assign users to the roles
- Add File Attachment controls to a form
- Insert ActiveX controls in a form and connect the control values to field values
- Change main data sources and use data documents with embedded schemas
For more information
- See the Using Drop-Down Lists and List Boxes section of Chapter 6, Adding Basic Controls and Lists, for more details about secondary data sources for drop-down lists.
- Refer to The Gory Details of Base64 Encoding sidebar of Chapter 6 for the details of Base64 encoding of file attachments.
Overview
To work through this chapter
- You should be familiar with adding standard controls, such as list boxes, and repeating tables and sections to a form.
- Your test computer should be connected to a Microsoft Windows 2000 or later Active Directory domain for testing user roles, but a network connection isn t essential.
- You must have installed the sample files from the CD that accompanies this book in your C:Microsoft PressIntroducing InfoPath 2003Chapter09 folder. The DataSources subfolder contains the XML files you need to complete exercises in this chapter.
SP-1 Microsoft InfoPath 2003 Service Pack 1 (SP-1) is much more than a traditional Microsoft Office service pack update, which usually delivers bug fixes and security patches. As discussed in the Introduction and Chapter 1, Presenting InfoPath 2003 SP-1, SP-1 adds a multitude of new features to the original version of InfoPath 2003. An extended Office System 2003 beta cycle gave the InfoPath development team the time required to overcome a few limitations in the original product and add functionality requested by beta testers and early InfoPath adopters. The upgrade performed by SP-1 easily qualifies as a new point release, such as InfoPath 1.1 or even InfoPath 2004, but the product name remains InfoPath 2003.
You ve already encountered many SP-1 improvements in the preceding chapters. This chapter concentrates primarily on SP-1 s advanced enhancements that apply to InfoPath elements with which you re already familiar ”sections, controls, and data sources. Later chapters discuss more SP-1 changes and additions as you encounter them in sections and exercises.
Designing Master Detail Forms
Master/detail forms are one of the most useful features added by SP-1. The purpose of master/detail forms is to improve the efficiency of forms that work with large amounts of data, such as lists of products, orders, employees , and the like. InfoPath s master/detail feature automatically adds a repeating table and repeating section to a form. The repeating table (master) displays a few important fields of a repeating group and, by default, the repeating section (detail) shows all group fields. The following two sections describe how to create a master/detail form from a single repeating group and from two related repeating groups linked by a key field value.
Creating a Master Detail Form Bound to a Single Repeating Group
Default master/detail forms rely on a data source with a single repeating group. In this case, the InfoPath master/detail form displays two views of a single repeating group s fields. A repeating table at the top of the form displays a row for each group instance, and a repeating section below the table displays in text boxes the field values of the table row you select.
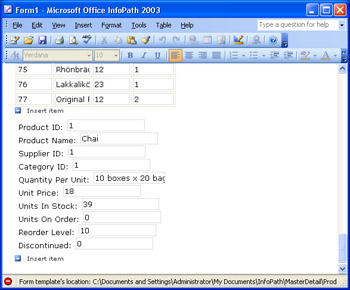
The basic objective of the default master/detail design is to permit users to easily view and edit a large number of items, such as a list of products or customers, whose field text boxes won t fit in a repeating table of reasonable width. You remove repeating table columns that users won t need to identify the group instance they want to view or edit. Clicking a table row synchronizes the form s details section with the selection, as shown in Figure 9-1.
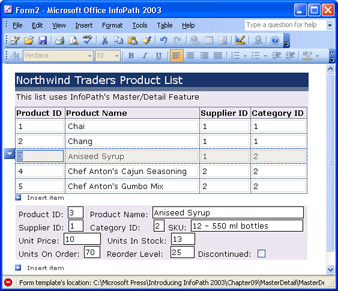
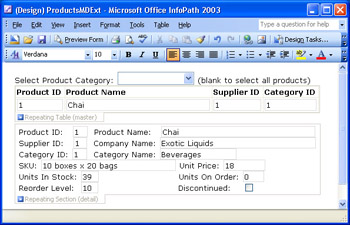
Figure 9-1: This master/detail form displays an XML document with five Product elements. Selecting a row of the repeating table displays the selected Product node s child elements.
| Note |
Filtering long lists |
To create and test a default master/detail form from a modified XML data document generated from the Products table of the Microsoft Access 2003 Northwind database, do the following.
Add a default master/detail table and section to a new form
- In InfoPath, click the Design A Form link in Fill Out A Form dialog box to display an empty form with the Design A Form task pane active.
- Click the New From XML Document Or Schema link to start the Data Source Wizard.
- Click Browse and navigate to the C:Microsoft PressIntroducing InfoPath 2003Chapter09DataSources folder, double-click Products.xml, and click Next and Finish to create the form s data source. Click Yes to use default values in the form.
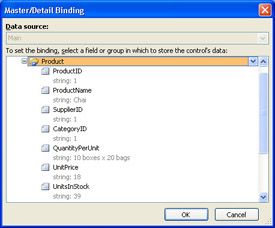
- Click the Controls link in the Data Source task pane, scroll to the Sections category of the Insert Controls list, and click the Master/Detail item to open the Master/Detail Binding dialog box.
- Select and expand the Product group, as shown here, to bind the master repeating table and detail section to the group.
- Click OK to add the default repeating table and its repeating detail section to the form, as shown here with empty lines at the bottom of the detail section removed.
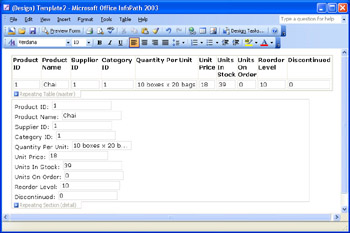
- The master repeating table duplicates all data in the detail section, so select the Quantity Per Unit column and all columns to the right of it, and choose Table, Delete, Columns to remove them.
- Resize the remaining four columns, and reduce the width of the detail section, as shown here.
- Save the template as ProductsMD.xsn in a new My DocumentsInfoPath MasterDetail folder, choose File, Properties, and name the form ProductsMD Test 1.
- Press Ctrl+F1 to activate the task pane, choose Fill Out A Form, and click the ProductsMD Test 1 link to open a new Form1, whose repeating table contains 77 rows.
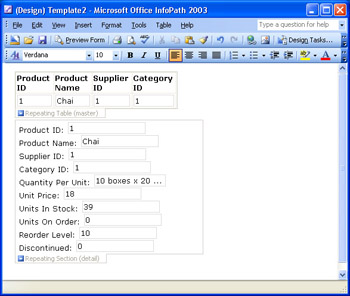
- Scroll to the end of the list, select a row in the master table, and verify that the data in the details section reflects the selection, as shown here.
- Save the form as ProductsMD1 for use in the next section s exercise, and close it.
Linking Master Detail Elements by a Key Field
You can modify master/detail relationships on the Master/Detail tab of the Properties dialog box for the Repeating Table (master) section or the Repeating Section (detail) section. This feature lets you add a repeating section from a related repeating group, and then link the added section by a common (key) field value. For example, if your form is based on an XML data document with Suppliers and Products nodes, you can link a detail section bound to the Product group to the Supplier table by the SupplierID value. This approach approximates the design of an Access master/child form that has a continuous subform for the child records. In this case, the repeating section can have multiple instances.
| Note |
Fixing XML data documents exported by Access 2002 and later If you want to use the exported document to provide temporary default values for testing or creating an initial XML data document, you must manually insert self-closing tags for all missing elements. Alternatively, you can create a copy of the table to export and use an update query to change null text values to empty strings (""), null numeric values to 0 or an improbable value, and null date/time values to 1/1/1900 or the like. You don t need to make these changes if you don t add the data as default values, but you ll find that the default sequence of fields in repeating tables and sections isn t the same as that of the data source. |
To create a master/child form based on the Supplier and Product repeating groups of the ProductsSuppliers.xml sample data document, follow these steps.
Create a master/detail form linked by key field values
- Repeat steps 1 through 3 of the preceding exercise, but open SuppliersProducts.xml in step 3. This XML data document has a Suppliers group with three Supplier child elements and a Products group with 10 Product child elements.
- Drag the Supplier repeating group node to the work area, and choose Master/Detail as the section type to add a repeating table and details section to the form.
- Delete the Repeating Section (detail), drag the Product repeating group under the repeating table, and choose Repeating Section with Controls.
- Right-click the Repeating Section tab, choose Repeating Section Properties to open the Properties dialog box, and click the Master/Detail tab.
- Select the Set As Detail option button to enable the controls related to master/detail relationships.
- Open the Link To Master ID drop-down list, and select the ID of the master repeating table, which is the only available, non-blank list item.
- Select the By Key Field option for linking the master and detail elements, click the Select XPath button to the right of the Key Field (master) text box to open the Select Field or Group Dialog box, and double-click Supplier ID.
- Select the XPath button to the right of the Key Field (detail) text box to open the Select Field or Group Dialog box, and double-click Supplier ID. The Master/Detail tab appears, as shown here. (Your Link To Master ID value might differ ).

- Click OK to close the dialog box and add the master/detail relationship. Click Preview Form.
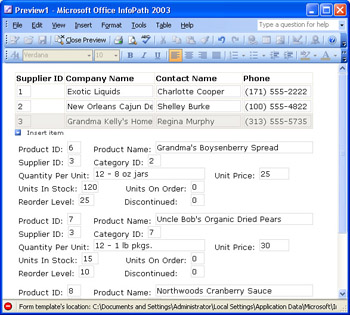
- Verify that three repeating section items appear for the default selection, Supplier ID 1.
- Click the second row of the Supplier table, and verify that the four repeating sections show 2 as the Supplier ID.
- Optionally, remove non-essential Supplier fields, reformat the detail section, and preview the form. The modified form preview appears, as shown here.
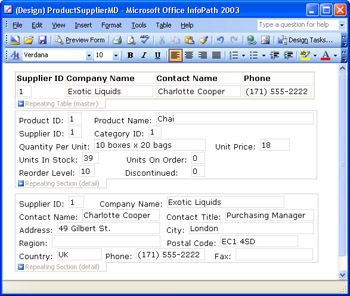
- If you remove Supplier columns from the table, open the table s Properties dialog box, and clear the Allow Users To Insert And Delete Rows check box. Alternatively, add a repeating section with controls bound to the Supplier node, and set its Link Master And Detail option to By Position In The Data Source, as shown here.
- Save your template as ProductSupplierMD.xsn in the My DocumentsInfoPath MasterDetail folder, and name the form ProductSupplierMD Test 1.
You can change a repeating detail section to and from a repeating table, but you can t change a master repeating table to a repeating section with controls. The Select A Control dialog box in the Change To, More menu item doesn t contain a Repeating Section With Controls item.
Filtering Repeating Tables and Sections
As mentioned in the preceding section, viewing and editing long lists isn t practical without a method for limiting the number of rows of the repeating table. To solve this problem, InfoPath s filter feature lets you apply a filter to repeating tables and sections. You apply the filter to the master table of master/detail forms. The most common way to apply a filter criterion is to make a selection from a drop-down list box. Drop-down list boxes must be bound to a field of the data source, so you must add to the data source an element or attribute to store the filter criterion value. A filter criterion is metadata, not document content, so an attribute is the better field type choice. You add the attribute to the repeating group s parent node ”Products, for this example.
The Specify Filter Conditions dialog box, which is similar to the Conditional Formatting and Data Validation dialog boxes, lets you determine how the filter behaves based on the drop-down list box selection. For example, a Show All or empty selection displays all records, and the drop-down list box s value field specifies the filter criterion value. If you add an alphabetic filter, for example, your list box would display Show All and 26 capital letter A through Z items. InfoPath stores filter conditions ”such as conditional formatting criteria ”in views, so you can specify a different dynamic (list box) or static (text value) filter criterion for a particular view.
The master/detail filter example in this section is based on the Northwind database s Categories list, which lets you select products in one of eight categories. To add the drop- down list box to the form, to set the list box s value field as the filter criterion value, and to learn how filters work in a form, follow these steps.
Add a drop-down list of categories
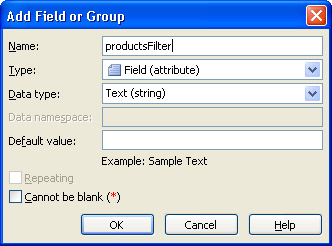
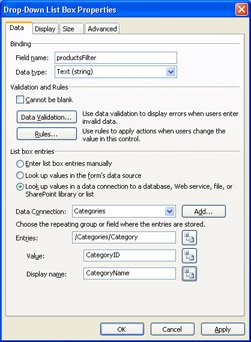
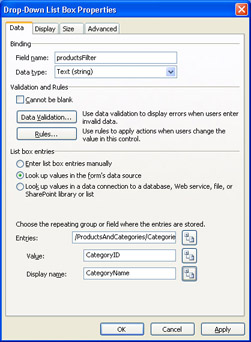
- Open the ProductsMD1.xsn template you created in the section Creating a Master/Detail Form Bound to a Single Repeating Group , activate the Data Source task pane, select the Products root node (not the Product child node), and click Add to open the New Field or Group Properties dialog box. Type productsFilter as the Name , select Field (attribute) as the Type, and leave the default Text (string) as the Data Type Value, as shown here.
- Click OK to add the new my:productsFilter attribute, add an empty line above the repeating table, type Select a Product Category: as the label, and choose Insert, Drop-Down List Box to open the Drop-Down List Box Binding dialog box.
- Select the productsFilter attribute, and click OK.
- Open the drop-down list s Properties dialog box, select the Look Up Values In A Data Connection option, and click the Add button to start the Data Connection Wizard.
- Accept the default XML Document option, click Next, click Browse, navigate to the C:Microsoft PressIntroducing InfoPath 2003Chapter09DataSources folder, and double- click Categories.xml. Then click Next , and click Finish to add the secondary data source, and click Yes to add the data document as a template resource file.
- On the Data tab of the Drop-Down List Box Properties dialog box, click the Select XPath button to the right of the Repeating Group text box to open the Select A Field Or Group dialog box. Select the Category group, and click OK.
- Click the Select XPath button to the right of the Display Name text box, select CategoryName in the Select Field or Group dialog box, and click OK. The Drop-Down List Box Properties dialog box appears, as shown on the next page.
- Click OK to close the Properties dialog box, remove the added Products Filter label from the first line of the form, and add (blank to select all products) to the right of the list.
- Open the Properties dialog box for the Repeating Section (detail), and clear the Allow Users To Insert And Delete The Sections check box. You can t add a new product to a repeating section that s bound to a filtered master repeating table.
- Click OK, choose Preview Form, and verify that the list contains an empty display name. Close the preview, and save your template changes.
Apply the filter to the CategoryID field
- Right-click the master repeating table, and open its Properties dialog box, leaving the Data tab active.
- Change Insert Item in the text box to Insert New Product, and click the Display tab.
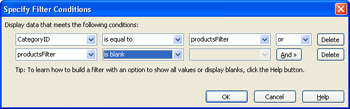
- Click the Filter Data button to open the dialog box of the same name, and click Add to open the Specify Filter Conditions dialog box.
- Select CategoryID in the first list, accept Is Equal To in the condition list, open the third list, choose Select A Field Or Group to open the dialog box of the same name, select the my:productsFilter attribute, and click OK.
- Click And to add a new condition row, change the preceding row s And operator to Or, choose Select A Field Or Group, select the my:productsFilter attribute, click OK, and select Is Blank in the condition list. The Specify Filter Conditions dialog box appears, as shown here:
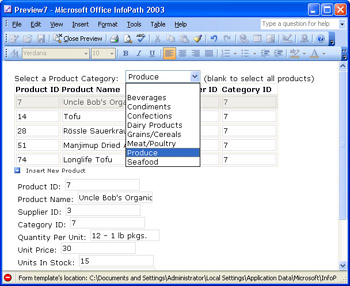
- Click OK three times to close the dialog boxes add the filter to the repeating table. Open a form preview.
- Select a category in the drop-down list to filter the repeating table, as shown here.
- Select a few other categories, and then select the empty item in the list and verify that all repeating table items reappear.
- Create an XML data document named ProductsMD2.xml from the template, and save it with a category selected.
Test new product addition and filter behavior
- Open ProductsMD2.xml, and select a category other than Beverages.
- Click the repeating table s Insert New Order button, or link to insert a new product with the default values for the first Product element, Chai. Notice that filtered items have a small yellow filter symbol (a funnel) at the upper left of their selection buttons , but the selection button for the added item with a CategoryID value of 1 doesn t display the filter symbol, as shown here.
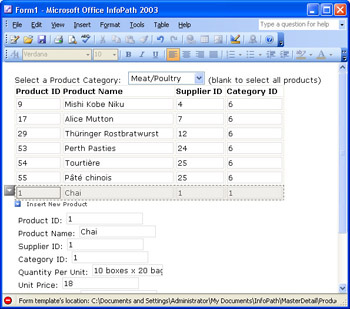
- Select the Beverages category, scroll to the bottom of the repeating table, and verify that the added product appears at the bottom of the list with a funnel symbol.
- Select the category value in effect during the addition, and verify that the added item no longer appears in the list.
- Close ProductsMD2.xml without saving your changes.
You also can apply filters to independent repeating sections that aren t linked to repeating tables and to independent repeating tables.
| Note |
Displaying secondary data sources in the Data Sources task pane |
Populating Lists with Form Data
A major deterrent to populating lists from secondary data sources whose values are stored in template resource files is having to update the resource file to accommodate periodic changes. The alternative is linking to a data source on a server share, but this prevents disconnected users from accessing the network data source. One solution to this problem is to include the secondary data source as a separate repeating group in the XML data document, and to use the new capability in SP-1 to populate list boxes from the repeating group. This lets you add or delete items from list boxes bound to the group by adding a repeating section for the group to another view thats dedicated to list box maintenance.
ProductsCategories.xml is a sample data source document thats similar to the SuppliersProducts.xml source document that you used earlier in the section Emulating an Access Master/Child Form. The Product repeating group acts as the main data source for the form, and the Category repeating group provides the data source for the drop- down category list.
To design a master/detail form that uses the Category repeating group as the data source for the filter list box, follow these steps.
Create the drop-down list and use it to filter a form
- Create a new template from the ProductsCategories.xml data document in the C:Microsoft PressIntroducing InfoPath 2003Chapter09DataSources folder, and add master/detail sections as you did in the earlier section, Creating a Master/Detail Form Bound to a Single Repeating Group.
- Drag the Products groups productsFilter attribute from the Data Source list to above the repeating table, and change the text box to a drop-down list box.
- Open the list boxs Properties dialog box, select the Look Up Values In A Form option on the Data tab, click the Select XPath button to the right of the Repeating Group text box, and double-click Category in the Select A Field Or Group dialog box.
- Click the Select XPath button to the right of the Display Name text box, and double-click CategoryName. Your Data tab appears, as shown here.
- Preview the form, and open the drop-down list box to verify that it contains a blank item and the eight category names .
- Repeat steps 1 through 9 from the Apply the filter to the CategoryID field exercise in the earlier section, Creating a Master/Detail Form Bound to a Single Repeating Group.
- Optionally, you can save your form as ProductsMDListDS.xsn in the My DocumentsInfoPathMasterDetail folder and name the form ProductsMDListDS Test 1.
Cascading Drop Down List Box Selections
InfoPath lets you filter a secondary data source or the repeating section of a form that serves as the data source of a list box. This capability lets you use a primary (parent) list box to determine the list items of a secondary (child) list box. As an example, a Country list box can limit choices in a City list box to those cities in the selected country. In this case, the repeating section must contain elements with Country and City child elements for each city. CountryCity.xml in the C:Microsoft PressIntroducing InfoPath 2003Chapter09DataSources folder is an example of the required repeating section structure. Cascading list boxes aren t limited to a two-level hierarchy; as an example, you can add a Continent list box and replace the Country data source with a ContinentCountry repeating section in the form.
| Note |
Staying in touch with list-management reality |
You can use cascading list boxes to filter the form s contents at any level in the hierarchy. The following example filters customer data generated from the Northwind sample database s Customers table by country or city.
Create the test form and add the drop-down list boxes
- Create a new template from the CustomersLists.xml data document in the C:Microsoft PressIntroducing InfoPath 2003Chapter09DataSources folder, expand the Customers node, drag the Customer repeating group to the work area, and choose Master/Detail to add a repeating table and section to the form.
- Remove all but the Customer ID, Company Name , City, and Country columns from the master repeating table, adjust the widths of the columns to suit their content, and save your form as CustomersMDCity.xsn in the My DocumentsInfoPath MasterDetail folder, and add CustomersMDCity Test 1 as the form name.
- Open the Data Source task pane, drag the CustomersList node s listCountry attribute above the master table, change the text box to a drop-down list box, and delete List from the label.
- Open the list s Properties dialog box, select the Look Up Values In A Form option on the Data tab, click the Repeating Group s Select XPath button to open the Select A Field Or Group dialog box, expand the Countries node, and double-click the Country node.
- Leave the default periods in the Value and Display Name fields, which are references to Country, in the Value and Display Name text boxes, and click OK. Preview the form to verify that the Country list contains the correct values, and then close the preview.
- Drag the listCountryCity attribute to the right of the Country list, change the label to City, and change the text box to a drop-down list box.
- Repeat step 4, but expand the CountriesAndCities node, double-click the CountryCity repeating group, and specify City as the Value and Display Name. The Drop-Down List Box Properties dialog box appears, as shown here:
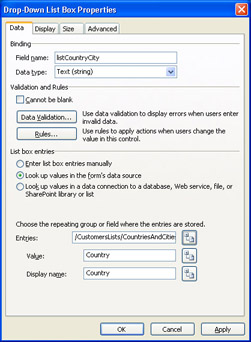
- Preview the form, verify that the City list begins with Buenos Aires and ends with San Cristobal, and then save your changes.
Filter the CountryCity group
- Reopen the Cities list s Properties dialog box, click the Repeating Group s Select XPath button to open the Select A Field Or Group dialog box with the CityCountry node selected, and click the Filter Data button to open the Filter Data dialog box.
- Click Add to open the Specify Filter Conditions dialog box, accept Country and Is Equal To in the first two lists, choose Select A Field Or Group in the third list, and double-click the listCountry node.
- Click the And button to add another condition, and change And to Or.
- Choose Select A Field Or Group in the first list, double-click the listCountry node, and select Is Blank in the condition list. The Specify Filter Conditions appears, as shown here.
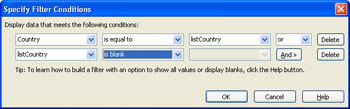
- After you apply the filter the Value and Display Name field names change from City to Country, so change them back to City. Click OK four times to close the dialog boxes and return to the work area. Preview the form.
- Select an item in the Country list, such as USA, open the City list to verify that the cities correspond to the country, and the select another country or no country. Notice that the City list retains an entry for the last city you selected. This artifact is related to the filter behavior mentioned in step 2 of the Test new product addition and filter behavior exercise in the Filtering Repeating Tables and Sections section.
Filter the master table by the Country or City drop-down value
- Open the Properties dialog box for the Customer repeating table, click the display tab, click the Filter Data button, and click Add to open the Specify Filter Conditions dialog box.
- Select City in the first list, accept Is Equal To, choose Select A Field Or Group, and double- click listCountryCity.
- Click And to add another condition, change And to Or, choose Select A Field Or Group in the first list, double-click listCountryCity, select Is Blank, and click OK to add the condition group.
- Click Add to add another condition group, select Country in the first list, accept Is Equal To, choose Select A Field Or Group, and double-click listCountry.
- Click And to add another condition, change And to Or, choose Select A Field Or Group in the first list, double-click listCountry, select Is Blank, and click OK to add the condition group. Your Filter Data dialog box appears, as shown here.
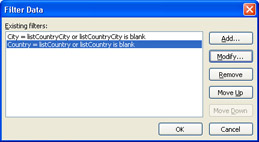
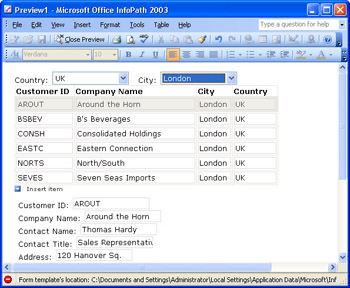
- Save your changes, and open a preview. Rows for all customer elements appear with both drop-down lists empty. Select a country, such as UK, with an empty City list box to display all customers in the country. Select a city to restrict the list to customers in the city, as shown here.
Applying Event Based Rules
InfoPath SP-1 adds a new rules feature that lets you intercept events created by user actions and specify a course of actions, which is subject to a set of conditions you designate for each action. Applying declarative event-based rules minimizes the need to write InfoPath event handlers with programming code.
You can establish rules to handle the following events:
- Form open . Choose Tools, Form Options, to open the Form Options dialog box, click the Open and Save tab, and click the Rules button to open the Rules For Opening Forms dialog box.
- Form submit from the toolbar button or File menu. Choose Tools, Submitting Forms to open the Submit Options dialog box, select the Enable Submit option, choose Custom Submit Using Rules from the Submit list, and click the Rules button to open the Rules For Submitting Forms dialog box.
- Button click. Add a button control to a form, double-click it to open the Button Properties dialog box, and click the Rules button to open the Rules dialog box.
- Control value change. Open the control s Properties dialog box, click the Rules tab to display the Rules list, and click Add to open the Rule dialog box, as shown in Figure 9-2.
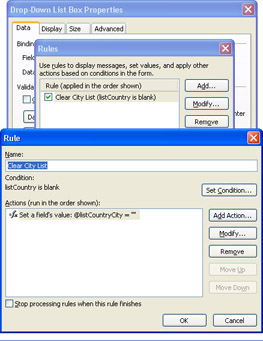
Figure 9-2: This rule sets the CustomersMDCity form s City list box value to blank when you select a blank Country value.
Invoking a rule is subject to conditions for the rule that you specify in a Condition dialog box, shown in Figure 9-3, which is identical to the Specify Filter Conditions dialog box. You can add multiple condition sets, which apply to actions in the same way that multiple expression sets apply to conditional formatting or data validation operations.

Figure 9-3: This condition specifies that the rule of Figure 9-2 is invoked only when you select a blank Country list box.
Following is a list of the actions you can initiate from an event:
- Show A Dialog Message. Displays a message box with the text message you specify and an OK button.
- Show A Dialog Expression. Displays a message box containing the result of a formula as the message and an OK button.
- Switch Views. Displays the view of a name you select from a list. You can specify a view based on the user s role or a button click. (Roles are the subject of the following section, Creating and Assigning Roles. ) This option isn t available for control value change events. Using the Switch Views action is one of the topics of Chapter 10, Adding Views to a Template.
- Set a Field s Value. Sets the value of a selected field to a static value or the result of a formula you specify in the Insert Formula dialog box. You can t change the field value of the control that initiates a control value change event.
- Query Using a Data Connection. Requests data from a database, XML Web service, or Microsoft SharePoint list specified by the data connection you select. You can invoke this action from a button click to refresh an external secondary data source supplied by a database or Web service. Chapter 13, Connecting Forms to Databases, and Chapter 14 cover query and submit actions.
- Submit Using a Data Connection. Sends updates to a database, XML Web service, SharePoint list, or Web site specified by the data connection you select.
- Open a New Form to Fill Out. Opens a new instance of the template s data document.
- Close the Form. Closes the active data document with the opportunity to save changes, if any.
Figure 9-4 shows the actions available in the Action dialog box s Action list for the control value change event. You can add multiple actions for an event, which execute in sequence or after processing an action with the Stop Processing Rules When This Rule Finishes check box selected. (See Figure 9-2.)
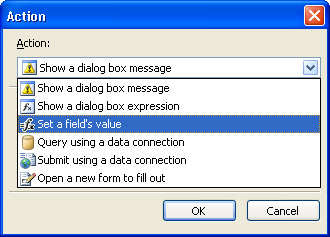
Figure 9-4: This subset of actions is available to handle a control value change event.
The CustomersMDCity.xsn form you created in the preceding section has a minor defect: when you select the empty item in the Country list with a non-blank City selection, the master/child elements don t change. The form should display all customers when you select the empty Country item. Fixing this defect provides a good example of adding a simple rule to a form.
To add a rule that sets the City text box value to an empty string (blank) when you select the empty item in the Country text box, follow these steps.
Add a control value changed event rule
- Open the CustomersMDCity.xsn template in design mode, if you closed it.
- Right-click the Country drop-down list box, open its Properties dialog box, and click the Rules tab.
- Click the Add button to open the Rule dialog box. In the Name text box, replace Rule 1 with Clear City List.
- Click the Set Condition button to open the Condition dialog box, leave the default listCountry in the first list, select Is Blank in the second list, and click OK to add the condition.
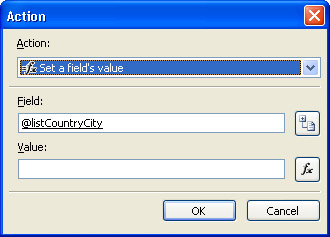
- Click Add Action to open the Action dialog box, select Set A Field s Value in the Action list, click the Field s Select XPath button to open the Select Field or Group dialog box, and double-click the listCountryCity attribute.
- Leave the Value text box empty to specify an empty string ( "" ), as shown here.
- Click OK three times to close the dialog boxes and apply the rule.
- Open a preview, select a country and city, and then select the blank value in the Country list to verify that the City list clears and all customer rows appear in the repeating table.
- Save your template changes.
Rules are a very powerful addition to the InfoPath 2003 feature set. The remaining chapters in Part III of this book contain several more examples of applying rules to views and forms that connect to databases or consume Web services.
Creating and Assigning User Roles
User roles are an essential element of workflow processing. As an example, any employee can initiate an expense report form, but only a supervisor can approve it, and, if the requested reimbursement is more than $1,000 or the initiating employee is a supervisor, a manager s approval might be needed. The roles in this workflow scenario are Employee (called the form s initiator), Supervisor, and Manager. You can specify rules with actions that depend on the role membership of the person who opens the form. For this scenario, the expense report might have different views for Employees , Supervisors, and Managers. The rule displays the appropriate view when the user opens the form.
Establishing roles is a two-step process: you add a role for the template and then add Windows user accounts or security groups; or you add the name of a field that contains a value of user, supervisor, or manager logon (DOMAIN/Username) to the new role. Figure 9-5 shows the UI for adding a Supervisor role and a domain user to the role. The process is similar to adding a new security group to an Active Directory domain or organization unit, or a local group to your computer, and then adding members to the group.
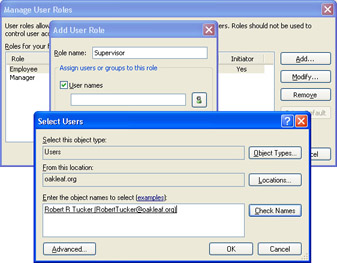
Figure 9-5: You can add a new role and add users, groups, or both in a single operation with InfoPath s Manage User Roles, Add User Role, and Select Users or Select Groups dialog boxes.
The security group analogy doesn t mean that roles provide data security. Even if you restrict members of a role to a read-only view of the data, determined users can edit the XML data document using Notepad. Form users without role membership are assigned to the designated default role, which must be present if you add roles to the form.
User roles are most effective when you and the users of your forms have accounts in a Windows 2000 or later Active Directory domain. If you assign a security group to a role, the form s user must be connected to the network to resolve the username s group membership when opening the form. In addition, the form must be published in a Microsoft Internet Explorer 6.0 local intranet zone or on a trusted site. By default, forms opened from server shares and Web sites in the user s domain are in the local intranet zone. The Automatic Logon With Current Username And Password (the default) or Automatic Logon Only In Intranet Zone option must be selected in the User Authentication, Logon section at the end of the Settings list of Internet Explorer s Security Options dialog box.
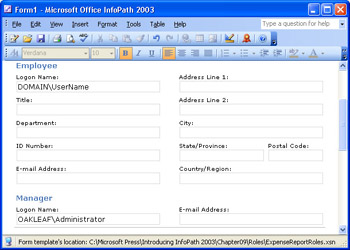
The ExpenseReportRoles.xsn template example ”derived from InfoPath s Expense Report (Domestic) sample form ” demonstrates the use of user logon names that are stored in form fields to determine which of two views a user sees when opening the form. The form has two roles: Employee and Manager. Typing your logon name in the Employee Logon Name text box opens the default Employee/Initiator view; doing the same in the Manager Logon Name text box opens the Manager/Approver view. To test the ExpenseReportRoles form and explore its design, follow these steps.
Open and test the ExpenseReportRoles form
- In InfoPath, open the ExpenseReportRoles.xsn form in the C:Microsoft PressIntroducing InfoPath 2003Chapter09Roles folder. Form1 opens with the default Employee/Initiator view active.
- Scroll to the Manager table, and replace DOMAINUsername with your logon name, as shown here. (Omit DOMAIN to use your local user account if your computer isn t connected to a Windows network.)
- Save the data document as UserAsManager.xml in a new My Documents InfoPathRoles folder, and close it.
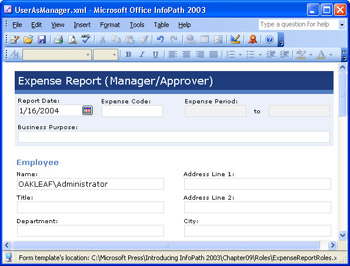
- Reopen UserAsManager.xml, which now displays the Manager/Approver view.
- Replace DOMAINUsername in the Employee table with your logon name, as shown here.
- Replace your logon name in the Manager table with DOMAINUsername or some other invalid account, and repeat step 3, but save the document as UserAsEmployee.xml.
- Reopen UserAsEmployee.xml to display the Employee/Initiator view.
Explore the User Roles and Form Opening Rules
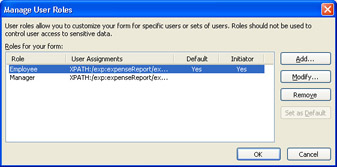
- Click the Design This Form button, and choose Tools, User Roles to open the Manage User Roles dialog box, as shown here.
- Select one of the roles (Manager, for this example), click Modify to open the Modify User Role dialog box, and then click the User Names From The Form text box s Select XPath button to open the Select A Field Or Group dialog box, as shown here.
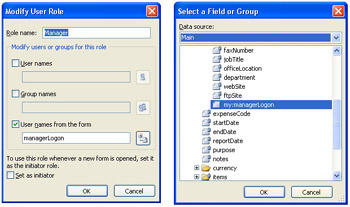
When a my:managerLogon field is added to the Manager node, it stores the Manager Logon Name value. A similar my:employeeLogon field stores the Employee Logon Name value.
- Click Cancel three times to return to the form, and choose Tools, Form Options to open the Form Options dialog box, click the Open and Save tab, and click Rules to open the Rules For Opening Forms dialog box.
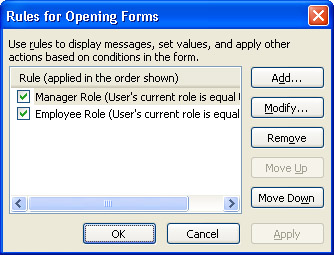
For this example, the rule application sequence isn t important because the manager and employee logons always differ and only one of the rules is invoked. If you specify groups or multiple user names, rule application sequence might be important.
- Select the Manager role, and click Modify to open the Rule dialog box, as shown here.

When rule application sequence is important, you might need to select the Stop Processing Rules When This Rule Finishes check box to prevent executing rules with lower priorities.
- Click Cancel three times to return to the work area.
You also can take advantage of user roles using conditional formatting. For example, you can make specific employee-entered fields read-only for managers, as shown in Figure 9-6, or designate manager-entered approval fields as read-only for employees.
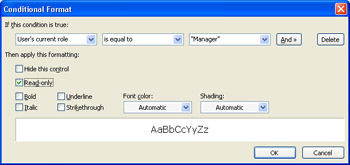
Figure 9-6: Conditional formatting with user role criteria enables specifying controls of a view as read-only for users in a specific role. You also can hide the view s optional sections or controls in optional sections.
Adding File Attachments
The File Attachment control lets you incorporate files of supported types as Base64- encoded data. Supported file types include ASCII or UTF-8 text, most Office System application documents, Web pages, and files of other types that aren t on InfoPath s list of verboten extensions in the note at the end of this section.
Add an attachment to the Expense Report sample form
- In InfoPath, click the Sample Forms link, select the Expense Report (Domestic) form, and click the Design This Form link.
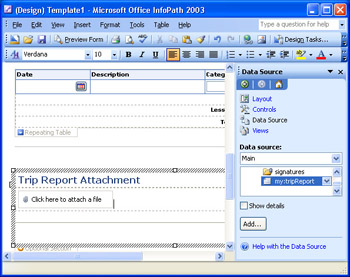
- Scroll to the optional Notes section, change Notes to Trip Report Attachment, and delete the notes rich text box.
- Select the expenseReport root node in the Data Source task pane s list, and click add to open the Add Field or Group dialog box. Type tripReport as the name , select Picture Or File Attachment (base64) as the Data Type, leave the remaining default values, and click OK.
- Drag the my:tripReport field to the table cell formerly occupied by the rich text box, and select File Attachment from the menu to add a default Click Here To Attach A File placeholder, as shown here.
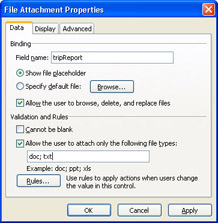
- Right-click the placeholder, and choose File Attachment Properties to open the dialog box. If you have a Microsoft Word or text document to provide a pre-formatted file for a trip report, select the Specify Default File, click the Browse button, navigate to the file, and double-click it. If you want to limit the file types that users can attach, select the Allow The User To Attach Only The Following File Types check box, and type their extensions, separated by semicolons, as shown here.
- Click OK to return to the work area, choose File, Save As, save your template as ExpenseReportAttachment.xsn or the like in a new My DocumentsInfoPath Attachments folder, and name your form ExpenseReportAttachment Test 1.
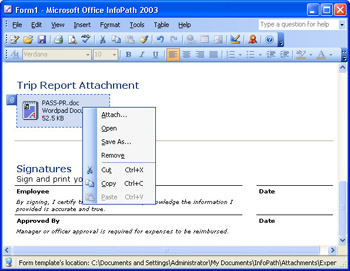
- Select the Fill Out A Form task pane, click the link for the template you saved to open Form1, scroll to the Trip Report table, and click the placeholder to open the File Attachment dialog box. Navigate to a .doc or .txt file, double-click it to add its Base64-encoded content to the form, and replace the placeholder with the document s name, type, and size .
- Right-click the document to display the menu options for file attachments, as shown here.
- Save Form1 as ReportWithWordAttachment.xml or the like, and then check the data document s file size, which is 74K for the 52K Word document used for this example.
- Double-click to open the file. It opens in Word with a randomly generated file name.
The document size without an attachment is 4K, which results in a net increase of 70K for the 52K attachment. The increase in size is the result of Base64 encoding of the binary file, as described in Chapter 4 s The Gory Details of Base64 Encoding sidebar.
| Note |
Practicing safe file attachment |
Using ActiveX Controls in Forms
SP-1 delivers the capability to add simple, single-value ActiveX controls ”such as scroll bar sliders, spin buttons , and progress bars ”to forms and bind their value to a field of the appropriate data type. You also can bind the value of ActiveX controls written specifically for InfoPath to the entire XML text content of a group , or directly to the InfoPath Document Object Model (DOM) node. Custom-written ActiveX controls are beyond the scope of this book.
The exercise in this section adds three types of ActiveX controls that install as part of the Windows XP or later operating system, or as part of Office 2000 or later. You use SpinButton and ScrollBar controls to set the values of text boxes and control the display of ProgressBar controls, as shown in Figure 9-7. InfoPath supports installation of controls that aren t installed on users computers by adding .cab files to the project, which also is beyond the scope of this book.
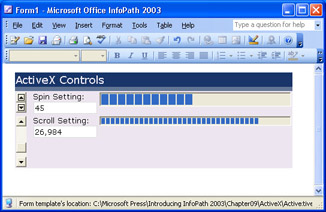
Figure 9-7: This form demonstrates the use of ActiveX SpinButton and ScrollBar controls to set the default values of fields that control the display of ProgressBar controls.
To add the four controls to the Insert Control list s Custom Controls section and then to a demonstration form, and use the SpinButton and ScrollBar controls to set the default value for the ProgressBar controls, do the following.
Add SpinButton, ScrollBar, and ProgressBar controls to a form
- In InfoPath, design a new form using the ActiveXControls.xml data document in the C:Microsoft PressIntroducing InfoPath 2003Chapter09ActiveX folder as its data source. Add a Table With Title to the form, split the second row into three columns , and add a row below the second row. Optionally, add a color scheme to the form.
- In the Data Source task pane, change the data type of each element to Whole Number (integer), and replace the missing default value with the original default value: 50 for spinValue and spinSetting, and 16000 for scrollValue and scrollSetting.
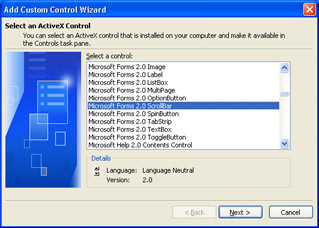
- Open the Controls task pane, and click Add or Remove Custom Controls to open the dialog box of the same name .
- Click Add to open the Add Custom Control Wizard s first dialog box, and scroll to and select the Microsoft Forms 2.0 SpinButton control, as shown here.
- Click Next to accept the default Don t Include A .cab File option, and click Next to display the Specify A Binding Property dialog box. Leave the default Value as the binding property, as shown here.
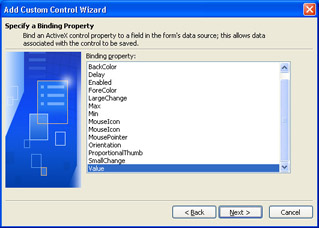
- Click Next, leave the default Enabled as the Enable or Disable Property and True in the list box, and click Next to open the Specify Data Type Options dialog box.
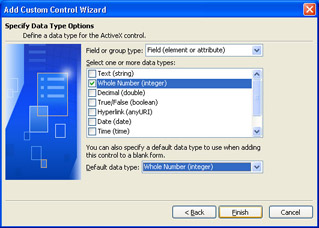
- Leave the default Field (element or attribute) selection. All ActiveX controls you add in this section have numeric Value properties, so clear the default Text (string) check box, select the Whole Number (integer) text box, and select the same data type in the Default Data Type list, as shown here.
- Click Finish to dismiss the Wizard, and click OK to close the dialog and add the custom control to the Custom Controls section of the Insert Controls list.
- Drag the added control to row 2, column A of the table to add a vertically oriented spin button. Bind the button to the spinSetting subnode of the spinButton node.
- Repeat steps 3 through 8, except insert a Microsoft Forms 2.0 ScrollBar control in step 4, drag the control to row 3, column A, and bind the control to the scrollSetting subnode of the scrollBar node.
- Repeat steps 3 through 8, except insert a Microsoft ProgressBar Control, Version 6.0, in step 4, drag the control to row 2, column C, and bind the control to the spinValue subnode of the progressBarSpin node. Refer to Figure 9-7 for sizing.
- Repeat step 11, but insert the ProgressBar in row 3 and bind the control to the scrollValue subnode of the progressBarScroll node, and size it appropriately. As you reduce the height of the ProgressBar control, the number of its elements increases .
- Right-click the second ProgressBar, open its Properties dialog box, click the General tab to display the control s properties sheet values, and change the Max value to 32767, as shown here.
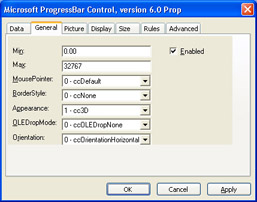
The default maximum value of a ScrollBar control is 32,767; the default maximum value of SpinButton and ProgressBar controls is 100. Microsoft Forms 2.0 controls don t have a properties sheet, so their Properties dialog boxes don t have a General page.
- Save your template as ActiveXDemo.xsn or the like in a new My Documents InfoPathActiveX folder, and assign ActiveXDemo - Test1 as the form name.
Add text boxes, hook up the ProgressBars, and test the form
- In the Data Source task pane, drag the spinSetting field to row 2, column B, and the scrollSetting field to row 3, column B.
- Open the spinValue field s Properties dialog box, click the Insert Formula button, click Insert Field or Group, expand the spinButton node, double-click spinSetting, and click OK.
- Verify that the Update This Value When The Result Of The Formula Is Recalculated check box is selected, as shown on the next page.
- Click OK to connect the ProgressBar to the specified field, and repeat steps 2 and 3 for the scrollValue field, except select scrollSetting in the Select A Field Or Group dialog box in step 2.
- Preview the form, and verify that the SpinButton and ScrollBar controls change the values in the text boxes and the ProgressBars display.
- Save your changes.
Using Advanced Main Data Source Features
SP-1 InfoPath SP-1 adds the ability to convert the main data source of a form to a modified version of the original data source without having to manually modify the template files. SP-1 also supports creating data sources from XML documents that have embedded schemas. The following two sections describe this added InfoPath functionality.
Converting the Main Data Source of a Form
The primary data source in the release version of InfoPath was cast in concrete. Once you created a form from an XML document, schema, database table or query, or Web service, even a minor change to a primary data source required you to create a new form template. InfoPath SP-1 lets you change the main (formerly primary) data source to a modified version that has a similar structure. You also can change the data source from an XML data document to a related XML schema, but you can t change from an XML data document or schema source to a Web service or other data connection (or vice versa). InfoPath maps dependent data to the new data source, where possible. Controls bound to fields or sections that are missing in the converted data source display a warning icon.
Follow these steps to convert the data source for the ProductsMD.xsn template that you created earlier in the chapter to a data source with added fields.
Change the ProductsMD.xsn template s main data source
- Open the ProductsMD.xsn template, if it isn t open .
- Choose Tools, Convert Main Data Source to start the Data Source Wizard.
- Click Browse, navigate to the C:Microsoft PressIntroducing InfoPath 2003Chapter09DataSources folder, double-click ProductsExt.xml, and click Next, Finish, and Yes to replace the main data source and its default values.
- Choose Save As, and save your file as ProductsMDExt.xsn in a new My DocumentsInfoPathAdvancedDS folder, and add ProductsMDExt Test 1 as the form name .
- Open a preview, and verify that the category filter works properly.
- Close the preview, rearrange the existing controls and their labels, drag the added CategoryName and CompanyName fields from the data source list, and, optionally , modify the layout, as shown here.
- Open a final preview, save your template changes, and exit InfoPath.
Creating a Data Source from an Embedded Schema
Data documents with embedded XML schemas are relatively uncommon; in most cases, documents that require schema validation include attributes that specify the namespace and location of the associated schema. Access 2002 and later let you export XML documents that include an embedded XML Schema, such as the ProductsSchema.xml file used in this section s exercise. The .NET Framework represents ADO.NET DataSet objects in DiffGram format, which includes a complete schema for the XML document returned as the payload from an XML Web service.
The advantage of using an embedded or associated schema to define the main data source is that the schema establishes the data types and other constraints when creating XML data documents from the template. The downside of this approach is that the schema is locked, unless the schema contains elements of the xsd:any datatype, which enables InfoPath schema modifications. Schemas containing the xsd:any datatype are as uncommon as embedded schemas.
To create a master/detail form from the Northwind database s Products table that includes an embedded schema, do the following.
Create a simple form based on an embedded schema
- In InfoPath, click the Design A Form link, and click the New From XML Document or Schema link to start the Data Source Wizard.
- Click Browse, navigate to the C:Microsoft PressIntroducing InfoPath 2003 Chapter09DataSources folder, and double-click ProductsSchema.xml. Then click Next, Finish, and Yes to add the data source with default values and activate the Data Source task pane.
- Drag the Products repeating group to the form, and choose Master/Detail to add the repeating table and section to the form. The Discontinued field adds a check box to the form because its field data type is xsd:boolean .
- Click the Show Details link in the Data Source task pane, and expand the Products group to examine the field data types. Access fields of the Text data type ”ProductName and QuantityPerUnit ”appear as elements of the xsd:simpleType datatype, and only the Discontinued field has a default value.
- Optionally, save the form as ProductsEmbedXSD.xsn in the ...Chapter09 AdvancedDS folder, with ProductsEmbedXSD Test 1 as the form name.
Summary
InfoPath SP-1 adds a remarkably useful set of advanced features to the first release of InfoPath 2003. The most important of the added elements is the master/child with its repeating table and linked repeating section. Master/child tables make it practical to manage long lists that incorporate detail fields. InfoPath s new filtering feature is especially applicable to master/child lists, but you also can filter independent repeating tables and sections.
Drop-down lists get a major facelift. You can populate a drop-down list from a form s repeating section, which simplifies list updates, and you can cascade parent/child lists to provide multiple drop-down lists to filter repeating tables, sections, or both. Declarative event-based rules replace complex programming code for intercepting form-based events and taking action based on conditions that you specify. User roles for workflow applications, combined with rules, let you specify what view members of a role see when they open a form or which controls are visible or read-only.
SP-1 extends the ability of base64Encoded fields to storing attachments of common,
e-mail “safe file types. Other helpful SP-1 features include the capability to change the main (formerly primary) data source for a form without starting a new form design from scratch. XML documents with embedded schemas aren t common ”except in ADO.NET DataSets ”but you can create new forms from such documents and establish strong field typing without manual schema modifications.
Q A
|
1. |
Can I incorporate a repeating table in the repeating section of a master/child form? |
|
|
2. |
Is it necessary to enclose repeating elements, such as < Order > or < Item > within parent < Orders > or < Items > tags? |
|
|
3. |
Can I assign users to roles if their Windows XP or Windows 2000 workstations are members of a Windows NT 4.0 domain? |
|

Answers
|
1. |
Yes, if your detail data source has the correct hierarchical structure. An example of a form of this type would be a list of customers, their orders, and the orders line items. In this case, the repeating line item field must be a child of the order field, because you can t cascade master/ detail forms. (A repeating section can t be a master and a detail section.) The following On Your Own section suggests creating an example of a repeating detail section that contains a repeating table. |
|
2. |
No, but it s a generally accepted XML document design practice. Full-featured text editors make it easy to add the parent tags to XML files formatted with white space (linefeeds or carriage -return/ linefeed pairs and indent spaces or tabs). Notepad can t easily handle the required search and replace operations with white space “formatted .xml files. |
|
3. |
Yes, but you can t use the Select Users or Select Groups dialog boxes to assign users or groups to roles. These dialog boxes depend on Active Directory to validate your entries. You can type user logins manually in the User Names text box of the Add User Role or Modify User Role dialog boxes. You also can assign Windows NT 4.0 domain users to roles by storing their logon names in the form. |
On Your Own
Heres an additional exercise that demonstrates the use of repeating tables within repeating sections:
- Create a new form from the CustomersOrdersItems.xml data document in the C:Microsoft PressIntroducing InfoPath 2003Chapter09DataSources folder.
- Add a master/detail repeating table from the Customer repeating group .
- Remove unimportant columns from the master table, and reformat the detail section text boxes to conserve vertical space.
- Add another detail section from the Order repeating group, and link it to the master table by CustomerID key fields. The Item repeating group within the Order group adds a repeating table to the repeating section.
- Reformat the Order sections text boxes to conserve vertical space.
- Preview your template and save it.
- Save an XML data document from the template.
Part I - Introducing Microsoft Office InfoPath 2003 SP-1
Part II - Designing InfoPath Forms
- Creating Forms
- Laying Out Forms
- Adding Basic Controls and Lists
- Formatting Forms
- Validating Form Data
- Working with Advanced Form Elements
- Adding Views to a Template
- Setting Form Template and Digital Signing Options
- Publishing Form Templates
Part III - Working with Databases and Web Services
Part IV - Programming InfoPath Forms
EAN: 2147483647
Pages: 248
