Buffer Layout
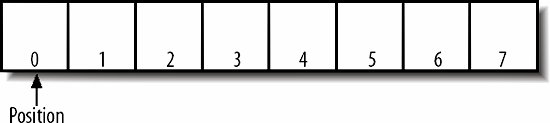
The conceptual model of a buffer is a fixed-size array. For example, suppose we allocate an IntBuffer with a capacity of 8:
IntBuffer buffer = buffer.allocate(8);
Figure 14-1 is a graphical representation of this buffer that I'll use to demonstrate various points. The slots in the buffer are numbered like arrays, starting with zero and ending with one less than the total capacity of the buffer.
Figure 14-1. An empty buffer with capacity 8
A buffer's capacity is fixed when it is first created. Buffers do not expand or contract to fit the amount of data placed in them. Trying to put more data into a buffer than it has room for causes a BufferOverflowException. This is a runtime exception, since overflowing the buffer normally indicates a program bug.
As well as a list of indexed values, a buffer also contains a pointer into that list called the position . The position is the index of the next slot in the buffer that will be read or written. Its value is somewhere between zero and one less than the buffer's capacity. It is initially set to 0 and incremented as data is written to or read from the buffer. You can get the buffer's current position with the position( ) method:
public final int position( )
You can also change the buffer's position by passing the new position to this position( ) method:
public final Buffer position(int new Position)
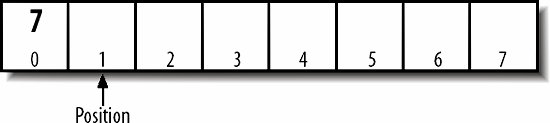
However, most of the time you don't do this explicitly. Instead, the position is updated automatically as data is put into the buffer or retrieved from the buffer. For example, suppose we put the value 7 into the buffer in Figure 14-1:
buffer.put(7);
The int 7 is put in the buffer at position 0, and the position is incremented to 1, as shown in Figure 14-2.
Figure 14-2. A buffer with position 1
|

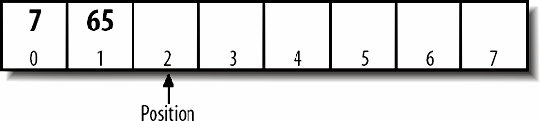
Next, we'll put the value 65 in the buffer at position 1, so the position is incremented to 2:
buffer.put(65);
The buffer is now in the state shown in Figure 14-3.
Figure 14-3. A buffer with position 2
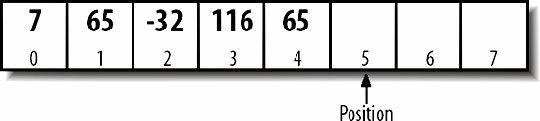
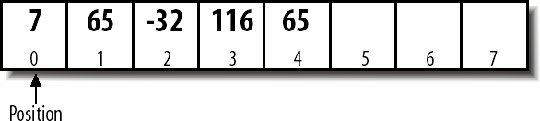
We'll then put three more values in so the buffer is in the state shown in Figure 14-4:
buffer.put(-32);
buffer.put(116);
buffer.put(65);
Figure 14-4. A buffer with position 5
|
Now it's time to read the data out of the buffer. There's a get( ) method that corresponds to the put( ) method. However, if we began getting from the current position, we'd read the zeros in slots 5, 6, and 7. Instead, first we rewind the buffer:
buffer.rewind( );
This doesn't change any of the data in the buffer, but it resets the position to 0, as shown in Figure 14-5.
Figure 14-5. A rewound buffer with position 0
Now it's ready to be read. Call the get( ) method once to read the zeroth value from the buffer:
int i1 = buffer.get( );
Now the variable i1 has the value 7, and the position has advanced to 1. The buffer is in the state shown in Figure 14-6.
Figure 14-6. After reading one value

We can read the next values from the buffer the same way:
int i2 = buffer.get( );
int i3 = buffer.get( );
int i4 = buffer.get( );
int i5 = buffer.get( );
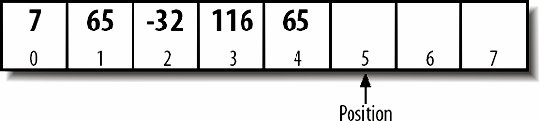
After this is done, the variable i2 has the value 65, i3 has the value -32, i4 has the value 116, and i5 has the value 65. The position has once again advanced to 5, as shown in Figure 14-7. It's important to note, however, that the data is still in the buffer. Unlike when writing data to a stream, the data hasn't vanished, even if we haven't stored what we read anywhere. It's possible to rewind the buffer and read it all again, any number of times. This capability turns out to be surprisingly useful.
Figure 14-7. The buffer after it's been drained
We could read three more times from the buffer:
int i6 = buffer.get( );
int i7 = buffer.get( );
int i8 = buffer.get( );
Again, although we never put anything in those slots, they are initialized to 0. After reading these bytes, the position will now be 8, equal to the capacity. Any further gets at this point without first rewinding the buffer will throw a BufferUnderflowException. This is a runtime exception that usually indicates a bug in the program.
14.3.1. Limit
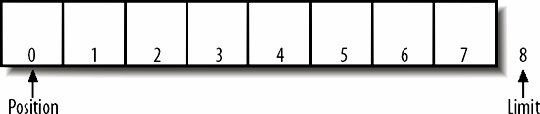
Besides position and capacity, each buffer also has a limit pointer. This is initially the same as the buffer's capacity. That is, a new, empty buffer with eight elements looks like Figure 14-8.
Figure 14-8. A new buffer at position 0 with its limit equal to its capacity
However, the limit can be set to a different value to keep the buffer from being read or written past a certain point. You can set the limit explicitly with this limit( ) method:
public final Buffer limit(int limit)
The no-args version returns the current limit:
public final int limit( )
For example, you might initialize a buffer with a very large capacity, perhaps 2 MB, to make room for any possible data you might want to put there. You'd fill the buffer with as much data as you have. Then, before draining the data out of the buffer, you'd set the limit to the size of the data actually stored. For example, if you put five bytes in the buffer, you could set the limit to 5 and then reset the position back to 0:
buffer.limit(5);
buffer.position(0);
This would allow the process to retrieve elements 0 through 4 from the buffer, but if it tried to read elements 5 through 7, a BufferUnderflowException would be thrown. Before reading, you'd check that the position is less than the limit:
while (buffer.position() < buffer.limit()) buffer.get( );
In practice, we don't manipulate the buffer quite so directly. Instead, we use the flip( ) and hasRemaining( ) methods:
public final Buffer flip( )
public final boolean hasRemaining( )
The flip( ) method sets the limit to the current position and then sets the position to 0. The hasRemaining( ) method returns true as long as the position is less than the limit. Using these two methods, we can make the code a little simpler and more generic:
buffer.flip( );
while (buffer.hasRemaining()) buffer.get( );
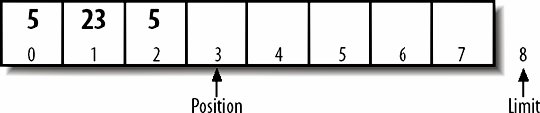
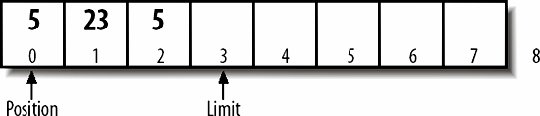
For example, suppose we put three bytes in the buffer from Figure 14-8, like this:
buffer.put(5);
buffer.put(23);
buffer.put(5);
Figure 14-9 shows the result.
Figure 14-9. A buffer at position 3 with capacity 8 and limit 8
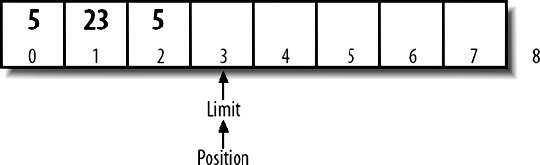
Before draining the data out of it, the buffer is flipped, like so:
buffer.flip( );
This puts it in the state shown in Figure 14-10: the data is the same, but now the position is 0 and the limit is 3. As data is read out of the buffer, the position advances, but the limit stays the same.
Figure 14-10. A flipped buffer
You read from the buffer only as long as the current position is less than the limit:
while (buffer.hasRemaining()) buffer.get( );
After this loop completes, the buffer is in the state shown in Figure 14-11, with the limit equal to the position.
Figure 14-11. A flipped buffer with the limit equal to the position
Basic I/O
Introducing I/O
- Introducing I/O
- What Is a Stream?
- Numeric Data
- Character Data
- Readers and Writers
- Buffers and Channels
- The Ubiquitous IOException
- The Console: System.out, System.in, and System.err
- Security Checks on I/O
Output Streams
- Output Streams
- Writing Bytes to Output Streams
- Writing Arrays of Bytes
- Closing Output Streams
- Flushing Output Streams
- Subclassing OutputStream
- A Graphical User Interface for Output Streams
Input Streams
- Input Streams
- The read( ) Method
- Reading Chunks of Data from a Stream
- Counting the Available Bytes
- Skipping Bytes
- Closing Input Streams
- Marking and Resetting
- Subclassing InputStream
- An Efficient Stream Copier
Data Sources
File Streams
Network Streams
Filter Streams
Filter Streams
- Filter Streams
- The Filter Stream Classes
- The Filter Stream Subclasses
- Buffered Streams
- PushbackInputStream
- ProgressMonitorInputStream
- Multitarget Output Streams
- File Viewer, Part 2
Print Streams
Data Streams
- Data Streams
- The Data Stream Classes
- Integers
- Floating-Point Numbers
- Booleans
- Byte Arrays
- Strings and chars
- Little-Endian Numbers
- Thread Safety
- File Viewer, Part 3
Streams in Memory
- Streams in Memory
- Sequence Input Streams
- Byte Array Streams
- Communicating Between Threads Using Piped Streams
Compressing Streams
- Compressing Streams
- Inflaters and Deflaters
- Compressing and Decompressing Streams
- Zip Files
- Checksums
- File Viewer, Part 4
JAR Archives
- JAR Archives
- Meta-Information: Manifest Files and Signatures
- The jar Tool
- The java.util.jar Package
- JarFile
- JarEntry
- Attributes
- Manifest
- JarInputStream
- JarOutputStream
- JarURLConnection
- Pack200
- Reading Resources from JAR Files
Cryptographic Streams
- Cryptographic Streams
- Hash Functions
- The MessageDigest Class
- Digest Streams
- Encryption Basics
- The Cipher Class
- Cipher Streams
- File Viewer, Part 5
Object Serialization
- Object Serialization
- Reading and Writing Objects
- Object Streams
- How Object Serialization Works
- Performance
- The Serializable Interface
- Versioning
- Customizing the Serialization Format
- Resolving Classes
- Resolving Objects
- Validation
- Sealed Objects
- JavaDoc
New I/O
Buffers
- Buffers
- Copying Files with Buffers
- Creating Buffers
- Buffer Layout
- Bulk Put and Get
- Absolute Put and Get
- Mark and Reset
- Compaction
- Duplication
- Slicing
- Typed Data
- Read-Only Buffers
- CharBuffers
- Memory-Mapped I/O
Channels
- Channels
- The Channel Interfaces
- File Channels
- Converting Between Streams and Channels
- Socket Channels
- Server Socket Channels
- Datagram Channels
Nonblocking I/O
The File System
Working with Files
- Working with Files
- Understanding Files
- Directories and Paths
- The File Class
- Filename Filters
- File Filters
- File Descriptors
- Random-Access Files
- General Techniques for Cross-Platform File Access Code
File Dialogs and Choosers
Text
Character Sets and Unicode
- Character Sets and Unicode
- The Unicode Character Set
- UTF-16
- UTF-8
- Other Encodings
- Converting Between Byte Arrays and Strings
Readers and Writers
- Readers and Writers
- The java.io.Writer Class
- The OutputStreamWriter Class
- The java.io.Reader Class
- The InputStreamReader Class
- Encoding Heuristics
- Character Array Readers and Writers
- String Readers and Writers
- Reading and Writing Files
- Buffered Readers and Writers
- Print Writers
- Piped Readers and Writers
- Filtered Readers and Writers
- File Viewer Finis
Formatted I/O with java.text
- Formatted I/O with java.text
- The Old Way
- Choosing a Locale
- Number Formats
- Specifying Width with FieldPosition
- Parsing Input
- Decimal Formats
Devices
The Java Communications API
- The Java Communications API
- The Architecture of the Java Communications API
- Identifying Ports
- Communicating with a Device on a Port
- Serial Ports
- Parallel Ports
USB
- USB
- USB Architecture
- Finding Devices
- Controlling Devices
- Describing Devices
- Pipes
- IRPs
- Temperature Sensor Example
- Hot Plugging
The J2ME Generic Connection Framework
- The J2ME Generic Connection Framework
- The Generic Connection Framework
- ContentConnection
- Files
- HTTP
- Serial I/O
- Sockets
- Server Sockets
- Datagrams
Bluetooth
- Bluetooth
- The Bluetooth Protocol
- The Java Bluetooth API
- The Local Device
- Discovering Devices
- Remote Devices
- Service Records
- Talking to Devices
Character Sets
