Atmosphere, Film, and Noise Effects
Whether you need to match the natural noise and film grain of your original footage with composited images or add smoke or fog to a scene, you can create most of these useful effects with layers created in Photoshop. It's just a matter of using creative masking, layer Blend Modes, and layer motion to provide realistic results.
Film and Video Noise
Often, when you composite still images with video, you will need to add some "noise" to the still image layer so it more readily blends in with the natural noise in the film or video footage over which you're compositing. There are a couple methods that I've found to work extremely well. One method is creating a noise loop movie that can overlay the still image with variable noise grain size, density, and Blend Modes. Another is using a third-party plug-in from Digital Film Tools, called 55mm Faux Film, which gives you optimal control over the noise size and color balance.
Creating a Noise Loop Movie
As mentioned previously in this book, I've created a noise loop using only a few Photoshop layers and animating them in ImageReady and QuickTime Pro. You can easily follow along with this simple process:
| Note |
You need to have QuickTime Pro installed for this technique, not QuickTime Player;otherwise, you will not be able to copy and paste the movie into itself. |
- Start with a new Photoshop file that is full NTSC 720480 and 72 dpi, with the background set to white.
- Apply the Add Noise filter (Filter > Noise > Add Noise), Gaussian and Monochromatic, and adjust the amount of noise, or film grain, you want to create (Figure 14.1). You can set the Amount to 3% for a simple yet effective grain pattern, although a higher percentage may be necessary to more closely match your footage.
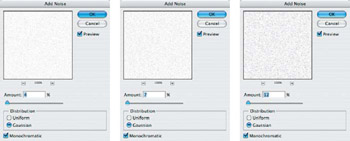
Figure 14.1: Adjust the amount of noise you're applying to closely match how much grain is in your original footage. - Duplicate the background layer and fill the duplicate layer with solid white. Apply the Add Noise filter to the duplicate layer by simply keying
 /Ctrl+F. Since the application of noise is completely random each time you apply it, the pattern of the noise applied will never look the same way twice. Repeat this step until you have created at least six complete layers (Figure 14.2).
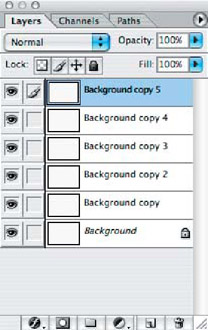
Figure 14.2: Duplicate the layers and apply the Add Noise filter on each layer.
| Note |
Usually, I'd recommend giving layers more meaningful names than these.But we're talking about only random noise here! |
- Jump to ImageReady and select Make Frames From Layers from the Animation palette menu. This will create a different frame for each layer in the file (Figure 14.3).
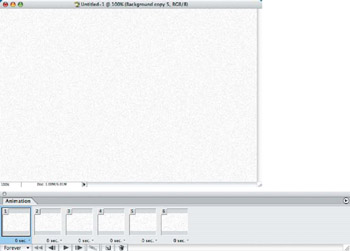
Figure 14.3: Make frames from the layers in the file and export the original as an uncompressed QuickTime movie. - Export the original as an uncompressed QuickTime movie (File > Export > Original Document). Set the options in the Save dialog and select None as a Compression option.
- Open your new noise movie in QuickTime Pro and play it. You'll notice that it's barely distinguishable at only six frames, so you'll need to lengthen it. Select all and copy, and then paste back into the movie file, keying
 /Ctrl+V. Continue pasting the copied movie repeatedly until you have approximately 10 seconds of the noise loop (Figure 14.4).
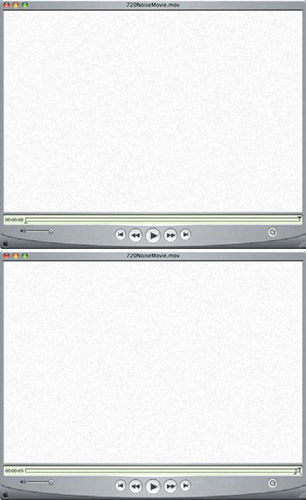
Figure 14.4: Copy and paste the movie into itself repeatedly until it is 10 seconds long. - Play back the movie and notice how smooth it appears. Since we're looping only random noise, the loop will not be noticeable.
Applying the Noise Loop in After Effects
As discussed in Chapter 10, "Motion Matte ‘Painting’ in Photoshop," I used the noise loop movie to add noise to the static image layers in After Effects. I simply imported the movie as footage and placed it in the Timeline just below the blue-screen video footage layer and adjusted the Opacity to 50% (Figure 14.5). To turn the layer into only visible noise, I set the layer Blend Mode to Multiply and made the layers above visible to check for a match in the grain.
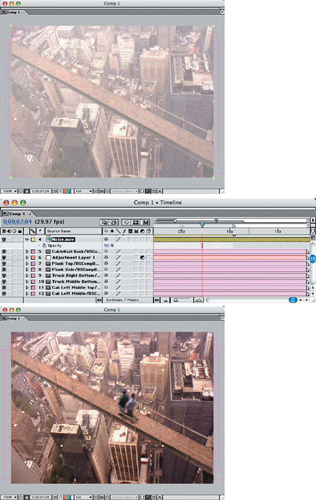
Figure 14.5: Place the noise layer above the static layers in After Effects and set the Blend Mode to Multiply.
Adding Noise with the 55mm Faux Film Effect
In Chapter 9, "Static Matte ‘Painting’ in Photoshop," I used a third-party filter from Digital Film Tools called 55mm Faux Film. This filter offers a lot of controls, such as grain color, size, and brightness.
| Note |
A demo version of this plug-in is on the accompanying DVD for you to try. |
In the After Effects project, I selected the static image layer that has both detailed and wide area coverage across the frame and applied the 55mm Faux Film effect (Figure 14.6). It's pictured here isolated from the rest of the composite to show which areas will be affected by the plug-in.
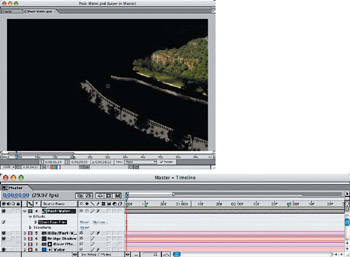
Figure 14.6: The static image layer of this composite has both detailed and wide area coverage.
With the Comp window magnified to 200%, you can see the amount of film grain that is being applied to the layer. The default film Grain size is 0.8, but that was too heavy for this composite, so I adjusted it down to 0.5 in all three RGB color channels (Figure 14.7). I left the rest of the plug-in effect at the default.
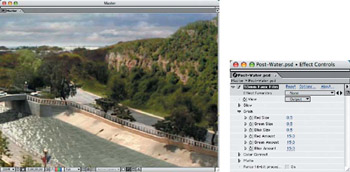
Figure 14.7: Adjust the Grain down to 0.5 in all three RGB color channels.
The final composite is well blended and no static elements appear to stand out (Figure 14.8). You can view the QuickTime movie, Water_Matte.mov, in the Chapter 9 folder on the DVD.
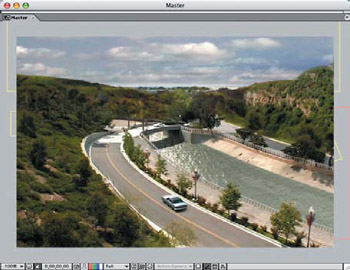
Figure 14.8: Apply the film grain effect to the static layer to make it blend in well with the original footage.
Creating TV Noise
Similar to the noise loop created earlier in this chapter, TV noise is random, only in negative. A blank black-and-white TV screen is black, so the noise, or "snow," created on the picture tube is the absence of information in a signal. This is why a strong TV signal is clear and the contrast is sharp, but a weak signal has this noise over the broadcast picture. Of course, the absence of any broadcast signal at all generates just noise.
- Open the multilayer noise Photoshop file in ImageReady and invert each layer (Image > Adjustments > Invert), so you have white noise on a black background (Figure 14.9). The frames in the Animation palette will automatically update.
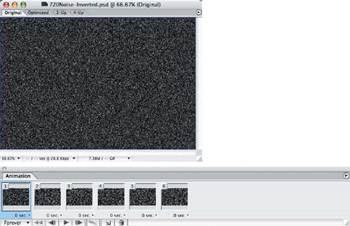
Figure 14.9: Invert the noise layers so the noise is white on a black background. - Export the inverted original as a QuickTime movie.
- Create a longer loop in QuickTime Pro, as you did earlier in this chapter.
- Import your loop into a new After Effects project along with the Photoshop composite file, TV.psd, found in the Chapter 14 folder on the DVD.
- Turn off the screen layer from the Photoshop composite; place the inverted noise layer on top of the TV background layer and set the layer Opacity to 75% to see the outline of the TV behind it (Figure 14.10).
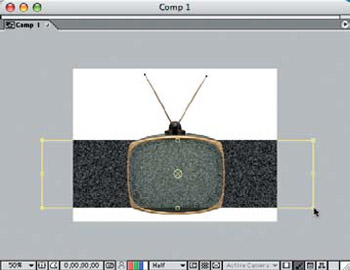
Figure 14.10: Resize the inverted noise movie layer over the TV background layer to fit the screen vertically and leave the layer width alone. - Resize the layer using the Transform handles and squeeze it vertically so that the noise dots become horizontal dashes.
- Apply the Track Matte option as Alpha Matte to the inverted movie layer, and the screen layer above will mask it automatically (Figure 14.11).
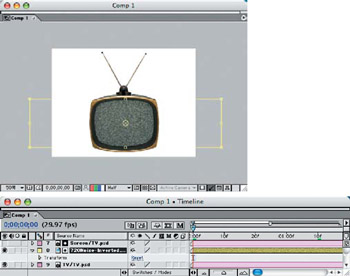
Figure 14.11: Apply an Alpha Matte to the inverted movie layer so that the screen layer above will mask it. - Place a scene on the TV screen and duplicate the inverted noise movie layer (for this sample project, I used a still image, Cowboy.jpg, found in the Chapter 14 folder on the DVD). Adjust the amount of noise that is applied over time in the Timeline, giving the appearance that the signal is wavering (Figure 14.12). Leave the first noise layer alone, but vary the duplicated layer's Opacity on the Time line from 0% to 100%.
| Note |
Layer "transparency"and layer "opacity"are very different.Transparency is the void on a layer surrounding the layer object;opacity is the density of the entire layer.Funny how Adobe chose |
 /Ctrl+T for the Opacity settings though, huh?
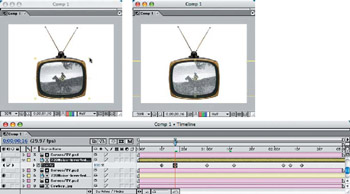
Figure 14.12: Duplicate the inverted noise layer positioned over a scene layer on the TV, and vary the Opacity to simulate a weak signal.
Creating Clouds and Fog from Photoshop Layers
Moving or distorting Photoshop layers in After Effects can produce realistic clouds and fog. By using the Clouds filter in Photoshop, you can create random cloud layers that can be used to float over one another to create 3-D effects—or you can Liquify layers to produce swirls in motion. These clouds can be composited into the background of a scene or screened lightly into the foreground to create fog effects.
| Note |
The process of making cloud layers is somewhat similar to making the initial noise loop, because the Clouds plug-in will randomize the pattern every time it is applied. However, you can reapply the filter over itself on a layer and it will not multiply or "build up"as the Add Noise filter does, so you can keep applying the filter effect until you see a desirable cloud pattern. |
- Start with a new Photoshop file, NTSC 720480 with a white background and the default foreground color set to black.
- Apply the Clouds filter (Filter > Render > Clouds) to the background layer; then duplicate the layer and reapply (Figure 14.13). Keep reapplying the filter by keying
 /Ctrl+V until you are satisfied with the result on each layer.
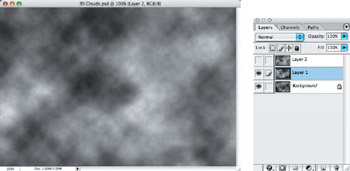
Figure 14.13: Apply the Clouds filter to as many as three layers. - Create a new project file in After Effects, NTSC 640480 with a 10-second composition, and import the Photoshop file as a composition to retain the layers.
- Drag the layers to the Timeline and set the Blend Mode of the top two layers to Screen. Then adjust the Scale of each layer to 160%. This will allow position movement of the layers over time (Figure 14.14).
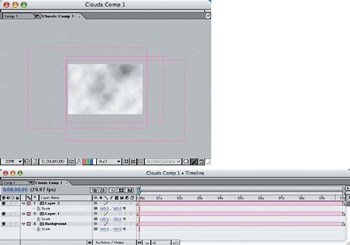
Figure 14.14: Import the cloud layers, increase their scale, and move each layer to prepare for motion. - Drag the layers to opposing diagonal corners. Set the Indicator to the first frame on the Timeline, and click the Position Stopwatch for each layer to set the starting position.
- Go to the last frame on the Timeline and move each layer to the opposite side or corner from its starting position (Figure 14.15). This will create the animation of the different layers and give a 3-D appearance to the clouds in motion.
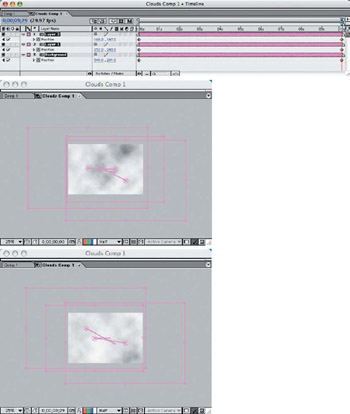
Figure 14.15: Move each layer's position to the opposite side or corner to create the effect of 3-D clouds in motion.
You can adjust the length of time or the distance each layer moves to control the speed of the cloud animation. This cloud animation can now be used as a background or screened over another scene.
Using Liquify to Move Clouds
In addition to moving a layer's position across the frame, you can further distort it to create motion and flow, using the Liquify option. You can also control the amount of distortion over time in the Timeline, which gives you the effect in motion.
Start by duplicating just one layer of the clouds project, and hide the original three layers. Move the Indicator to the first frame on the Timeline and open the Liquify palette (Effect > Distort > Liquify). Apply only a small amount of one of the Liquify distortion tools to a section of a cloud to set the keyframe. Set the Stopwatch in the Effects option on the Timeline to set the first keyframe. Then move the Indicator to the last frame, and apply various distortions to the clouds in the frame, such as Grow, Shrink, Move, or Twirl (Figure 14.16). You can go back along the Timeline and make other distortions if you like, and it will automatically tween. Play a RAM Preview or render out your animation to see the moving cloud effect that was so easy to make!
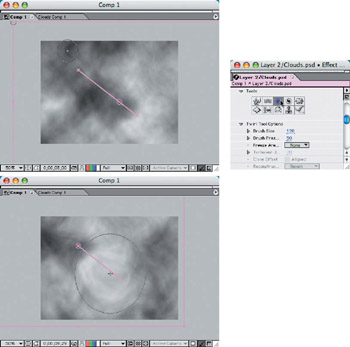
Figure 14.16: Use the Liquify tools to distort the clouds over time.
Adding Mist or Fog to Your Footage
The multiple cloud layer method works well for adding a misty marine layer or moving fog bank into your scene. But to make the effect subtler, you need to lower the layer Opacity and use some of the background footage base colors in making your clouds.
In this example, I opened the footage in QuickTime Pro to which I was going to add the mist and fog. I then created a new Photoshop file and changed the foreground color using the Eyedropper Color Picker to match the green water in the visible Quick Time movie (Figure 14.17). I then applied the Clouds filter and repeated the process on another layer.
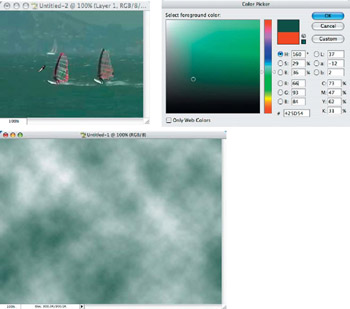
Figure 14.17: Sample the original footage base color to use as the foreground color for your cloud layers.
I then imported the original footage and the Photoshop cloud layer files into an After Effects project. I created a mask for each cloud layer, resized the mask, and applied a 150-pixel feather (Figure 14.18). This allowed the bottom edge of the clouds to be soft while the clouds still went past the edges of the frame.

Figure 14.18: Add a feathered oversize mask to the cloud layers to create a soft bottom gradation.
Since my original footage was 320240 and my cloud layers were 720480, I had to resize them to better fit the scale of the footage layer. I made them two different sizes so they could move independently and still follow the direction the camera moves in the footage layer (Figure 14.19). I scaled them much shorter vertically and the top layer much longer horizontally to match the movement of the camera. I adjusted both layers in Opacity as well, setting the top layer to 50% since it will be the fog layer that moves along with the camera. I set the lower layer to 35% to create a mist effect.
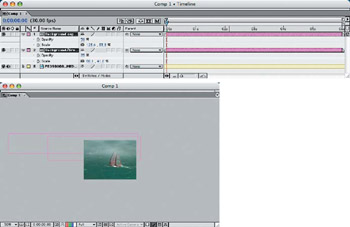
Figure 14.19: By stretching out the cloud layers, you can move them to follow the camera motion in the video clip.
I set the two cloud layers off to the left of the frame in the beginning of the clip and then set the position to the extreme right at the end of the clip (Figure 14.20). Because the lower cloud layer is shorter in horizontal scale, it moves less and makes the effect appear more 3-D.
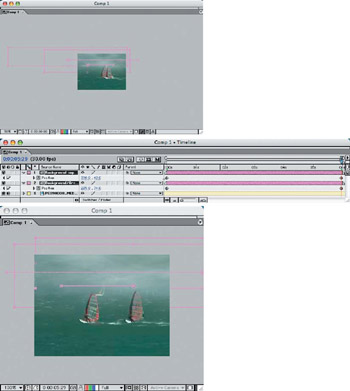
Figure 14.20: Move the cloud layers’ position to the opposite side of the frame to create the motion.
Making Smoke A Real Barnburner
By combining several techniques in this chapter with video alpha channels, you can add realistic smoke effects to stock footage. This effect uses only one Photoshop cloud layer and two stock video clips of fire with a mask copy. You can follow along with these steps or simply open the After Effects file, BarnBurnerProject.aep, to use for reference.
Create a new After Effects project with a composition, NTSC 640480, and import the QuickTime video files RedBarn-Corn-ShortClip.mov (the background footage), RF108.mov (the fire clip), and RF108M.mov (the fire mask clip). Position all three files on the Timeline. Then select both the fire and fire mask clips, scale them down to 19.4%, and move them onto the right corner of the barn (Figure 14.21). Make sure that you keep both layers selected as you scale and reposition them.
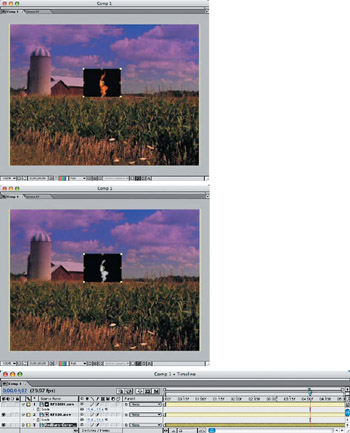
Figure 14.21: Scale and reposition the two fire clips exactly the same over the corner of the barn.
Hide the fire mask layer and select the fire layer. Then apply a Track Matte (Layer > Track Matte > Luma Matte) to reveal just the fire without the black background around it (Figure 14.22). Run a RAM Preview to verify that the two layers match exactly.
The two layers seem a bit too sharp and crisp for the background footage of the barn, so you'll need to apply a 5.0-pixel Gaussian Blur on the fire layer and a 20.0-pixel Gaussian Blur on the fire mask layer. Then apply Brightness & Contrast with the Brightness adjusted to –50 to soften the edges of the flames (Figure 14.23).
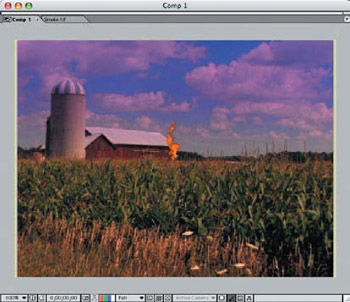
Figure 14.22: Apply a Track Matte, Luma Matte to the fire layer to reveal only the fire.
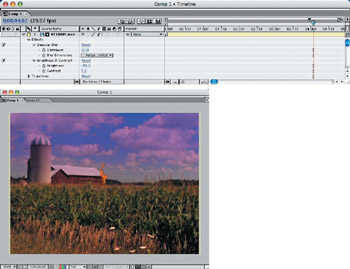
Figure 14.23: Apply a Gaussian Blur and adjust the Brightness of the fire mask layer to soften the flames' edges and match the resolution of the barn footage.
Duplicate the fire mask layer and move it below the fire layer. Change the layer Blend Mode to Silhouette Luma. This is going to become the first smoke layer and it needs to move slower than the flames, so stretch the movie length out 300% (Layer > Time Stretch). Use Transform to stretch the layer vertically to 43.3%, leaving the horizontal dimension the same and move it off to the left in the Timeline to take it out of synch with the flame layer, so it doesn't appear to be a duplicate (Figure 14.24). Increase the Gaussian Blur to 50.0 pixels and remove the Brightness & Contrast effect from this layer. Adjust the Opacity to 20% and play back the RAM Preview to see the effect.
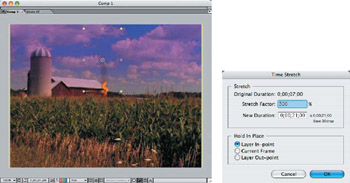
Figure 14.24: Create a moving dark smoke layer from the original fire mask clip.
| Note |
Move the new smoke layer on the Timeline to put it slightly out of synch with the beginning of the fire layer to make it appear more random. |
Import the file Smoke.tif into the project file. This is a single-layer Photoshop cloud file that has been blurred slightly. Apply a feathered mask to the layer, and adjust the Bezier handles to create a tall, narrow shape around the brighter section of the image (Figure 14.25). Set the layer Blend Mode to Lighten and the layer Opacity to 20%.
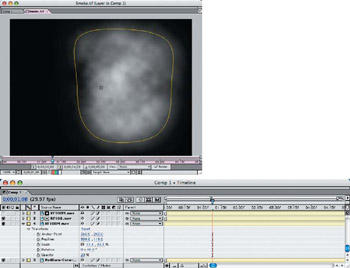
Figure 14.25: Position the smoke cloud behind the first smoke layer and move it subtly against the background (Continues)
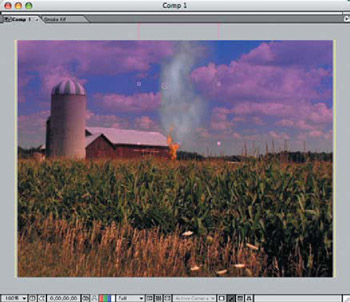
Figure 14.25: Continued
To make the smoke cloud gently rise, click the layer Position Stopwatch at Frame 1 on the Timeline; then go to the last frame and drag the layer up slightly to set the keyframe. Now, to animate the smoke, return to the first frame and apply Liquify with a small amount of the Twirl tool. Go to the last frame again and use larger Twirl and Shift Pixels tool brushes to create upward swirls of the smoke (Figure 14.26). Run a RAM Preview to test the animation of the smoke cloud and adjust the Liquify effects as necessary.
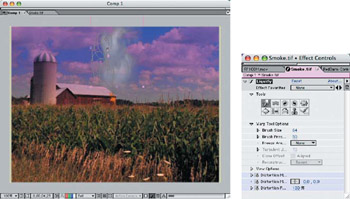
Figure 14.26: Use the Liquify effects to swirl the smoke cloud upward.
Part I - Connecting Photoshop, ImageReady, and After Effects
- Basic ImageReady Animation, Tweening, and Layer Styles
- Photoshop Layers and After Effects
- 3-D Layers from Photoshop Layers
Part II - Applying Animation Concepts
Part III - Clean-Up, Mattes, and Objects
- Blue-Screen Garbage Mattes
- Rotoscoping Techniques with Photoshop
- Matte and Keying Plug-ins
- Static Matte Painting in Photoshop
- Motion Matte Painting in Photoshop
- Making Movies from Stills
Part IV - Advanced Movie Magic
EAN: 2147483647
Pages: 104
