3-D Layers from Photoshop Layers
D Layers from Photoshop Layers
After Effects has the ability to turn any layer into a 3-D layer, allowing you to spin and move the layers, cameras, and lights—just like a 3-D application. There are many detailed camera and light controls to create realistic 3-D motion. Though you can't import primitive shapes or extrusions, you can do many things to fool the eye with photographic shapes cut out from Photoshop layers and rendered in a 3-D scene in After Effects.
Basic 3 D Layers in Motion
Setting up a basic 3-D animation in After Effects requires some basic knowledge of multiple views and moving layers in three-dimensional space, or X-, Y-, and Z-axis. It's really much easier than it sounds, and this project will introduce you to some of those basic controls. You may wish to follow along with the completed After Effects file, 3-DText.aep, on the DVD.
- Start a new project file in After Effects and import two single-layer Photoshop files, FilmReel.psd and MovieText.psd, from the companion DVD (look in the 3-D_MovieText subfolder of the Chapter 3 folder). Import them as composite files to preserve the transparent layers.
- Create a new composition, 640480 NTSC, drag the film reel composition file from the Project window onto the Comp 1 window, and resize the layer to 70% (Figure 3.1).

Figure 3.1: Import and place the film reel composition and resize the layer. - Select the film reel layer, right-click/Ctrl+click it in the Comp 1 window, and select 3-D Layer from the context menu. This will convert the layer to a 3-D layer, using the transparent space of the Photoshop layer as the defining edges in 3-D. (You can, instead, click the 3-D Layer box on the Timeline to convert layers.) This layer can now be moved in all three directions, as shown with the X-, Y-, and Z-axis arrows in the middle of the layer (Figure 3.2).
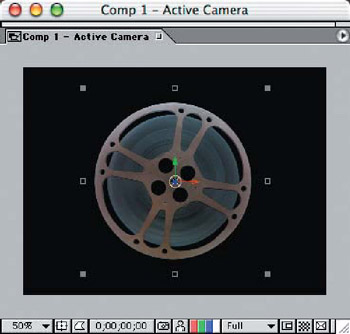
Figure 3.2: Converting the layer into a 3-D layer will allow it to be moved in X-,Y-, and Z-axis. - To make the third dimension more predominant, we'll add the ability for this layer to cast shadows when we shine a light on it. Drop down the settings for the layer and open Material Options. Turn the Casts Shadows option on.
- Duplicate the layer in the Timeline window (
 /Ctrl+D) and press the A key to reveal the Anchor Point settings on both layers.
 - Right-click/Ctrl+click the Comp 1 window tab to bring up the context menu and select Switch 3-D View > Left.
- On the top layer, set the Z-axis Anchor Point to –20. On the bottom layer, set the Z-axis Anchor Point to +20. This will separate the two layers at the center point, creating a simulated film reel (Figure 3.3).
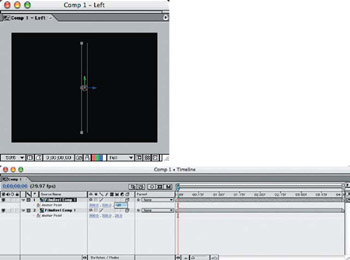
Figure 3.3: Offset the anchor points at the center core to simulate two halves of a film reel.
Parenting the Layers and Adding Text
Now we will connect the two halves of the film reel so they will move in sync with each other.
- Select the top layer and the Parent pull-down menu in the Timeline. Select the second layer as its parent—the top layer will now copy anything that is applied to the bottom layer. They will now rotate around the center of their perspective anchor points, as if they were actually connected.
- Press the R key to reveal the Rotate settings, and click the Stopwatch to set the first marker at the beginning of the Timeline.
- Move the Indicator down to the 6-second mark on the Timeline. Set the Y-axis rotation to 3 +0.0—this will make the film reel spin three complete revolutions in six seconds (Figure 3.4).
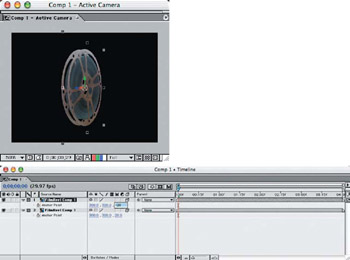
Figure 3.4: With the film reels connected through parenting, they will move together on their anchor points and appear as one object when rotated. - Add the movie text layer to the Comp 1 window and scale it down to 85%, centered in the window. Right-click/Ctrl+click it in the Comp 1 window and select 3-D Layer from the context menu.
- Right-click/Ctrl+click the Comp 1 window tab to bring up the context menu and select Switch 3-D View > Left. Drop down the settings for the layer and open the Material Options. Turn the Casts Shadows option on.
- Move the Indicator in the Timeline down to the point where you see the movie reel at a perfect 90 angle. You will see how the movie reel slices right through the text layer. Select the movie text layer and drag the Z-axis arrow to the right until the layer is just out of reach of the movie reel (Figure 3.5).

Figure 3.5: Make the movie text layer a 3-D layer and move it out of the rotating motion path of the film reel. - Up to this point, there isn't any real light source shining on the scene, so no shadows are visible yet. Create a spotlight for the scene by selecting Layer > New > Light. When the Light Settings dialog pops up, choose Spot as the Light Type and select the Casts Shadows check box. Adjust the Shadow Darkness to 85% and the Shadow Diffusion to 20 pixels (Figure 3.6).

Figure 3.6: Create a spotlight for the scene that will cast shadows and add depth and realism.
| Note |
For more natural-looking light, add a little yellow or orange tint to the light source. It will warm up your scene as if lit by incandescent light—or even natural sunlight. If you leave it white, your scene will retain a bluish cast and appear cold. |
Positioning Lights and Layers
From this point, we will be working in several views on our scene to help us position our lights and layers: the main Active Camera view and Top, Front, and Left side views. Right-click/Ctrl+click the Comp 1 window tab and select Apply Workspace and Two Comp Views. This will create two comp windows on your screen, so if you're working on a smaller monitor, things might get a bit crowded. Just resize the windows to see the entire comp area and stack them up if necessary. You should leave one of them in the Active Camera view all the time, because you will need to see the effects from all of your movements. At times you will need to adjust the scale of the preview window to be able to see some of the objects that move outside the view window, such as lights, cameras, and layers that fly in and out.
- Open a side view window, right-click/Ctrl+click the Comp 1 window tab to bring up the context menu, and select Switch 3-D View > Left. You can also use the view tab on the bottom right side of the Comp window to change views.
- Drag the light up to the right of the object layers, and then drag the Point Of Interest handle down to the center of the movie reel. Open the Front view window and drag the X-axis arrow to pull the light slightly off-center and to the right. This will provide a shadow that will be down and to the left of the movie text layer as it rests in front of the film reel (Figure 3.7). You may wish to zoom out in the Comp window so you can see where you are moving the light beyond the boundaries of the frame.
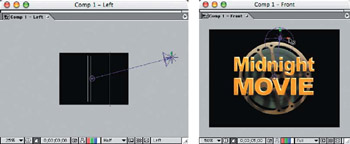
Figure 3.7: Move the light into position to create a shadow that is cast on the lower-left side of the film reel. - Once the light is set into position, hide the layer so the redraw time won't slow down with each move you make of the Timeline Indicator. Move the Indicator down to the 3-second mark, select the movie text layer in the Timeline, and click the Position Stopwatch. This will set the final position of the movie text fly-in animation (Figure 3.8).
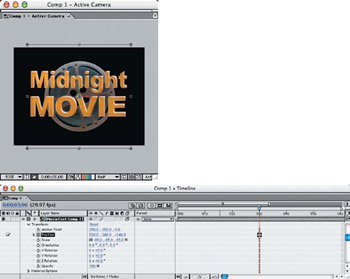
Figure 3.8: Set the final rest position of the movie text layer at the 3-second mark. - Move the Indicator to the first frame on the Timeline, and set the Z-axis of the movie text layer to –890. This makes the layer disappear from the Active Camera window, but viewing the Left side window, you will see it's just out of camera range (Figure 3.9). This gives the appearance that the text will fly in from behind the camera and pull into the spotlight before resting in front of the film reel.
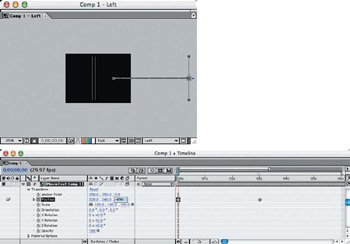
Figure 3.9: Move the movie text layer along the Z-axis to pull it out of frame so it will appear to fly in from behind the camera. - To enhance the realism in this effect, we will add motion blur to the movie text layer as it first enters the frame and pulls into the spotlight. At Frame 1 on the Timeline, apply the Directional Blur filter to the movie text layer, Effect > Blur & Sharpen > Directional Blur. Adjust the Blur Length to 10 pixels and leave the default angle at 0 (Figure 3.10).
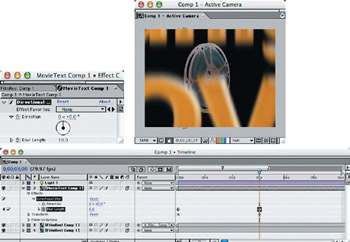
Figure 3.10: Adding motion blur to the movie text will enhance the fly-in motion. - Set the Effects Stopwatch on the Timeline and move the Indicator down to the 3-second mark. Change the Blur Length to 0, because the movie text layer is no longer in motion at this point.
Use a RAM Preview to check that all of the motion is working properly. Though the light and shadows are in the right place at this point, the scene seems a bit muddy—so we'll add some warm ambient light to brighten up the highlights and shadows. Select Layer > Light and choose an Ambient light, set at 35% Intensity without casting shadows. It will help to adjust the color to a darker orange to be sure the shadows are warmed up a bit as well (Figure 3.11). Notice the big difference a small amount of ambient light can have on the entire animation! You can watch the example QuickTime movie 3DFilmText-320.mov found on the DVD for reference.
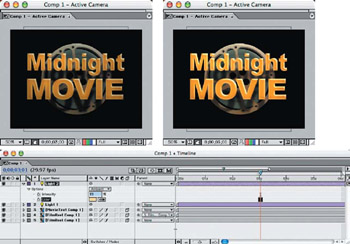
Figure 3.11: Adding a little ambient light to the scene brightens up the layers and warms up the shadows.
Animation with a Camera in Motion
Now that you've experienced working with rotating and moving 3-D layers on an axis, positioning lights, and changing work views, it's time to explore working with cameras. Instead of just moving the 3-D layers, you can move the camera to zoom in on or fly by a scene with static layers. Combine this effect with layers in motion and you have a more exciting animation.
We are going to build this scene at a 90 angle—where the ground will actually be a distant back wall, and the camera will move toward it horizontally, as will the "falling" leaves.
- Create a new project file in After Effects and import a few files from the Chapter 3 folder, the 3-D_Leaves subfolder, on the DVD: Branch.psd, Leaf1.psd, Leaf2.psd, and Leaf3.psd, as composite files to retain the layer transparency. Import the file Grass.jpg as a footage file since it is flat and does not have a transparent layer.
- Create a new composition, 640480 NTSC—6 seconds in length. Drag the grass file from the Project window onto the Comp 1 window and scale it to 85%.
Note You can also open the After Effects project file (3D_Leaves.aep) and follow along with this tutorial;the finished QuickTime movie is also available on the DVD.
- Right-click/Ctrl+click the image in the Comp 1 window and select 3D Layer. Set the Z-axis position to 1800 (Figure 3.12). This will place the grass layer far enough from the window view to appear just slightly larger than the frame window.
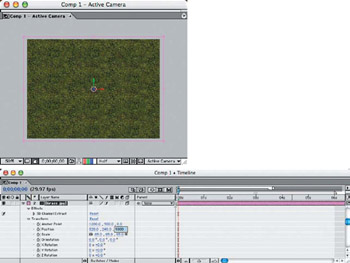
Figure 3.12: Set the grass background away from the frame view in Frame 1 as the zoom out position.
| Note |
In projects that have a lot of camera moves, lights, and several layers, it's a good idea to set the resolution in the Comp window to Half or Quarter.This will allow you to preview the frames quicker and give you faster scrubbing and RAM Previews.Switch back to Full resolution any time you need to double-check the true color and focus of the frames. |
Setting Up a Camera
Let's create a camera to move:
- Choose Layer > New > Camera. There are many options available to customize your camera at this point, but for this project, just select the 50mm Preset option and click OK (Figure 3.13).
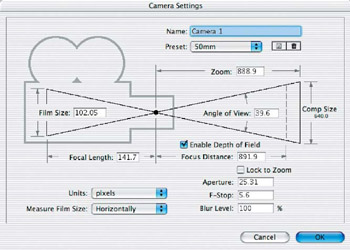
Figure 3.13: Create a simple camera with a 50mm lens that can be moved through the scene.This places the camera on the Timeline as a layer—so all of the same settings and controls for position, rotation, options, and more are controlled in time—just like any other layer.
- Open the Left side view; you will see the triangle of the camera's field of view (FOV). To make sure you keep everything aligned properly, show rulers (
 /Ctrl+R) and drag down a guideline to the center of the motion path. Drag the Point Of Interest circle from the camera down to the center of the grass layer (Figure 3.14).
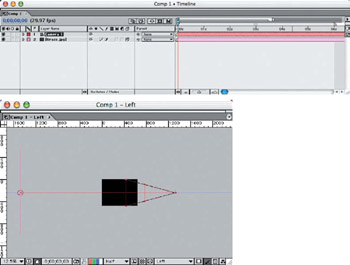
Figure 3.14: The camera works like any other layer that can be moved in the Timeline. - Open the Timeline settings for the camera layer and click the Position Stopwatch at Frame 1. This sets the current position of the camera at the beginning of the animation.
- Move the indicator to the 5-second mark, set the Z-axis on the camera to 900, and select the Easy Ease In Keyframe Assistant (Figure 3.15). This should place the camera FOV triangle in the Left side view right up next to the grass layer at the end of its motion path. The new Active Camera view should show the grass zoomed in close.
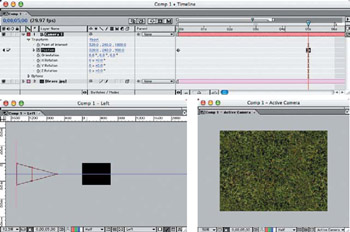
Figure 3.15: The motion of the camera is a simple straight line that will travel "through"the tree branches and toward the ground.
Preparing the Layers
We have a lot of work to do, scaling and positioning layers. The branches will be placed in 3-D space in our scene, and the leaves need to be animated to "fall" to the ground as the camera moves in.
- Drag the branch composition file to the Comp 1 window and convert it to a 3-D layer, as we did to the grass layer. Since this layer will remain static as the camera passes by, just place it into position by setting the Z-axis to –500 (Figure 3.16). Check the Left side view to see the placement in reference to the camera— which should be so close that it shows only the edges of a few leaves.

Figure 3.16: Place the static branch layer close to the camera so it will brush by in the animation. - The branch layer is a bit dark in contrast to the lush green grass, so we'll adjust the levels on the layer. Select Effect > Adjust > Levels and set the Input White setting to 180.0 (Figure 3.17). When we add the lights later in this project, the leaves will appear more natural in the scene.
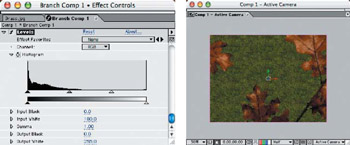
Figure 3.17: Adjust the levels of the branch layer to enhance the leaf colors. - Duplicate the branch layer and position the duplicate below the first branch layer. Open the Transform settings for Branch Layer 2, and set the Z Rotation to +180.0 and the Position to 223.0, 178.6, –120.0. Check the distance from the first layer and the camera in the Left side view.
- We want this layer to be a little darker than the first branch layer, since the light will be shining on the lower branches more in this project. Set the Input White to 220.0 (Figure 3.18). This will also add more depth to the view from the camera as it passes by.
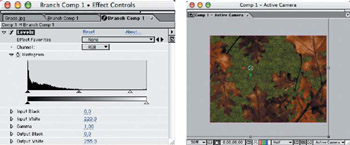
Figure 3.18: Adjust the levels of Branch Layer 2 slightly darker than the first to add depth to the camera view. - Duplicate Branch Layer 2 and reposition it lower in relation to the other branch layers: Z Rotation +345.0 ; Position 324.6, 254.1, 290.0. This will be our "bottom" branch on the tree as the camera passes through, and it creates another layer of depth. Notice how the layers are stacked in the Left side view (Figure 3.19). Select the Levels settings and adjust the Input White level to the default 255.0.
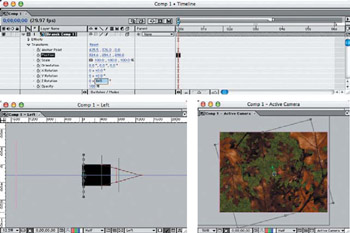
Figure 3.19: Reposition the third branch layer to give added depth to the tree layers.Scrub the Timeline Indicator to preview the camera's motion path (Figure 3.20). You will notice that the camera appears to be heading straight for the ground through the tree branches. There is no other scaling or zooming in this effect—only natural camera motion.
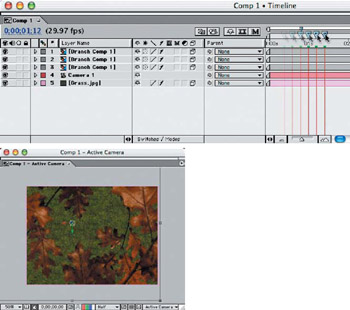
Figure 3.20: Preview the camera's motion path by "scrubbing" the Current Time Indicator back and forth on the Timeline. - Drag the Leaf 1 composition to the Comp 1 window, convert it to a 3-D layer, and set the scale to 40%. Open the Material Options settings on the Timeline and turn on the Casts Shadows option.
Note Don't worry about where the leaf layer is.As a 3-D layer it doesn't matter where it will be placed in the Timeline hierarchy, and it will be animated in the Z-axis as well.
- Move the Indicator to the 5-second mark on the Timeline and set the Z-axis to 1790.0 (Figure 3.21). This places the leaf just 10 pixels above the grass layer in its resting position, and it will appear more natural when the lights are added and a slight shadow is cast on the grass layer beneath it. This leaf will be the first one to hit the ground, so subsequent leaves will land about 10 pixels higher on each occurrence so that they overlap slightly.
- Rotate and drag the layer off-center and to the lower left so there will be room for the other leaves to fall into the frame. You can use the Move and Rotation tools or enter these numeric settings: Z Rotation –80.0 ; Position 227.9, 306.1, 1790.0.

Figure 3.21: Position the leaf just above the grass layer in its resting position as the first leaf to hit the ground in the animation.
The Rotation Tool: the "Axis of Evil"?
As handy as the Rotation tool is, you must take care in its use, because it is often unwieldy and can spin your camera or object around in ungodly directions—right in the middle of your motion path! A slight movement too far in one direction and you've inadvertently added a complete revolution or overcorrected in the opposite direction. This happens the most with lights and cameras—where you may not discover the error until you do a RAM Preview of your animation. I have opted for the numeric input right on the Timeline, or you can use the drag method on the axis number on the Timeline. This gives you precise control and instant feedback in the Comp view windows—and, I hope, not spinning in all directions!
Repeat this procedure with the remaining two leaf layers, converting them to 3-D layers and repositioning them at the 5-second mark (Figure 3.22). Open the Material Options settings on the Timeline and turn on the Casts Shadows option. Check Table 3.1 for the position and rotation settings of these layers, or use the Move tool to position them manually to your liking. The most important setting to watch is the Z-axis position so the layers don't intersect with one another or get hidden behind another layer.
|
Transform |
Leaf Layer 2 |
Leaf Layer 3 |
|---|---|---|
|
Position |
466.5,103.4,1780.0 |
359.2,232.2,1770.0 |
|
Z Rotation |
0.0 |
+15.0 |
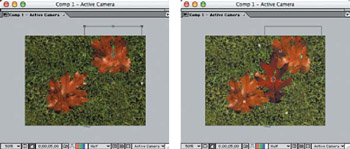
Figure 3.22: Position the second and third leaf layers just above first so they appear to overlap.
Animating the Layers
Now that we've determined the resting positions of the leaf layers, let's put them into motion! I've created some simple animations of the leaves falling to the ground slightly ahead of the camera's motion path and will list all of the settings in tables for each leaf. Take note that even though we've created the resting positions for the leaf layers, they will all end their motion path at different intervals, so make sure to follow the key frames as indicated in the tables.
The first step to applying these settings for the animation paths is to start with the last frame of each layer's motion path (the leaf's resting position on the Timeline) and click the layer's Position and Rotation Stopwatches. Also, look for the appropriate Keyframe Assistants for Ease In settings. A blank cell in a table denotes no key frame marker for that setting.
We'll start with Leaf Layer 1 settings (Figure 3.23/Table 3.2). Notice the finished motion path that is created. Scrub the Timeline Indicator to preview the motion the leaf makes to the ground.
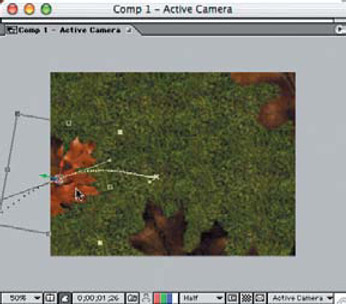
Figure 3.23: The motion path for Leaf Layer 1
|
Transform |
00;16 |
01;26 |
03;13 |
|---|---|---|---|
|
Position |
−104.7,561.8,100.0 |
−1.5,280.0,877.0 |
227.9,306.1,1790.0 |
|
Z Rotation |
−19.0 |
−80.0∞ |
|
|
Keyframe Assistant |
Easy Ease In |
The animation settings for Leaf Layer 2 (Figure 3.24/Table 3.3) and Layer 3 (Figure 3.25/Table 3.4) follow consecutively.
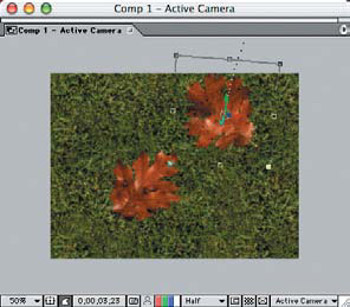
Figure 3.24: The motion path for Leaf Layer 2
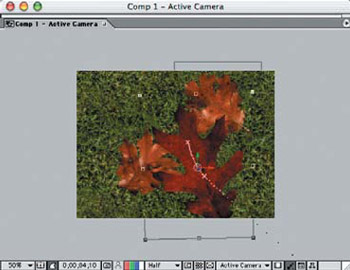
Figure 3.25: The motion path for Leaf Layer 3
|
Transform |
00;25 |
01;16 |
02;11 |
03;00 |
03;23 |
04;03 |
|---|---|---|---|---|---|---|
|
Position |
779.5, |
543.0, |
436.3, |
466.5, |
||
|
−158.3, |
10.8, |
23.8, |
103.4, |
|||
|
266.3 |
200.0 |
1102.9 |
1780.0 |
|||
|
X Rotation |
−11.0 |
+12.0 |
+0.0 |
|||
|
Y Rotation |
+18.0 |
−9.0 |
+0.0 |
|||
|
Z Rotation |
+26.0 |
+0.0 |
||||
|
Keyframe Assistant |
Easy Ease In |
|
Transform |
00;00 |
02;00 |
03;03 |
04;08 |
04;23 |
05;00 |
|---|---|---|---|---|---|---|
|
Position |
593.2, |
544.8, |
369.0, |
359.2, |
||
|
342.3, |
298.7, |
294.2, |
232.2, |
|||
|
100.0 |
0.0 |
1306.1 |
1770.0 |
|||
|
X Rotation |
−16.0 |
−16.0 |
+4.0 |
+0.0 |
||
|
Y Rotation |
−10.0 |
+17.3 |
−6.8 |
−2.0 |
+0.0 |
|
|
Z Rotation |
−18.0 |
−18.0 |
+10.0 |
+15.0 |
||
|
Keyframe Assistant |
Easy Ease In |
Now that the animations have been created, use a RAM Preview or scrub the Indicator in the Timeline to verify that all of the settings are correct.
Adding Lights
We'll add lights to the scene, which will add depth and dimension to the animation.
- First add a spotlight (Layer > New > Light) and choose Spot Light, 100% Intensity, and a warm yellow light color.
- Open the Left side view and drag the light up and to the right of the camera's position at Frame 1. Drag the Point Of Interest circle to the center of the grass layer, at the same point as the camera's Point Of Interest (Figure 3.26).
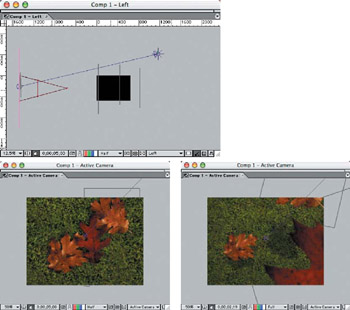
Figure 3.26: The spotlight adds shadows and dimension to the scene. - Move the Indicator to the 5-second mark and open the Light 1 layer Options settings in the Timeline. Click the Shadow Stopwatches and set the options as follows:
- At 02;00, Shadow Darkness 0%
- At 02;19, Shadow Darkness 35%
- At 05;00, Shadow Darkness 70% and Shadow Diffusion 10.0 pixels
After applying the settings, scrub the Indicator to see how the shadows increase as the leaves near the ground.
- You'll most likely notice that the scene has a lot of contrast between the shadows and the lit areas, which has actually made the animation look a bit muddy.
Select Layer > New > Light and choose Ambient Light at 35% Intensity and a yellow-orange color (Figure 3.27). Adding a warm ambient light to the scene will soften the shadows and brighten the colors of the leaves—especially in the foreground at the beginning of the animation.
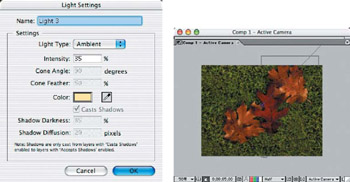
Figure 3.27: Adding a warm ambient light will brighten the animation and soften the shadows.
Duplicating Layers in Motion
Adding motion to more of the objects in the animation, as well as moving the camera and light source, can liven up a 3-D scene. By duplicating some layers in motion and redistributing them along the Timeline, you can create a complex animation in little time.
This project uses a camera on a single motion path through a scene with static and moving 3-D layers and a spotlight moving in an arc from left to right. You can open the file 3-DMoney.aep from the 3-D_Money subfolder on the DVD to follow along with this project to familiarize yourself with the process. Again I've provided a sample of the final QuickTime movie.
Create a new project file in After Effects and import the single-layer Photoshop file, BillsBackground.psd, from the Chapter 3 folder on the DVD. Create a new composition, 640480 NTSC—6 seconds in length. Import the two multilayered Photoshop files, CoinStacks.psd and Bills.psd, as composition—cropped layers. This will trim the unwanted transparent space around the layer objects so they can be properly scaled and placed.
Drag the background file onto the Comp 1 window and convert it to a 3-D layer. Open the Left side view and drag the Z-axis arrow to the left about 1000 pixels from the center. Alternatively, you can open the background layer setting on the Time line and enter 1000 in the Z-axis position (Figure 3.28).
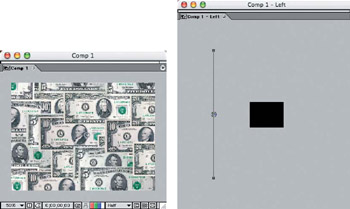
Figure 3.28: Position the stacked bills image as a 3-D layer in the background.
Duplicate the background layer and position it upward in the Y-axis position, next to the original layer. Apply the Position settings, –1928 in the Y-axis and 1008 in the Z-axis in the Timeline (Figure 3.29). This will place the duplicated layer just slightly behind the original so the seam won't show in the final rendering.
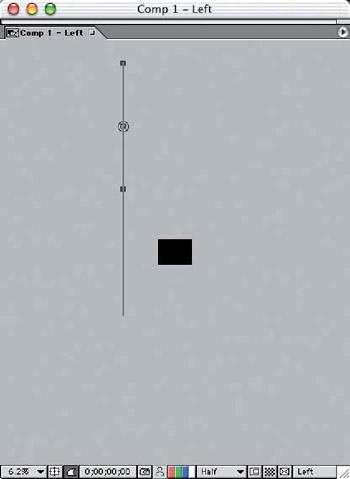
Figure 3.29: Duplicate the background layer and position it on top of the original to create one long background to move the camera along.
Create a new camera layer, with the 50mm preset. From the Left side view window, reposition the camera and its Point Of Interest down toward the background layer, to get an idea of the starting angle for the animation (Figure 3.30). The exact location is not critical at this point, since we'll be animating the camera later on in this chapter.
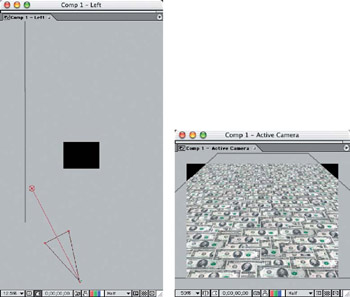
Figure 3.30: Angle the camera down at the background layer by dragging the Point Of Interest handle.
Drag the four stacked coin layers from the Project window to the Comp 1 window, from inside the CoinStacks folder in the Project window. While they are all still selected, convert them to 3-D layers and select the Casts Shadows Materials option. Then rotate all four selected layers 90 in the X-axis by opening up the Rotation settings on the Timeline.
Set the scale of the four layers to 60%. Deselect and hide the penny, nickel, and dime layers. Then enter the following Transform settings for the stacked quarters layer position at Frame 1 (Figure 3.31):
- Position 91.0, 586.2, 906.0
- Scale 60.0%
- X Rotation +90.0
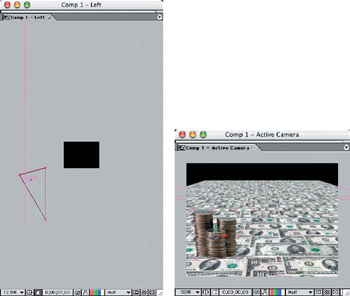
Figure 3.31: Position the stacked coin layers against the background layer
Position the remaining three stacked coin layers to the settings shown in Table 3.5. This will set the first location of these layers before we duplicate and relocate them (Figure 3.32).
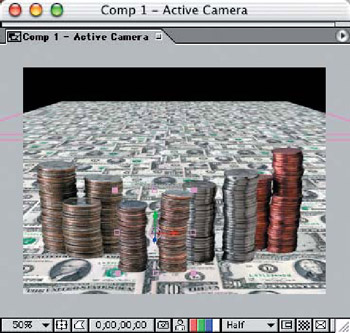
Figure 3.32: Follow the settings to position the stacked coin layers on the background.
|
Transform |
Dimes |
Nickels |
Pennies |
|---|---|---|---|
|
Position |
428.0,708.7,923.1 |
536.0,416.3,909.6 |
172.0,388.5,896.1 |
|
Scale |
60.0% |
60.0% |
60.0% |
|
X Rotation |
+90.0 |
+90.0 |
+90.0 |
Now that you have the initial stacked coin layers in place, you can duplicate them and reposition them around the background. Be sure to space them out so they aren't too close together, and leave plenty of room for the other elements to pass through in animation (Figure 3.33). All of your movements can be done in either the Left side view window or the X-and Y-axis settings of each layer on the Timeline. Be sure not to change the Z-axis settings, or your coin stacks may be cut off at the bottom or appear to float in the air above.
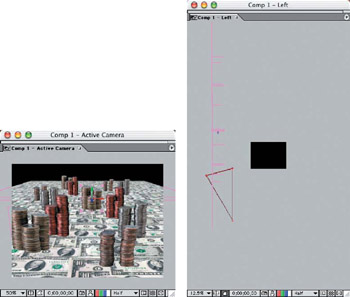
Figure 3.33: Duplicate and reposition the coin layers, distributed around the background.
Putting the Camera in Motion
We'll now animate the camera by creating a motion path for it. This will determine the speed of the animation as well as the timing for the remaining motion elements. Since we've added the stacked coins and placed them about the background, we can determine the path down the middle for the camera.
I've created this motion path to emulate physical camera motion. The camera's motion path is smooth, as if it is on a dolly track, but then it swoops down and back up again at the end as if on a crane (Figure 3.34). Follow the keyframe settings in Table 3.5 to re-create this motion track. Scrub the Indicator on the Timeline to preview the camera motion path.
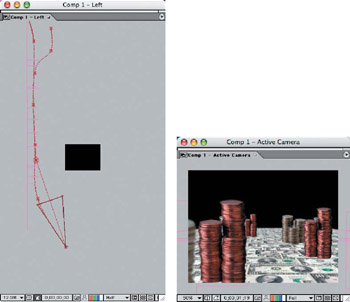
Figure 3.34: Create the camera's motion path through the scene.
|
Transform |
00;00 |
01;15 |
03;00 |
04;15 |
05;00 |
05;26 |
|---|---|---|---|---|---|---|
|
Point Of Interest |
272.0, |
272.0, |
272.0, |
272.0, |
||
|
288.0, |
−712.0, |
−1864.0, |
−2416.0 |
|||
|
848.0 |
896.0 |
888.0 |
1048.0 |
|||
|
Position |
272.0, |
272.0, |
272.0, |
272.0, |
272.0, |
272.0, |
|
1856.0, |
984.0, |
16.0, |
−1288.0, |
−1688.0, |
−2096.0, |
|
|
311.1 |
815.1 |
863.1 |
871.1 |
575.1 |
575.1 |
|
|
Keyframe Assistant |
Easy Ease In |
We'll add the bills in and animate them, and then we'll duplicate and reposition as we did with the static coin layers. Select and drag all three bill layers from the Project window to the Comp 1 window. Convert them to 3-D layers and select the Casts Shadows Material option. Apply the motion path settings for each bill as outlined in Tables 3.6, 3.7, and 3.8. Note the placement of the bill animations in the Left side view and how they land in between the gaps of the stacked coins (Figure 3.35).
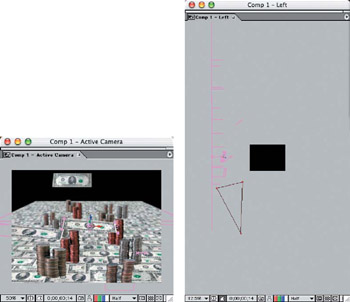
Figure 3.35: Animate the bill layers to land in between the stacks of coins.
|
Transform |
00;00 |
01;00 |
01;08 |
|---|---|---|---|
|
Position |
−504.0, 507.4, 596.0 |
484.0, 507.4, 998.0 |
540.0, 507.4, 998.0 |
|
X Rotation |
+15.0 |
+0.0 |
|
|
Y Rotation |
−10.0 |
+0.0 |
|
|
Keyframe Assistant |
Easy Ease In |
|
Transform |
00;00 |
00;15 |
01;00 |
01;09 |
|---|---|---|---|---|
|
Position |
680.3, 214.9, 998.2 |
287.2, 215.1, 801.6 |
625.2, 215.1, 998.0 |
687.2, 215.1, 998.0 |
|
X Rotation |
+0.0 |
+15.0 |
+0.0 |
|
|
Y Rotation |
+0.0 |
−6.0 |
+0.0 |
|
|
Keyframe |
Assistant Easy Ease |
|
Transform |
00;00 |
01;22 |
01;24 |
02;00 |
|---|---|---|---|---|
|
Position |
78.0, −409.6, 350.0 |
284.0, −409.6, 949.0 |
284.0, −409.6, 998.0 |
|
|
X Rotation |
+0.0 |
8 x +0.0 |
6 x +17.0 |
+0.0 |
Duplicate the animated bill layers and redistribute them along the Timeline, filling in the gaps between the stacked coin layers. Scrub the Indicator to test the timing of the animations to see that there isn't any interference with subsequent animations (Figure 3.36).
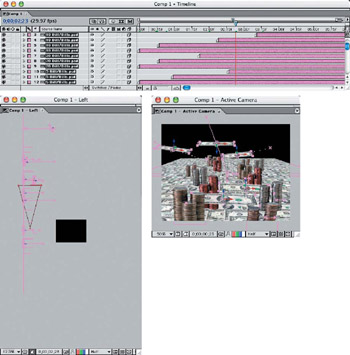
Figure 3.36: Duplicate and reposition the animated bill layers, distributed along the Timeline and in between the stacks of coins.
Adding Lights
Once the animations are positioned and the timing is satisfactory, it's time to shed some light on this animation. We'll need a spotlight to cast shadows and an ambient light to warm and brighten up the scene.
Create a new spotlight layer, with 100% Intensity and a warm yellow light. Select the Casts Shadows check box, and set the Shadow Darkness to 85% and the Shadow Diffusion at 20 pixels. Open the Left side view and move the light over the back tip of the camera, and then drag the Point Of Interest handle down to the middle of the background layer (Figure 3.37). I've set the light's Point Of Interest to 320.0, 208.0, 1801.0 and the Position to 346.7, –418.7, –846.2.
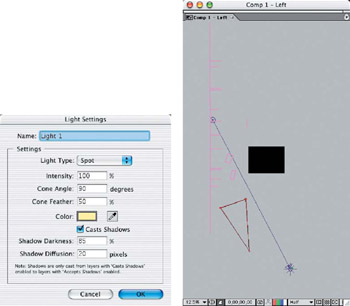
Figure 3.37: Create a warm spotlight and position it above the camera, pointed toward the middle of the scene.
Open the Front view window and move the spotlight over to the left side of the scene, so the light will cast shadows off to the right in the Active Camera window. To set the spotlight in motion, click the Position Stopwatch in the Timeline and move the Indicator down toward the end of the animation. Move the spotlight to the right side, and pull the adjustment handles in the Left side view window to create an arc in the spotlight motion path (Figure 3.38).
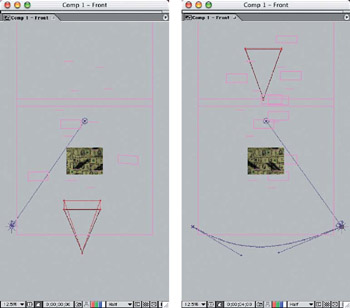
Figure 3.38: Move the spotlight to the upper left to cast shadows off to the right in the beginning of the animation.
Add an ambient light layer, 35% Intensity and a warm orange color. Adjust the Intensity level if the scene is too bright or too dim. To create a greater depth of field from the camera in motion, adjust the camera layer's Aperture to 50 pixels—a higher number provides a greater depth of field, while a lower number offers less depth (Figure 3.39).
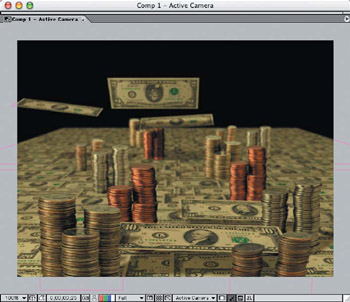
Figure 3.39: Adding a warm ambient light and increased depth of field adds to the realism of the animation
Part I - Connecting Photoshop, ImageReady, and After Effects
- Basic ImageReady Animation, Tweening, and Layer Styles
- Photoshop Layers and After Effects
- 3-D Layers from Photoshop Layers
Part II - Applying Animation Concepts
Part III - Clean-Up, Mattes, and Objects
- Blue-Screen Garbage Mattes
- Rotoscoping Techniques with Photoshop
- Matte and Keying Plug-ins
- Static Matte Painting in Photoshop
- Motion Matte Painting in Photoshop
- Making Movies from Stills
Part IV - Advanced Movie Magic
EAN: 2147483647
Pages: 104
