Photoshop Layers and After Effects
At the root of the partnership of After Effects and Photoshop is the ability to transfer Photoshop layers to separate comp layers in After Effects and then edit the original as desired without having to replace or re-import layers. What may be 20 static layers in Photoshop can become 20 moving layers in After Effects.
This chapter briefly explores that union between the two applications so you can design your projects with this workflow in mind. See Chapters 10–12 for more projects utilizing this concept.
Basic Layer Transfers
Virtually any Photoshop file with multiple layers can be imported into After Effects with all of the layers separated—but there are a few rules to consider before attempting this process. If you don't properly organize and name your project files and name the layers correctly, you may end up with a real mess!
When you are creating your Photoshop layers, be sure to name them sequentially (1, 2, 3, etc...) or alphabetically (a, b, c, etc...), with Layer 1 or Layer a being the top layer (see Figure 2.1). This will ensure that the layers will remain in the correct order when you import the file into After Effects. I've created some real problems for myself by not remembering to do this and ended up with Background as my top layer of a 20-layer project!

Figure 2.1: Correct naming will ensure that your project's layers will remain in the correct order when transferred.
You can import your Photoshop files into After Effects as either a footage file, which merges all of the layers together (or allows you to select just one layer in the file), or as a composition, which leaves the layers intact (see Figure 2.2). Once the file is imported into your project, you will have a composite layer and a folder that contains all of the individual layers.
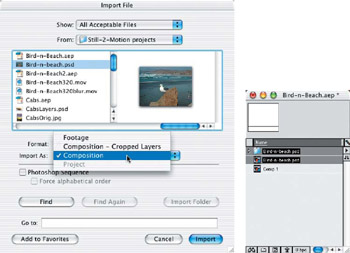
Figure 2.2: Importing the Photoshop file as a composition will keep the layers intact.
To maintain the correct positioning of the layers, drag the entire folder to the Comp view window or the Timeline window (Figure 2.3). If you try to select all of the layers inside the folder and drag them independently, they will center in the Comp view window instead of maintaining their correct positions in relation with one another.
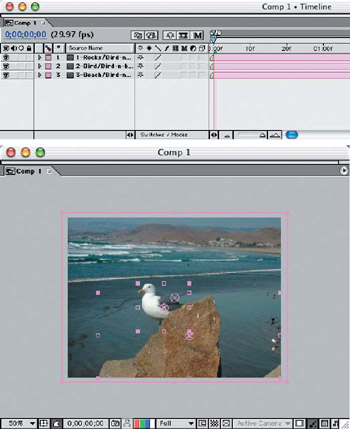
Figure 2.3: Move the imported file folder to maintain proper layer position and hierarchy.
| Note |
If you are importing a layered Photoshop file as a composition and are not going to need the layers scaled down drastically for an extreme zoom, then simply double-click the composition file After Effects creates for you in the Project window. All of your layers will remain intact and in the proper hierarchy. |
You can easily edit a file once it's imported into After Effects. Click on any layer in the Project window and select Edit > Edit Original ( /Ctrl+E). This will launch Photoshop and open the file for editing.
Once you've made your edits in Photoshop, save the file. Go back to your After Effects project, and select the layer(s) of the edited file and choose File > Reload Footage from the menu (Shift+ +L/Shift+Ctrl+L). This will update the entire project with the edited layers, so there's no need to re-import the file or start over again with a new project.
Transferring Layers with Style Effects
After Effects doesn't utilize layer styles like Photoshop does, so it's important to know how to transfer layers and keep the applied effects in place. In most cases, merely merging the layer with the style effect applied to a new blank layer will do the trick.
There are only four layer styles that will transfer correctly visually, though they are not editable in After Effects: Drop Shadow, Bevel And Emboss, Color Overlay, and Inner Shadow (Figure 2.4).
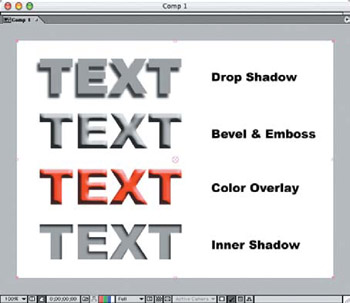
Figure 2.4: There are only four layer style effects that appear correctly when the layers are transferred to After Effects.
When the Photoshop file is imported into After Effects as a composition, it will give you all of the actual Photoshop layers, plus a composition layer for each layer that has an effect applied to it. It will also give you a composition layer for every layer set you have in your file—though all of the layers in the layer set composition will not be separately movable (Figure 2.5).
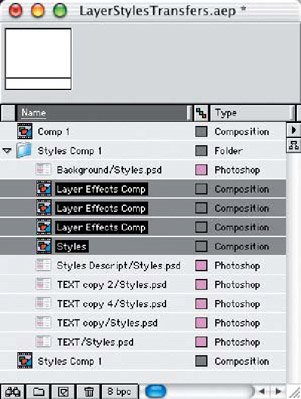
Figure 2.5: Composition layers are created when importing layers with style effects applied, as well as layer sets.
When applying effects that won't transfer—especially when there are several effects applied to one layer—you will need to create a new layer and link it with the style layer. Select Merge Linked from the Layers palette menu, and the effects will be rendered and rasterized, as shown in Figure 2.6. In this example, the layer with style effects applied was duplicated to demonstrate how both layers will transfer to After Effects.
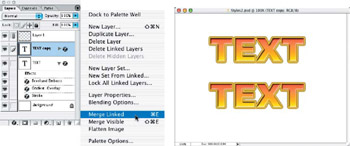
Figure 2.6: Merge styled layers with new blank layers to render the effects in one layer, retaining all transparency of the layer's content.
Importing this example file with one rendered layer and one layer with the style effects applied shows how the effects will not transfer correctly unless rendered first (see Figure 2.7).
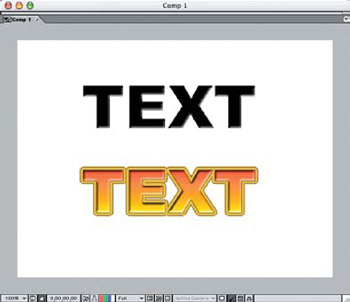
Figure 2.7: After importing the Photoshop file with both a style effect layer (black) and a rendered layer, you can see what the preferred method would be.
However, if you don't render the layers first, you can import the file as footage and merge the layers. This will render all of the style effects on the fly, but it will also flatten the file so no editable layers will remain (see Figure 2.8).
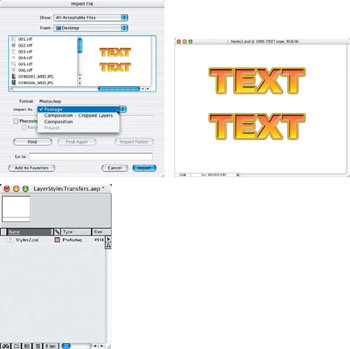
Figure 2.8: Importing the Photoshop file as footage and merging the layers, you will get a flattened image with all of the style effect layers rendered.
Displacement Maps Static Layers in Motion
One way to animate a static image is to apply a moving displacement map layer to the image layer. Using this technique, you can make still waters ripple, static flags wave, or trees in the background sway in the wind. This requires creating a grayscale displacement map image that will be animated in a loop and applied to the image layer you want to affect.
In this first project study of displacement maps, we will be using the file Water.jpg, found on the DVD (Figure 2.9). Notice that this is a perspective angle photograph—which will be important as we create the displacement map image.
| Note |
For comparison and examples, you can view the completed QuickTime sample movies for this chapter, found on the DVD. |
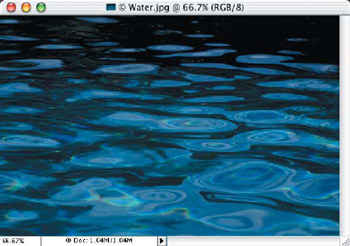
Figure 2.9: The source image that will be put into motion with a displacement map
Creating a Displacement Map
The Displacement Map Effect plug-in in After Effects uses varying levels of gray in the map image. Lighter areas of the image will move the image up and to the right, while the darker areas will move portions of the image down and to the left. How much it gets moved is controlled not only by the effect settings in After Effects but also by how much contrast is in the displacement map source image.
To create the displacement map for this project, we'll start with a new image file in Photoshop that is 720720 pixels, Grayscale. Apply the Clouds filter to the image (Filter > Render > Clouds). This will create the contrasting light-to-dark areas in a random pattern.
We will need to tile this image horizontally for use as a moving displacement map. To make a seamless tile, apply the Offset filter (Filter > Other > Offset), and set the Horizontal offset to +350 pixels with the Wrap Around option selected. There will be a sharp vertical division line down the center of the image that needs to be edited out. Using the Clone Stamp tool with a large soft-edged brush, select areas of the image that will most likely cover up the hard edge line and blend them in with the rest of the image (Figure 2.10).
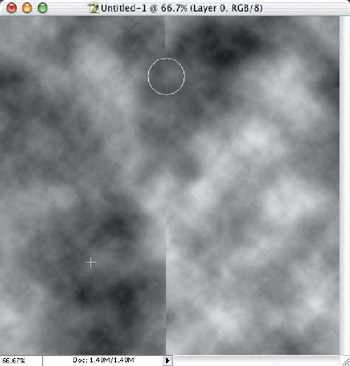
Figure 2.10: After applying the Offset filter to the cloud image, use the Clone Stamp tool to eliminate the hard vertical line down the center.
The more contrast a map image has, the more severe the motion will be. Since we don't want violent movement in the water image we're using, apply a 10-pixel Gaussian Blur to soften the image and take away any sharp contrast.
| Note |
An alternative method of normalizing an image used for a displacement map would be to adjust the midtone marker in Levels;this also gives you a real-time preview of the amount of contrast in the image. However, this method will not smooth out the edges of transition from the contrasting shapes, as a Gaussian Blur will. |
The water image we're applying the displacement map to is a perspective view, so we will control the amount of motion toward the back of the scene (or top of the image window) by adding a Solid Color Fill layer with a soft gradient mask (Figure 2.11). When selecting the color of the Fill layer, choose 50% gray (128 RGB), because this will read 0% as a displacement map color, while white is +100% and black is −100%. To further force the illusion of depth, resize the height of the image to 480 pixels, for a final dimension of 720480 pixels.
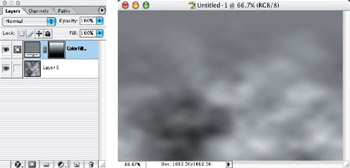
Figure 2.11: Softening the cloud effect and adding a neutral gradation from the farthest perspective point will create a sense of depth in the motion of the final composite.
Applying a Displacement Map
Follow these steps to apply the map to an image:
- Create a new project in After Effects and make a new composition, selecting the preset, NTSC DV, 720480, and 5 seconds in length.
- Import the file Water.jpg from the DVD and the Cloud map image you just created (or use the provided map image, CloudsBlur720.jpg on the DVD). Center the Cloud map image in the Comp 1 window (Figure 2.12).
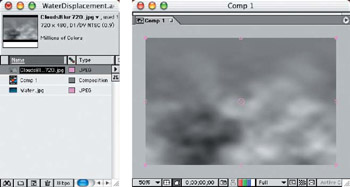
Figure 2.12: Create a new project and import the source image and the displacement map image files. - Now that everything is imported into After Effects, we will set the displacement map in motion. Select the CloudsBlur720.jpg layer in the Timeline window, and apply the Offset filter (Effects > Distort > Offset). Make sure the Current Time Indicator in the Timeline window is set to Frame 1, and select the Time-Vary Stopwatch on the Shift Center option in the Effects window. This will allow beginning and end points for the motion of the displacement map image.
- Move the Current Time Indicator on the Timeline to the last frame position (5 seconds). In the Effects window, drag the horizontal position of the Shift Center option to the right, increasing the movement to at least 1000 pixels. This is the distance the image will move (or offset) while the tile wraps around and appears to be a continuous loop (Figure 2.13).
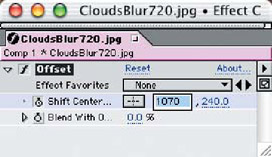
Figure 2.13: Adjusting the number of pixels the displacement map will move will speed up or slow down the animation.You can choose a RAM Preview to test the speed at which your loop is moving. To slow it down, simply adjust the amount of motion set at the last frame in the Effects window. To speed it up, increase the number of pixels it will move.
- Once you are satisfied with the speed of your animation, create a pre-composition by selecting Layer > Pre-compose, with the options Move All Attributes Into The New Composition and Open New Composition selected (Figure 2.14). This will treat the displacement map as a continuous loop animation in one layer of Comp 1.
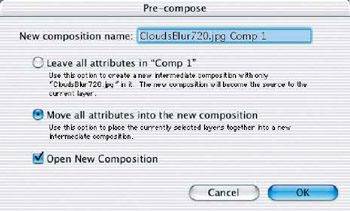
Figure 2.14: Create a pre-comp for the displacement map animation loop. - Hide the Pre-comp layer in the Timeline by clicking the small eye icon. The displacement map does not need to be visible for the effect to work.
- With the Comp 1 project window open, center the Water.jpg image in the window. Adjust the size of the image just slightly larger than the live area of the project window frame (Figure 2.15). This will assure there will be enough image around the edges that will be pulled in by the movement of the displacement map effect.
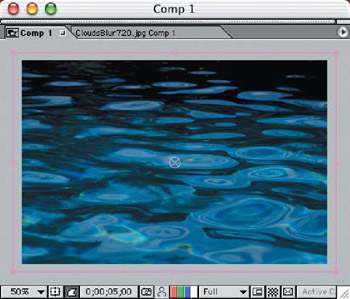
Figure 2.15: Adjust the image layer to allow source material to be pulled and pushed out of the frame by the displacement map. - Apply the displacement map effect to the Water image layer by selecting Effects > Distort > Displacement Map. Select the source displacement map image from the selector, choosing the pre-comp layer name (Figure 2.16). Use Luminance for both the Horizontal and Vertical displacements, and set the maximum pixel movement to 15 for both. Increase or decrease these numbers to control the amount of movement you wish to have in your animation.
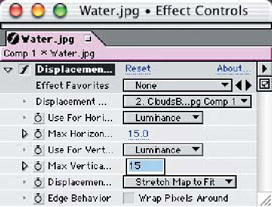
Figure 2.16: Apply the displacement map pre comp layer to the image layer and adjust for the amount of displacement the map source image will affect.
Run a RAM Preview to test the animation of the displacement map effect and adjust the speed and pixel displacement as necessary (Figure 2.17). Notice how the neutral gray toward the top of the image has less of the effect applied, aiding the illusion of depth in the scene.
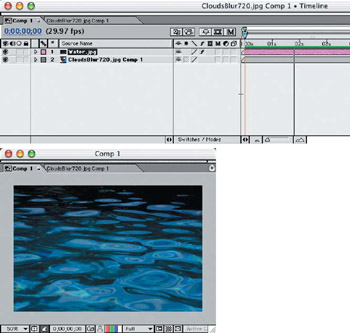
Figure 2.17: A RAM Preview will allow you to test the amount of displacement and the speed of the motion effect.
Masking and Adjusting a Displacement Map
Using different techniques in creating your displacement map for varying needs, you must keep in mind the scale of the source image and how much displacement you want to apply to generate motion.
In the image Reflect.jpg found on the DVD, we want to just put a slight motion in the water without affecting the shoreline (Figure 2.18). We need a denser displacement map for this project since we don't want to create a lot of violent motion in the water.

Figure 2.18: This image will require a displacement map with more density for a smaller scale water surface texture, plus a mask to keep from affecting the shoreline or the trees in the background.
Starting with a new file, 720480 pixels, Grayscale, apply the Difference Clouds filter (Filter > Render > Difference Clouds). Repeat the filter application at least a dozen times ( /Ctrl+F) until you have a detailed swirl pattern with a lot of contrast (Figure 2.19). Next, add a new layer and apply the Clouds filter to it. Adjust the opacity of the layer to 50%, and the resulting image is softened but the details still show through the surface (Figure 2.20).
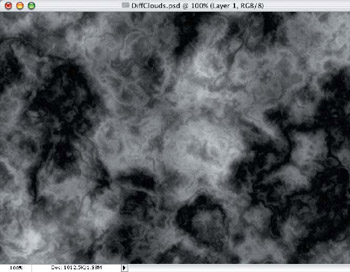
Figure 2.19: Reapplying the Difference Clouds filter over itself several times creates an intricate swirl pattern.
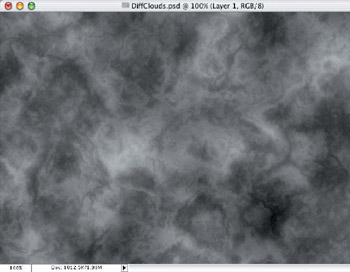
Figure 2.20: A 50% Cloud layer added above the swirl pattern softens it without losing detail.
Create a new project in After Effects and follow the steps in the previous project for setting up and importing, using the new displacement map you just created and the Reflect.jpg image from the DVD. Similarly to the previous displacement map project, follow the steps to create an animated pre-composition of the displacement map layer. Use the same Offset settings for the speed of the animation loop.
Apply the displacement map effect to the reflection image, selecting the pre-composition layer as the displacement source, and use Luminance for both Horizontal and Vertical displacement. For this project, leave the default settings for pixel movement, as we need a more subtle effect applied to the image, and the scale is much lower.
We now need to mask the upper portion of the displacement map so the effect is applied only to the water in the image. Open the displacement map composition in the Composition window. Add a solid color layer (Layer > New > Solid), and set the color to 50% gray (128 R, 128 G, 128 B). To quickly apply an adjustable mask, we'll use a fixed Linear Wipe transition (Effect > Transitions > Linear Wipe). Set the Wipe Angle to 0 and the Transition Completion to 30%. This will place the edge of the effect close to the tree line, but adding a Feather of 75 pixels will make a smooth transition into the water and scale back the amount of movement in the water near the shoreline (Figure 2.21).
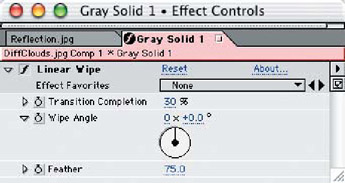
Figure 2.21: Adding a solid layer and applying a static transitional wipe will mask the effect of the displacement map to the image.
Run a RAM Preview to test the animation of the displacement map effect and adjust the speed and pixel displacement as necessary.
Part I - Connecting Photoshop, ImageReady, and After Effects
- Basic ImageReady Animation, Tweening, and Layer Styles
- Photoshop Layers and After Effects
- 3-D Layers from Photoshop Layers
Part II - Applying Animation Concepts
Part III - Clean-Up, Mattes, and Objects
- Blue-Screen Garbage Mattes
- Rotoscoping Techniques with Photoshop
- Matte and Keying Plug-ins
- Static Matte Painting in Photoshop
- Motion Matte Painting in Photoshop
- Making Movies from Stills
Part IV - Advanced Movie Magic
EAN: 2147483647
Pages: 104
