Matte and Keying Plug-ins
If you have the Standard version of After Effects, your blue-screen keying choices are pretty limited. You can manage to get a decent outline of your subjects, but forget about fine details such as hair, transparency, or shadows. The Professional Bundle version of After Effects 6 now ships with a very powerful professional chroma keying plug-in called Keylight. Other professional keying Plug-ins have been available from third-party developers for several years, as well as specialized Plug-ins specifically for DV.
Keylight
This is the plug-in that currently ships with the After Effects Professional (Production on v.5.5) Bundle. This new version of Keylight is derived from the version used on high-end software-editing systems for the professional film industry and is simple and easy to use. If you have this plug-in installed, you probably won't need anything else for your general keying needs. It does an overall great job and retains the texture and subtle nuances of the keyed material's highlights and shadows.
In most cases, a single click of the Eyedropper from within the plug-in will give you great results with either green-screen or blue-screen shots. With the background layer and blue-screen or green-screen layer (also known as the chroma key layer) placed on top in the Comp window, select the Keylight plug-in from the Effects menu (Effects > Keying > Keylight). Use the Eyedropper tool in the Effects window and select the blue or green chroma background (Figure 8.1). If you have a clean shot of the chroma key layer, then even details such as fine hair will be nicely composited with the background layer at this point.
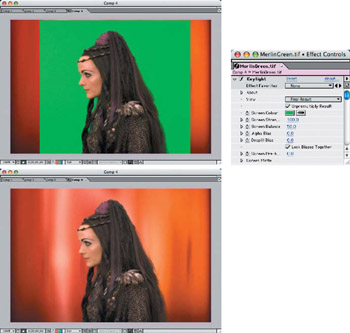
Figure 8.1: One simple click with the Eyedropper tool in the Keylight effect plug-in will give you good results most of the time without the need for further adjustments.
| Note |
If you don't have the Pro Bundle version of After Effects 6,then you can't use Keylight.Unfortunately, The Foundry has not written a stand-alone plug-in for After Effects at the time of publication, so there is no demo version available.You may wish to check with The Foundry online at http://www.the-foundry.co.uk. |
Removing Chroma Spill from Details
When you have a chroma key shot that has a lot of background color bleed or "spill" into the details and edges of the subject, the shot will require a bit more than just the simple click to remove it. Keylight can remove spill from fine hair or separate reflections from glass with only a few adjustments.
In this first example, the figure was lit very lightly against a dark blue-screen background, which was composited against a scenic background (Figure 8.2). The problem was that her fine, wavy blonde hair was picking up too much of the surrounding chroma hue, so when the initial key was made, there was still a great deal of blue-magenta color in her hair that needed to be removed (Figure 8.3).
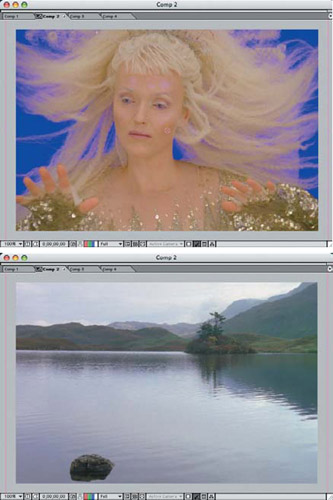
Figure 8.2: The image to be composited had fine details with a lot of color spill in the hair.
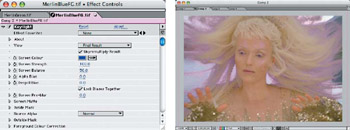
Figure 8.3: The initial keying still left a lot of residual color in the hair details.
For this example, just increasing the Despill Bias from 0.0 to 25.0 seemed to eliminate most of the unwanted color spill, without taking away the natural colors of the figure's skin and hair color (Figure 8.4). The default plug-in setting has the Lock Biases Together check box selected, which changes the Alpha Bias along with the Despill Bias when adjusted.
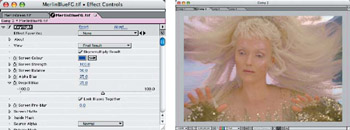
Figure 8.4: Increasing the Despill Bias helped to eliminate the color spill in the hair details.
This next example had a very dark, poorly lit, green-screen background in the chroma key image (Figure 8.5). The fighter pilot was to be composited over the background with the two trailing jets in flight against the sky.

Figure 8.5: This was a more complicated composite, where the chroma key image had a very dark background to deal with.
When the initial key was applied by using the Eyedropper tool in the most neutral green background area, most of the image was adversely affected by not providing a clean matte (Figure 8.6). The resulting effect was more of a double exposure than a keyed matte.
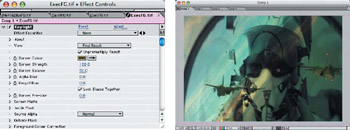
Figure 8.6: The initial key provided only a very crude beginning to our composite matte.
At this point, adjusting the Screen Strength and Screen Balance sliders helped bring back the matte details. By changing the view selector to Screen Matte, I could preview the density and edges of the matte being generated (Figure 8.7). Once I evened out the matte's density and edges, I then returned to the Final Result view and adjusted the Despill Bias down to eliminate any bleed or "holes" in the subject.

Figure 8.7: Making a few adjustments to the density of the matte provided the desired results.
Ultimatte AdvantEdge
Ultimatte is the true pioneer of chroma keying technology and has won several awards for advances in compositing hardware and software. Ultimatte AdvantEdge is the most sophisticated keying plug-in available for After Effects and Photoshop, and it actually operates as a separate application when the effect is applied.
With an easy-to-navigate interface and live previews of any phase of the composition, Ultimatte has made AdvantEdge user friendly for beginners and powerful enough for the top professional. You can save color corrections, color matching, and matte settings for repeated application in your projects—and it offers advanced controls and a navigable histogram for each session for multiple Undos (Figure 8.8).
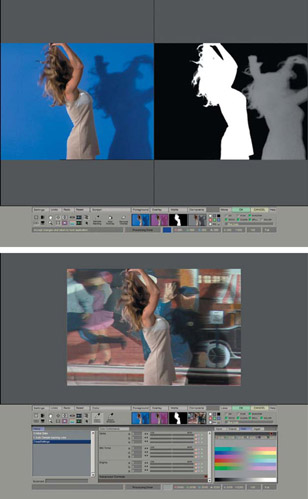
Figure 8.8: Ultimatte AdvantEdge has advanced controls for handling details, shadows, transparency, and color matching.
| Note |
To try a demo of Ultimatte AdvantEdge, visit their website at http://www.ultimatte.com.The User Guide for Ultimatte AdvantEdge is included on the DVD. |
Applying a Chroma Clean Plate
Ultimatte allows you to use a "clean plate" with your chroma key shots, which works similarly to a difference matte of sorts. An exact locked-off shot of the blue-screen background and environment is taken without objects or actors. More often, this is used with blue or green painted environmental objects that shadows will be cast on or that the actors will interact with in the final composite. This Clean Plate layer is then used in Ultimatte to produce a more accurate matte.
The three sources are imported into After Effects and placed in the Comp or on the Timeline, with the foreground chroma layer on the top and the Clean Plate layer hidden or beneath the background layer. You must first select the preview and Clean Plate layers before launching the Ultimatte AdvantEdge application by choosing Effects > Ultimatte > AdvantEdge (Figure 8.9). When the Ultimatte effect is applied, the Effects palette appears.
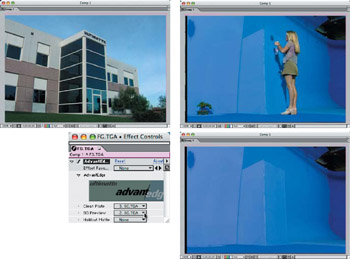
Figure 8.9: Using a Clean Plate layer in Ultimatte AdvantEdge, you can retain many of the chroma keyed background's shape and shading.
| Note |
One thing Ultimatte will not allow you to do is mix resolutions or sizes of background and foreground layers for preview. The background and foreground layers must be the same size and resolution to allow previewing the composite in the application, or a warning dialog pops up telling you so. |
You reset crop lines by dragging them from the outside edges of the image window in to where you wish to crop the matte (Figure 8.10). Make sure you don't crop into the live action areas of a moving subject.
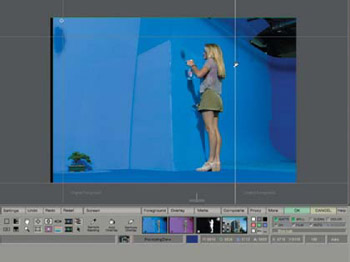
Figure 8.10: Set the outer edge crop to create a large garbage matte reference.
Use the Sample Backing Eyedropper in the Screen mode to select the initial background chroma color from the chroma foreground layer. You'll notice when looking at the matte that not all of the blue is selected at the first pass. If you use the Add Overlay tool and select those areas that have holes in the mask, then the keyer will include that range of pixels in the creation of the matte (Figure 8.11). If too many pixels are selected too close to the objects in the scene, you'll need to use the Remove Overlay tool and select the areas that bleed over onto the image.
Figure 8.11: Select the background color with the Sample Backing Eyedropper, and fill in the missing areas with the Add Overlay tool.
If you click the More button, advanced settings will pop up from the bottom of the screen; select the Inputs tab and make the Clean Plate layer visible (Figure 8.12) to see your preview. In my example, the details and shadows on the building now show up, and there's a clean composite around the young woman.
Figure 8.12: Turn on the Clean Plate layer to complete the composite.
You can do a comparison between the final composite and the original foreground layer or mattes at any time, either by selecting the dual-screen button on the bottom left of the user interface or by selecting the split-screen button and dragging the handle back and forth on the screen to see the preview (Figure 8.13)
Figure 8.13: Two different previews are available:dual-screen and split-screen modes.
Using Ultimatte in a Production Composition
Let's look at the blue screen that we cleaned up with a garbage matte and rotoscoping in Chapter 6, "Blue-Screen Garbage Mattes." This footage is going to be composited over a motion matte painting (which is created in Chapter 11, "Making Movies from Stills"). The blue-screen footage has been scaled down to the appropriate size for this composition and positioned where the actors will walk across the catwalk in the scene (Figure 8.14).
Figure 8.14: The blue-screen footage was scaled and positioned over the matte painting footage in After Effects.
I applied the Ultimatte AdvantEdge plug-in to the foreground chroma key layer and then clicked the AdvantEdge logo in the Effects palette to launch the application. Since the resolution of both foreground and background layers did not match, they could not be used as a background preview.
To set the source color to mask, I used the Sample Backing Eyedropper and dragged a selection of the blue background (Figure 8.15).
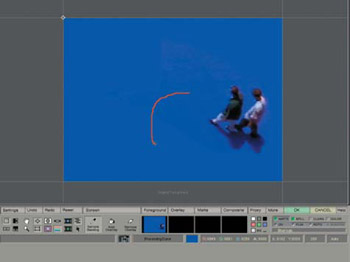
Figure 8.15: I selected the blue background with the Eyedropper.
Since the background wasn't completely clean and free of defects, I needed to apply the Add Overlay tool to the noisy areas (Figure 8.16). This actually covered up the shadows under the actors, so I used the Remove Overlay tool in just those areas.
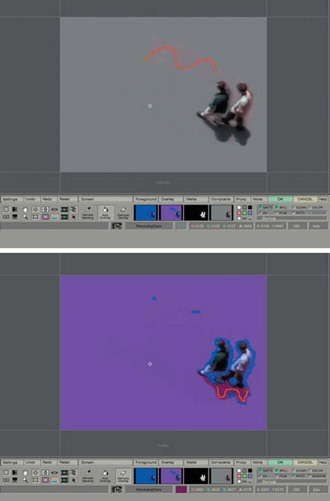
Figure 8.16: I used the Add Overlay tool to clean up and mask out the noise in the background.
I then clicked the Composite button to see the preview against a gray background. Then I clicked the Screen button and selected Spill. I used the Remove Spill tool to get rid of any blue or magenta on the edges of the backs of the actors (Figure 8.17).
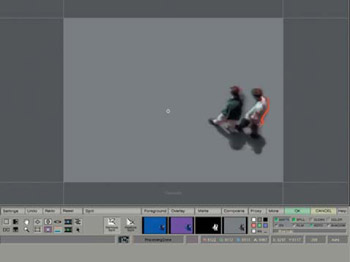
Figure 8.17: I used the Remove Spill tool to eliminate spill color on the edges of objects.
Once I was satisfied with a composition in Ultimatte AdvantEdge, I clicked the OK button and ran a RAM preview to see the composite in motion (Figure 8.18).
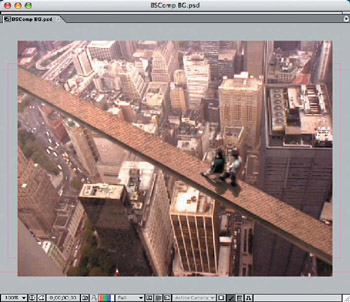
Figure 8.18: The final composite revealed subtle shadows and smooth edges against the background matte.
zMatte
Digital Film Tools has created a very easy-to-use plug-in—not to mention a more affordable solution for most chroma keying purposes. As with other more-expensive keying Plug-ins, you can use it to key out most blue and green backgrounds, including a blue sky. zMatte has tools to quickly adjust the matte to eliminate uneven backgrounds. This example combines a scenic city image and a freeway sign against a blue sky (Figure 8.19).
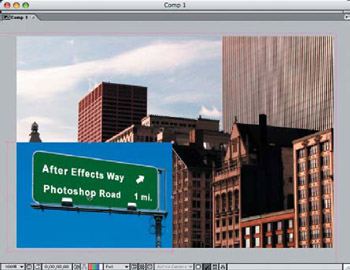
Figure 8.19: Even a blue sky can be keyed out easily with the zMatte plug-in.
| Note |
To try a demo of zMatte, visit the Digital Film Tools website at http://www.digitalfilm-tools.com/html/zmatte_download.html |
When I applied the zMatte plug-in to the sign layer by choosing Effects > DFT zMatte > zMatte and changed the View selection from Output to Matte on the Effect Controls palette (Figure 8.20), the layer turned to a reversed black-and-white matte in the Comp window.

Figure 8.20: I selected View Matte to see how much the matte needed to be adjusted to get a clean key from the sky.
I then spun down the Primary Matte arrow and opened the Background and Foreground sliders and dragged the sliders to fill in the background and foreground areas in the matte (Figure 8.21). I adjusted the Background to 30.0 and the Foreground to 20.0, which looked like a fair balance between the two.
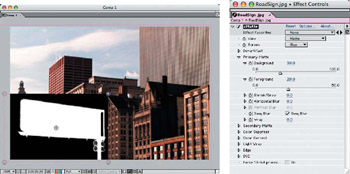
Figure 8.21: I adjusted the Background and Foreground to get a clean key but a solid mask.
I set the View back to Output and checked that the composite was nice and clean. However, there was still a bluish hue to the metal on the signpost that looked out of place against the city. If it had been actually photographed as a freeway off ramp in the scene, it would have had a warmer tone to match the background colors of the city.
I was able to adjust the color without affecting the matte in the foreground layer. I spun down the Color Correct arrow, opened the Red and Blue settings (Figure 8.22), and used the sliders to reduce the amount of blue while increasing the amount of red in the layer. Since the green level was already where I wanted it, I left that alone. The final composite shared a balance between the two light sources.
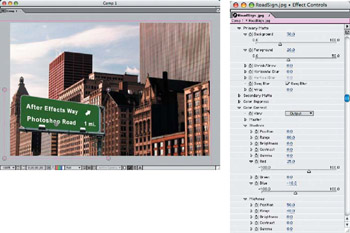
Figure 8.22: I was able to make color corrections with the plug-in without affecting the matte.
Primatte Keyer
This plug-in, from Red Giant Software, is a simple and easy-to-use keyer with plenty of additional control when needed. The sample image they provide to test it with shows that it handles transparency and spill quite well with little fuss.
| Note |
A demo copy of the Primatte Keyer plug-in is available on the companion DVD. |
I used one of Red Giant's provided sample blue-screen images of a fountain with water pouring over a statue's head (Figure 8.23) This is usually a pretty tricky combination for the less-sophisticated keying Plug-ins, but Primatte appeared to handle it with a broad sampling of the blue-screen background.
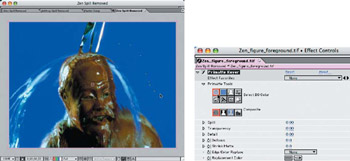
Figure 8.23: Primatte allows you to click-drag the selection to get its full range of color sampling.
To get rid of the slight blue spill in the water edges, I selected the Spill Sponge and click-dragged over the area with the spill (Figure 8.24). It amazingly removed just the blue and not the subtleties of the water flow and highlights.
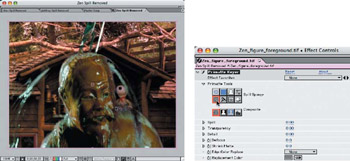
Figure 8.24: Using the Spill Sponge, I removed the blue cast from the flowing water.
Changing the view to Matte, I then cleaned up the matte by click-dragging the Matte Sponge along the light gray areas inside the white part of the matte (Figure 8.25). This helped the plug-in to identify the opaque areas of the matte from those that should be transparent.
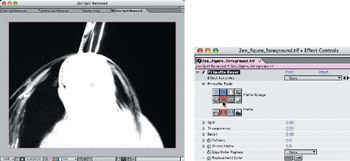
Figure 8.25: The Matte Sponge cleaned up and removed areas of the matte that needed to remain opaque.
dvMatte Pro
Everybody shooting chroma key shots using DV, mini-DV, Digital Beta, and HD already knows it's nearly impossible to get a decent key through the DV compression jaggies on the edges of the matte characters. The development group at the DV Garage has created dvMatte Pro, a plug-in keyer specifically designed for DV footage. This very affordable keyer is extremely easy to use and does everything it promises to do— give you professional chroma keys with digital video footage.
| Note |
A demo copy of dvMatte Pro is available on the companion DVD. |
Using the footage files I downloaded from the DV Garage website, I completed a nice keyed composite with just a few steps. This footage was not well lit and had a lot of detail in the person's hair—the worst combination you can have with DV chroma footage.
I started by cropping as much of the outside of the motion area on the green-screen layer as possible, using an adjustable mask to create a garbage matte. I then feathered the mask (Layer > Mask > Feather) 30 pixels horizontally and vertically to create a softer edged mask (Figure 8.26).
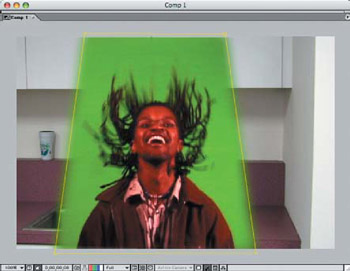
Figure 8.26: I created a garbage matte by adjusting the handles on the rectangular mask and feathering the edges.
I applied the dvMatte Pro plug-in to the chroma footage layer (Effects > DV Garage > dvMatte Pro) and selected the two extreme ranges of the color key—lightest and darkest—with the Eyedropper tools (Figure 8.27). I changed the view to Base Matte and adjusted the Black Point slider under the Base Matte settings to darken the background until it was solid black. To lessen the effect of the jaggies visible in my example on the edges of the jacket and hair, I applied about 5 pixels of the Softness Black Point setting.
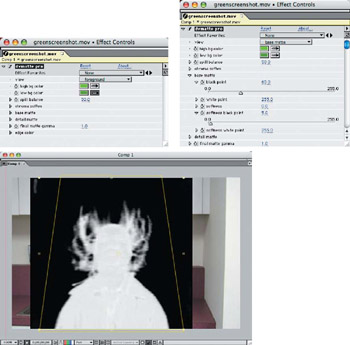
Figure 8.27: Next I adjusted the Base Matte Black Point slider until the background in the Base Matte was solid black.
I changed the view back to Composite to see if I needed to increase the softness around the edges without making it blurry. Since the original green screen was not lit well, there were dark corners at the top, so I cropped out most of it with the feathered mask. Some of the black was still showing through, so I increased the Final Matte Gamma to 0.7 to eliminate it from the final composite (Figure 8.28).
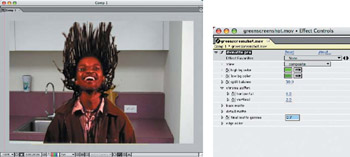
Figure 8.28: I was able to make color corrections with the plug-in without affecting the matte.
Side by Side Plug in Comparisons
So, how do all of these plug-ins compare with one another? How do they perform in different production situations? They all do a great job in specific areas, and I'd recommend every one of them if you need those specific requirements. But which one will serve you well for all of your general needs?
I've created a few examples of different situations you may encounter in the real world with chroma key compositing. Of course, the more expensive products do extremely well, as expected, but the others may surprise you!
The One Click Wonder Test
I took a professionally shot blue-screen composite, provided courtesy of The Foundry's website sample gallery (Figure 8.29). I then applied the different plug-ins and used only the initial color key selector—the "one click" in our "one-click wonder" test.
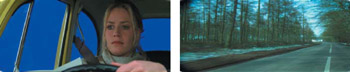
Figure 8.29: Here's the original chroma key shot and background for the composite test.
To avoid confusion, I'm listing these in the order in which they appeared earlier in the chapter—starting with Keylight (Figure 8.30). Notice the matte screen with the pointer showing the subtle areas that are masked out, allowing the light reflections from inside the car to show up on the window. As I stated before, if you have the After Effects 6 Pro Bundle with Keylight, then you may not need anything else for all-around general keying. The only exception may be dvMatte Pro for those DV clips that cause us so much grief.
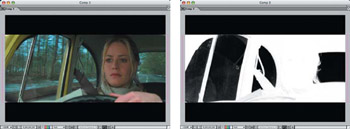
Figure 8.30: Keylight does a great job with just a single keying.
Next I tried out Ultimatte AdvantEdge. It provides excellent keying as well, but the matte shows extensive image graininess from the original shot (Figure 8.31). This matte would probably require some refinement to soften the lighter areas a bit before making the final composite.
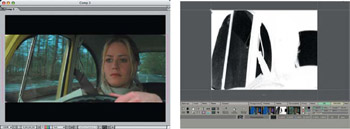
Figure 8.31: Ultimatte AdvantEdge does an equally excellent job of keying out the blue and leaving the details of the reflections in the matte.
With the first application, zMatte does a basic key, removing all the blue and the highlights as well (Figure 8.32). It would take some adjustments on the mattes to bring back the reflections in the window.
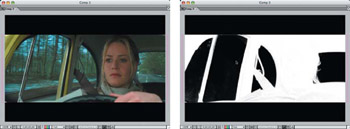
Figure 8.32: zMatte has a hard time distinguishing the subtleties of the matte right off the bat and needs further tweaking of the matte.
dvMatte Pro does a surprisingly decent job on the chroma shot from just the straight keying (Figure 8.33). Since it looks at two keys, I had to actually give it the "two-click" test, but I sampled the exact same spot in the back window, so as not to lose the reflections on the side window. dvMatte Pro created a somewhat greenish cast over the chroma layer that would need some color correction.
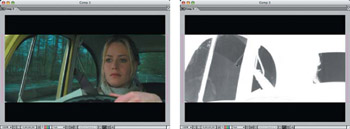
Figure 8.33: dvMatte Pro steps up to the plate and hits a double.
Primatte Keyer seemed to eliminate the reflections in the window, even with a 1-pixel sampling (which I tried in several areas of the window just to see if I could get a better sample). But looking at the matte, it appears that a coarse shading of the reflections remains in the matte (Figure 8.34).
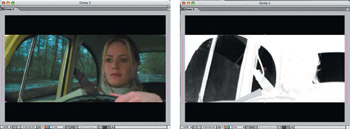
Figure 8.34: Primatte Keyer has a hard time retaining the subtle reflections in the window.
Blue Skies
This was a test to see if any or all of these plug-ins would provide a believable composite of two images using only the blue sky behind autumn leaves (Figure 8.35). Since the sky is gradated from bottom to top, I had to push the settings in all plug-ins until a clean matte could be generated. In addition, I placed a 10-pixel feathered mask around the live area of the trees to avoid any hard edges showing in the composite. All of the plug-ins performed well in this test.

Figure 8.35: The blue sky behind the trees was used as the chroma key source for this composite.
In this test, Keylight needed only to have the Screen Balance turned all the way down to 0.0 to clean up the background matte (Figure 8.36). The edges of the leaves were clean and the color was retained from the original.
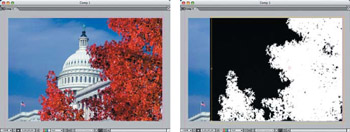
Figure 8.36: Keylight required only one adjustment in addition to the key sample.
Ultimatte performed similarly; with only a click of the CLEAN button, the matte was clear (Figure 8.37). The color was retained from the original, and there was no noticeable difference from the Keylight matte.
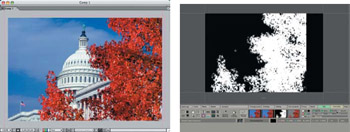
Figure 8.37: Ultimatte AdvantEdge worked equally well with minimum adjustments.
zMatte is a straight keyer, so this is the type of image it works best with. Since there was no real key sampler—just a selection of Blue or Green applied to the entire image—it's amazing that it handled this so well (Figure 8.38). Only the Primary Matte needed adjustments for a clean matte, by setting both the Background and Foreground to 15.0.
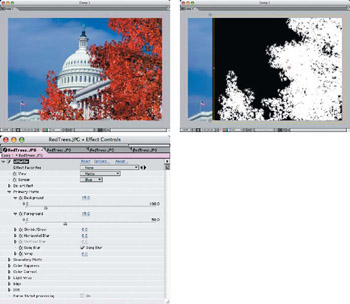
Figure 8.38: zMatte keyed this image quite well with only a couple of adjustments to the matte.
dvMatte Pro performed well as expected. Since this keyer allows you to select the lightest and darkest areas of the background to be keyed, it needed only to have the Base Matte Black Point set down to 65.0 (Figure 8.39).
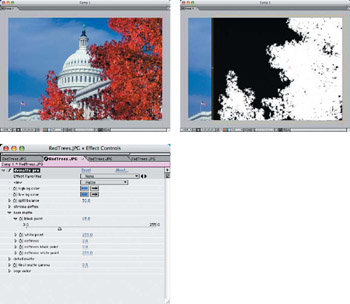
Figure 8.39: dvMatte Pro required only one adjustment.
Primatte Keyer does a quick key, but even after a lot of adjustments, I couldn't seem to get rid of the dark cast in the sky (Figure 8.40).
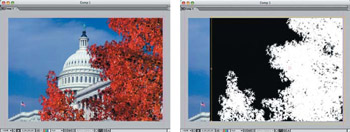
Figure 8.40: Primatte left behind a dark cast in the sky that was difficult to correct through the plug-in.
Blue Screen Textures Shadows and Highlights
This test was a bit different, in that the chroma layer not only covered the image that it was being keyed over, but it also became the displacement map for the background image. The only thing being keyed here was the color—not the shadows or highlights or the texture of the cloth (Figure 8.41).

Figure 8.41: The foreground chroma layer also served as the displacement map for the flag layer in the background.
I selected the flag layer in the background and applied the displacement map (Effects > Distort > Displacement Map). Then I selected the blue cloth layer for the Displacement Map layer and set both the Max Vertical Displacement and Max Horizontal Displacement settings to 35.0 pixels (Figure 8.42). This created waves and wrinkles in the flag that follow the contour of the highlights and shadows in the chroma layer.
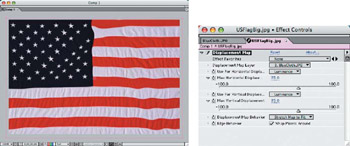
Figure 8.42: The displacement map was applied to the flag layer to create wrinkles that match the chroma-keyed layer above.
Keylight did a great job of taking the blue out, but it left the highlights of the chroma layer a bit strong (Figure 8.43). The details of the cloth texture showed up, but the overall composite seemed a little bit washed out.
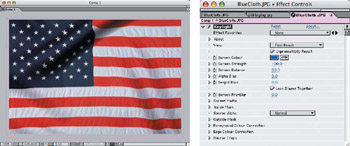
Figure 8.43: Keylight did a nice job of creating a believable composite.
Ultimatte AdvantEdge was the hands-down winner in this comparison (Figure 8.44). Not only was it a simple, one-click key, but it retained all the texture, shadows, and highlights in their normal levels, creating the best final composite.
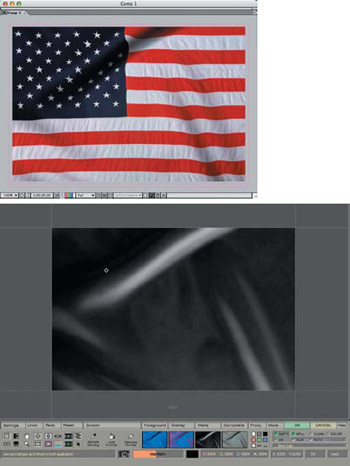
Figure 8.44: Ultimatte AdvantEdge did a fantastic job of creating the best composite, retaining textures and highlights.
zMatte did a decent job with the keying but left a light blue haze over the composite. Adjusting the Saturation to –100.0 in the Color Correction settings took out the blue but still left the composite overall a little washed out (Figure 8.45).
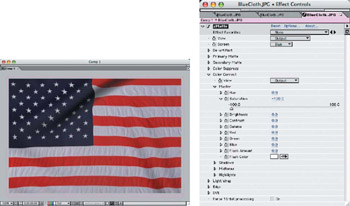
Figure 8.45: zMatte made a decent composite, though it remained a bit washed out and the texture of the cloth wasn't very prominant.
Unfortunately, dvMatte Pro didn't give the results hoped for—not that it promises to be used in this way! It was difficult to create a detailed matte without turning the mid-to-dark areas of the chroma layer to green. With a few attempts at sampling the right color range with the Eyedroppers and adjusting the Detail Matte In Point to 75.0 and setting the Detail Channel to Color Difference, I was able to create a barely acceptable matte (Figure 8.46). Texture is pretty much nonexistent, but that's really what the plug-in is supposed to do with noisy DV footage.
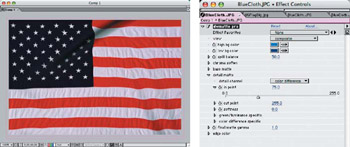
Figure 8.46: dvMatte Pro was barely able to provide a detailed matte, because it wanted to remove too much material and texture—just what it was designed to do.
Primatte Keyer did a remarkably nice job of removing just the blue, with a broad range selection of the sampling tool (Figure 8.47). No other adjustments were necessary after the initial click-drag sampling of the varied blues in the foreground image.
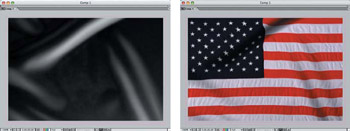
Figure 8.47: Primatte Keyer did a great job of just removing the blues from the foreground image in only one step.
Part I - Connecting Photoshop, ImageReady, and After Effects
- Basic ImageReady Animation, Tweening, and Layer Styles
- Photoshop Layers and After Effects
- 3-D Layers from Photoshop Layers
Part II - Applying Animation Concepts
Part III - Clean-Up, Mattes, and Objects
- Blue-Screen Garbage Mattes
- Rotoscoping Techniques with Photoshop
- Matte and Keying Plug-ins
- Static Matte Painting in Photoshop
- Motion Matte Painting in Photoshop
- Making Movies from Stills
Part IV - Advanced Movie Magic
EAN: 2147483647
Pages: 104
