Static Matte Painting in Photoshop
Matte paintings have been part of the motion picture industry for decades. Traditionally, background scenes were painted on vertically mounted sheets of glass and were either mounted in front of the camera while shooting a scene or exposed to masked portions of the original film. Today, with computer technology, matte "painting" is a composite of several photographic and artistic elements overlaying the original footage. This allows for more control in post-production and makes it easier to match the degree of perspective and detail to the original footage.
Embellishing on a Location
Location matte painting is often done in motion pictures and major television movies. Often, a location may have excellent characteristics and "feel" for the ground-level shot, but it may not have the entire scene that is desired. Sometimes additional buildings and objects need to be added or existing buildings modified to fill out the scene's frame. Through the use of computer-generated compositing, only some portions of the matte painting are actually "painted"—the bulk of the elements come from source photos or 3-D design elements and animation.
Still, creating some elements from scratch is a major part of this process and requires an eye for details and good digital painting skills. Every project you encounter will be different from the last and will have very specific requirements, so a broad generalization of matte painting is nearly impossible to cover in one chapter. I have, however, selected a couple of example projects that will cover some of the biggest hurdles you may encounter in a composite with a matte painting.
This first project is an example of adding taller buildings and a water tower to an existing piece of footage. It has all the elements of possible problems that might occur when creating a matte painting that has to coexist with elements in motion, such as moving trees that will slightly overlap some of the painted buildings. I'll use a combination of source photos, cloning, masking, and painting techniques to demonstrate.
I started by opening a locked-off clip of DV footage (on location in our small historic downtown Fullerton, California) in QuickTime Pro and exporting a single frame as a PICT file that I could use as a base for my matte painting in Photoshop (Figure 9.1). You can follow along with this project with the files located in the Chapter 9 folder on the DVD. Due to the "suggestive" nature of this production process—the highly individual and creative choices to make, such as painting elements—the complete Photoshop file FullertonMaster.psd, with all of its layers intact, is provided.
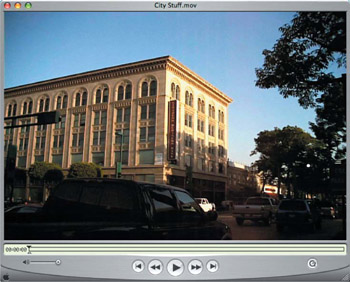
Figure 9.1: Open the movie file in Quick Time Pro and export a single frame as a PICT file.
| Note |
A "locked-off"shot means that it was filmed on a heavy, steady tripod with absolutely no camera movement. This is important because if there is any camera or frame movement in the original footage, then anything you layer or paint over it will appear as if it's floating above or out of synch with the rest of the image and won't blend in. Mattes over sweeping pans or zooms in major motion pictures are usually matched using sophisticated motion-control software and hardware.Handheld footage is nearly impossible to match exactly. |
I opened the PICT file in Photoshop and began working on the big building in the center of the frame. The traffic signal in the foreground was blocking part of the building and distracted from the scale of the building. A simple way to eliminate an object this large, against a background with a repetitive pattern or texture such as the building, is to copy a similar section from the background and paste it on top of the foreground object (Figure 9.2). In this case, since the building was at a perspective angle, the pasted portion needed to be scaled down a bit to fit precisely. Additional use of the Clone Stamp tool from other windows on the building helped break up the repeating patterns and blend in the edges.
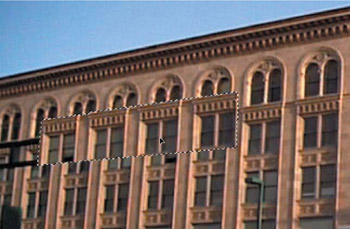
Figure 9.2: Copy another section of the building, paste it over the top of the traffic signal, and rescale it to fit.
The building needed to be taller, and I tiered a second level to enhance the perspective of height. By simply adding a couple stories straight up to the existing building, it wouldn't have had the same visual scale or architectural interest as adding a second tier—especially since the building would be the closest in the group of buildings being matte painted.
Since I wanted the second tier of the building to resemble the rest of it, I selected the top two floors of the building with the Lasso tool, copied them, and pasted the selection to a new layer. I then set the Opacity of the pasted layer to approximately 65% so that it was ghosted over the original building, and I used the Transform options to scale it down so that it matched the original building in the perspective scale toward the top of the building. The perspective angles of the roofline needed to be adjusted for the new height, so I selected one half of the addition, divided at the corner, and skewed it down— Edit > Transform > Skew (Figure 9.3).
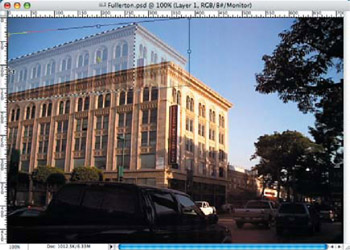
Figure 9.3: Rescale and skew each half of the building top addition to account for the change in perspective.
I then needed to remove the vertical sign from the lower part of the building that I sampled to create the top tier using the Clone Stamp tool (Figure 9.4). I increased the Opacity of the layer to better see what I was working on. It also helped to hide the bottom layer while I was working on it. Then I carefully aligned the perspective angles along the building's horizontal lines and window ledges.
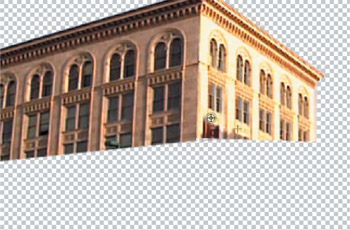
Figure 9.4: Clone out the sign and any other unwanted objects repeated from the original source image.
Making the bottom layer visible again and setting the top layer's Opacity down to 65%, I used the Eraser tool with a hard-edge brush to carefully remove the overlapping material from the top layer (Figure 9.5).
I created a railing that ran across the top edge of the lower part of the building, as if there were a terrace level, to give the building a little more character. (A couple of historic buildings in the area feature similar architectural elements.) I created a new layer and used a 1-pixel Paintbrush with the Shift key; I "snapped" lines to create a straight railing. The colors I chose were sampled from light and dark areas on the original photo to create the top of the railing (lighter colors) and the bottom of the railing (darker colors). I simply cut a single vertical rail, pasted it to a new layer, rotated it 90, and then duplicated it several times to create a length of railing (Figure 9.6). Zooming in about 300% allowed me to work on the details, pixel by pixel.
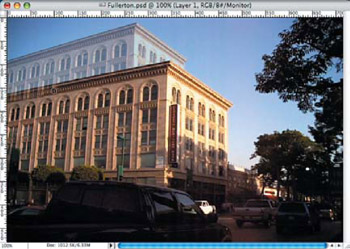
Figure 9.5: Use the Eraser tool to eliminate the overlapping material from the top layer.
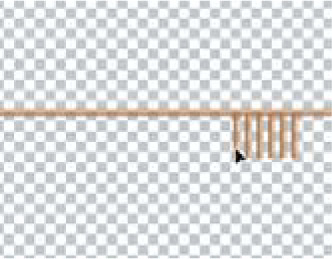
Figure 9.6: Create lengths of railing by starting with just two 1-pixel lines painted on top of each other and duplicating the vertical rails.
| Note |
A quick way to create lengths of railing is to duplicate several layers and then link them and merge the linked layers. Duplicate the groups and repeat the process until you have longer and longer lengths to work with. |
Once I had a length of the railing created that would fit the long side of the building top, I used the Perspective Transform option to shrink the far-left railing to match the building's perspective. (I could also have used the Perspective Transform option to skew the left side down to follow contour of the building top.) I then trimmed the railing at both ends, selected a section of the railing, and pasted it to a new layer. I duplicated the layer and trim-adjusted the sections for the opposite angle on the roof's top on the right (Figure 9.7).
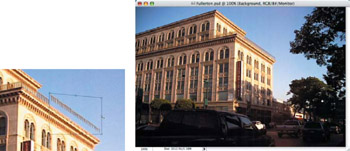
Figure 9.7: Use the Perspective Transform option to size and align the railing sections to the rooftop line.
The next three additions to the scene—a tall building in the back, a taller building next door, and a water tower—were all derived from source images, or the source images were used as references for painting (Figure 9.8). In all cases, a great deal of image manipulation and painting or cloning was needed to make up the right combination for our scene.
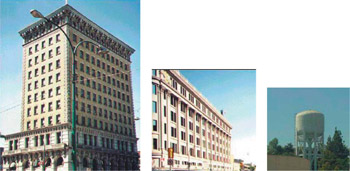
Figure 9.8: Use these source images as guidelines for creating new buildings and objects in the new scene.
The back building started off as only the front-facing wall with the windows, which I had to severely clone to remove the light pole and wires, as well as brighten and properly highlight to match the direction of the light source on the scene (late afternoon sun). I extracted the crown from the original image and reshaded it to look like it was on the building (Figure 9.9). Then I placed a solid block of neutral color on the adjacent wall, which would have tile covering it.
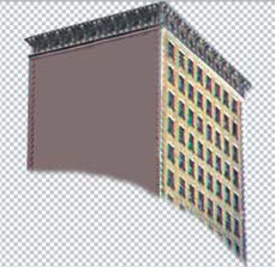
Figure 9.9: Use cloning, along with copying and pasting selections, to create this building from scratch.
I wanted to add an aged brick side to the building, with some old painted advertising from days gone by. I found an old Coca Cola sign and modified it a bit. I added some chunky noise on a gray solid layer above the sign and used my Eraser tool with a soft-edge brush to remove a lot of the material, exposing only a small portion of the noise in a random order over the top of the sign. Then I made a duplicate of the layer, inverted the Mode, and changed the Blending Mode to Screen (Figure 9.10). This gave the illusion of peeling paint and created more of a 3-D effect on the side of the building.
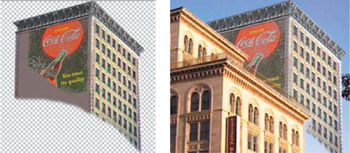
Figure 9.10: Use a combination of images and painting techniques on the building and signage details.
Since I didn't have an exact photographic match for the building addition on the right, I made it primarily from painting layers in Photoshop, with some reference from an architectural photo. I did use the crown of the building from source image material, because it was lit correctly for the scene and I was able to utilize the details. The first painted section was the front wall face itself, complete with the shadows of the trees across the street (Figure 9.11). I added the windows to the blank wall next, by painting a larger block and using a hard-edge Eraser tool brush to eliminate the in-between sections and create a grid for the windows.
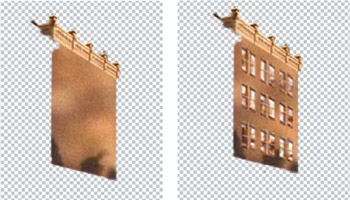
Figure 9.11: Other than the crown on the top of the third building, I needed to paint all of the sections and elements in Photoshop.
I added the rest of the building's face details by brushing lines on several layers, with enhancements to shadows and light features that showed the direction of the light source (Figure 9.12).
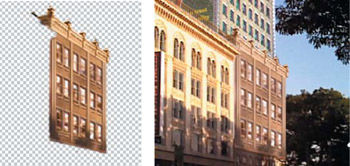
Figure 9.12: Add the details in the architectural design of the building with a paintbrush.
The final element I added was the water tower, which I recolored, and I added a graphic to it for realism (Figure 9.13). Notice how the water tower and additional buildings covered up trees along the edges. This was intentional, since I would add a masked section of the trees in After Effects, which would be in motion to match the rest of the scene.
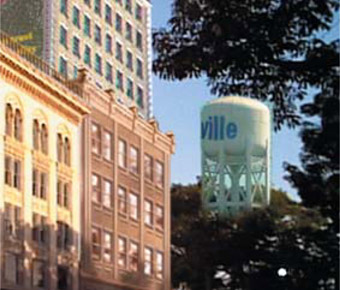
Figure 9.13: I added the water tower to the scene, and partially covered it up again in After Effects with a masked section of trees in motion.
Masking Motion Layers
What really tied in the static matte elements was the incorporation of motion layers, masked or keyed on top of the static layers. In this case, the new buildings and water tower covered up some of the trees. I could have just pasted a layer of static trees there, but they wouldn't have looked natural in the scene. What I did instead was to duplicate the movie layer, mask just the overlapping tree area, and key out the blue sky to let the matte painting show through.
In a new After Effects project, I imported the Fullerton PSD file as a composition to retain the layers and the movie of the original background. I opened the PSD file by double-clicking it in the Projects window, which revealed that all of the layers were in their proper placement and hierarchy in the Timeline (Figure 9.14). Then I created a new comp and dragged the PSD comp and well as the original movie clip into it, placing the movie on the bottom layer in the Timeline.
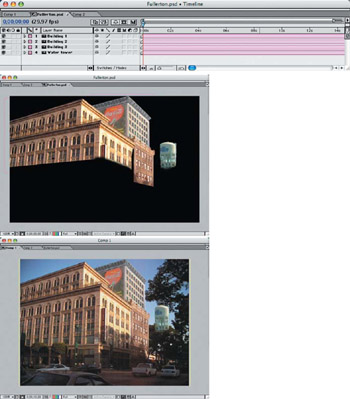
Figure 9.14: Import the PSD and original movie files and place them in the project comp.
Next, I created a new composition and dragged a copy of the original movie into it. I used the freeform Mask tool to draw out a selection around the water tower and the front of the building. Then I added a 15-pixel feather to the selection to create a smooth vignette in which the moving leaves would appear (Figure 9.15).
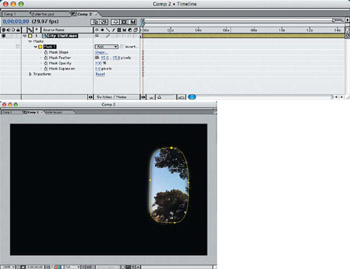
Figure 9.15: Use a feathered mask on the duplicated original movie comp to help blend it into the scene.
The only portion of the masked footage that was not needed was the blue sky, since this was going to be a layer on top of the matte painted buildings and the original background layer. I used the Keylight plug-in to key out the blue sky (Figure 9.16). I also boosted the Screen Strength to 110.0 and the Despill Bias to 60.0.
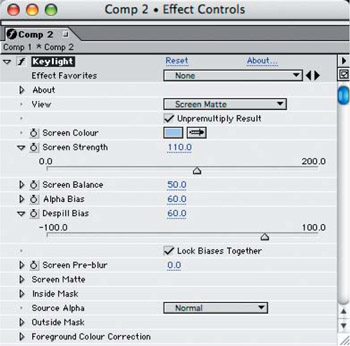
Figure 9.16: Key the blue sky out of the masked tree layer, allowing it to move above the matte painting and background layers.
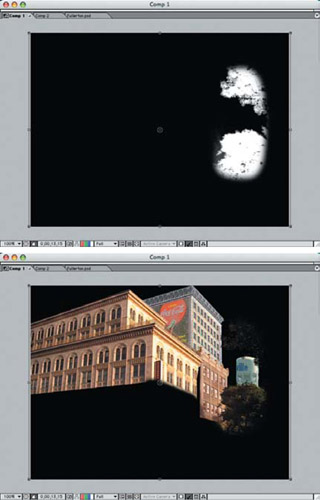
Figure 9.16: (continued)
Since the original movie footage and the masked tree layers were both in full motion, they generated a natural DV movie noise that was visible even in the still areas with no motion. The same problem appeared on film, where the film grain was in constant motion across the screen. If I had left the new matte painting in the shot as it was, then it might have been noticeable as not part of the original footage because of the absence of this DV noise or film grain.
To rectify this, I added a motion noise movie to the mix, changed the Blend Mode to Multiply, and masked it to affect only the matte painted areas (Figure 9.17). Using the freeform Mask Pen tool, I made a rough selection around the buildings in one mask and then again around the water tower. This selection didn't need to be precise, since the noise layer effect was very subtle and the edges couldn't be easily noticed.
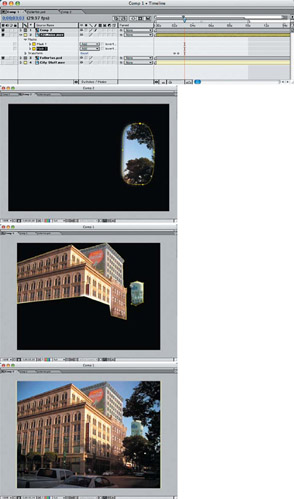
Figure 9.17: Mask a noise layer to the boundaries of the matte painted areas to blend in the motion effect.
| Note |
Creating the noise movie used in this project, 720Noise.mov, is described in Chapter 14, "Atmosphere, Film, and Noise Effects." The file can also be found on the DVD in the Chapter 9 folder. |
Relocating the Location
Sometimes a scene can't be realistically shot on location—or the location simply doesn't exist. So directors may choose to shoot a location that can be transformed into the scene they're looking for, which may be less time-consuming and more cost-effective in the long run. You may also encounter a project that requires several subjects in motion on the same location shot, which requires compositing many different pieces of footage over the top of one another.
This project used several pieces of footage, locked off in one location to gather a number of moving vehicles on the road that would be combined and composited into one shot. It also used additional sky footage, still images, cloning, and painting, along with small masked trees and bushes in motion from the original footage. To fill the riverbed with water, I used a remarkable third-party plug-in called Psunami.
| Note |
You can follow along with this After Effects project by opening the file BreaMatteProject.aep in the Chapter 9 folder on the DVD. |
From the original location, I shot several minutes of running footage to capture several vehicles in motion (Figure 9.18). I edited out the best portions of footage and composited them to make it appear that several cars were traveling on the road at the same time.
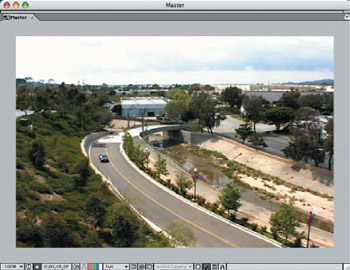
Figure 9.18: Shoot the original location footage over a period of several minutes to capture enough activity to composite in the final movie.
I ran the base footage in the background on the bottom layer with the first car in motion, while running three separate footage clips in upper layers, which were masked to reveal only the cars so they could be added to the road in sequence (Figure 9.19). I had to be careful to select only footage where the cars were traveling at the same rate of speed, or else they would "run into" each other in the composite.
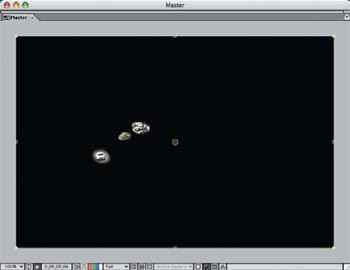
Figure 9.19: Mask out individual cars from additional layers of footage.
I used the layer Track Matte method of masking the cars on the layers, adjusting the matte size and shape on solid layers above each of the car footage layers (Figure 9.20). Since the footage was shot in a locked-off position, the mask did not need to be precise around each car because the surrounding ground would not move or change in color or exposure.

Figure 9.20: Use the solid layers as masks for the cars on the layers below, so that they act as movable masks.
Each solid layer had a fairly simple mask with a 10-pixel feather on it, so it could be easily scaled and moved along a path to follow each car (Figure 9.21). With the car footage layer selected and the mask layer above it in the Timeline, I applied the Track Matte mask (Layer > Track Matte > Alpha Mask) to allow the mask to become transparent so I could move and adjust it over time.
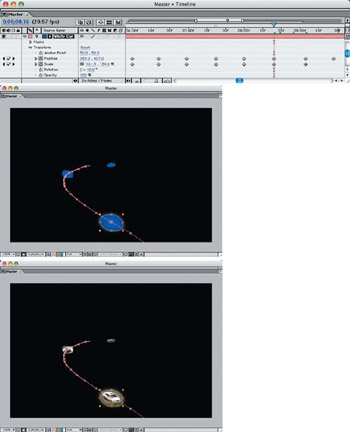
Figure 9.21: Use the Track Matte masking on the solid layers to allow the mask to be positioned and scaled to match the cars on the footage layers below.
Adding a New Sky and Horizon
The final location depicts a lush green valley with the city barely visible over the hills. I added a more interesting sky that wasn't overexposed, as the original footage sky appeared to be.
I duplicated the original footage layer, placed it directly above in the Timeline, and scaled it down, stretched horizontally. I was interested only in the horizon line of buildings in the center of the frame, so I drew a mask with the Mask Pen tool to isolate the area (Figure 9.22). I then applied a 10-pixel feather to the mask to let it blend in better.
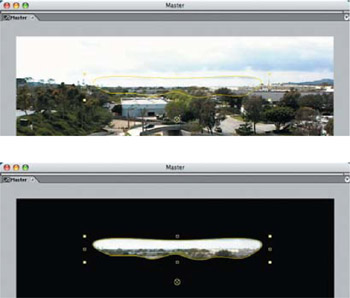
Figure 9.22: Scale the central focus of the horizon and stretch it to fit where the valley meets on both sides.
The new sky came from a piece of footage of only clouds moving in the sky. I first positioned and scaled the clouds vertically to the upper one-third of the frame, where they were compressed and positioned to match the angle of the location shot. I sped up the cloud footage slightly to make the clouds move across the sky more dramatically, by adjusting the Time Stretch of the cloud layer (Layer > Time Stretch) to 30% (Figure 9.23). To make the new sky footage blend in with the horizon, I created a mask with the Mask Pen tool and applied a 25-pixel feather to it.
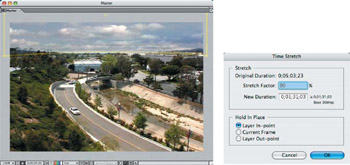
Figure 9.23: Speed up the cloud footage and mask it to fit the scene.
The hills on the sides of the valley leading into the city horizon were created in Photoshop from source photos and painting techniques and imported into After Effects (Figure 9.24). I placed this layer well above the sky and horizon layers in the Timeline so that they would fall behind the tops of the hills.
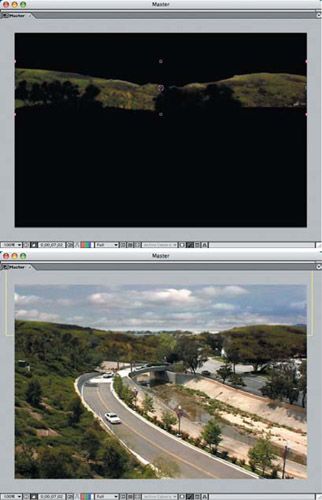
Figure 9.24: Create the hills in Photoshop and place them above the horizon in After Effects.
| Note |
Because this was a large static image area of the project, it needed to have noise applied to it. Instead of using the noise layer method previously described in this chapter, I opted for a third-party plug-in, from Digital Film Tools, called 55mm Faux Film. I chose to use this plug-in instead of the noise layer because I could control and adjust the size and density of the noise until it matched that of the running video footage. A demo version of the 55mm Faux Film plug-in is available on the DVD. |
Just Add Water
To fill up the spillway with running water that matched the mass and scale of the location, I used a third-party plug-in called Psunami from Digital Anarchy. A demo version of Psunami is included on the DVD for you to try out and use on this project if you wish (or just play with it—you won't be disappointed in the results!).
I started by painting a mask in Photoshop up to the top water level in the spill way, and then I imported the file as a composition to retain its exact placement. I then placed the masked water layer in the Timeline to use it as a mask for the layer to which I would apply the Psunami plug-in effect (Figure 9.25). I hid the mask layer by clicking the eye icon in the Timeline.
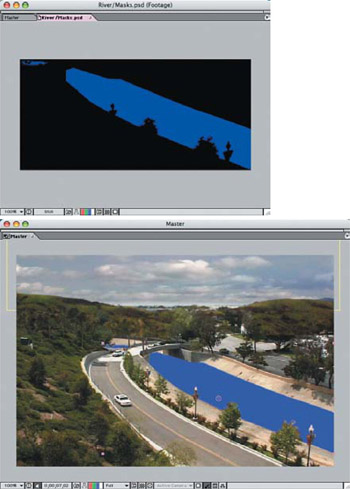
Figure 9.25: Paint a mask for the water level in Photoshop and import it into After Effects.
I created a new solid layer and placed it underneath the water mask layer in the Timeline, and I applied the Track Matte Alpha option. I then applied the Psunami effect plug-in to the solid layer, which brought up the Effects palette, where I started creating my water effect (Figure 9.26). Since I was starting from scratch, I had to first select my camera angle and wave scale. I then adjusted the water color and set the light angle to match the sun on the day the original footage was shot. This gave a realistic reflection on the water surface as well.
There are many options for creating water in Psunami—more than in an ordinary 3-D application in some aspects. Waves and swells are all controllable as well, so that Psunami gives an incredibly realistic result!
To create the shadow of the bridge on the water, I created a small gray solid layer above the water mask layer and used the Mask Pen tool to draw out a shadow that matched the curve of the bridge (Figure 9.27). I changed the Blend Mode to Multiply and reduced the layer Opacity to 85%.
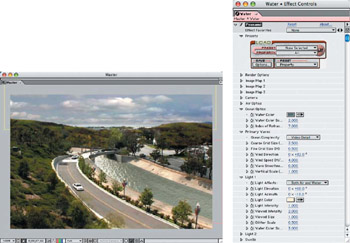
Figure 9.26: Apply the Psunami effect plug-in to a solid layer that's masked by the Photoshop mask layer.

Figure 9.27: Add a simulated bridge shadow to the water surface with a masked solid color layer.
Collecting the Details
Many of the detailed areas, such as sidewalks, railings, simple trees, and grassy spaces, were all painted in Photoshop layers. A snapshot of the project in After Effects served as the background for the painted detail layers (Figure 9.28). I used the same principles of painting the railings in the first project earlier in this chapter. Remember that it's important to pay as much attention to light and shadow as it is to scale when creating elements from scratch.
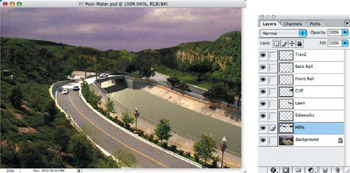
Figure 9.28: Paint the details in Photoshop on layers.
I imported the Photoshop file as a composition to retain all the layers in their proper position (Figure 9.29). Then I added the entire comp to the Timeline above the water layers, since the static detailed layers needed to overlay the layers in motion. Next I applied the DFT 55mm Faux Film effect plug-in to the composition—which affected all layers in the composition.
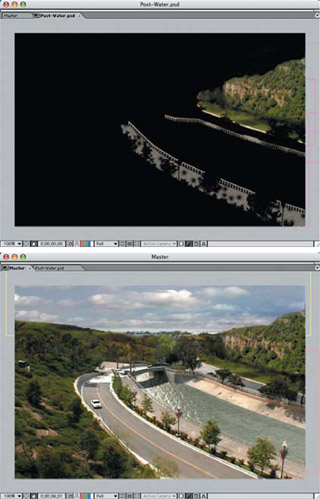
Figure 9.29: Import the Photoshop file as a composition to retain all of the layer transparency and proper placement.
There were still a few areas where some camouflage was needed to get rid of some buildings, power stations, and holes and where there were missing trees and bushes. Instead of just adding more static layers, I duplicated the original footage layer about four more times and repositioned, scaled, flipped, and masked specific trees or shrubbery that I wanted to place in these areas (Figure 9.30). I replicated these in motion since there was a nice breeze on the original footage shot and I wanted them to distract much of the static painted areas.
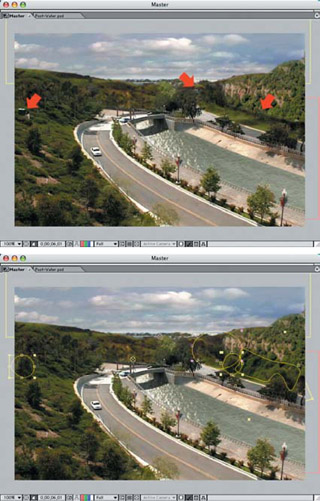
Figure 9.30: Use masked areas of the duplicated original footage to fill in spaces with moving trees and bushes.(Compare with Figure 9.29).
You can view the final rendered QuickTime movie from the Chapter 9 folder on the DVD.
Part I - Connecting Photoshop, ImageReady, and After Effects
- Basic ImageReady Animation, Tweening, and Layer Styles
- Photoshop Layers and After Effects
- 3-D Layers from Photoshop Layers
Part II - Applying Animation Concepts
Part III - Clean-Up, Mattes, and Objects
- Blue-Screen Garbage Mattes
- Rotoscoping Techniques with Photoshop
- Matte and Keying Plug-ins
- Static Matte Painting in Photoshop
- Motion Matte Painting in Photoshop
- Making Movies from Stills
Part IV - Advanced Movie Magic
EAN: 2147483647
Pages: 104
