Cause and Effect
The effects of gravity, recoil, drag, friction, inertia, and collision are around us every day. We'll explore some common principles applied to animation that will give the viewer a sense of realistic motion. This is all part of telling the story of what your characters or moving objects are supposed to be doing. The projects in this chapter will include realistic effects, timing, and more, to help you better understand these principles and apply them to your own animations.
Gravity The Freefall
A study in gravity is more than just dropping objects off the Tower of Pisa. In animation, it involves several other factors that include velocity and wind drag—but ultimately, all objects in the natural world will find their way down. Falling objects need smooth motion; don't use a sharp turn unless there's a clear reason for it, an outside force that changes the object's direction. And a smartly placed blur helps sell the motion.
The first project we'll create in our study of gravity starts with a single image on a Photoshop layer. The orange will appear as if it is rolling on a surface and then drops off suddenly. Since there is some momentum to the rolling orange, it will not drop straight down along the very edge of the surface but will roll forward off the corner and then down at an arc.
- Import the sliced orange file, OrangeSlicedSmall.psd on the DVD, into a new After Effects project as a composition—which retains the transparency around the orange.
- Open the composition into a Comp window and change the composition settings to 640480 NTSC.
Note If you wish to follow along with a completed After Effects project file, you'll find GravityFall.aep as well as the completed QuickTime movie on the DVD in the Chapter 4 folder. I've included finished QuickTime versions of all the projects of this chapter.
- Click the orange and move it to the upper half of the window. Make the rulers visible (View > Show Rulers;
 /Alt+R) and drag down a guideline to the bottom of the orange's surface. Drag out a guideline from the left side to just past the halfway point. These guides will act as our surface and the edge of the drop-off (Figure 4.1).
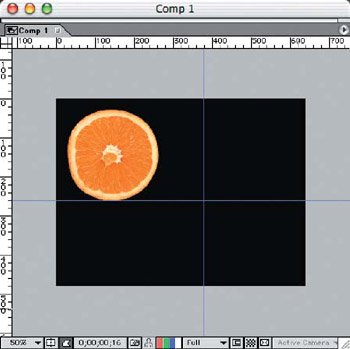
Figure 4.1: The guidelines will help us correctly animate the orange rolling off an imaginary table surface. - Click the orange layer in the Timeline window and drag the Current Time Indicator down to the 1-second mark. Move the orange in the Comp window to the center of the vertical guide and touching the bottom edge with the horizontal guide.
- Press the P key on the keyboard to show the Position settings. Click the Stopwatch, and return the Indicator back to zero (or home key). Drag the orange in the Comp window off the left side of the window, keeping it in line horizontally with the previous position by holding down the Shift key while dragging the layer.
- Press the R key to select the Rotation settings, and click the Stopwatch to set the current degree of rotation. Move the Indicator to the 1-second mark, and set the rotation to +180.
- Select RAM Preview to note the path your orange is moving, and make sure it is rotating the right amount for the motion path it's traveling. If it looks as if it's spinning on the surface, then adjust the degree of rotation at the 1-second mark to a lesser rotation. If it appears to be dragging on the surface, then increase the degree of rotation (Figure 4.2).
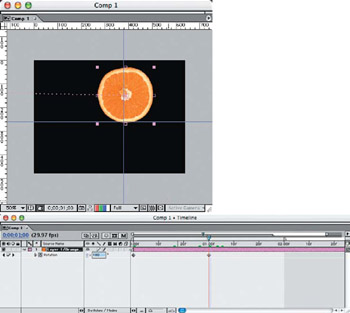
Figure 4.2: Adjust the rotation of the orange along the horizontal guide so that the orange appears to be rolling on a flat surface. - Return to the Timeline window and move the Indicator to 01:03 (three frames past the 1-second mark). In the Comp window, drag the orange down to the right of the intersection of the guidelines; use that intersection as an imaginary corner to the table, and place the orange at a 45 angle right on the corner. Set the rotation to an additional 45 (Figure 4.3).
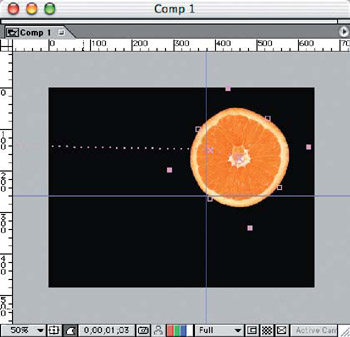
Figure 4.3: Since the orange in still in motion at this point, it will spin off the edge of the table surface. - Since there is no more contact with the table surface, the orange will drop down in a freefall, and it will spin approximately another 45 in the duration. Move the Indicator on the Timeline window to 01:10; then continue to move the orange down to the right and off the bottom of the Comp window, creating a slight arc from its departure from the table surface. Add an additional 45 to the rotation at the bottom point (Figure 4.4). Run a RAM Preview to see the motion path the orange takes.
Figure 4.4: The orange continues a slight rotation and at a slight arc because of the momentum created from rolling before the freefall.This animation is now functional, but it still lacks visual realism during the freefall. To enhance this, we will add a motion blur (Directional Blur) to the orange layer.
- Move the Indicator on the Timeline window to the 01:03 mark, where the starting point of the freefall will begin the motion blur. Select Effect > Blur & Sharpen > Directional Blur, click the Stopwatch for the Blur Length settings in the Timeline window, and leave the default setting of zero at this point.
- Move the Indicator to the 01:05 mark, click the Direction Stopwatch, and set the Direction to −60 and the Blur Length to 24 pixels (Figure 4.5).

Figure 4.5: Adding a Directional Blur to the freefall portion of the animation will provide smoothness and realism, similar to the natural motion blur in video or film footage. - Since the orange is still spinning slightly during the freefall, it is important to adjust the blur direction to keep it in a vertical motion blur. Move to the 01:10 mark and increase the Direction and Blur Length. I've selected a Direction of −105, but you can adjust yours to get the arc you want. In addition to the rotation, the freefall of the orange is at a maximum toward the bottom of the Comp window, so I increased the Blur Length to 50 pixels.
Run a RAM Preview and take note of any discrepancies in the animation motion path, rotation, or motion blur, and make minor adjustments accordingly. If the overall timing is an issue, then open up all of the settings in the Timeline window and select/drag an entire column of markers to the right or left to make adjustments (Figure 4.6).
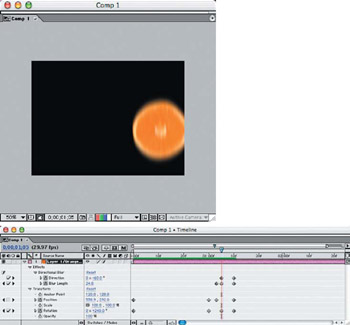
Figure 4.6: Make global adjustments to the timing of the animation with an entire column of Timeline markers.
Gravity Smooth Landing
In Pixar's Toy Story, after Buzz Lightyear soars around the bedroom, Sheriff Woody says, "That's not flying—it's falling with style!" We can tell the difference, visually, between something that's flying under power and something that's falling or gliding. Using a paper airplane for this project helps us to visualize a different effect of gravity. The factors of wind resistance and loft keep the airplane from making a dramatic free-fall like the orange. (Although I have seen some horribly designed paper airplanes that defy all principles of flight and behave more like a brick than an airplane!)
The image I chose for this project was originally a flattened TIFF file with an alpha channel, which I used to extract the plane for the background, and I added a feathered selection for creating a slightly blurred shadow layer in Photoshop. The finished two-layered file, PaperAirplane.psd, can be found on the DVD.
Create a new project in After Effects and import the airplane file as a composition. Change the composition dimensions to 640480 NTSC and select a white background color. Move the airplane in the Comp window to the upper-left corner along the top, just outside the window's boundaries. Move the shadow to the left side, just outside the window and down about 150 pixels from the airplane (Figure 4.7).
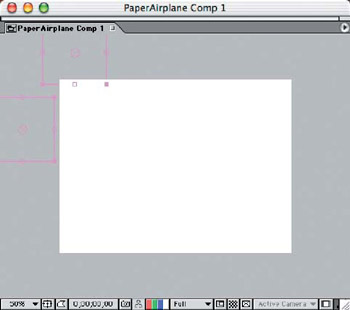
Figure 4.7: Position the two layers outside the Comp window for their final approach.
Select both layers on the Timeline window and hit the P key to get the position settings; click the Stopwatch for both layers and move the Indicator to around the 1-second mark. Move the airplane in the Comp window down past the center of the window, and drag the shadow a little bit under it. Move the Indicator down about 10 frames and continue to drag the airplane and shadow together along the same direction as the combined landing angle about 50 pixels (Figure 4.8). The shadow will need to enter the window before the plane in order to create the illusion of a top light source; nudge the position marker for the airplane layer down a few frames so its movement starts later. To give the shadow a better sense of depth, set the beginning opacity to 0% (press the T key and set the Stopwatch) and set the landing opacity to 65% on out to the end.
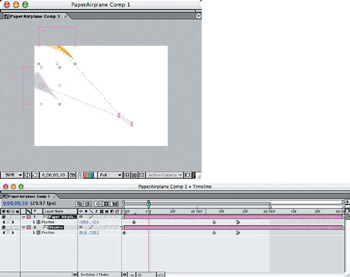
Figure 4.8: Creating a believable flight/landing path requires an eye for perspective and attention to timing.
Since this animation is of a fairly slow descent, we want the airplane to experience a little lift upon landing. This is where the motion and mass of the airplane cause a slight bit of air compression against the floor surface, which causes it to nose up very slightly and scoot across the floor before the drag on the floor surface makes it come to a complete stop. A simple, slight upward rotation at the end of the flight path provides this effect.
Select both layers in the Timeline window. Starting just before the 1-second mark and the actual landing of the plane, create a Rotation marker set to 0. Halfway between the landing point and the end of the skid, set a Rotation marker for both layers to −10 (Figure 4.9). The effect is very subtle but reinforces the illusion of the plane actually landing on a hard, smooth surface.
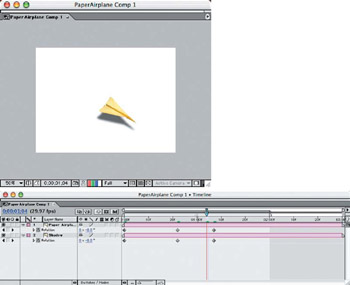
Figure 4.9: A slight rotation at the end of the flight path establishes the perspective of the floor surface to the plane.
Gravity and Collision The Bounce and Hang Time
"It's not a fear of falling—it's the sudden stop at the end that scares me!" We've heard that from many characters, and it reflects the fact that the movement of different materials is affected by more than just their mass and the atmosphere. If you drop something heavy, solid, and inflexible, it will either break or it will make a dent in whatever it lands on or collides with. Soft, semi-flexible objects, such as a tomato, could explode from the pressure, depending on the amount of gravitational force applied (how high was it dropped from?).
In between these extremes, gravity causes a force on impact that makes a flexible object, such a basketball, repel with nearly equal pressure in the opposite direction. This is known as a bounce, and when the downward force is continued in a similar method repeatedly (dribbling the ball, for example), the motion is continued for a sustained period of time—at least until someone's arm gets really tired!
So what happens when you bounce the ball really hard and watch it until it bounces again? There is an effect at the top of the bounce cycle called hang time, where the upward energy that thrusts the ball into the air ceases and gravity takes over again. When there is no continued downward thrust of the ball, then the energy gets absorbed with each bounce, and the ball is repelled less with every bounce until it comes to a complete stop.
Let's defy the natural laws of physics for a moment and create a 1-second animation loop so we can study the bounce effect and the hang time at the top of the bounce:
- Create a new project in After Effects and import the file Basketball_Small.psd from the DVD as a composition. Resize the composition to 640480 NTSC and add a black background.
- Make the rulers visible, and drag down two guidelines to set the bottom and top bounce points. Drag the ball up to the top guideline, and click the Position Stopwatch in the Timeline window.
- Move the Indicator on the Timeline to 00:15 (Frame 15), and drag the ball straight down to the bottom guideline.
- Go to the 1-second mark and drag the ball back up to the top (Figure 4.10).
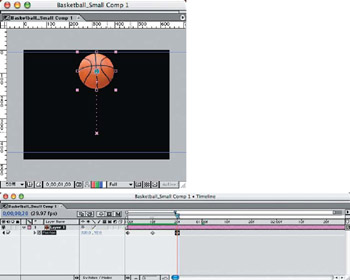
Figure 4.10: Set the animation to loop in a 1-second bounce.Set the work area slider to the 1-second mark and run a RAM preview of the loop. At this point, it looks more like a game of Pong than it does a bouncing ball. To simulate the hang time at the highest point of the bounce, we'll slow down the animation at both ends of the loop:
- Select the first marker in the Timeline and apply the Easy Ease Out Keyframe Assistant. Select the last marker at the end of the animation and apply Easy Ease In. Adjust the speed in the Keyframe Velocity dialog box (Figure 4.11). Increase the percentage to slow down the delay, and lower it to increase the delay.
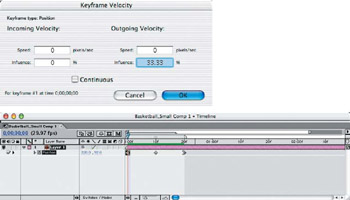
Figure 4.11: Applying an Ease In/Out to both ends of the animation loop will create the illusion of hang time. - To add visual realism to the bounce, we need to add motion blur, increasing in effects through the quickest part of the animation. Apply the Directional Blur filter to the ball layer (Effect > Blur & Sharpen > Directional Blur). Move the Indicator on the Timeline to the Frame 10 position, and press the E key to reveal the Directional Blur Effect settings. Click the Stopwatch to create a marker, and set the Blur Length to 25 pixels, leaving the Direction in the default position of 0.
- Move the Indicator back to the Frame 2 position and set the Blur Length to 0. Move the Indicator to the Frame 18 position and set the Blur Length to 0 there also (Figure 4.12).
Run a RAM Preview to see the timing of the hang time and motion blur effect, and make any necessary adjustments.
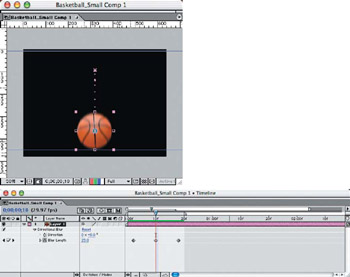
Figure 4.12: Adding motion blur through the fastest part of the animation for visual realism.
Gravity and Recoil The Yo Yo
Somewhat similar to an upside-down bounce, the recoil of a yo-yo has a slight pause at the end of the motion path, when the string is extended. The difference is that the yoyo is jerked back instead of returning solely under its own power, so the timing is slightly different.
The yo-yo image used in this project, YoyoLayersSmall.psd on the DVD, is a two-layered Photoshop file, created from the original flat TIFF image file. The shiny highlights on the yo-yo were selected and copied to a new layer. The original yo-yo layer beneath was retouched to remove the highlights, because it will be rotated underneath the highlight layer in After Effects (Figure 4.13).
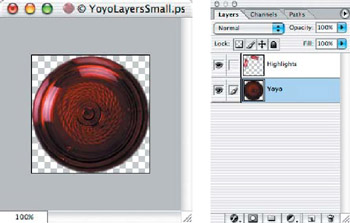
Figure 4.13: The highlights from the yo-yo image are copied to a layer above, and then they are retouched from the lower image so it can rotate.
- Create a new project in After Effects and import the yo-yo PSD file as a composition. Open the composition in the Comp window and resize the composition to 640 480 NTSC with a black background. Make the rulers visible and drag down a horizontal guideline to set the bottom point. Drag out a vertical guideline to the center of the Comp window.
- Drag the yo-yo and highlight together past the top of the window so they are out of the frame, and click the position Stopwatch in the Timeline window for both layers. Open the Rotation setting in the Timeline for the yo-yo layer and click the Stopwatch.
- Move the Indicator on the Timeline to Frame 20, and drag the two layers straight down to the lower guide. Then move the Indicator to the 1-second mark, and drag the two layers back up out of the top of the window. Set the Rotation of the yo-yo layer to 8 0.0. This will keep the yo-yo rotating at the same speed the full duration of the animation, but the highlights on the layer above will remain static.
- Select the Position and Rotation markers at Frame 20, apply the Easy Ease In Keyframe Assistance, and adjust the Influence percentage in the Keyframe Velocity dialog to 100% (Figure 4.14). This will create the slight hesitation at the end of the unwinding and allow a quick "snap" back up.
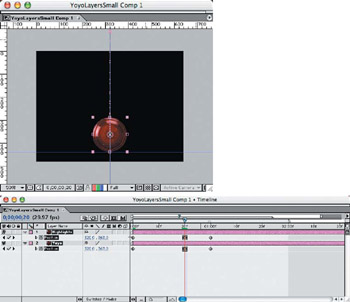
Figure 4.14: Applying an Ease In will help to define the pause and snap of the yo-yo in motion. - Import the file String.psd from the DVD as footage, selecting only the string layer, and drag it into the Comp window. Arrange it to be on the bottom in the Timeline window. Move the Indicator so the yo-yo is visible, and line up the string layer vertically with the yo-yo's motion path, to the left of the yo-yo's center winding core. Press the P key to select the position settings, and click the Stopwatch to set the Frame 1 position.
- Move the Indicator to the 1-second mark, and move the string layer over to the right side of the winding. This will give the side-to-side motion of the string unwinding and rewinding back onto the yo-yo.
- Move the Indicator to the center point of the animation where the yo-yo gets to the bottom of the path, and move the string to the inside left side of the center core. Then move the Indicator ahead about two frames, and move the string layer to the right side of the inside center core. This is the point where the string comes to the end of the unwinding and jumps to the other side to begin rewinding (Figure 4.15).
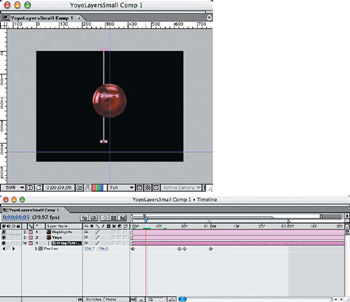
Figure 4.15: Move the string from left to right to simulate the unwinding and rewinding motion.Note Since the unwinding and rewinding of a string around the core of the moving object generate the yo-yo's recoil motion, there is no spring tension involved in the string. The string in the animation doesn't move up and down with the yo-yo;it moves only from side to side as it unwinds from one side and winds up on the other.
If you run the animation in RAM Preview at this point, it will look pretty silly since the string moves just horizontally. We need to cover up the excess string that appears at the bottom of the yo-yo while it's traveling up and down, since we will not move the string with the yo-yo.
- To do this, we'll need to create a new solid layer that can follow the yo-yo's motion path. Select Layer > New > Solid, set the width at 30 pixels and the height at 400, and set the solid color to black. The dimensions of the layer should be only be large enough to move around and cover up the string where needed, so a full-frame size is not necessary.
- With the Indicator at 0 on the Timeline, move the new black solid layer in position to cover up the string layer, and click the Stopwatch for the position settings. Move the Indicator down to the bottom of the yo-yo's motion path, and move the black solid layer to match the position of the bottom of the yo-yo at that point. Apply the Easy Ease In Keyframe Assistant to this point so the rate will match that of the yo-yo layer.
- Adjust the marker back in the Timeline so the motion paths match (Figure 4.16) Continue following the string layer path with the solid, keeping the string covered up underneath the yo-yo. This is not a precision motion path, so don't worry about exact tracking with the other layers. Run the RAM Preview to make sure that every frame has coverage over the string below the yo-yo.
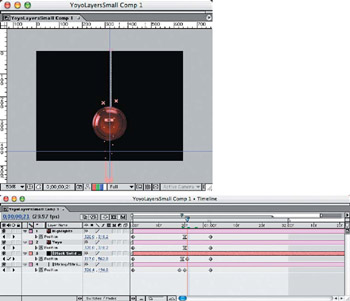
Figure 4.16: Using a solid color layer to follow the motion path of the yo-yo, you will reveal the string only above the upper portion of the yo-yo. - Finally, add a motion blur to smooth out the animation and give it more visual realism. Select both the yo-yo and highlight layers, and apply a Directional Blur (Effect > Blur & Sharpen > Directional Blur). Press the E key on both layers in the Timeline, and click the Stopwatch for the Blur Length. At Frame 1, set the Blur Length to 25, and then move the Indicator to the 1-second mark and click the Add Keyframe icon in the Timeline. This will produce a constant blur that needs to be modified to more closely match the motion of the yo-yo.
- Move the Indicator to the Frame 9 mark and set the Blur Length to 0. Move the Indicator to the Frame 22 mark and set the Blur Length to 0 again (Figure 4.17). Run the RAM Preview and notice how the blur effect is visible only during the fastest motion of the yo-yo's motion path.

Figure 4.17: Adding a motion blur will give the animation a realistic appearance.
Inertia and Friction What a Drag!
Simulating friction and drag in an animation is all about the timing. Think about some simple practical situations you may encounter in everyday life, like rolling a chair across different floor surfaces or the difference between running on land and running in a swimming pool. Not only does friction increase the force needed for movement, it also slows down the speed at which the motion is made.
This project is a simple exercise in creating motion drag—a principle that can be easily applied to your animations and adjusted for different types of surfaces and conditions. We will look at variations in floor texture and their effect on a rolling chair with the same momentum and starting speed.
The office chair is pushed into frame from the left on a smooth floor finish, and the energy of the momentum is absorbed by the wheels on the chair and is affected by the weight of the chair. The chair eventually comes to rest in a smooth motion. If it were to be pushed with the same amount of thrust on hard, slick ice, it would most likely go right through the frame without slowing down, since it would then be sliding on the surface instead of rolling on its wheels.
| Note |
You can review this project file, ChairDrag.aep, on the DVD. |
Import the single-layer Photoshop image of the office chair (ChairwShadowSmall.psd) into After Effects as a composition, and place it into an existing comp scaled to 640 480 NTSC with a white background. Position the chair layer outside the Comp 1 window frame, and set the Position Stopwatch at Frame 1. Drag the image across the Comp window and stop before reaching the other side—at approximately the 01:15 mark. This will be our stopping point for the chair's motion path (Figure 4.18). Select the Easy Ease In Keyframe Assistant, and set the Keyframe Velocity to 85%.
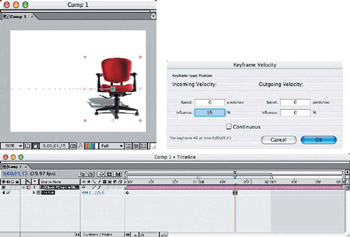
Figure 4.18: The chair will glide on a smooth surface almost all the way across the frame and come to a rest in a smooth motion.
Apply a motion blur for improved visual realism by selecting the Directional Blur filter (Effect > Blur & Sharpen > Directional Blur) and adding a 15-pixel blur at a 90 angle. Set the Blur Length to 15 and click the Stopwatch in the Timeline. It's important now to find just the right placement for the next marker in order to end the motion blur before the chair slows down too much. Locate the motion path dots, and look for the area of the path where the dots get closer together (Figure 4.19). Run the RAM Preview to test the motion and blur effects, and make adjustments as necessary.
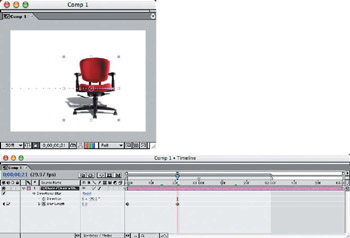
Figure 4.19: Adding a Directional Blur to the faster portion of the motion path will greatly aid in the animation's realism.
Contrary to the chair's motion on the smooth surface, a course surface will cause more friction and expel the energy from the initial thrust much more quickly. How gritty or bumpy the surface is (hard-packed dirt, sandy concrete, carpet, etc.) will determine how you will need to adjust the chair's animation.
Duplicate the chair layer in the Timeline window ( /Ctrl+D), and hide the original chair layer. Activate the gritty surface layer, placed beneath it. Move the Indicator in the Timeline to about Frame 7, and drag the chair back to the far-left side of the frame so it's barely touching the edge.
Move the old end marker to Frame 20. Set the Easy Ease In Keyframe Velocity to 100%. Drag the chair back to just to the right of the last marker, about 30 pixels (Figure 4.20). This will give the chair the appearance that it is being thrust into the frame at the same rate as the smooth floor example but is quickly brought to a stop due to the friction caused by the gritty floor surface.
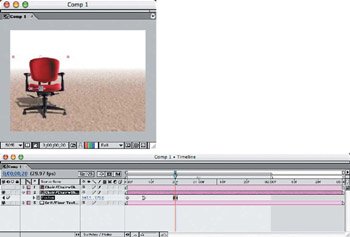
Figure 4.20: A gritty floor surface causes more friction and stops the chair abruptly.
Apply the Directional Blur filter to the chair layer as directed in the smooth floor example, setting the Frame 1 Blur Length at 15 pixels and the end of the blur just short of the Frame 20 mark to 0 (Figure 4.21).
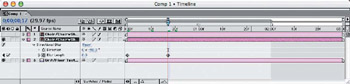
Figure 4.21: The motion blur will be quite short—just like the motion of the chair!
Complex Animations Combining the Techniques
You'll often encounter a project that requires the application of several techniques that you will need to refer back to. Animated subjects always have to go somewhere or do something that will need to obey at least one or two of the basic physical laws described in this chapter.
This project uses several of the physical motion techniques. It's a bowl of popcorn sliding across a surface before it grabs quickly and tips slightly, spilling out some of the popcorn onto the surface. The sliding bowl speeds in and starts to slow down (friction and drag) before it catches a small bump at the end and tips slightly while popcorn continues to fly in motion (inertia). Some of the popcorn falls and lands on the surface, bounces, and comes to rest (gravity, collision, and drag), while a few pieces roll back into the bowl without escaping (recoil).
| Note |
For more detailed examples of character animation, |
 Chapter 5, "Exaggeration Equals Characterization."
The original image was a flat TIFF file that had an existing alpha channel of the outline of the bowl of popcorn against a white background. It was cut up into smaller pieces, including the bowl and about half of the popcorn, while about 20 pieces of popcorn were extracted from the top half of the bowl (Figure 4.22).
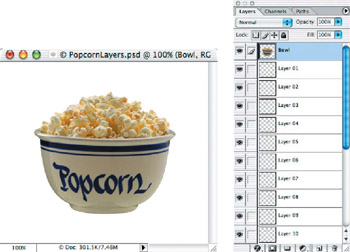
Figure 4.22: Cutting out individual pieces that will later be animated
Each piece of popcorn had to be cleaned up and its missing parts cloned back in (Figure 4.23). Most of the pieces fell back into place where they were first extracted, but it didn't matter too much since they were all realigned in After Effects later.
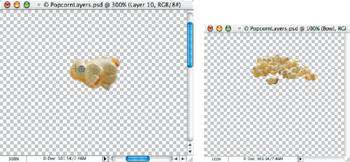
Figure 4.23: Great care is necessary to re-create each piece of popcorn in Photoshop.
Import the finished Photoshop file, PopcornLayers.psd on the DVD, into a new project in After Effects as a composition. Double-click the composition in the Project window, and it will appear quite small in the Comp window, since it's cropped down to the bowl. Change the Composition Settings to increase the comp size to 640 480 NTSC. This won't affect the actual layers, only the background and frame size of the composition.
Now we'll set things in motion:
- In the Timeline window, select all the layers; then drag them in the Comp window off the left side of the frame, out of sight.
- Press the P key, and all of the layer's Position settings will pop down. Select the Position Stopwatches on all layers. Move the Indicator to the Frame 15 mark, and drag the selected layers straight out near the halfway point.
- Apply an Easy Ease In Keyframe Assistant, and set the Keyframe Velocity to 10% (Figure 4.24). Run the RAM Preview to see that all of the layers move exactly the same all the way through to the half-second mark. They should appear as one moving image.
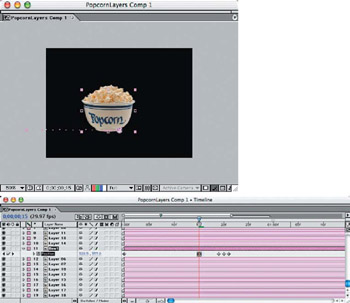
Figure 4.24: For the first half-second of the animation, all of the layers move in unison before the bowl tips. - Deselect all of the layers except the bowl layer, and press the R key to show the Rotation settings and click the Stopwatch. This will set the rotation of the bowl to 0 degrees during its slide. Move the Indicator down a few frames and slightly rotate the bowl up (clockwise) a degree or two. Move two frames down and rotate back (counter-clockwise). Add a couple of "wobbles" by repeating the added frames and slight rotations in small increments until the bowl comes to rest back at 0 degrees.
- Select all the layers again and apply the Directional Blur filter, with the Rotation set at −90 and the Blur Length at 12 pixels. Click the Effects Stopwatches for each layer. Move the Indicator to Frame 10 and set the Blur Length to 10 pixels. Move to Frame 15 and set the Blur Length to 1 pixel (Figure 4.25). Run a RAM Preview to make sure all of the layers’ motion blur is in synch.
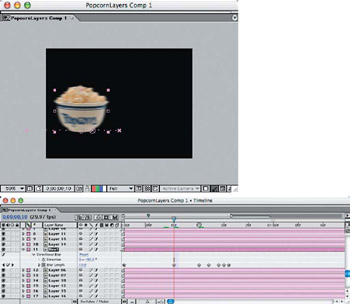
Figure 4.25: Add motion blur globally for the 15 frames before the layers start to fly apart.
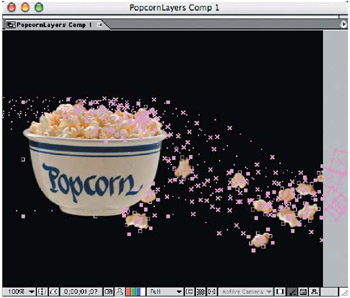
Now comes the fun part! You may wish to open the existing After Effects project file, Complex_Popcorn.aep on the DVD, to see how the individual layers are positioned, rotated, and blurred. Each piece of popcorn that is separated onto its own layer is manually moved in a path that looks believable when played back in real time. You'll have to apply any or all of the techniques used in this chapter to decide how each piece will travel and bounce, rotate and slide (Figure 4.26). Use the Indicator to scrub the animation paths as you create them. Make sure to keep each piece on its own random motion path and use your creativity!
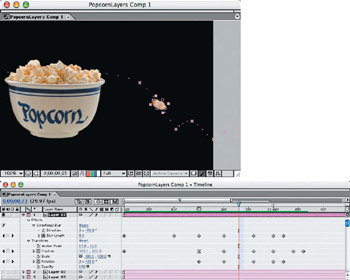
Figure 4.26: Apply the techniques in this chapter to each individual piece, using random paths.
Make Your Work Easier Visually
Take the complexity out of a large project:Hide the layers you're not currently working on. When there are several small pieces in motion in a group, as there are in this project, concentrate on only one layer of animation at a time. Things can be a bit confusing if you see too many paths crossing all at once.
Make sure a few pieces move in the bowl and roll back with the static kernels that are part of the bowl layer. This will add dimension and movement in the focal point of the animation subject (Figure 4.27).
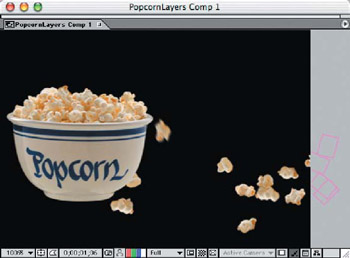
Figure 4.27: To help disguise the largest static layer, keep a few kernels in motion in the bowl.
Part I - Connecting Photoshop, ImageReady, and After Effects
- Basic ImageReady Animation, Tweening, and Layer Styles
- Photoshop Layers and After Effects
- 3-D Layers from Photoshop Layers
Part II - Applying Animation Concepts
Part III - Clean-Up, Mattes, and Objects
- Blue-Screen Garbage Mattes
- Rotoscoping Techniques with Photoshop
- Matte and Keying Plug-ins
- Static Matte Painting in Photoshop
- Motion Matte Painting in Photoshop
- Making Movies from Stills
Part IV - Advanced Movie Magic
EAN: 2147483647
Pages: 104
