Rotoscoping Techniques with Photoshop
Rotoscoping is the process of animating, compositing, or editing individual frames of a video or film. Before computers were used in special effects, films were projected onto special animation stands, called rotoscopes—where animated characters could be traced or drawn to match the footage step-by-step. This process is now completed digitally, using software that can manipulate layers on each frame to be modified, such as After Effects and Photoshop.
Roto Sequences Getting In and Out
In order to edit frames of running footage, you need to capture the individual frames and put them back when you've finished working on them. An easy way to divide a movie file into a folder of sequenced frame files is to use QuickTime Pro to export them and then open the entire folder in ImageReady as animation frames and layers. The layers can then be edited in Photoshop and exported as a QuickTime movie from ImageReady.
Open the QuickTime movie file, LoungeGuy_MED.MOV, located on the DVD in the Chapter 7 folder, with QuickTime Pro. Export the movie file as an Image Sequence, and place it in a new folder. Select the TIFF file format and set the Frame Rate to 15 fps, which is the movie's original frame rate (Figure 7.1). This will create only one frame for each frame in the movie, which would normally play back at double speed, but we will be duplicating the frames in the following steps.
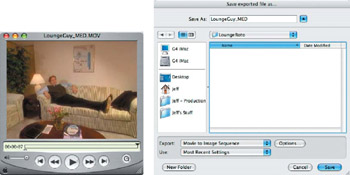
Figure 7.1: Open the movie file in QuickTime Pro and export it as an Image Sequence.
Open ImageReady and import the folder as frames. This will automatically create the animation frames and layers (Figure 7.2). At this point, we're not as interested in the animation frames as we are the layers, since we will eventually duplicate the number of layers and create a new animation sequence from them.
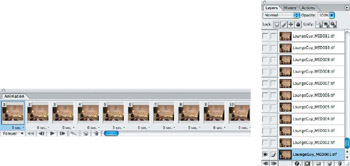
Figure 7.2: Import the image sequence folder as frames, and the layers will automatically be added in order.
Simple Roto Removal
As we continue with this project, we'll be removing the jacket the guy tosses on the arm of the sofa before he plops down. This is an easy video clip in which to do this because it's a locked-off camera shot and we have excellent resource material from Frame 1, before he enters the scene.
Jump to Photoshop and select Layer 1 (Frame 1 of the video sequence). Using the Clone Stamp tool and a 5-pixel hard-edge brush, clone out the tip of the jacket that is coming into the frame in the lower right (Figure 7.3). Be sure that the stripes on the sofa line up correctly as you apply the tool.
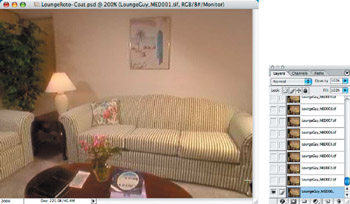
Figure 7.3: Clone out the small portion of the jacket against the sofa.
| Note |
When rotoscoping details, it's best to zoom into the area you're working on so you can be sure that each layer (or frame) lines up perfectly. If you don't carefully pay attention to detail, you will create a pattern that will skip and jump frantically when the video is played back. |
Select All and copy Layer 1 to the clipboard. Go to Layer 2 and paste. Link Layer 2 and the pasted Layer 1 together, and choose Merge Linked from the Layers palette menu, or you can choose Layer > Merge Down ( /Ctrl+E). Continue until you reach Layer 10. At this point, the guy's foot and leg start to show and will need to be revealed in the frame. Set the pasted Layer 1 Opacity to 35% so you see a ghosted image over the sofa pattern, and then use the Eraser tool with a 5-pixel hard-edge brush to remove only the area where the leg and foot are visible (Figure 7.4). Set the pasted Layer 1 Opacity to 100%, and make sure you have a clean edge on the pant leg, without any of the jacket showing.
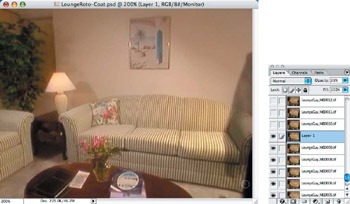
Figure 7.4: Use the Eraser tool to remove only the areas where the guy's leg and foot are visible.
Since the guy is coming into frame in the room, his body will begin to cast shadows on the surrounding furniture, starting with the coffee table. Click the Layer Visibility icon on and off to see where the shadows lie. Use the Eraser tool with a large soft-edge brush (at least 65 pixels in diameter) to remove material on the pasted Layer 1 to expose those shadows (Figure 7.5).
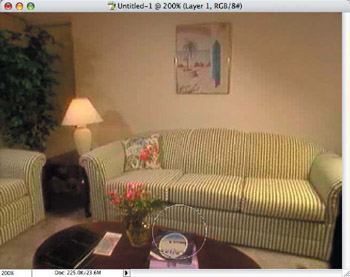
Figure 7.5: Use a large soft-edge brush with the Eraser tool to remove the areas covering the shadows in the foreground.
Once you are satisfied with the edited layer, link it with the layer below and choose Merge Linked. Repeat this process for a few more layers until the guy is completely into frame and has already tossed the jacket onto the sofa.
| Note |
When merging the linked layers together, be sure to select the original named layer—not the pasted Layer 1—so it will retain the original layer naming. When merging layers, Photoshop will always rename the merged group to whichever layer is selected at the time the merge is applied. |
We are now at a place where we no longer need to paste such a large area, since our edits will be concentrated around the jacket and the guy as he moves in front of it. Use a large 65-pixel soft-edge brush with the Eraser tool to remove all but a general area around the jacket (Figure 7.6). This will leave a soft area that will cover the jacket without affecting the rest of the image—requiring only smaller edits around the guy's legs and feet through the end of the video clip.
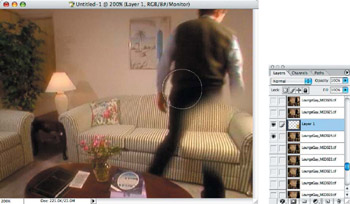
Figure 7.6: Use a large soft-edge brush with the Eraser tool to remove all material except for a general area covering the jacket.
Before continuing to edit this layer, we want to copy it to use in additional layer edits, but, if we just copy and paste it, the pasted layers will now center the small amount of material in the frame instead of placing it exactly in the proper location. To remedy this, we will replace a very small portion of the layer in all four corners, using the History Brush.
In the History palette, go back to the point where you pasted Layer 1, and click the check box next to it, identifying this as the reference point for the History Brush to get its information from. Return to the current state in the History palette and hide the subsequent layer, leaving the background transparent. Use a 9-pixel soft-edge brush to replace a small portion of the pasted Layer 1 image into the four corners (Figure 7.7). Select All and copy this layer to the clipboard. This will allow proper placement of the copied layer, aligned correctly from this point on.
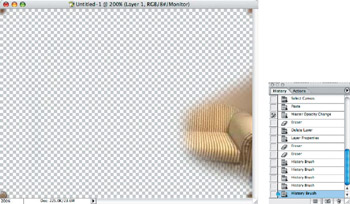
Figure 7.7: Use the History Brush to replace the four corners of the pasted layer to assure proper alignment.
Continue editing the pasted layers with the Eraser tool brushes and merging the remaining layers accordingly. Once you have completed the entire sequence, start from the first layer and duplicate it ( /Ctrl+J). Repeat for all remaining layers until each layer has a duplicate above it in the Layers palette, save the file, and then jump to ImageReady.
From the Animation palette menu, choose Delete Animation and then Make Frames From Layers. This will give us the correct playback rate from the duplicated frames, giving us 30 fps from the original 15 fps video clip (Figure 7.8).
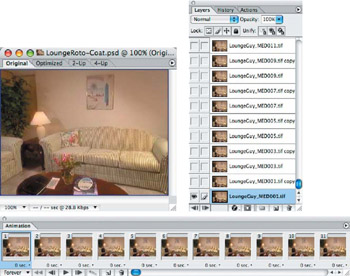
Figure 7.8: Duplicate each layer and create a new animation from the layers to produce a full 30 fps video clip.
Save your work, and then export the movie (Export > Original Document) and choose QuickTime Movie from the Format selector (Figure 7.9). Save the movie uncompressed for the best possible quality, and play it back in QuickTime Pro for review.
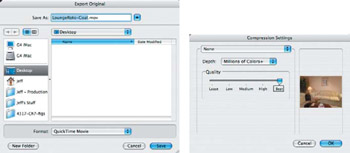
Figure 7.9: Export the rotoscoped sequence as a QuickTime movie from ImageReady.
Blue Screen Matte Rotoscoping
As we covered the process of making of garbage mattes in Chapter 6, "Blue-Screen Garbage Mattes," there were several frames that required rotoscoping where the actors walked off the edge of the blue-screen tarp. From the After Effects file, we rendered out two QuickTime movies—a "pre" and "post"—that contain about 1 second of video that needs to be roto edited.
- Open the movie file, BSMattePre.mov, in QuickTime Pro, and export it as an Image Sequence to a new folder, TIFF file format and 30 fps (Figure 7.10).
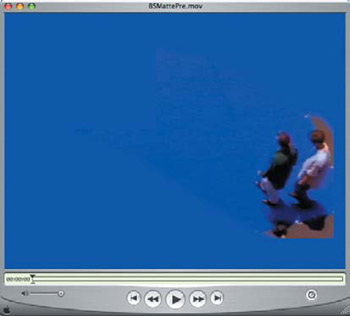
Figure 7.10: Export the QuickTime movie as an Image Sequence to be rotoscope edited in Photoshop. - Import the folder as frames in ImageReady and jump to Photoshop. Start with the first layer (Frame 1), and use the Paintbrush tool with a small hard-edge brush to paint in the missing blue background (Figure 7.11). You must take great care in selecting brush sizes and edge hardness/softness to blend in with the edges of the characters and around their shadows. You will notice some natural video noise along the edges of the characters; try not to remove too much of it, or it will show in the final composite.

Figure 7.11: Carefully paint in the blue background around the characters and their shadows. - Use the Clone Stamp tool to fill inside the shadow area that's off the matte, being careful not to create duplicate patterns or banding, because these will show up in the final video (Figure 7.12). Do not clone more area than is necessary to help minimize the changes from frame to frame.
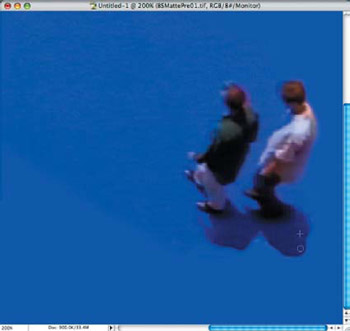
Figure 7.12: Use the Clone Stamp tool to fill in the missing details of the shadow areas. - Continue with each layer, checking your progress against the preceding layers and taking care not to paint in too close to the character edges.
- When you have finished, save the file and jump to ImageReady. Export the original as a QuickTime movie with no compression so it will match the garbage matte original movie.
- Repeat the entire process for the "post" blue-screen matte sequence and export it as a QuickTime movie.
- Open After Effects and import the original garbage matte composite movie, along with the two new QuickTime movies. Align the rotoscoped movie sequences to both ends and render them as one complete movie, to be used in composite projects (Figure 7.13).
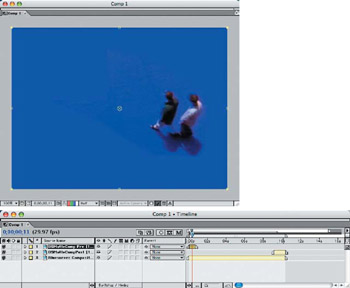
Figure 7.13: Export the edited sequence as a QuickTime movie from ImageReady, and import them into After Effects to be aligned with the original garbage matte movie.
Stabilizing and Rotoscoping Old Movies
Many old movies that are digitized require a lot of work for restoration, because of deteriorating film and crude photographic equipment from the early twentieth century. Early moviemakers used hand-cranked cameras that had loose mechanisms during film exposure. This loose quality was usually compounded by equally crude-fitting projection equipment, making for a pretty jumpy viewing experience.
Restoration of old movie footage requires many techniques, depending on the amount of deterioration or affected motion. In this project, we will stabilize the footage, reframe it, and rotoscope the worst dirt particles and scratches. The stabilizing is done in After Effects, which will give us a steady palette on which to do our roto work. Unfortunately, with hand-cranked cameras, the exposure on each individual frame varies too much to make the proper adjustments, since too much information is lost in over-exposed frames.
- Create a new project file in After Effects and import the movie file HorseStabilize .mov; create a new composition 640480 NTSC, 7 seconds in length.
- Scale the movie up to 102%. This will hide the rough edges in the original movie file.
- Apply a stabilizing tracker to the movie (Animation > Stabilize Motion). This will create Tracker 1 and will place a square Track Point 1 in the middle of the Comp window. Locate a stationary object in an area of the movie that has contrast—such as the lettering on the sign—and drag the box out and around some of the smaller details (Figure 7.14).
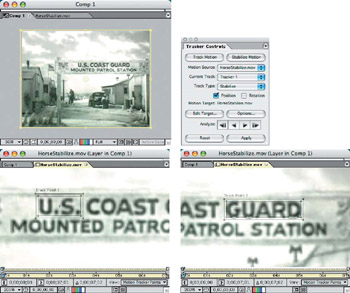
Figure 7.14: Apply and align stabilizing trackers to detailed contrast areas in your movie. - Click the forward Analyze button on the Tracker Controls palette and let it run all the way through the movie. Watch the Track Point box in the Comp window as it passes to make sure it doesn't jump far from its original position. If the tracker looks okay after the movie is analyzed, then click the Apply button.
- Add a second tracker by clicking the Stabilize Motion button and repeating the process on another section of the sign.
- Render the project as a QuickTime movie, at full resolution and with no compression. Open the rendered movie in QuickTime Pro and export it as an Image Sequence so that you can roto out the dirt and scratches. Since this movie is already 30 fps, make sure to export the Image Sequence at 30 fps as well.
- Import the folder of sequence files into ImageReady, and then jump to Photoshop to begin the roto process.
Note For this example, I've rotoscope edited only 1 second of the movie. The before and after example movies can be found in the Chapter 7 folder on the DVD.
- On each layer, use the Clone Stamp tool with various size brushes to carefully remove dirt, dust, and scratches in the frame (Figure 7.15). Compare each layer with the preceding and following frames to be sure that the "spot" you remove really should be! Take care to not disturb contrasting edges of clouds, buildings, and other objects in the movie.
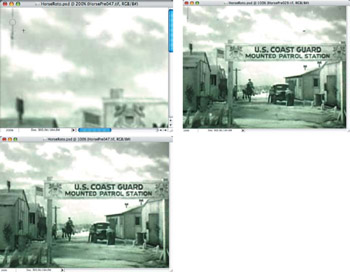
Figure 7.15: Rotoscope out the dirt, dust, and scratches from each frame with the Clone Stamp tool.
Once you've completed the rotoscope edits on all layers, save the file and jump back to ImageReady. Export the sequence to a QuickTime movie file and review it in QuickTime Pro.
Colorizing Old Movies with Photoshop Layers
Once you've stabilized and rotoscoped an old movie, you may wish to give it a little character and modernization by tint colorizing. Instead of perfect colorizing in fine detail, this stylized process will result in something you may have seen in the ’50s or ’60s with tinted black-and-white movies. This process can be done easily by creating a few layers in Photoshop and animating them in AfterEffects on top of the black-and-white QuickTime movie.
In this project we'll use an old Los Angeles street scene, featuring a few classic cars in motion. Open the movie file CarsRoto.mov in QuickTime Pro. Find a few frames of the movie that show the best view of each of the cars. This might be a bit more difficult for the faster moving cars, but we don't have to be too precise in this process.
Copy each frame where a car is in view to the clipboard, and paste it into a new Photoshop file of the same dimensions (Figure 7.16). Keep adding the layers, one on top of another.
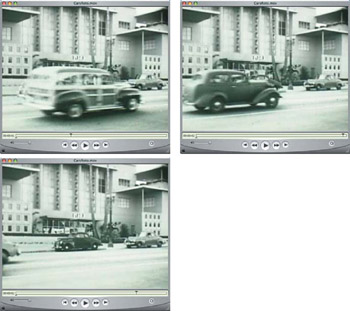
Figure 7.16: Locate the frames that show the cars best, and copy and paste them into a Photoshop file as layers.
Start with the background cars and buildings, hiding the other car layers. Create a new layer above the street-level layer, and set the Blending Mode to Color. Use the Paintbrush tool with hard-edge brushes to paint color around all of the objects in the frame, using colors that may be somewhat natural, but don't try for perfect shading (Figure 7.17). Change the Blending Mode to Normal occasionally, and check to see that you have total coverage on the buildings, the street, and the two cars in the background.
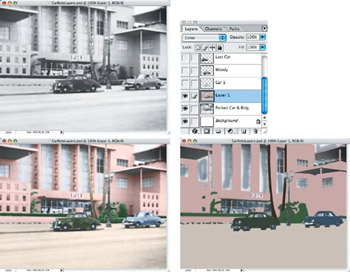
Figure 7.17: Paint in colored areas in a layer above the street-level layer.
On the remaining layers, select and remove all of the image material around the cars you want to colorize. This does not need to be an accurate selection, since the colorization will be very generalized in the areas of motion in the final movie composite.
Similarly to the street-level layer, create a new layer above each car layer and set it to Color Blending Mode. Paint the colored layers completely on this layer, switching back and forth between the Color and Normal Blending Modes, to make sure there aren't any "holes" in the colors (Figure 7.18). If an area is to be left with no color, such as around the wheels or chrome, then use white or gray, so they do not become transparent. It is fine to leave some transparency in the windows so the background colors will pass through.
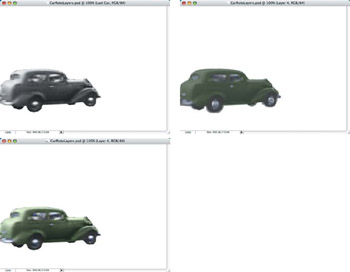
Figure 7.18: Isolate the cars on their own layers and paint on color layers above each of them, without leaving any gaps in the painted areas.
Once you have created color layers for each separate car and the street-level layers, save the PSD file and create a new project file in AfterEffects. Import the CarsRoto.mov QuickTime movie file and the color-layered PSD file. Create a new composition, 640480 NTSC, 3 seconds in length, and drag both imported files to the Comp window. Delete the still black-and-white and background layers from the PSD file in the Timeline window. Change the Blending Mode on all of the color layers for the individual cars and the street-level layer to Color (Layer > Blending Mode > Color). Arrange them in order on the Timeline so the street-level layer is on the bottom, just over the movie layer, and then proceed with Layers 2, 3, and 4 in order on top of that (Figure 7.19). At Frame 1 on the Timeline, hide Layers 3 and 4, since those cars are not in the frame yet.
| Note |
Layers that have the Blending Mode set to Color in After Effects will override the colors of the layer beneath as they pass over the top of one another. This makes it easy to colorize with only the color layers without having to set each colorized object on its own layer. |
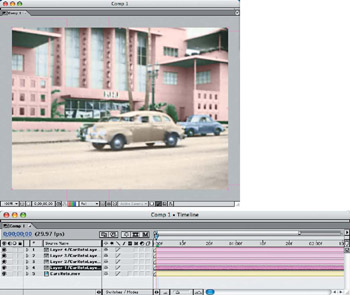
Figure 7.19: Arrange the layers in order on the Timeline so that the street-level layer is just above the movie layer, followed by Layers 2, 3,and 4.
Starting with Layer 2 at Frame 1, the yellow car is in the center of the frame. You may need to drag the layer into position over the car if it isn't already aligned. Since the car will be moving at an angle off the left side of the screen, the color layer will need to be scaled and moved along to follow the car beneath. Open the Transform option on Layer 2 in the Timeline, and click the Stopwatches for both Position and Scale. This will set the keyframes for Frame 1.
Move the Indicator down to the point where you see the yellow car start to go off the screen, and then drag the color layer to the left to match up with it (Figure 7.20). You will need to adjust both the Scale and Position as the car approaches, and try to align it as close as possible to the car in the movie layer. When you click on and drag a color layer, it will temporarily turn opaque. This is normal behavior, and the layer will return to the colorized mode as soon as you let go.
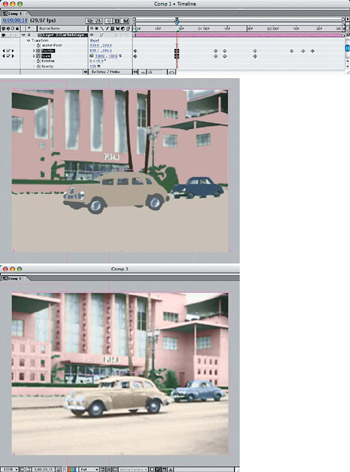
Figure 7.20: Reposition and scale the color layer of the yellow car to match the motion as close as possible with the movie.
Continue with the remaining color layers, repositioning and scaling them to match the car's motion on the movie layer beneath them. Notice how the colors of the cars and background show through the transparent portions of the windows (Figure 7.21).
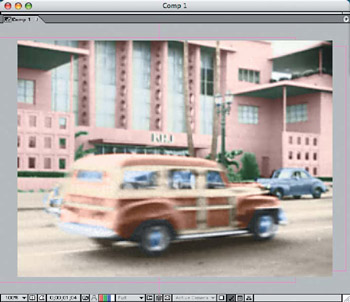
Figure 7.21: Move and scale the other two color layers for the cars.
Part I - Connecting Photoshop, ImageReady, and After Effects
- Basic ImageReady Animation, Tweening, and Layer Styles
- Photoshop Layers and After Effects
- 3-D Layers from Photoshop Layers
Part II - Applying Animation Concepts
Part III - Clean-Up, Mattes, and Objects
- Blue-Screen Garbage Mattes
- Rotoscoping Techniques with Photoshop
- Matte and Keying Plug-ins
- Static Matte Painting in Photoshop
- Motion Matte Painting in Photoshop
- Making Movies from Stills
Part IV - Advanced Movie Magic
EAN: 2147483647
Pages: 104
