Basic ImageReady Animation, Tweening, and Layer Styles
Photoshop and ImageReady work together as an image creator, editor, and animation tool. While Photoshop is the preferred tool to create content, ImageReady will put it into motion. Some of the projects in this chapter can be totally created in ImageReady alone. These animations can be exported as uncompressed QuickTime movies that you can import into After Effects. We will cover some animations that just can't be created any other way, such as animated layer styles.
Turning Photoshop Layers into Frames
If you create an animation using different layers in Photoshop, such as a distorted or "Liquified" object, then there's a simple way to convert each layer into a single frame of animation. You might choose to create an animation in Photoshop because some tools, such as the Liquify command or the applied Contour Shape layer style, are not available in ImageReady (Figure 1.1).
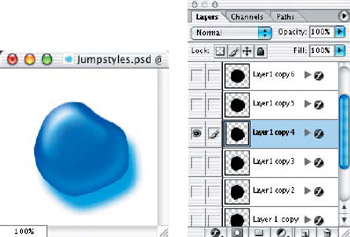
Figure 1.1: Several layers created for an animation sequence
After you jump over from Photoshop, select the Make Frames From Layers option from the Animation palette menu. This will insert the background layer as Frame 1 and the subsequent layers as frames in order of layer hierarchy (see Figure 1.2). Since in most cases you won't want the background layer to be inserted as a frame in the animation, simply delete Frame 1 from the Animation palette. This will eliminate the background color/texture behind the animated pieces in the example animation. Choose Select All Frames from the Animation palette menu and make the background layer visible.
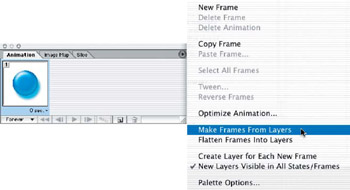
Figure 1.2: Selecting Make Frames From Layers from the Animation palette menu
Now the animation sequence is in place and is ready for any adjustments in timing or output options and previewing in the default web browser for quick reference (see Figure 1.3). Even though the animation will appear as an animated GIF, it will run at normal playback speed, though it's not in full resolution. It will give you a better idea of the actual flow and real-time animation than the Playback button in ImageReady, and you don't have to export the animation to a QuickTime movie just to preview the animation sequence timing.
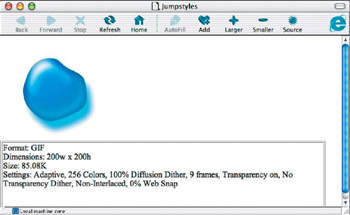
Figure 1.3: Previewing the animation in the default web browser
| Note |
Look for finished examples of many of the book's projects and animations on the enclosed DVD. |
The Animation Palette in ImageReady
Most common animation techniques, such as moving and blending object and text layers in a sequence, are best left for video compositing tools such as Adobe After Effects. Still, there are many animation techniques that can be done quickly and easily with ImageReady and that require very little programming or timeline editing. These techniques are covered in detail throughout this book, and references will be made to the Animation palette.
The Animation palette (Figure 1.4) is the heart of creating animations in ImageReady. It's a very intuitive layout for frame-by-frame animation sequences, with advanced features such as tweening and frame generation from layers. Getting familiar with the features and buttons on the palette will help speed up your animation process.

Figure 1.4: Features of the Animation palette
We'll create a simple one-layer animation to familiarize you with the Animation palette. To begin to move the object on a single layer, using the Animation palette, click the Duplicates current frame button.
After duplicating the frame, and with the frame selected in the palette, use the Move tool to relocate the object on the layer to another area in the window. The Animation palette will show the updated frame. Shift+click the two frames in the palette to select them, and click the Tweens Animation Frames button to bring up the Tween dialog box (Figure 1.5) to add a few frames "in between" the selected frames. Select the All Layers and Position options and set the number of frames to add. In this example, only five frames were added.
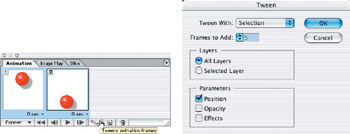
Figure 1.5: Create a single text layer and apply Warp Text to it for the starting frame of the animation.
| Note |
There's more about tweening in the Animation palette later in this chapter, in the section "Pre-Animation: Painless Tweening in ImageReady." |
Continue duplicating frames, moving the object layer and tweening to create a simple animation that can be played back from the palette for preview. Select the Play button on the Animation palette to preview the animation, or use the Preview In Default Browser button on the toolbar to view in real time.
To adjust the playback speed of all frames, choose the Select All Frames option from the palette menu, and select the frame delay to set (see Figure 1.6). The frames can be adjusted individually as well.
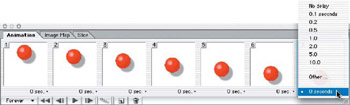
Figure 1.6: Adjusting the frame delay
Exporting Animation Files from ImageReady
There are two basic ways to save your animations out of ImageReady: as QuickTime movies or animated GIF files. Of course it helps to know going into your project what kind of animation you're creating—the frames per second, pixel dimensions, color depth, etc. Exporting the animations requires testing and previewing to get the timing correct. You can do this quickly by selecting the default web browser; although the color depth will be limited to an optimized 256-color palette, you will still be able to gain a sense of your final timing.
To export an animated GIF, choose the Save Optimized As option and then select Images Only as the format, as shown in Figure 1.7. Make sure you set the color depth and dithering prior to exporting, which is how you adjust the size of the finished GIF file. Your exported file will look just as it did when you previewed it in the web browser.
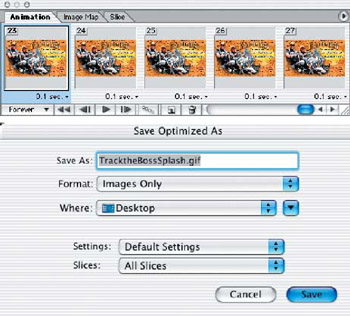
Figure 1.7: Save Optimized As an animated GIF file
Exporting a QuickTime movie file is a bit different, however. The timing of each frame will be reflected in QuickTime Player as the repetition of certain frames to make up the frame rate. If you have very few frames and wish to stretch out the time, then it may be a good idea to increase the frame timing in the Animation palette first.
| Note |
Importing and exporting frames from QuickTime movies requires the inexpensive commercial product QuickTime Pro, not just the free QuickTime Player. |
To export the movie, select File > Export Original to bring up the dialog box. Select QuickTime Movie from the Format selector, name the file and click Save, and then set the Compression Settings from the pop-up dialog box (see Figure 1.8).
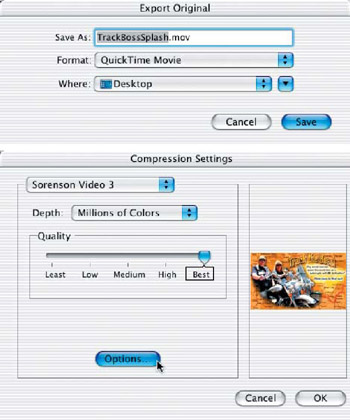
Figure 1.8: Exporting a QuickTime movie file from ImageReady
Open the QuickTime movie file and play back the animation (see Figure 1.9). If you need to make adjustments in time or size, just go back into ImageReady and re-export when you have finished.
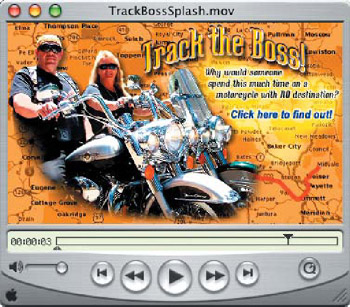
Figure 1.9: Playing back the animation in QuickTime Player
In some cases, you'll want to use the animation frames as individual images that you can work on or import into another application. You can do this simply by selecting File > Export from QuickTime Pro and selecting the Frames Per Second settings and the file format with compression settings (see Figure 1.10).
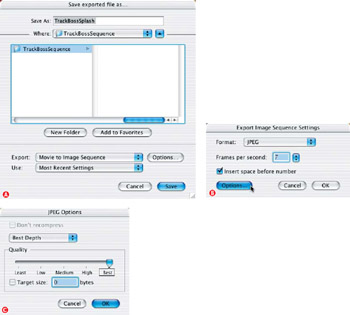
Figure 1.10:
Ⓐ Export the animation frames from the QuickTime movie;
Ⓑ set the Frames Per Second timing;
Ⓒ after clicking Options, set the compression.
Pre Animation Painless Tweening in ImageReady
Tweening is the process of adding frames between two selected frames (called key frames) automatically to create a designated number of steps of motion, opacity, or applied effects—to create a smooth, continuous animation sequence. The more key frames you have, the more control you will have over your animation's tweening.
Knowing what the final animation will be used for will help you to determine the speed and length of the animation sequence you are creating. Using more frames for tweening makes your animation not only smoother but also longer. It takes some practice to determine the correct number of tweened frames to add for each sequence, as well as the delay time that each frame is made visible. If you are creating an animation for a DV (digital video) or a QuickTime movie, it will be around 15–30 frames per second, depending on the final movie frame rate required.
| Note |
The reason I choose to tween animations in ImageReady, rather than using After Effects, is usually because I want to get the layer styles or text effect shapes to animate.Simply moving the Photoshop layers in After Effects won't create the same effects. |
Tweening Motion
You don't have to be an experienced animator to be rewarded with simple motion tweening. By simply tweening a single object layer that is positioned on opposite sides of the frame window, you can make an animation in just a couple of steps. To see how, open MotionTweening.psd from the Chapter 1 folder on this book's companion DVD.
In this example, I started with a multilayered Photoshop file, with simple shapes on layers, including Trees, Hills, Moon, and Stars. The layers were placed in order from closest (at the top of the layers stack) to farthest (at the bottom) in the frame. With the Moon layer tucked down behind the Hills layer, I jumped to ImageReady, where the default position is automatically created as Frame 1 on the Animation palette, as shown in Figure 1.11.
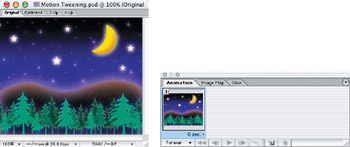
Figure 1.11: Jumping to ImageReady from Photoshop creates Frame 1 on the Animation palette.
Click the Duplicate Selected Frame button on the Animation palette to create a new frame (Frame 2). The Moon layer then moves up into the sky (see Figure 1.12), which becomes the current position for Frame 2. Select the two frames in the Animation palette and click the Tweens animation frames icon to open the Tween dialog box (Figure 1.13). Select the number of frames to add for your animation and set the Tween Parameters to Position.
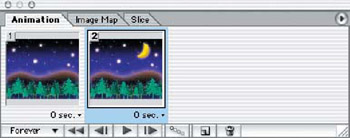
Figure 1.12: Duplicate the first frame and move the object to its destination point.

Figure 1.13: Set the number of tweened frames to insert.
The tweened frames are added between the original selected frames. Click the Play button on the Animation palette to preview the motion path that is created by tweening, as shown in Figure 1.14.
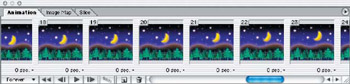
Figure 1.14: Use the Playback controls on the Animation palette to preview the motion created by tweening the two frames.
For a quick preview of the animation (and timing), select the Preview In Default Browser button on the toolbar. This opens the browser window and plays the animation as an animated GIF, so the color depth will be limited to 256 colors, but you will gain a sense of how the animation will move in real time. Export the completed animation as a non-compressed QuickTime file for your final movie, or view my version (MotionTweening.move in the Chapter 1 folder) on the DVD.
Tweening Effects
Tweening effects is a matter of dealing with custom layer styles and text warping effects to create fun and interesting animations. There are several effect tweens that you can create, such as the motion of warped text and the transition of layer styles—though they do not work with Photoshop filters or Plug-ins.
For this example, let's create a simple warped-text animation using only the Tween Effects feature in ImageReady, so we won't need to jump to Photoshop.
- Open groovytext.psd, which is provided on the DVD.
- Start with a single text layer with a Warp Text applied to it in an exaggerated position, as in Figure 1.15; this becomes Frame 1 of the animation.
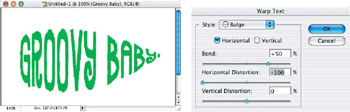
Figure 1.15: Create a single text layer and apply Warp Text to it for the starting frame of the animation. - Duplicate the frame and open the Warp Text dialog box again. Reverse all of the parameters of the warp, as shown in Figure 1.16. This becomes the state of Frame 2, or the second key frame.
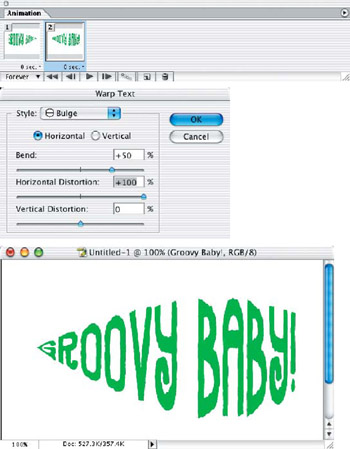
Figure 1.16: Duplicate Frame 1 and reverse the parameters of the Warp Text for the second key frame of the animation. - Select the two frames on the Animation palette and click the Tween button to open the Tween dialog box (Figure 1.17). Select the number of frames you wish to add and choose the Effects check box.
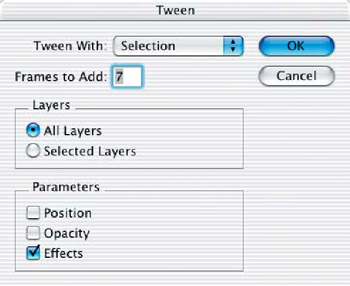
Figure 1.17: Tween the Effects between the two key frames. - Duplicate the tweened frames and move them to the right of the second key frame. Select the Reverse Frames option from the Animation palette menu to create a closed "loop" animation (Figure 1.18). Preview the finished animation in the default web browser.
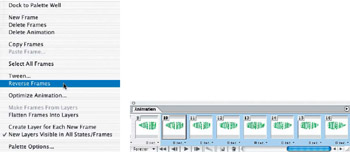
Figure 1.18: Reverse the frame order to create a closed loop animation.
Applying Depth and Realism to Animations
To create the illusion of depth in a two-dimensional image, you need to have a basic understanding of lighting and shading. Knowing the direction of light on an object is not as important as understanding that all shading must be applied on the opposing sides, including shadow falloff. For example, if you have a sphere that has a light source at the 10 o'clock position projected onto it, then naturally you will want the shaded side of the sphere to appear at the 4 o'clock position. The shadow from this sphere would then fall upon whatever planes or objects are 180 from the light source.
Fortunately, the layer styles in Photoshop handle all of this automatically (when Use Global Light is selected). There may be times when you might wish to take control over the automatic settings to force a highlight or shadow onto an area of your image to create an illusion of forced perspective.
Using the text animation in the preceding project, apply a layer style to the text. I applied Lime Green Glass Button, from the Styles palette (if you don't see that style in your list, append the Glass buttons from the Styles palette pull-down menu to get it). I then modified the drop shadow layer to act more as a refracted light gel, by changing the color to green and reducing the opacity to 50% (see Figure 1.19, which shows the Photoshop layer style settings and the result in ImageReady).
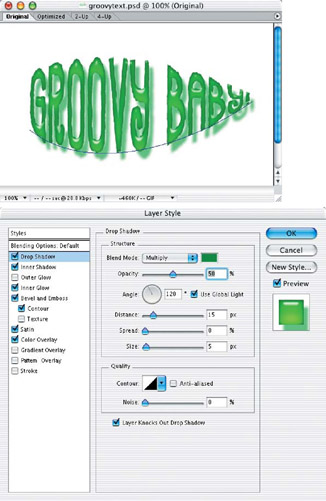
Figure 1.19: Modify a default layer style to refract light and enhance transparency and dimension.
Styles in Motion Neon Text
This project will familiarize you with different layer style options and animating a sequence in ImageReady by only making changes to the layer style settings. Creating neon effects involves two elements: the tubing and the light glow. When the light is off, the tubing still has a 3-D surface and casts a shadow if any ambient light is present. When the light is on, it casts a glow but no shadows.
| Note |
Intermediate or advanced Photoshop users may wish to open the file NeonText.psd on the DVD and skip ahead to the animation section of this project. |
- Start by creating a text or object layer in Photoshop that will simulate the shape of the neon tubing (see Figure 1.20).
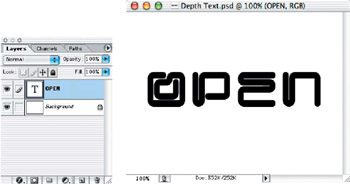
Figure 1.20: Create a new text or object layer. - Click the Add Layer Style button on the Layers palette to open the Layer Style dialog box. The first step is to give the shape a base color, so select the Color Overlay option and choose a color by clicking on the colored rectangle. In this example, I used the default red color for my base.
- Select the Bevel And Emboss option, and adjust the Depth to 200% and set the Size to 6 pixels. Change the Highlight color to a lighter shade of the base color you're using (mine is a pale pink) and change the Shadow color to a darker shade (a dark red in my example). Adjust the Opacity of each to achieve a balance between the base color and the highlights.
- Set the altitude of the light source high so that it creates the highlight on the top surface of the tubing, as shown in Figure 1.21.
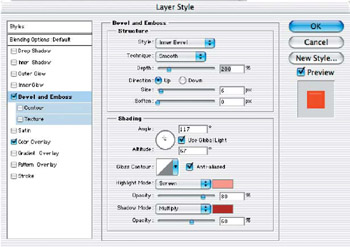
Figure 1.21: Apply the Bevel And Emboss option and change settings to create a tubing effect. - Apply the Inner Glow option. Change the color to a lighter version of your base color (in my example, it's a pale pink). Set the size to approximately 10 pixels—adjust for the size/resolution of your image and object layer. Change the Contour from the default to Ring-Double.
- Select the Outer Glow option and set the color to a slightly lighter variation of your base color. Set the Opacity to 50% and the Blend Mode to Normal. Adjust the Size to 15 pixels to achieve an even spread of "light" around the object (see Figure 1.22).
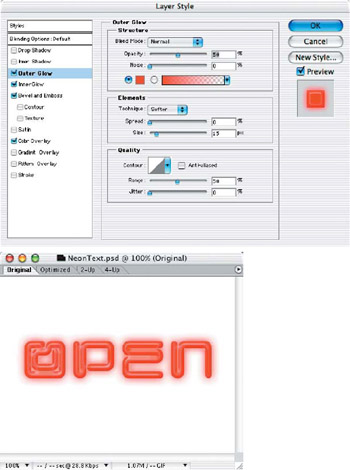
Figure 1.22: Use Outer Glow to make the neon shed some light! - Click OK and apply a dark background texture to a layer below the neon object layer.
Your final image should have a soft glow around the edges of the tubing (See Figure 1.23). You may need to make some adjustments to the glow opacity and size if the image appears too weak or strong for a realistic effect.
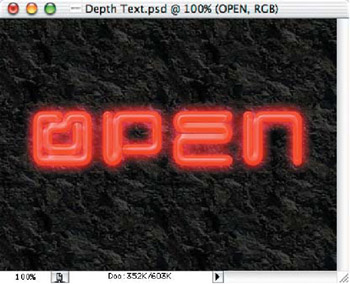
Figure 1.23: The completed image should have a soft glow around the edges.
We will now create the "off" version of the tubing by making a few changes in the Layer Style dialog box:
- Duplicate the neon tube object layer and open the Layer Style dialog box. Deselect the Inner Glow and Outer Glow options by clicking their check boxes off.
- Set the Opacity of the Color Overlay to approximately 30% and apply a slight Drop Shadow, as shown in Figure 1.24. Depending on your background color, you will need to adjust the opacity of the shadow's intensity to make it just barely visible.
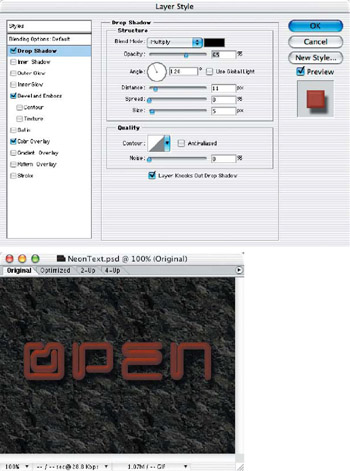
Figure 1.24: Applying a drop shadow in the "off" version of the tubing will give the object a 3-D effect against the background. - Jump to ImageReady to animate the sequence of the light flashing on and off. For a believable effect of the neon light turning on and off, there should be a bit of flicker, which can easily be created in the timeline.
- Start with the first frame in the Animation palette and make only the "off" layer visible. In the second frame, make the "on" layer visible.
- Duplicate these two frames three times (creating a total of eight frames—off/on, off/on, and so on).
- On the seventh frame, make the "on" layer visible and set the Opacity to 50%. This will make it appear as if it is fading as it turns off completely.
- Set the timing on each frame by clicking on the delay setting (as shown in Figure 1.25). Set the first and sixth frames to 2 seconds, while setting the remaining frames to No Delay. This will cause a slight flicker as the light goes on and off.
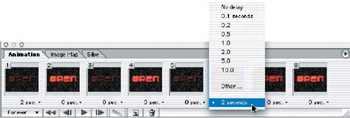
Figure 1.25: Adjust the timing of the frames to create a realistic "flicker"in the neon light.
| Note |
As with all animation projects created in ImageReady, you can preview the animation in a web browser to gain a feel of the timing. Then choose Export Original Document and create a QuickTime movie of your completed animation sequence. |
Light in Motion Leaf Shadow
There are obviously several methods of moving layered objects around in ImageReady to create animation, but there are ways to animate with layer styles that will give realistic 3-D effects. Lighting and shadows in motion or moving textures across an object are just a few ways you can create motion with a single object or text layer. This project will guide you through creating lights, shadows, depth, and motion—by modifying only the layer styles in Photoshop and animating their settings in ImageReady. You can follow along by opening LightMotion.psd from the Chapter 1 folder on the companion DVD.
Using the Global Light directional settings, you can create incredibly realistic 3-D animations with layer styles. This project shows that an image with only one layer and a single layer style applied can be animated in ImageReady to create the illusion that a light source is moving from the bottom to the top of the frame.
Start with a text layer or an object floating in a layer in Photoshop. Apply a Drop Shadow to the object layer in the Layer Styles dialog box, setting the Distance far away from the object. I changed the Angle to create the illusion of the light source coming from the bottom and moving to the top and also made the shadow a bit bolder by adjusting the Spread (see Figure 1.26).
|
Setting |
Value |
Result |
|---|---|---|
|
Angle |
−120 |
Creates the illusion of the light source coming from the bottom and moving to the top. |
|
Distance |
30 pixels |
Positions the light far away from the object. |
|
Spread |
20% |
Makes the shadow bolder, exaggerating the shadow depth. |
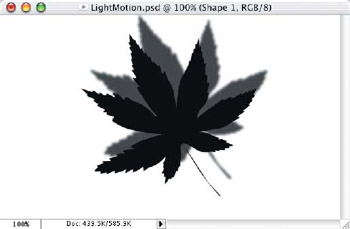
Figure 1.26: Create dramatic drop shadows for your object layer.
Apply a solid Color Overlay to the object layer and a Pattern Overlay for texture if you wish. I applied a Pattern Overlay of Gouache Watercolor and set the Color Overlay Blending Mode to Overlay, allowing the texture to show through the solid color.
Apply a Bevel And Emboss to the layer, with a Quarter Round Contour. Set the options as shown in the following list and in Figure 1.27. In addition, I added a light background texture to give it depth and interest.
|
Setting |
Value |
|---|---|
|
Depth |
250% |
|
Size |
Approx.10 pixels |
|
Light Source Direction |
Leave as is, Up |
|
Altitude |
65 |
Jump to ImageReady—your first frame will automatically be positioned in the current state. Duplicate the first frame and change the angle of the Drop Shadow to +120, making sure that the Use Global Light selection is checked (see Figure 1.28).
Select both frames on the Animation palette and click the Tween button. Select only the Effects option and set the number of frames you wish to add to your animation. I chose 28 for a smooth 1-second animation at 30 fps (see Figure 1.29).
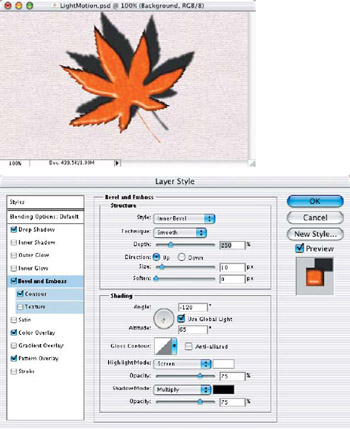
Figure 1.27: Apply a Color Overlay and Emboss to the layer to give it depth and dimension.
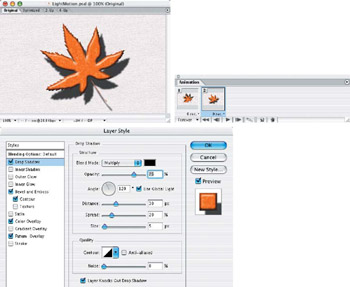
Figure 1.28: Note how the light angle as well as the drop shadows affect the surface of the image.
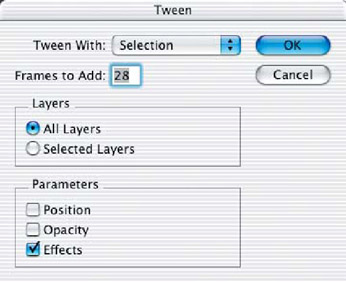
Figure 1.29: Tweening the effects with several frames will give you a longer, smoother animation.
You may set the delay timing to slow down or freeze the animation in the time-line on the Animation palette. I chose to add.1 Sec a few frames toward the end of the animation sequence to "ease in" to the last frame, then hold on the last frame for 2 seconds before looping again (Figure 1.30). See the final animation, LightMotion.mov, in the Chapter 1 folder on the companion DVD.
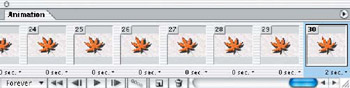
Figure 1.30: Speed up or slow down the animation further by setting the delay timing for each frame.
Pattern in Motion Rolling Eye
You don't always need a 3-D application to create realistic 3-D animations or effects. Starting with a single photograph, you can extract portions of it and apply them as a layer-style pattern on a shape layer that can be animated to appear as if it was rendered with light sources and reflections.
Start this project by opening the file EyeballAnim.psd in Photoshop, from the Chapter 1 folder on the DVD (see Figure 1.31). Duplicate the background layer and hide the background. Select only the eyeball from the center of the eye and cut it from the image layer, as shown in Figure 1.32. You may wish to use the Lasso tool to select the eyeball, or for more accuracy, use the Eraser tool to remove the portion of the image on that layer.
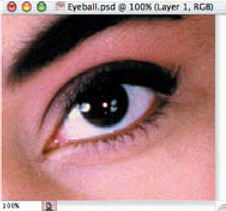
Figure 1.31: The eyeball image file found on the DVD
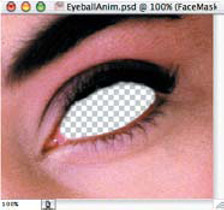
Figure 1.32: Delete the eyeball portion of the image, revealing the transparency behind it.
Make the background visible again, and click on it to activate the layer. Select the transparency of the modified layer (Ctrl+click/ +click in the Layers palette and invert the selection) and copy/paste the eyeball section from the background. This will create a new layer with just the eyeball on it. Hide the other layers and start painting around the eyeball to create a large, soft circle (see Figure 1.33). Be sure to clone over areas like the light reflections and highlights on the pupil of the eye and add interesting details, artifacts, and noise back into the eyeball texture. Select All and chose Edit > Define Pattern to add this new texture to the Pattern library. This will become the pattern that will be applied to the final shape via the layer style.
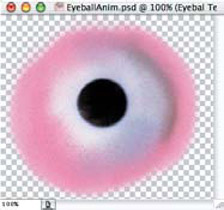
Figure 1.33: Paint out reflections and put details back into the eyeball "texture map."
Create a new layer. With the Elliptical Marquee tool, draw out a circle larger than the eye socket and fill it with white, as shown in Figure 1.34. This will be the shape that the pattern and layer style will be applied to.
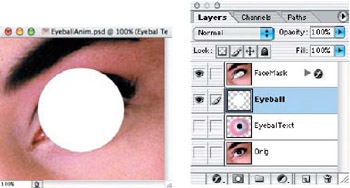
Figure 1.34: Create a circular filled shape to apply the pattern style to.
Making only the filled-circle layer visible, open the Layer Style editor and add a Bevel And Emboss with a 1/4 Round Contour shape. Use a dark purple for the Shadow Mode, and turn the Highlight Mode down to 0% Opacity. Set the Size to 65 pixels and Soften to 7 pixels. Set the Depth to 150%. Change the Angle to 130 with the Altitude at 30. This is the basic geometry of the eyeball sphere.
Select Pattern Overlay and the eyeball pattern you just added to the pattern library. It will already be the correct size, so leave the scale at 100% (see Figure 1.35).
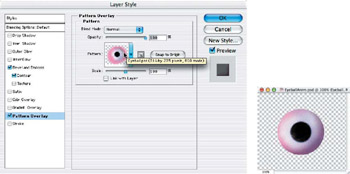
Figure 1.35: Apply an Emboss and the eyeball pattern to the circle shape layer.
Make the background and top face layers visible. Open the Layer Style editor again and choose the Pattern Overlay option. Drag the pupil of the eyeball into position approximately where the original was.
Create a new layer. Using the Paintbrush tool and a small, soft-edged brush, paint in the original white highlights on the eyeball. Click the Layer Visibility of the eyeball layer on and off to make sure you're getting all of the original highlights in approximately the correct positions. Apply an Outer Glow layer style to the highlights, change them to a pink "melon" color, and set the Size to 3 pixels (see Figure 1.36). This will give a natural glow around the reflected lights on the surface of the eyeball and help to give it a "wet" look.
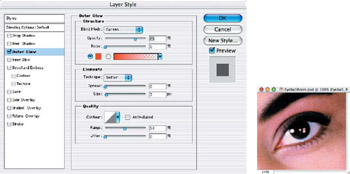
Figure 1.36: Add highlights to a layer above the eyeball to give a wet look to the surface of the eye.
Select the top face layer and apply an Outer Glow layer style. Change it to a pink flesh color and set the Blend Mode to Multiply. Set the Opacity to 50% and add 6% Noise. Make the size 20 pixels (Figure 1.37). This will help blend the edges of the eye socket tissue into the eyeball and throw some ambient reflection onto the surface of the eye.
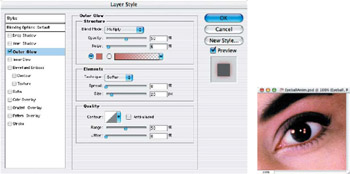
Figure 1.37: Apply an outer glow to the eye socket to help blend the tissue colors with the eyeball.
Jump to ImageReady and duplicate Frame 1. Select Frame 2 and jump back to Photoshop. Open the Layer Style editor on the eyeball layer and choose the Pattern Overlay option. Drag the pattern over toward the inside (toward the nose), as shown in Figure 1.38. Notice how the highlights remain in place, as they would in nature. Be sure not to move the eyeball pattern too much of an extreme, or it will look comical instead of realistic. (Which may be fun, actually!)
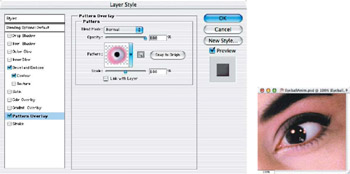
Figure 1.38: Move the eyeball pattern in the Layer Style editor to create the second key frame position in the animation sequence.
Jump to ImageReady and duplicate Frame 2. Select Frame 3 and jump back to Photoshop. Repeat the process in the previous step, moving the eye to the outside position, and return to ImageReady (see Figure 1.39).
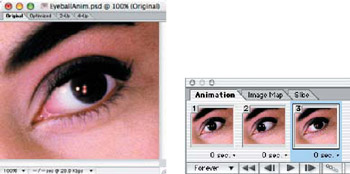
Figure 1.39: Repeat the process, moving the eye to the outside position.
Select Frames 1 and 2 in the Animation palette and chose the Tween option. Select only the Effects check box and add three frames (see Figure 1.40). Select the last two frames and repeat, adding five-seven frames. Create new key frames and repeat the process of moving the eyeball pattern around, and make new, creative movements of the eyeball.
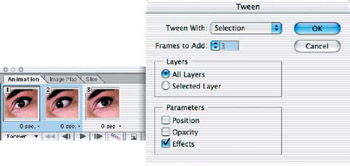
Figure 1.40: Tween between the key frames to create the eyeball movement animation.
Preview the final animation in the default web browser. You can make adjustments in timing before saving or exporting your final QuickTime movie. More frames create longer, smoother animations. Just remember that at 30 fps, the frames must have no delay added to them, but if you wish for a pause on any frame, the movie will export the timing you set in the frame delay.
Part I - Connecting Photoshop, ImageReady, and After Effects
- Basic ImageReady Animation, Tweening, and Layer Styles
- Photoshop Layers and After Effects
- 3-D Layers from Photoshop Layers
Part II - Applying Animation Concepts
Part III - Clean-Up, Mattes, and Objects
- Blue-Screen Garbage Mattes
- Rotoscoping Techniques with Photoshop
- Matte and Keying Plug-ins
- Static Matte Painting in Photoshop
- Motion Matte Painting in Photoshop
- Making Movies from Stills
Part IV - Advanced Movie Magic
EAN: 2147483647
Pages: 104
