Making Movies from Stills
Still images are great source material for motion graphics and video. You can bring an image to life by extracting foreground and subject elements onto layers that can be panned, zoomed, and moved in believable motion and perspective. Create a quick animated clip for your DV project when there's no source footage available. Create a 3-D stereo effect in a static scene.
This fantastic phenomenon is at the heart and soul of this book! Mastering the techniques in this chapter will differentiate your abilities as a motion graphics creator from those of just a DV editor or compositor.
Extracting the Subjects from an Image
Extracting subjects and layers of depth from your images requires a command of the Clone Stamp tool and some creative image compositing skills. Once you cut out your subjects from the original image, you need to fill the holes behind them (or at least the edges where motion will reveal the void).
In this first example we'll be using the image Bird-n-BeachFlat.tif on the DVD in the Chapter 11 folder (Figure 11.1).
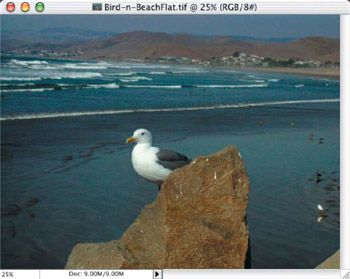
Figure 11.1: This image is a good example of clear foreground subjects and an easily editable background.
We will extract the seagull and the rocks in the foreground onto their own layer and patch up the background to fill in the missing image area. For the most precise method of accurately dividing the images, it is best to roughly copy and paste the subjects to a new layer and then carefully remove the unwanted material around the edges with the Eraser tool. This gives you great edge control, by changing brush sizes and edge hardness while editing.
- Open the file and start by using the Lasso tool to quickly select the area well outside of the edges of the seagull and rocks; then press
 /Ctrl+J to copy and paste the selection to a new layer (Figure 11.2).
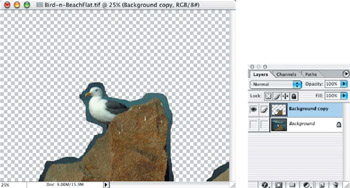
Figure 11.2: Select a rough area around the subjects in the image and copy and paste it to a new layer. - Use the Eraser tool to remove the excess material around the foreground subjects, changing brushes as needed to adapt to the edge softness and complexity. With this image, you can start with a larger brush size along the edges of the rocks and switch to a smaller brush in the details, leaving the seagull for the next step (Figure 11.3). Select the seagull from the rocks layer, and use
 /Ctrl+J to copy and paste it to a new layer.
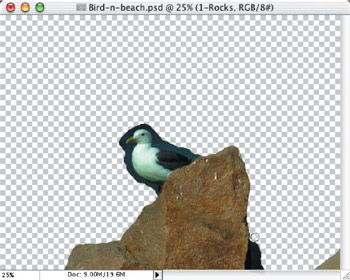
Figure 11.3: Remove the background from around the edges of the rocks with the Eraser tool brush. - Return to the rocks layer and use the Eraser tool to remove the seagull and remaining background material from around the rocks.
- Go back to the seagull layer and use smaller Eraser tool brushes to remove the background material around the edges.
- Since the seagull will have some slight motion from behind the rocks, we need to add just a little more of the bird's image area. Use the Clone Stamp tool with a small soft-edge brush to carefully fill in toward the tail and legs of the seagull— adding about 1/4"" more of the image area (Figure 11.4).
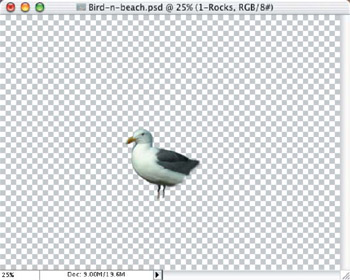
Figure 11.4: Use the Clone Stamp tool to add some more feathers to our friend! - We now have three layers in our image: the background layer, the rocks layer, and the seagull layer. Select the background layer, hide the top two layers, and use a combination of techniques to fill in the area where the rocks and seagull were previously. I find that a random application of the Clone Stamp tool with a large soft-edge brush works well in this case, taking care not to create a repeating pattern in the water and sand. If this occurs, you can use the Healing brush to touch up some of the repetitions (Figure 11.5).
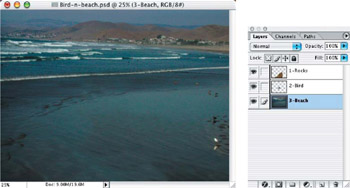
Figure 11.5: Use the Clone Stamp tool and Healing brush to fill in the background image where the subjects have been removed.
Creating Zoom Effects with Moving Layers
Simply zooming in on a static image in After Effects provides expected but limited results—it still looks like a static image. By separating the elements of an image and putting them into motion during a zoom-in, you will create a dramatic and realistic effect that has dimension and interest. This effect requires files that are at least twice the size of your movie window, because we will be increasing the layer dimension to create the zoom in After Effects.
- Using the layered image we created in the preceding section, or the file Beach-n-Bird.psd from the DVD, import the image into a new project in After Effects as a composition to retain all of the layers. For this project, set the project composition to standard NTSC 640480 default, 3 seconds in length.
- Drag the entire PSD file folder from the Project window, center it in the Comp 1 window, and scale down the group to slightly larger than the Comp 1 window area, as shown (Figure 11.6). This will be the position for Frame 1 of the zoom effect animation.
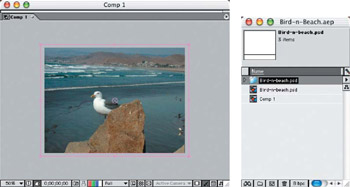
Figure 11.6: Import and place the Photoshop layers into your Comp window, and scale down to set the beginning of the zoom effect. - Hide the top two layers in the Timeline window, and move the Current Time Indicator to approximately 7 frames. Select the background layer, and press the S key to reveal the Scale settings for that layer in the Timeline window. Click the Time-Vary Stopwatch to set the current scale setting for this layer (Figure 11.7).
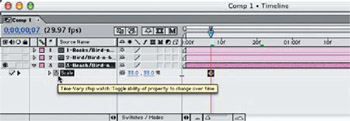
Figure 11.7: Begin the background zoom a few frames in from the beginning of the animation. - Move the Indicator down to the 2-second mark, and adjust the scale up to 75%. Right-click/Ctrl+click the scale marker, and select Keyframe Assistant > Easy Ease Out (Figure 11.8). This will automatically slow down the end of the zoom to give a more natural camera feel and not have an abrupt mechanical stop.
- Repeat with the first scale marker at Frame 7, but select Easy Ease In.

Figure 11.8: Applying the Easy Ease In and Out Keyframe Assistants will give a more natural camera zoom effect. - Make the rock layer visible, and move the Current Time Indicator to the same Frame 7 marker that the background layer is set to. Press the S key to reveal the Scale settings in the Timeline window, and click the Time-Vary Stopwatch to set the current scale.
- Repeat for the seagull layer, and apply the Easy Ease Out Keyframe Assistant to both markers (Figure 11.9).
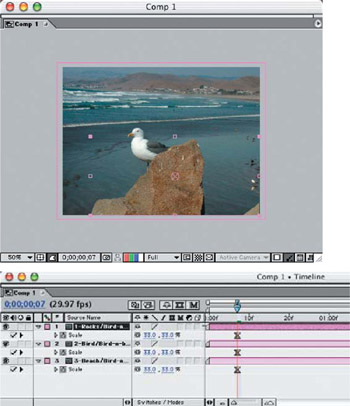
Figure 11.9: Set scale markers for both the rock and seagull layers. - Move the Indicator to the 2-second mark, increase the scale of both the rock and seagull layers to 55%, and apply the Easy Ease In Keyframe Assistant to both markers (Figure 11.10). The reason we aren't increasing the scale of these layers (or "zooming in") as much as the background layer is to give the effect of a camera lens that "pulls" the background and foreground together and decreases the depth of field.
Since the different layers scale at separate center points, it's important to align them to keep the focus of the motion centered in the Comp 1 window frame and not move toward the bottom of the frame.

Figure 11.10: Increase the scale of the rock and seagull layers and set the time markers. - With the rock layer selected, return to the Frame 7 marker and press P for the Position settings in the Timeline window. Click the Time-Vary Stopwatch to set the current Position setting. Move the Indicator to the 2-second mark, and then drag the rock layer in the Comp 1 window to bring it up in the frame. Scrub the Indicator back and forth to see the motion of the rock layer. Be sure to move it in a matching vertical alignment with an object in the background layer, such as the birds along the water's surface, as shown in Figure 11.11. Set the marker in the Timeline and apply the Easy Ease In Keyframe Assistant.
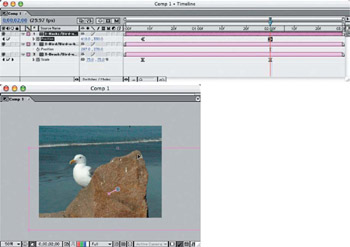
Figure 11.11: Move the rock layer up in the frame to keep it centered in the motion zoom path. - Repeat the above process with the bird layer, keeping it in the same vertical path in relation to the rocks, but position it slightly lower (behind the rocks) to reinforce the motion zoom effect (Figure 11.12). After applying the Easy Ease In Keyframe Assistant to the marker, check that all of the markers at the 2-second mark have the same ease-in amount applied by right-clicking/Ctrl+clicking the marker and selecting Keyframe Velocity (Figure 11.13). Check the markers at the Frame 7 mark as well.
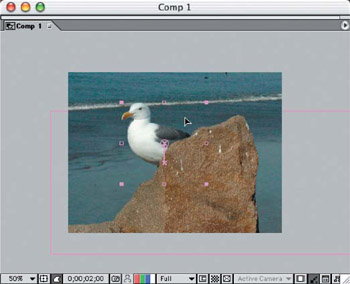
Figure 11.12: Move the bird layer in a vertical path to match the movement of the rock layer, and scrub the Indicator to view the motion path.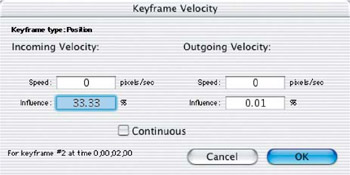
Figure 11.13: Check the Keyframe Velocity of all the markers to make sure the ease-ins and -outs all match.
For variation, experiment with adding blur to the background layer over time, as shown in Figure 11.14. Though, in reality, a zoom wouldn't necessarily take the background out of focus like that, it does give a nice effect that puts the focus of the frame onto the foreground subjects.
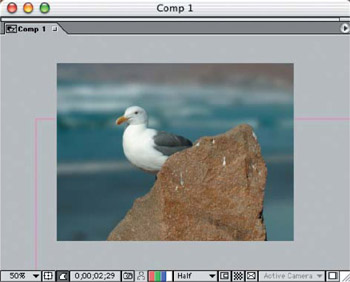
Figure 11.14: Try adding a blur over time in the background layer for an interesting effect.
| Note |
For your reference, the After Effects project files are also included on the DVD, along with the completed example movies. |
Simulated Forward Motion with Zoom Effects
In addition to zooming in on an image as if you were using a camera lens, you can zoom right "into" the image—bringing it to life and actually creating the effect of moving through the image. You can do this by extracting not only the foreground objects but also predominant objects and landmarks, all the way to the farthest point in the background.
To make this effect realistic, you will need to start with an image that will allow many selections and transformations with a predominant perspective point. For this project, we'll use the image OR_HighwayFlat.tif found on the DVD (Figure 11.15).
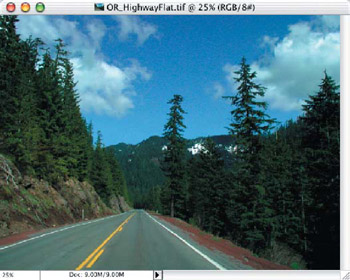
Figure 11.15: Select an image with a predominant perspective and several layers going off into the background.
Start "peeling-away" the layers of the image by selecting foreground objects first and working your way all the way back to the farthest point in the image. For every layer that you create, use the Eraser brush to remove excess material, and try to create as clean of an edge as possible but still blend in with the background elements (Figure 11.16).
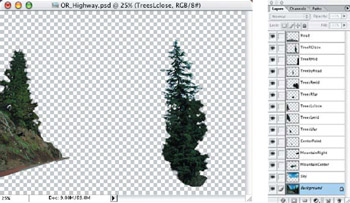
Figure 11.16: Separate the layers and clean up around all of the edges.
Since the path of motion will be to zoom into the image, moving each layer farther to the outside and down into the frame, you will need to modify every layer and add an extra image area to the bottom edges with the Clone Stamp tool (Figure 11.17). Extra care is necessary to create believable textures and modifications to each layer, because repetitive textures will stand out and ruin your effect.
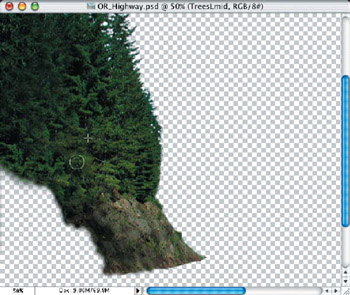
Figure 11.17: Use the Clone Stamp tool to add image area in the direction of motion where the foreground objects will pull away from the background.
| Note |
Use your creativity! When cloning on layers to build up the image area, use sections of like color and texture and mix them up a bit. The Healing brush may help eliminate some of the problematic areas, such as repetitive texture cloning. Sometimes you may need to use the Paintbrush tool to add color or darken/highlight areas, as well as the Dodge or Burn tools. Plan ahead and look at the layers—with the foreground layers both on and off. Anticipate what might naturally be revealed on that layer were you to actually drive into the scene, and create extended imagery to match. |
Be sure to plan ahead. I want the clouds in the sky to move as well, so I have cloned and painted additional sky and clouds well beyond the boundaries of the original coverage area. Since the cloud layer will ultimately move from the right to the left in the animation, move the layer to the right, out of the frame window, and continue cloning and painting more sky and clouds to cover the open areas. You may wish to adjust the scale and proportions of this layer as well (Figure 11.18).
Import the Photoshop file into a new After Effects project as a composition. Create a new composition, NTSC, 640480, and 3 seconds in length. Drag the imported .psd file folder from the Project window, and center it in the Comp 1 window frame. The layers will be really huge in the frame, so make sure to select them all and scale them down to fit the frame. If you don't scale them all at the same time, they will not be aligned properly from the start of the animation.
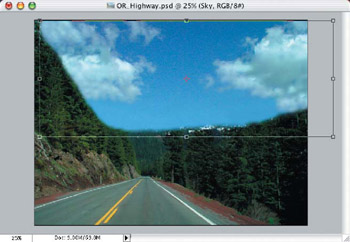
Figure 11.18: By creating the sky and cloud layer larger than the active frame window, the layer will be moveable horizontally in After Effects.
In this project, we want to create the illusion of traveling down the road, but when we scale the composition up at the 3-second mark, the road below disappears off the bottom of the screen. When we drag the layer in the Comp 1 window to bring it back up in the frame where we want it, it is not a straight vertical line; rather, it is a diagonal path that keeps the image on the layer in vertical alignment (Figure 11.19). This is similar to motion path of the rocks layer in the previous Zoom project.
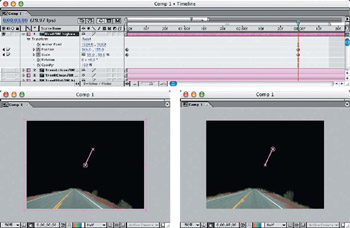
Figure 11.19: After scaling up the layers to the desired amount, move each layer in the screen to match the line of perspective along the motion path.
Each layer will have to move to the right or left to follow the edge of the road (except the background layer) to enhance the effect of forward motion. The trees on each side will have to move in the direction of their perspective motion path—just as if you were to draw perspective lines to the focal point at the end of the road. As you continue to make adjustments to the layers to create the correct amount of motion, scrub the Current Time Indicator back and forth to see the motion in low-res preview in the Comp 1 window (Figure 11.20). Use RAM Preview to view the animation in real time.
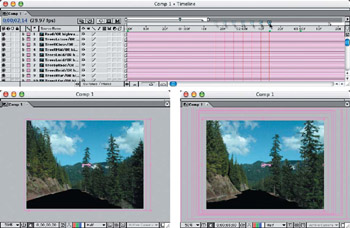
Figure 11.20: Scrub the Current Time Indicator back and forth to preview the motion of the layers.
If you discover that a layer needs some more editing, such as trimming a bit more closely to the subject or adding material to cover up a hole, select the layer name in the Project window and choose the Edit > Edit Original to open the .psd file in Photoshop (Figure 11.21). Once you've finished editing, save the .psd file and return to After Effects. Select the layer in the Project window again, and choose Reload Footage from the File menu. The edits will be automatically updated.
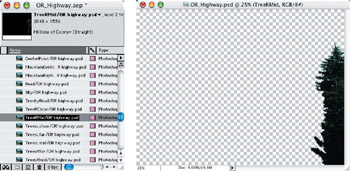
Figure 11.21: Edit the original layers in Photoshop as necessary to assure a realistic motion effect.
Three Dimensional Moving Camera Pans
Panning a moving camera in a scene requires not just moving objects and scenery from one side to the other, but taking into consideration the three-dimensional angle that occurs in the foreground subjects. If your original static image is at an angle to start with, it may actually help you reconstruct the layers to allow a more believable moving camera pan. Keep in mind that this is a simulated motion effect with Photoshop layers and not a true rendered 3-D effect, and it does not use 3-D layers in After Effects.
The image I chose for this project is a small footbridge over a slow-moving stream (Figure 11.22). The problem I encountered at first was that the bridge was cut off on the left side and the format was Portrait instead of Landscape Mode. It took a lot of cloning and patching to create the final Portrait Mode image, Footbridge.psd, found on the DVD.
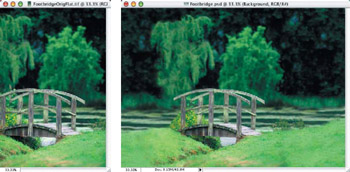
Figure 11.22: (left) The original image in this project was in Portrait Mode and cut off some of the main subject on the left. (right) By carefully editing the image into layers, I centered the bridge and other elements within a Landscape Mode image.
I divided the bridge into three separate layers: front rail, boards, and rear rail (Figure 11.23). This not only allows the railings to be moved independently, but the floorboards can be moved and scaled to fit in After Effects. Since this is the subject of focus in this scene, it will actually appear to "rotate," as if the camera were moving around its center. Other elements in the image are separated by two foreground hills that move one over the other, some bushes right behind the left side of the bridge, the two trees, and the background trees and water.
Import the image into an After Effects project file, NTSC, 640480, as a composition to retain the layers. Drag the composition file from the Project window to the Comp 1 window and center it. Adjust the scale of all layers simultaneously to maintain their positions.
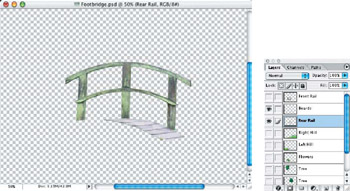
Figure 11.23: The bridge is cut up and separated into layers so that we can pan around it in After Effects.
Since this motion will be a camera pan from left to right (meaning the "camera" will "move" from left to right), then the image layers will move from right to left. The background layer will move the least, while the closest hill on the right will move the most. While the front rail layer will move a bit more than the rear rail layer, the boards layer will need to stretch to match this movement, as well as change location (Figure 11.24). Open the After Effects file FootbridgePan.aep on the DVD for reference as needed.
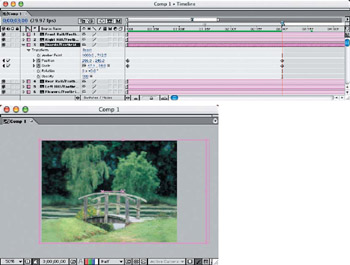
Figure 11.24: Move the front and back rails of the bridge at different rates, and stretch the floorboards to scale with the alignment between the two side rails.
| Note |
When moving objects and elements in a panned animation, be sure to pay attention to how much or how little each layer moves;it will make the effect look fake or scale down the scene to a miniature size when played back. |
Still Camera with Moving Subjects
Take a still image and create a moving scene—no camera or lens motion but the subjects pass by in front of you, with added atmospheric effects. This works well with multi-image composites too, as long as all of the images composited into one image match in perspective, lighting, and scale.
This is a fairly complicated sample project, so I won't get into too many details about all of the edits and cloning done in the Photoshop layers. You can follow along by opening the file CabsLayers.psd on the DVD, or you may want to skip ahead and open the After Effects project file, Cabs.aep, also found on the DVD.
The original image was a Portrait Mode still shot with the foreground subject in a heavy motion blur (Figure 11.25). I decided that I would remove the front cab and the next cab in line to the left. This meant that I had to re-create the pavement surface and paint in the missing portions of the cabs in the background, as well as the markers and posts in the middle ground (Figure 11.26).
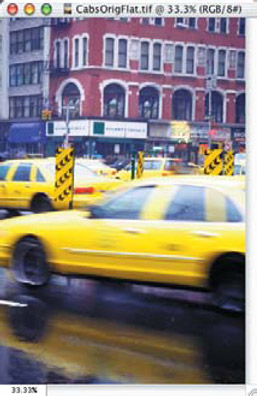
Figure 11.25: The challenge of trying to pull contents out of this image was the large subject in the foreground with a heavy motion blur.
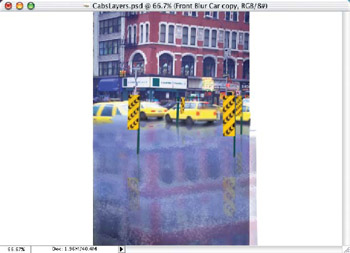
Figure 11.26: Removing the front and middle cabs necessitated a lot of "paint"work in order to fill in the background.
The midrange cab is going to be set in a slow rolling motion off the left side of the frame, so I had to add its own reflection and brake lights layers (Figure 11.27). Since I want to move the front cab through the entire width of the frame, I had to rebuild it in its entirety and make the associated reflection and light layers match, much wider than the project frame size (Figure 11.28).
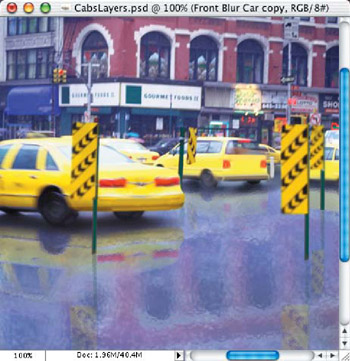
Figure 11.27: I added the cab on the left back in with reflections and a brake light layer that will be animated while the cab rolls out the left side of the frame.
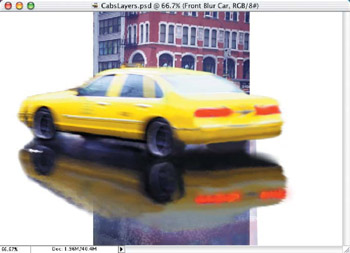
Figure 11.28: The foreground cab had to be reconstructed in its entirety and made wider than the project frame so it could be animated to pass by quickly.
I imported the PSD file into a custom-sized, vertical After Effects project file as a composition and centered it in the Comp 1 window. The layers are all arranged in order front to back, and the foremost cab layers are hidden. While working on the motion of the midrange cab on the left (and with a bit of trial and error), I discovered that it should be scaled down as well as moved just to the left. To give a little more action to the cab's movement, I added the brake lights about halfway through the motion. I applied the Easy Ease In Keyframe Assistant to both the Scale and Position markers in the Timeline and increased the Keyframe Velocity to 50%, which slows down the vehicle a bit sooner (Figure 11.29).
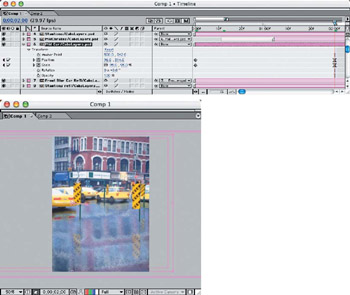
Figure 11.29: Both Scale and Position are adjusted to create the illusion of motion in the correct perspective path.
To create some motion in the surface of the wet pavement, I needed a moving displacement map. I made a file about twice the width of the Project window in Photoshop and applied the Noise filter, level 15, Gaussian (Figure 11.30). I then imported this file into After Effects and created a new composition to hold the noise file layer. Then I moved the layer from the left to the right, duplicated it, and reversed the motion path to move from right to left. I inverted the top layer so that the noise patterns don't match up when they cross each other, and I set the Blending Mode to Darken. This will enable the black points of the noise to be visible in both directions (Figure 11.31).
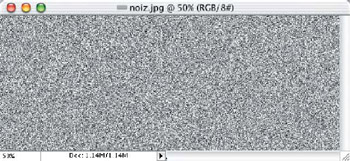
Figure 11.30: First I generated a displacement map with a noise file in Photoshop.
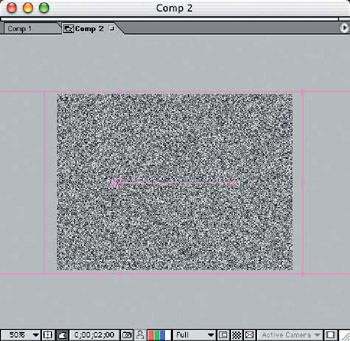
Figure 11.31: Then I created a new composition and inverted the noise file layers and moved them in both horizontal directions.
I placed the new composition into the bottom of the Timeline of Comp 1 and hid it. Then I applied the Displacement Map filter to the pavement texture and the building reflection layers (Figure 11.32). I used a RAM Preview to get a real-time view of the animated ground surface, which simulates rain on the wet surface.
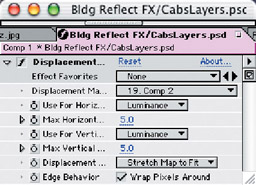
Figure 11.32: The new composition is used as the displacement map for the rainy, wet surface on the ground.
Next I made the front cab visible and selected the reflection and brake lights layers, placing them off-screen to the right in the beginning of the motion path. I then attached the reflection and brake layers to the front cab layer as the parent, selecting them from the Timeline window. Once I determined the motion path and made some scale adjustments, I applied a Directional Blur of 10 pixels at 93 to enhance the quick drive-by effect of the cab (Figure 11.33) and set the brake layer to become visible just past the halfway point of the motion path. I then applied the Easy Ease In Keyframe Assistant to the markers in the Timeline window to slow down the cab toward the end.
Finally, to create the effect of rain coming down, I placed the noise file layer at the top of the Timeline window and rotated it to a 10 angle. Then I set the Blending Mode to Screen and the Opacity to 10%. I configured the motion path to run from top to bottom at a 10 angle and applied a Directional Blur filter at 10 to match and set it to 10 pixels in length (Figure 11.34). Then I ran a RAM Preview to make sure all layer motions, scale effects, and timings were set correctly and all adjustments made.
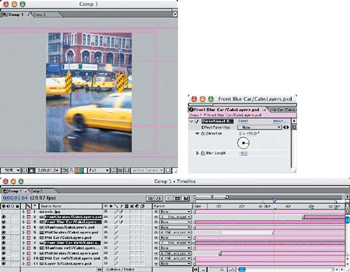
Figure 11.33: A Directional Blur is added to the front cab layer to enhance the drive-by effect.
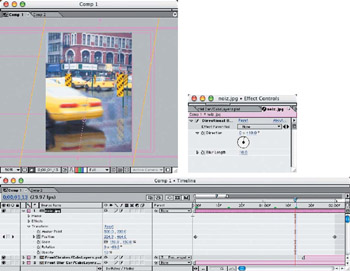
Figure 11.34: A motion blur is also used to create the effect of falling rain.
Part I - Connecting Photoshop, ImageReady, and After Effects
- Basic ImageReady Animation, Tweening, and Layer Styles
- Photoshop Layers and After Effects
- 3-D Layers from Photoshop Layers
Part II - Applying Animation Concepts
Part III - Clean-Up, Mattes, and Objects
- Blue-Screen Garbage Mattes
- Rotoscoping Techniques with Photoshop
- Matte and Keying Plug-ins
- Static Matte Painting in Photoshop
- Motion Matte Painting in Photoshop
- Making Movies from Stills
Part IV - Advanced Movie Magic
EAN: 2147483647
Pages: 104
