Blue-Screen Garbage Mattes
Blue-screen and greenscreen compositing have become more and more popular, with higher-quality pro-sumer DV cameras and video editing software becoming more accessible. But sometimes stuff gets in the way; you want to edit out something that falls in front of or next to your blue screen. A simple crop or mask of the scene might eliminate the majority of the unwanted materials. If the shot has too much movement in an asymmetrical pattern or was shot at an angle in the frame, then a combination of techniques, such as garbage mattes and rotoscoping, may be necessary.
What Is a Garbage Matte?
Unfortunately, locations and chroma backgrounds aren't always the best suited for the shot, but you have to work with what you have. For instance, if you have a distant shot of subjects in front of a chroma tarp, you may be limited to the available size for the scene. This would leave edges of the frame, hardware, lights, or cables exposed in the shot around the subject. All of these items and edges have to be removed before you can use the blue-screen footage in a composite.
A garbage matte is a solid-layer mask that covers up the majority of "garbage" around the blue-screened subject—staying clear of any motion paths that may get covered up. This helps to minimize the amount of rotoscoping necessary to remove the remaining unwanted material.
A garbage matte is usually a single, static layer that overlays the blue-screen footage in an After Effects composite. Placed in combination with solid-colored layers that track the movement in the frame, a garbage matte can help you cover up a great deal.
The project used in this chapter is a blue screen shot from a crane above the actors walking across a chroma tarp. The lighting was natural daylight with a few large reflectors to soften any hard shadows on the actors. The problem was that the chroma tarp was too small for the entire required scene, so a garbage matte and rotoscoping were required to fill in the gaps and outlying areas beyond the tarp in the frame.
A Blue-Screen/Green-Screen Primer
Proper lighting for blue/green screens varies for the location and shoot. If it is an outdoor shot that doesn't require capturing the actors'shadows, then the screen is placed well behind the actors with reflectors flooding it with light. Most blue/green screen shots are done in a controlled studio environment that virtually emulates optimum natural lighting conditions. The reason why it is important to keep the chroma background evenly and brightly lit is to eliminate as many shadows, wrinkles, or imperfections as possible and give an even space for proper removal. The actors are usually placed at least 10 to 15 feet in front of a well-lit chroma background to keep the background evenly lit and have the minimum amount of spill onto the back and edges of the actors.
Why use blue rather than green—or vice versa? Green has an obvious advantage over blue for complete and separate keying from a background, because this shade of green doesn't exist in nature. However, the blue is much more tolerant to spill onto the actor, because the light does exist in nature and is less discernable in a composite. This is why blue has been preferred for close-range keying, where the shadows and close proximity of the actors mean that they come in physical contact with the chroma background.
Today's software matte and keying plug-ins (commonly referred to as "keyers") are more capable of accurately blending edge tolerances and background-to-foreground color correction than their predecessors of only a few years ago. You can learn more about these software plug-ins for After Effects and Photoshop in Chapter 8, "Matte and Keying Plug-ins."
The Static Garbage Matte Defining the Matte s Boundaries
Defining precisely where the boundaries of the garbage matte need to be placed depends on the extreme motion path of your actors in the frame. You will need to define the beginning and end of their path, as well as how far outside of a straight line in that path that they venture—including any extremities or props used in the scene.
| Note |
The work in this chapter requires the upgrade to QuickTime Pro, not QuickTime Player.Pro is available from Apple for less than $30. |
- For this project, we'll start with the QuickTime movie file, WalkingBluescreen.mov, located on the DVD in the Chapter 6 folder. Open this movie file in QuickTime Pro (Figure 6.1).
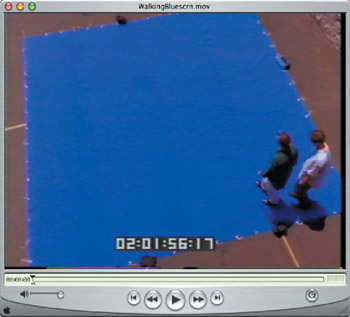
Figure 6.1: Open the movie file in QuickTime Pro to set up the edge definition process. - Start from Frame 1 and copy the frame to the clipboard (
 /Ctrl+C), and then create a new file in Photoshop, using the dimensions from the clipboard.
 - Paste the image into the Photoshop file, which will become Layer 1 in the Layers palette.
- Return to the QuickTime movie and drag the playback Indicator to the position where the actors stop briefly, bend over, and look off to the lower-left side of the frame. This will be the extreme lower-left position defined in our garbage matte. Make sure to scrub the Indicator back and forth to locate the exact frame that moves into the extreme position, and copy it to the clipboard.
- Return to Photoshop and paste the frame into the file we've created, as Layer 2 in the Layers palette. Set the Blending Mode for Layer 2 to Darken (Figure 6.2). This will allow the placement of the actors from the previous frame to show through so both will be visible to trace over.

Figure 6.2: Paste the new layer over the old and set the Blending Mode to Darken to expose the layer below. - Continue this process with a few more frames that take the actors outside a direct path from beginning to end, including the last frame—giving you several reference layers.
- Create a new layer on the top. Use the Lasso tool with a 10-pixel feather to roughly draw an area around the entire path of your characters, creating a large, oblong selection. Invert the selection (
 +Shift+I/Ctrl+Shift+I) and fill with a solid color that matches the existing blue-screen background, using the Eyedropper to select the color as necessary (Figure 6.3).
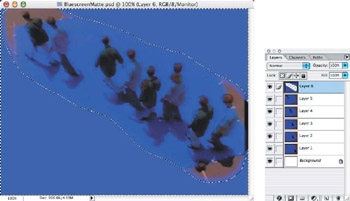
Figure 6.3: Select a rough area around the actors and fill the surrounding area with a solid color of the blue-screen background. - Save the PSD file with the layers intact, because this is the static garbage matte that will be imported into After Effects.
- Create a new project in After Effects, as a composition 640480 NTSC. Import the movie file, WalkingBluescreen.mov, and only the top garbage matte layer of the PSD file you just created (or use the file BluescreenMatte.psd, also found on the DVD).
- Drag both files from the Project window to the Comp 1 window, with the garbage matte layer on top (Figure 6.4).
This completes the static portion of the garbage matte. Scrub the Indicator in the Timeline window to verify that the garbage matte layer doesn't interfere with the motion path of the characters in the movie. If there is an error in your matte, then simply edit the original file (Edit > Edit Original, or  /Ctrl+E) to make corrections.
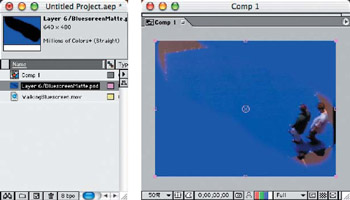
Figure 6.4: Import the blue-screen movie file and the garbage matte layer into a new After Effects composition.
The Garbage Matte in Motion
Sometimes the static garbage matte is sufficient to cover up the bulk of unwanted material, leaving only a small portion of the footage to be retouched. In this example, there are sections of the footage where the actors are off the edge of the blue screen at both the beginning and the end of the motion path. We will add some solid blocks of color that can be moved to fill in the largest gaps, so only the first and last few frames will need to be rotoscoped.
- Add a solid layer (Layer > New > Solid, or
 /Ctrl+Y), and set the dimensions small enough to quickly resize and position where needed. Set the color of the layer to match the garbage matte, using the Eyedropper in the dialog box. Resize and position the solid layer as close to the right side of the actors as possible.
 - Duplicate the solid layer (Edit > Duplicate, or
 /Ctrl+D), and move and resize it to fit. Position one layer on the bottom side of the actors and two in the top-left corner, completely covering up the exposed area (Figure 6.5).
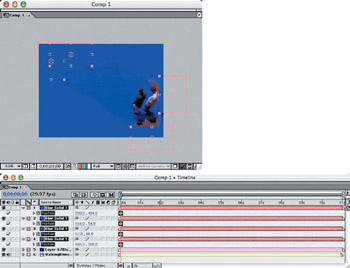
Figure 6.5: Create solid layers that can be animated to follow the characters' motion path and fill in the exposed areas off the blue-screen tarp. - Select all of the solid layers in the Timeline, press the P key to open the Position settings, and select the Stopwatch on each layer to set the initial position of the layers.
- Select just the two bottom-right layers, move the Indicator on the Timeline down a few frames, and drag-move the solid layers to follow the actors' motion path to close up the exposed area. Continue a few frames at a time, trying to cover as much unwanted material as possible until the gap is completely filled (Figure 6.6).
- Move the Indicator toward the end of the actors' motion path, just until they touch the edges of the upper-left solid layers, and then back off one frame so they don't touch. Click the Set Marker box for both layers in the Timeline. Move the layers just ahead of the actors every few frames—just the opposite of the movements made in the lower-right solid layers (Figure 6.7).
- Save the After Effects project file.
Note that the main middle section of the blue-screen footage has a clean and clear background and needs no further retouching or roto work—the garbage mattes have done the bulk of the work. However, the first second or two's worth of footage, as well as the last, need to have work done on them.
Move the Work Area slider from start and finish to capture just the last couple of frames that need to be exported and worked on. Render out a non-compressed full-size QuickTime movie of the Work Area, and repeat the process for the opening sequence of the footage. View the rendered movies in QuickTime Pro (Figure 6.8).
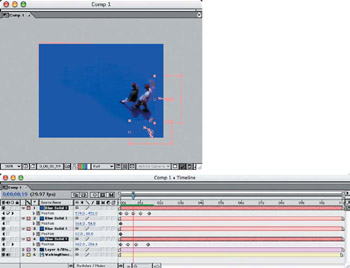
Figure 6.6: Move the solid layers to follow the actors' motion path to close up the exposed area off the edge of the chroma tarp.
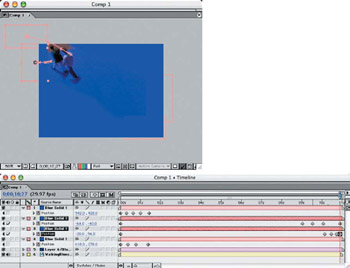
Figure 6.7: Repeat the process with the solid layers on the actors' exit path, but in reverse motion.
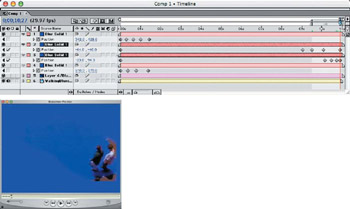
Figure 6.8: Render only the Work Area of the section of footage that needs roto work to a QuickTime movie.
Preparing Frames for Rotoscoping
To do frame-by-frame rotoscoping in Photoshop, you need to convert the movie to separate editable frames. QuickTime Pro allows you to export the movie file as individual sequentially numbered files.
With the rendered movie open in QuickTime Pro (you can also open the file BluescreenPre.mov on the DVD), export the movie as an image sequence (File > Export), and choose the Movie To Image Sequence option from the Export selector. Create a new folder so the files don't end up on your desktop or in an inappropriate place, and click the Options button before proceeding (Figure 6.9). Set the Format to Photoshop and the Frames Per Second to 30 (make sure the Insert Space Before Number option is deselected if you are working in Windows). Select the Options button once again, and set the Color Space to the highest setting.
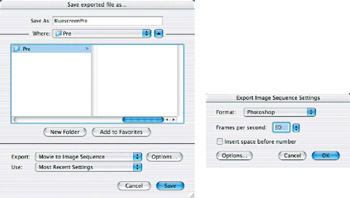
Figure 6.9: Export the QuickTime movie to a numbered image sequence that can be edited in Photoshop.
ImageReady now allows you to import an entire folder as frames of an animation and conveniently creates a layer for each frame! Choose File > Import > Folder As Frames, and select the folder that contains the numbered sequence you exported from QuickTime Pro (Figure 6.10). Save the new file as a Photoshop document.
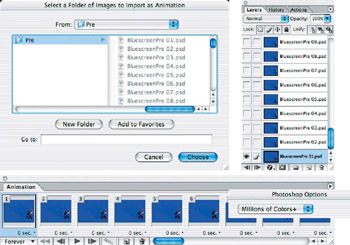
Figure 6.10: Import the entire folder that contains the image sequence exported from QuickTime Pro.
Jump to Photoshop and perform the rotoscoping edits to each layer as necessary (Figure 6.11).  Chapter 7, "Rotoscoping Techniques with Photoshop," for more information on how to tackle this task. Once the editing is completed on all of the affected layers, save the Photoshop file and jump back to ImageReady.
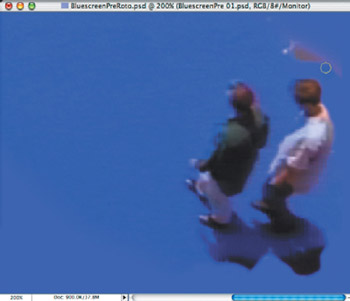
Figure 6.11: Repeat the process with the solid layers on the actors' exit path, but in reverse motion.
Your File Really Isn't Too Big
When jumping back to ImageReady from Photoshop with a rather large multilayer file, you may encounter a recommended file size warning (40 MB maximum).Don't be alarmed—though you might be taken aback by the warning message, you can continue the process without interruption. (You may also choose to disable the warning message in the future).

You can now export the file as a QuickTime movie by selecting File > Export > Original Document and choosing the QuickTime Movie format. Once you click the OK button, a dialog box will appear to allow you to set the compression and color depth of the QuickTime movie. Since this movie needs to remain as pure and unadulterated as the original blue-screen frames, you will want to select None for the compression and choose the maximum color space.
| Note |
Alternatively, you may wish to export single frames from ImageReady instead of a QuickTime movie. Select File > Export > Layers As Files or Animation Frames As Files. These sequenced image files can be opened in QuickTime Pro by selecting File > Open > Image Sequence. A dialog will appear, asking you to set the Frame Rate in frames per second. Since the original footage was 30 fps, you will want to match that exactly. Save the new movie as a noncompressed QuickTime movie file. |
Check the QuickTime movie in real time to see if any frames require additional editing. Sometimes it's hard to tell if you are rotoscoping too close to the actors, which may cause some frame flickering. More on controlling this effect is found in Chapter 7.
Bringing Matte Techniques All Together
Once you have rotoscoped both of the sequences and converted them back into Quick-Time movies, you can import them back into After Effects to complete the blue-screen footage.
Open the After Effects project with the garbage mattes (you can select the file BluescreenMatte.aep on the DVD), and import the two rotoscoped QuickTime movies (also on the DVD, titled BluescreenPreRoto.mov and BluescreenPostRoto.mov).
Place the beginning rotoscoped movie at the beginning of the Timeline, and position it to match the frames of the existing blue-screen footage. Do the same with the ending rotoscoped movie (Figure 6.12). The entire footage sequence should now be entirely clean and free of all unwanted background materials, leaving only the blue-screen background in the full frame behind the actors. Render out this movie in full scale with no compression to use in a composite movie. (We'll refer to this blue-screen movie later in the book;  Chapter 10, "Motion Matte Painting in Photoshop.") Figure 6.13 shows a sample frame.
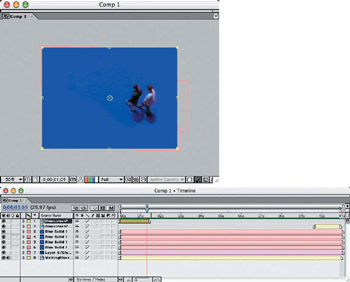
Figure 6.12: Position the rotoscoped movies with the garbage mattes and the original blue-screen footage to create a complete full-frame blue-screen movie.
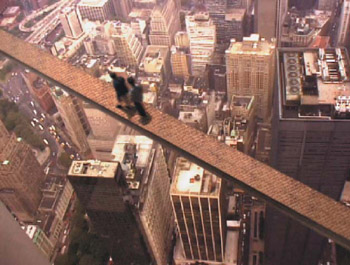
Figure 6.13: Now you can use this rendered, cleaned-up blue-screen movie in your composite, with no interference or loss of image quality.
Part I - Connecting Photoshop, ImageReady, and After Effects
- Basic ImageReady Animation, Tweening, and Layer Styles
- Photoshop Layers and After Effects
- 3-D Layers from Photoshop Layers
Part II - Applying Animation Concepts
Part III - Clean-Up, Mattes, and Objects
- Blue-Screen Garbage Mattes
- Rotoscoping Techniques with Photoshop
- Matte and Keying Plug-ins
- Static Matte Painting in Photoshop
- Motion Matte Painting in Photoshop
- Making Movies from Stills
Part IV - Advanced Movie Magic
EAN: 2147483647
Pages: 104
