Building a Data Tunneling Interface
Now that you know how the relationship graph for this interface works, it's time to start the actual construction. Start with the new global field. It's an easy place to begin, and you need the global field for all the next steps.
8.4.1. Creating a Global Field
Since the context of your interface is the Expenses table, that's where you add the field. Open the Customers database and proceed as follows:
- Choose File
 Define Database and switch to the Fields tab. From the Table pop-up menu, choose FileMaker shows the fields in the Expenses table.
 - In the Field Name text box, enter Global Invoice ID, and then click Create.
The new field appears in the field list. (See the box on Section 8.4.2 to see why you've put the word global in this field's name.)
- Click Options. Then, in the Field Options dialog box, click the Storage tab.
FileMaker shows you the field storage options. You first saw these on Section 3.3.4.1.
UP TO SPEED
The Importance of Being OrganizedYou can easily get so carried away with new table occurrences and new relationships that you make an illegible, illogical graph. This window illustrates a common mistake that can create havoc in a database: no consistent naming system to the table occurrences, and no visual grouping to show how the relationships operate. The database may work just fine, but if it ever does need troubleshooting or updating, any developer (even if that's you) would have a hard time figuring out what's going on.
First of all, the relationships graph is about as easy to navigate as a bowl of spaghetti. Even worse, since every table occurrence relates to every other, the table occurrence menus would be useless. And the table occurrence names, though marginally descriptive, don't help you find the TO you need. If you do a little planning before you go throwing your new TO creation skills around, you can steer clear of these rocky shoals.
- Turn on "Use global storage (one value for all records)," and then click OK.
FileMaker creates the field, and it now appears in the Field list.
You use this new global field as a key field in the next section.
8.4.2. Creating a New Table Occurrence Group
Since the Assign Line Items layout has to be tied to an occurrence of the Expenses table, you need a new one of those. You also want to be able to show the line item attached to that expense, so you need a new occurrence for that table, too. Finally, you'll use the global field you just defined to hook up to another new table occurrence that will hold an invoice ID. With it, you'll access the following information:
- The job name of the job associated with that invoice.
- The line items attached to that invoice.
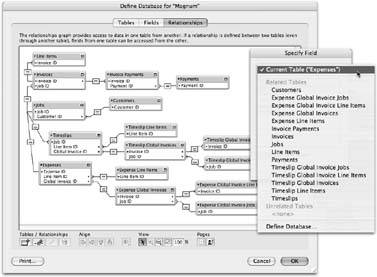
A quick glance back to Figure 8-16 reveals all the new table occurrences you need to create.
| POWER USERS' CLINIC One (Global) Field to Rule Them All |
|
You know that fields set with global storage have the same value across every record in the table that holds them. Since they're so different from other fields, many database designers give them special names so that the fields stand out in a list. That way, it's less likely that they'll get used inappropriatelysay in a context where they don't have much meaning, or plopped down on a layout where someone can edit the values when they should stay static. You can just preface the names of all your global fields with the word "global," like you did in the exercise on Section 8.4. But in the real world, people commonly just use a lowercase "g" as a prefix. With this scheme, you can name your global field "gInvoice ID" and save a few keystrokes. Plus, you look like a guru. |
The steps are simple if you take it one table at a time:
- If necessary, click the Relationships tab of the Define Database window.
You need to see your existing relationship graph.
- Click the Add Table Occurrence button (see Section 8.1.2). When the Specify Table window appears, select the Jobs table.
It's always good to give TOs a descriptive name. When you're data tunneling, it's even more important. When you create relationships, the names help you keep the various tables and groups straight.
- In the Name of Table Occurrence box, enter Expense Assign: Global Invoice Job, and then click OK.
The Expense Assign bit says that this new table occurrence was created especially for the process of assigning expenses. "Global" says you're planning to use the new TO in global relationships and the "Invoice Job" part helps you remember which other TOs you plan to hook up to it.
When you click OK, FileMaker adds the new table occurrence to the middle of the graph. Move it out of the way to get ready for the next steps.
- Add an occurrence of the Invoices table called Expense Assign:Global Invoice, and an occurrence of the Line Items table called Expense Assign:Global Invoice Line Items.
You now have the three table occurrences on your graph. Since the names are so long, you might have to stretch your new TOs so you can tell them apart. See Section 7.3.4.1 for tips on resizing TOs.
- Create a relationship between Expense Assign: Global Invoice::Invoice ID and Expense Assign: Global Invoice Line Items::Invoice ID.
You drag and drop; FileMaker draws the lines.
- Create another relationship, this time between Expense Assign: Global Invoice: :Job ID and Expense Assign: Global Invoice Job::Job ID.
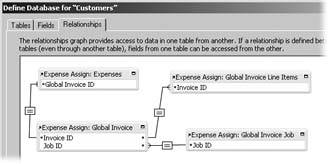
The necessary relationships are now in place. Your new graph looks something like Figure 8-17.
|
Now that the occurrences and relationships are in place, you can move them to a new spot on the graph where they have some breathing room. FileMaker gives you nearly infinite space down and to the right, so pick a spot that you like.
Tip: Remember, if you like things lined up nice and neat, you have Arrange tools in the Relationships graph that let you resize and align a selected group of TOs together (Section 7.3.3).
8.4.2.1. Adding new table occurrences to a group
You're partway through creating the new table occurrence group that supports the Assign Line Items layout. You've created some of your new TOs and arranged them on the graph. It's time to take stock. The purpose of that layout is to select an invoice based on a global field, and then show the job name and a list of line items. But this group of table occurrences simply defines the relationships between Invoices, Line Items, and Jobs. You already know the layout will be tied to an occurrence of the Expenses table, so you need to make sure that from that layout, you have a relationship that pinpoints the invoice you're interested in. In other words, you need a relationship from the Expenses table to the Invoices table, based on the global Invoice ID field. Figure 8-18 shows this connection.
|
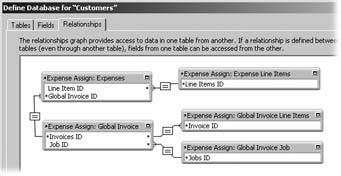
You need one last table occurrence to complete your group. Once you pick a Line Item ID from the pop-up menu, the Expenses::Line Item ID field gains a value. It would be nice to show you information about the line item you just selected, to reinforce the choice. Although your main group of table occurrences (the one you created in the last chapter) knows how expenses relate to line items, this new table group doesn't. Fortunately, you can add new TOs to an existing group the same way you create any other TO:
- Add a new occurrence of Line Items called Expense Assign: Expense Line Items and create a relationship between the two Line Item ID fields in each table occurrence.
Fastest way: drag the Line Item ID field in one TO to the Line Item ID field in the other. (It doesn't matter which direction you dragjust do it.) You can see the result in Figure 8-19.
|

8.4.3. Building a Global Field Layout
Now that you've finished the new table occurrence group and hooked up its relationships, you're ready to create the Assign Line Item layout you first saw way back in Figure 8-14. With the graph defined, this process is surprisingly simple. First, create a new, blank layout that's based on your Expenses Assign: Expenses table occurrence, and call it Attach Line Items. See Section 5.1.6 if you need a refresher on creating layouts.
Now add these fields to the layout:
- Expense Assign: Expenses::Expense.
- Expense Assign: Expenses::Global Invoice ID.
- Expense Assign: Global Invoice Job::Name.
- Expense Assign: Expenses::Line Item ID.
- Expense Assign: Expense Line Items::Description.
Note: Remember, this layout is associated with the Expense Assign: Expenses table occurrence. When you choose fields for the list above, in the Specify Field dialog box, from the top of the pop-up menu, select Current Table.
8.4.3.1. Using a global pop-up field to change the display in a value list
By definition, a global field has the same value in all its tables' records.. Therefore, you can change the data in a global field without affecting any of your "real" data for those records. When your global field is used in a relationship, and you change the value in the global field, the relationship changes and so do the records that are related to your current record
You use this technique to create a value list that's based on the global relationship between your new Expenses TO and the new Invoice TO. When that global relationship changes, FileMaker tunnels in the new table occurrence group from Expenses to Invoices to Line Items to get the line item that's related through the value in your global. Refer to your relationships graph to refresh your memory on how those TOs hook up, if this technique doesn't make sense without a visual aid.
This advanced technique is just like searching for records, without all the hassle of going to Find mode and actually performing a search.
To make the Line Item ID field into a pop-up menu, double-click it to see the Field/Control Setup dialog box:
- From the "Display as" pop-up menu, choose Pop-up Menu.
The "Display values from" pop-up menu appears, with displayed.
- From the "Display values from" pop-up menu, choose Define Value Lists.
You need a new value list based on the values in the Line Item ID field from the Expense Assign: Global Invoice Line Items table occurrence you made a few pages back.
- Click New and type Expense Assign: Global Invoice Line Items as the value list name.
Even though you're about to assign your new value list to a field, you want the name to be descriptive, so you can remember your thought process later on.
- urn on the "Use values from field" radio button and choose Expense Assign: Global Invoice Line Items from the Specify Fields window's the drop-down list. Then click the Line Item ID field.
This field's data shows up in your new value list.
- Under Value List Content, select "Include only related values starting from" and, from the drop-down list, choose Expense Assign: Expenses.
The idea is to keep your users from assigning an expense to a line item from the wrong invoice, or from assigning an invalid Line Item ID. This option tells the value list to display only line items that are related to the invoice that matches the value in your Global Invoice ID field. Since that field's on the Expense Assign: Expenses TO, then that's where the value list relationship is "starting from." To understand how this works, remember the concept of context (Section 8.3.2).
- Turn on the "Also display values from second field" checkbox and, from the list, choose the Description field.
Since a Line Item ID by itself isn't very meaningful, you show the description too.
- Turn on the "Sort by second field" radio button and click OK until the dialog boxes are gone.
You're back on your Attach Line Items layout and your Line Item field is formatted with your new value list.
Switch to Browse mode and try out your new layout. If you type I00001 into the Global Invoice ID field, you should be able to pick a line item from the pop-up menu. When you do, the Expense Assign: Expense Line Item::Description field should show the selected line item's description. Figure 8-19 shows how you might format this new layout.
Part I: Introduction to FileMaker Pro
Your First Database
- Your First Database
- An Very Quick Database Tour
- Creating a New Database
- Opening and Closing Database Files
- Saving Your Databases
- Adding Records to Your Database
- Navigating Your Database
- Same Database, Multiple Windows
Organizing and Editing Records
- Organizing and Editing Records
- Views
- Advanced Find Mode
- Changing Multiple Records
- Sorting Records
- Editing Whats in Your Fields
- Paragraph Formatting
- Beyond Text: Container Fields
- Checking Spelling
- Printing and Preview Mode
Building a New Database
- Building a New Database
- Tables and Fields
- Defining Fields
- Advanced Field Options
- Bringing It All Together
Part II: Layout Basics
Layout Basics
Creating Layouts
Advanced Layouts and Reports
- Advanced Layouts and Reports
- Setting up Field Controls
- Adding Field Controls to Layouts
- Field Behavior
- Tab Order
- Print-Related Layout Options
- Format the Number/Date/Time/Graphic
- Adding Buttons
- Tab Panels
- Reports and Summary Fields
Part III: Multiple Tables and Relationships
Multiple Tables and Relationships
- Multiple Tables and Relationships
- Relational Databases Explained
- Modeling Your Database
- Creating a Relational Database
- Relational Databases
Advanced Relationship Techniques
- Advanced Relationship Techniques
- Creating Related Records
- Table Occurrences
- Managing Data with Data Tunneling
- Building a Data Tunneling Interface
- Connecting Databases
- Lookups
- Advanced Relationships
Part IV: Calculations
Introduction to Calculations
- Introduction to Calculations
- Understanding Calculations
- The Structure of a Calculation
- Creating a Calculation Field
- Auto-Enter Calculations
- Validate Data Entry with a Calculation
- Replacing Data Using a Calculation
- Comments
Calculations and Data Types
- Calculations and Data Types
- Number Crunching Calculations
- Going Beyond Basic Calculations
- Text Parsing Calculations
- Date and Time Calculations
- Containers in Calculations
Advanced Calculations
- Advanced Calculations
- Stored, Unstored, and Global Fields
- Logical Functions
- The Let Function and Variables
Extending Calculations
Part V: Scripting
Scripting Basics
- Scripting Basics
- Your First Script
- The Importance of the Layout
- Running Scripts
- Branching and Looping in Scripts
Script Steps
- Script Steps
- Go to Layout
- Scripting for Fields
- Working with Records
- Finding Records
- Sorting Records
- Working with Windows
- Working with Files
- Printing
- Other Script Steps
Advanced Scripting
- Advanced Scripting
- Commenting Scripts
- Asking and Telling the User
- Organizing Complex Scripts
- Handling Errors
- Putting a Complex Script Together
Part VI: Security and Integration
Security
Exporting and Importing
- Exporting and Importing
- Exporting a File
- Export Formats
- Importing Data
- Import Data Sources
- Importing and Exporting in a Script
Sharing Your Database
- Sharing Your Database
- FileMaker Network Sharing
- Sharing Over the Internet
- FileMaker Server
- Server Hardware
Developer Utilities
- Developer Utilities
- Script Debugger
- Disable Script Steps
- The Database Design Report
- Tooltips
- Copying Database Structure
- Custom Menus
- Developer Utilities
- File Maintenance
Part VII: Appendixes
Appendix A. Getting Help
EAN: 2147483647
Pages: 176
