Views
In the Contact Management database example, you learned how to add to and edit your new database with only one record onscreen at a time (Section 1.5.3). This view is a common way to look at your information, but it's far from the only way. In fact, there are three possible ways to look at a database: Form view, List view, and Table view.
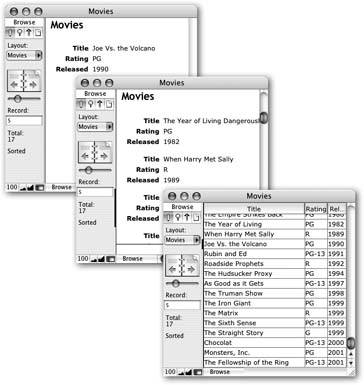
The one-at-a-time approach to viewing records you saw in Chapter 1 is called Form view. In List view, you see lots of records in, well, a list. If they don't all fit in the window, you can use the vertical bar to scroll through them. If you've used a spreadsheet program like Microsoft Excel, the Table view will look familiarit looks a lot like a spreadsheet, with one row for each record and one column for each field.
To switch among views in any FileMaker database, use the View menu. Choose View images/U2192.jpg border=0> As Form, View
images/U2192.jpg border=0> As List, or View
images/U2192.jpg border=0> As Table. Figure 2-1 shows the same database in all three views.
|
Note: When you design a database, you can add clickable buttons, tabs, or other handy means to switch among views. For example, the Contact Management database you used in Chapter 1 has View tabs built into the template (see Figure 1-5). You can even turn off certain views if you want. If your database holds mostly digital photographs and makes no sense in Table view, then you can make sure no one ever sees it that way. (You'll learn how in Chapter 5.)
2.1.1. Form View
In Form view, you see only one record at a time. If you want to see the next record, you must click the pages of the Book icon, press Control-down arrow, or use some other method of switching records (see Section 1.6.1). Most of the database work you've done so far has been in Form view. You might use Form view when you have a lot of information to see about one record, or if you want to focus on just one record without being distracted by all the other records.
2.1.2. List View
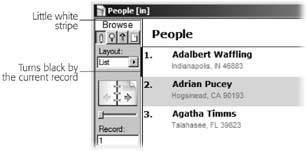
List view works almost exactly like Form view. It shows your layout complete with its pretty design, but instead of limiting you to one record at a time, it shows you multiple records in a scrolling list. It also adds another element of feedback to the status area, as shown in Figure 2-2.
When you're working with a group of recordsupdating one field in several records or browsing through all your records in search of somethingList view comes in handy.
|
2.1.3. Table View
If List view looks a lot like Form view, then Table view…well…doesn't. This view appeals to spreadsheet fans since it offers a consistent rows-and-columns design, the ability to sort with the click of a button, and the freedom to rearrange columns by dragging them around. Of course, like any self-respecting view, you can use Table view to add, edit, delete, and find records too.
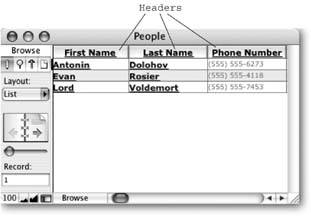
When you put your layout into Table view, any graphical embellishments disappear. Instead, FileMaker displays the fields of your layout in a no-nonsense, spreadsheet arrangement (Figure 2-3).
Each column represents one of your fields, and the order of the columns matches the order you go through the fields when tabbing. For example, the first column is the field you wind up in if you press Tab for the first time. Another Tab takes you to the second column.
|
In Table view, you can move columns around by dragging them. To switch the First Name and Last Name columns, for example, do the following:
- Point to the words Last Name and hold down the mouse button.
FileMaker darkens the column header to show you it's selected.
- Drag the column to the left of the First Name column.
You see a black line extending from the top of the window to the bottom. This line shows you where the column will land when you let go. All the other columns will shift around to make room. In this case, you want the black line to appear to the left of the First Name column.
- Let go of the mouse button.
FileMaker moves the Last Name column to its new home, swapping the columns.
The column headings also make it easy to sort your data, as shown in Figure 2-4.
Part I: Introduction to FileMaker Pro
Your First Database
- Your First Database
- An Very Quick Database Tour
- Creating a New Database
- Opening and Closing Database Files
- Saving Your Databases
- Adding Records to Your Database
- Navigating Your Database
- Same Database, Multiple Windows
Organizing and Editing Records
- Organizing and Editing Records
- Views
- Advanced Find Mode
- Changing Multiple Records
- Sorting Records
- Editing Whats in Your Fields
- Paragraph Formatting
- Beyond Text: Container Fields
- Checking Spelling
- Printing and Preview Mode
Building a New Database
- Building a New Database
- Tables and Fields
- Defining Fields
- Advanced Field Options
- Bringing It All Together
Part II: Layout Basics
Layout Basics
Creating Layouts
Advanced Layouts and Reports
- Advanced Layouts and Reports
- Setting up Field Controls
- Adding Field Controls to Layouts
- Field Behavior
- Tab Order
- Print-Related Layout Options
- Format the Number/Date/Time/Graphic
- Adding Buttons
- Tab Panels
- Reports and Summary Fields
Part III: Multiple Tables and Relationships
Multiple Tables and Relationships
- Multiple Tables and Relationships
- Relational Databases Explained
- Modeling Your Database
- Creating a Relational Database
- Relational Databases
Advanced Relationship Techniques
- Advanced Relationship Techniques
- Creating Related Records
- Table Occurrences
- Managing Data with Data Tunneling
- Building a Data Tunneling Interface
- Connecting Databases
- Lookups
- Advanced Relationships
Part IV: Calculations
Introduction to Calculations
- Introduction to Calculations
- Understanding Calculations
- The Structure of a Calculation
- Creating a Calculation Field
- Auto-Enter Calculations
- Validate Data Entry with a Calculation
- Replacing Data Using a Calculation
- Comments
Calculations and Data Types
- Calculations and Data Types
- Number Crunching Calculations
- Going Beyond Basic Calculations
- Text Parsing Calculations
- Date and Time Calculations
- Containers in Calculations
Advanced Calculations
- Advanced Calculations
- Stored, Unstored, and Global Fields
- Logical Functions
- The Let Function and Variables
Extending Calculations
Part V: Scripting
Scripting Basics
- Scripting Basics
- Your First Script
- The Importance of the Layout
- Running Scripts
- Branching and Looping in Scripts
Script Steps
- Script Steps
- Go to Layout
- Scripting for Fields
- Working with Records
- Finding Records
- Sorting Records
- Working with Windows
- Working with Files
- Printing
- Other Script Steps
Advanced Scripting
- Advanced Scripting
- Commenting Scripts
- Asking and Telling the User
- Organizing Complex Scripts
- Handling Errors
- Putting a Complex Script Together
Part VI: Security and Integration
Security
Exporting and Importing
- Exporting and Importing
- Exporting a File
- Export Formats
- Importing Data
- Import Data Sources
- Importing and Exporting in a Script
Sharing Your Database
- Sharing Your Database
- FileMaker Network Sharing
- Sharing Over the Internet
- FileMaker Server
- Server Hardware
Developer Utilities
- Developer Utilities
- Script Debugger
- Disable Script Steps
- The Database Design Report
- Tooltips
- Copying Database Structure
- Custom Menus
- Developer Utilities
- File Maintenance
Part VII: Appendixes
Appendix A. Getting Help
EAN: 2147483647
Pages: 176
