Editing Whats in Your Fields
Editing What s in Your Fields
Once you've found the records you want to work on, it's time to learn timesaving and creative ways to revise and format your record text. FileMaker fields are a lot more capable than the little fields you're used to from dialog boxes. Each field is like a miniword processor, with features that you're familiar with if you've ever written a letter on a computer. Of course you can do basic things like select text, and cut, copy, and paste. There's even a Find and Replace feature and flexible text formatting powers. Read on to find out what you can do.
2.5.1. Find and Replace
Like your word processor, FileMaker has a Find and Replace feature. And also as in your word processor, you can (and should) use Find and Replace tools as often as possible to automate your editing process and eliminate retyping.
Suppose one of your clients is called Anderson Consulting. For one reason or another, they decide to change their name to Accenture. Unfortunately, you have 27 folks in your database with the old name. You could look through your records one by one and fix them yourself, but you're never going to become a database guru that way. Instead, do a Find/Replace operation.
FileMaker fields can hold a lot of information, and it's not at all uncommon to put things like letters, emails, product descriptions, and other potentially long documents into a field. In cases like this, the Find/Replace command is just as useful as it is in your word processing program.
Since FileMaker has fields and records to worry about, though, its Find/Replace dialog box is a little more complicated that what you may be familiar with. Luckily, the concepts are simple, as shown in Figure 2-10. The Find/Replace dialog box lets you search a field, a record, or all records for a little snippet of text. It can also replace every occurrence of that text with something neweither one at a time, or all at once.
Note: Don't confuse Find/Replace with Find mode. Find/Replace is for finding text in one or more fields and one or more records. Find mode is for finding records. You'll probably use Find mode much more often than Find/Replace. For the full story, see the box on Section 2.5.1.
Here's FileMaker's version of Find and Replace:
- Choose Edit
 Find/Replace
 images/U2192.jpg border=0> Find/Replace.
In the lower-left corner of the dialog box, turn on "Match case" and/or "Match whole words only" to tell FileMaker how you want it to match the text you're looking for.
Turning on "Match case" ensures that FileMaker looks for an exact uppercase and lowercase match. For example, when "Match case" is turned on, "Kite" and "kite" don't come up as a match.
If you turn on "Match whole words only," FileMaker eliminates partial word matches. For example, "Drag" matches "Drag" and not "Dragon."
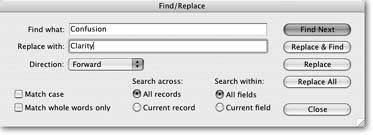
Figure 2-10. In FileMaker, you use the same dialog box both to find text and to find and replace text. If you aren't replacing anything, don't click any of the Replace buttons. The text you're looking for goes in the "Find what" text box. If you're replacing it with something new, type that text in the "Replace with" text box. (If you want to replace some text with nothing, making it go away, leave the "Replace with" box empty.)
- Under "Search across," select either "All records" or "Current record."
You've just told FileMaker whether you want it to look through all the records in the found set, or only the record you're currently on. In a case like the Anderson/Accenture example, choose "All records."
- Under "Search within," select either "All fields" or "Current field."
"Current field" refers to the field you were editing when you opened the Find/ Replace dialog box. If you weren't editing one, FileMaker will let you pick Current field, but when you try to find, it will complain with an error message. You're allowed to select any combination of Search across and Search within. Here's how that shakes out:
- All records and All fields. FileMaker looks through every field in the window for a match. When it's done, it moves on to the next record.
- Current record and All fields. FileMaker looks through every field in the window, then tells you it's finished.
- Current record and Current field. FileMaker looks only in the current field. When it reaches the end of the text in that field, it stops.
- All records and Current field. FileMaker looks through the current field, then moves to the next record. It keeps looking through records for more matches, but it pays attention only to the current field.
- From the Direction pop-up menu, choose Forward, Backward, or All.
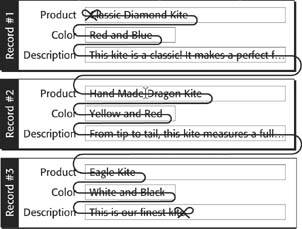
The Direction pop-up menu controls which way FileMaker goes when it starts its search. To figure out what that means, imagine there's a long string running through your database. One end is tied to the first letter of the first field of the first record. The other end is tied to the last letter of the last field of the last record. This concept is pictured in Figure 2-11.
|
- Forward. FileMaker starts looking at your current spot on the string, and moves forward (towards the end of the string). When it gets to the end, it beeps.
- Backward. FileMaker starts looking at your current spot on the string, and moves backward (towards the beginning of the string). When it gets to the beginning, it beeps.
- All. FileMaker starts off just like a Forward search. When it reaches the end of the string, instead of beeping, it skips to the start of the string and keeps looking. It finally beeps and stops when it gets back where it started.
Now that you're through setting all your Find/Replace options, it's time to decide which button to click:
- Click either Find Next, Replace & Find, or Replace All.
Find Next starts FileMaker looking. When it finds a match, it highlights it right in the field. The Find/Replace window doesn't go away yet, though. This way, you can click Find Next as many times as necessary to find what you're looking for, then click Replace to change it to your replacement text. Click Find Next again to go to the next match.
UP TO SPEED
Find/Replace vs. Find/ReplaceYou may be wondering how Find mode combined with Replace Field Contents is different from Find/Replace (discussed earlier in this chapter). In fact, they're very different, but deciding which to use can be confusing. Here are some guidelines:
- Find mode is significantly faster at finding things than Find/Replace. In Find mode, FileMaker uses something called an index, which lets it find ten matching records out of 293,000 in an instant. Find/Replace, on the other hand, looks through the fields the same way you would: one by one. It's faster than you, but it still takes time.
- Replace Field Contents always operates on one field across the entire found set. Find/Replace, on the other hand, also lets you replace across all fields in just the current record, as well as all fields and all records in the found set.
- Replace Field Contents always replaces the entire contents of the field. You can't replace every occurrence of "the" with "the" for example. You can only give a new value that replaces whatever is in the field.
- Most important, Replace Field Contents assumes you've already found the records you want, and always modifies every record in the found set. Find/Replace adds a second layer of searching, as it scours the record or the found set looking for matches.
So why would you ever use Replace Field Contents? Sometimes you really do want to replace everything in the field every time, just like in the Company Name example on Section 2.3. Also, Replace Field Contents is significantly faster at changing lots of records than Find/Replace. It takes just a few seconds to accomplish what Find/Replace would spend several minutes doing.
In general, if you want to find records, use Find mode, but if you want to find certain bits of text, use Find/Replace. Likewise, if you want to replace everything in a field in every record, use Replace Field Contents, but if you want to replace little bits of text, use Find/Replace. (If you want to replace little bits of text across thousands of records, study Chapter 7 first, or be prepared to take a vacation while your computer thinks about it.)
Finally, there's no reason you can't mix Find/Replace with Find mode. Since Find/Replace only searches records in the found set, you can establish a good found set first to make your Find/Replace go faster. (For example, if you're replacing "the" with "the" in the Notes field, you may as well find all the records that have "the" in their Notes field first, since Find mode is so much faster than Find/Replace.)
If you feel the need to work more quicklysay you've done Find Next and Replace a couple times and everything looks in orderclick Replace & Find instead. It replaces the current match, and then finds the next one all in one step. Repeat as many times as necessary.
Finally, if you're sure you want every match replaced, click Replace All, and FileMaker will do the entire find-replace-find-replace dance for you. FileMaker always asks you if you're sure about Replace All first, just in case. For instance, if you have some clients whose last name is Anderson and others whose company name is Anderson, you may not want to use the Replace All option. You'll need to check each occurrence individually to make sure you don't accidentally change someone's last name to Accenture.
WORKAROUND WORKSHOP
Get Out of My WayUnlike the Find/Replace window in most other programs, FileMaker's won't politely step aside. If you try to click in your database window to switch back to it, FileMaker just beeps at you. In fact, you can't do anything else but find and replace unless you close the Find/Replace window first. You can always move the Find/Replace window around the screen by dragging it, but if your database window is big, or your screen is small, the Find/Replace window can really get in the way, keeping the very results it's finding hidden behind it. Here are a few pointers to help you cope:
Make sure the Find/Replace window is as small as possible by dragging the resize handle in the lower-right corner. Like most windows, it is resizable, but its smallest size is almost always big enough.
If you close the Find/Replace window (Click Close or just press Escape), FileMaker keeps the last-found item highlighted. Since FileMaker remembers all your settings, you can always open the Find/Replace window again and continue searching where you left off.
Wouldn't it be great if you could click the buttons in the Find/Replace window without having it open onscreen? Fact is, you can. In the Edit
Find/Replace menu, youll see two handy commands: Find Again and Replace & Find Again.Choosing these menu commands is just like clicking the Find Next and Replace & Find buttons in the Find/Replace dialog box.
FileMaker also offers one more convenient shortcut. If you have some text already in a field, and you want to find the next occurrence of the same text, you can choose Edit
Find/Replace Best of all, these handy commands all have keyboard shortcuts:
- To find the next occurrence (Find Again), just press Ctrl+G (
 -G).
-G). - To replace the currently selected text and find the next occurrence (Replace & Find Again), press Ctrl+Shift+G (Option--G).
To find other occurrences of the selected text, press Ctrl+Shift+H (Option-
-H) - >When you're done with the Find/Replace window, just click Close.
Warning: Find/Replace can take a long time because it looks through the individual words in each field. If you're searching across all records, and you have lots of records, be prepared to wait a while as FileMaker does its magic.
2.5.2. Fields for Lots of Text
Click in the Notes field in the Contact Management database. Notice that when you do, a scroll bar appears on the right side of the field. If you type lots of notes, you'll be able to scroll through them. FileMaker fields can hold a lot of text. Technically, each field is limited to two gigabytes of data per record, which is a fancy way of saying "way more than you'll ever need." (When you design a database, you get to decide which fields have scroll bars, as discussed on Section 4.4.7.2.)
You can enter text into a field in all the usual ways, like typing on your keyboard or pasting text you copied from another field or another program. You can also select text in one field and drag it into another. (In Mac OS X, in fact, you can drag text into a field from any other program.)
Note: Even if a field doesn't have scroll bars, you can still add lots of text. In this case, FileMaker just makes the field grow to hold whatever you type. When you leave the field, it shrinks back to its normal size, hiding anything that goes outside the edges. Don't worry, though, the text reappears when you click back into the field.
2.5.3. Drag and Drop Editing
In addition to copying and pasting, you can drag text from one place to another. But first, you have to turn it on in FileMaker's preferences, like so:
- On Windows, choose Edit Preferences. On Mac OS X, choose FileMaker Pro
Confirm that "Allow drag and drop text selection" is checked.
If you decide you don't like using drag and drop, just come back here and turn it off.
- Click OK.
Now that dragging is turned on, here's how it works:
- Make a new record (Records New Record).
Type Editing text a is drag into the Notes field.
Yes, it says "text a is." Type the mistake and all. Next you'll drag to fix it.
- Double-click the word "is."
The word is highlighted to let you know it's selected.
- Drag the selected word over between "text" and "a."
Figuring out where dragged text is going to land can be tricky. If you look closely, you'll see that in addition to the text you're dragging, a little vertical line moves along under your arrow. You can see this in action in Figure 2-12.
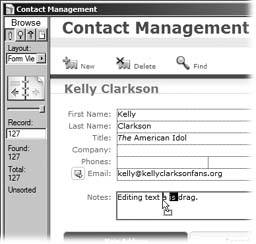
Figure 2-12. When you turn on "Allow drag and drop text selection" in Preferences, FileMaker lets you drag selected text around with the mouse. Here, the word "is" is being moved after "text" by dragging. The little vertical line under the arrow shows you exactly where the text will go when you drop it.
You'll probably have to fix the spaces between words. Unlike most word processors, FileMaker isn't smart enough to figure out where they go for you.
Note: You can also drag text from one field to another. Instead of moving the text, FileMaker copies it. In other words, once you let go of the mouse button, the text will be both where it started and where you dropped it. If you want this behavior when dragging within a field, hold down the Alt (Option) key while you drag.
2.5.4. Text Formatting
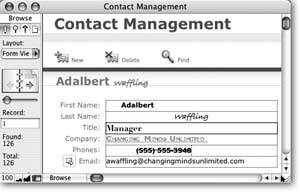
Just like a word processor, FileMaker has commands to set the Font, Size, and Style of the text in a field. (Figure 2-13 shows a field with formatted text.) This feature comes in handy for many reasons. For instance, imagine you have some really important information about a customer ("NEVER PAYS HIS BILL") that you want to keep in the Notes field. To make sure it gets noticed, you can make it big, bold, and red. You can even use one of those fancy frilly fonts just to keep things interesting.
The formatting commands for font, font size, and type style are in the Format menu. But before you change anything, you'll notice that all FileMaker fields come with a preset (and pretty boring) standard formatting. (Part 2 of this book explains how you can change this automatic formatting.) Each of the formatting commands covered in this section lets you override the standard formatting for a field on a record-by-record basis.
Warning: Consider (and remember) the full implications of the paragraph above: All of the techniques described in the rest of this chapter pertain only to editing and formatting individual records. If you would like to change a field's formatting across the board, you need to make that change to your databases layout. For example, you might want all last names in your database to appear in boldface letters, or put a box around everyone's phone number. You'll learn how in Part 2 of this book.
|
2.5.4.1. Font
FileMaker lets you pick from all the fonts you have on your computer (see More Fonts on Windows if you don't believe it). Using a font is a breeze if you're one of those FileMaker users who's heard of a computer. Just select the text you want to change, then choose the font you want from the Format Font menu. (If youre the type who plans ahead, you can also choose a font before you start typing.)
Tip: As with all FileMaker's editing commands, if you make a mistake, just choose Edit Undo. Or use your trusty Undo keystroke: Ctrl+Z (Windows) or -Z (Mac).
2.5.4.2. Size
Changing the size of text is equally easy. Like changing fonts, you simply select the text and pick a size, in points, from the Format Size menu. (Again, you can pick the size Size menu only lists a few standard sizes. If you need a size thats not listed, just choose Format images/U2192.jpg border=0> Size
images/U2192.jpg border=0> Custom and FileMaker will let you enter any point size from one to 500. (See Section 4.4.6.3 for more detail on font sizing.)
Immediately after Custom, one last size is listed. This one isn't separated from the rest just to be cuteit shows the last custom size you used. If you prefer 11 point, you only need to visit the Custom command once.
Once you've made the change, 11 will be listed at the bottom of the menu…until you decide that 13-point type is your new favorite, that is.
| UP TO SPEED More Fonts on Windows |
|
On Windows, the Font menu may not show the fonts you wantit normally only shows a few (on Mac OS X, the Font menu always displays all your fonts). To get to the rest, choose Format
When you're finished configuring, click OK. Your selected text won't be changed, but the font menu will now list the fonts you put in the Appear in Menu list. If you want to change the font of the selected text at the same time, select the font and click Apply instead. 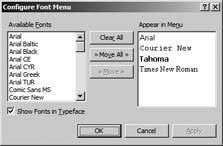 |
2.5.4.3. Style
Using styles is a snap. Pick the style from the Format Style menu and start typing, or select some text and apply a style. In addition to the industry-standard Bold, Italic, and Underline styles, FileMaker adds a few less common options to the mix. Except where noted here, you can mix-and-match styles to your hearts content (see the Notes field in Figure 2-12).
- Word Underline underlines each word, but not the space(s) between them. Double Underline puts two lines under your text. Each of the Underline styles is mutually exclusive, meaning you can't have text that's double underlined and word underlined.
- Condense squishes the text together so it takes up less space. Extend does just the opposite, putting a little extra space between each letter. Since these choices are opposites, you can't use both at the same time.
- Strike Thru draws a line right thru…uh, through the middle of each line of text. Use it when you want something to look like it's been crossed outperhaps you have some data in the Notes field that no longer applies, but you want it there anyway in case it's important later.
- Small Caps replaces all the lower-case letters in your text with uppercase letters in a slightly smaller size, for an effect like you often see on fancy lawyer's stationery or wedding invitations.
- Uppercase, Lowercase, and Title Case are handy for those times when you've already typed text and later realize that you capitalized it incorrectly. Maybe your Caps Lock key got stuck halfway through someone's name, or you realize that you forgot to capitalize every word of a street address. You can use these commands to repair the damage. Uppercase and Lowercase turn all selected letters to capital or small, respectively. Title Case makes the first letter of each word uppercase, and every other letter lowercase.
Note: Using one of these styles doesn't change the actual text in the field at all. If you type Mr. President into a field, then change its style to Uppercase, it will show as MR. PRESIDENT. But at any time, you can go back and remove the Uppercase style, and you'll get the original capitalization back unchanged. - Superscript (Ctrl+Shift+plus sign or -Shift-plus sign) makes the text a little smaller and raises it up on the line, as in x2. Subscript (Ctrl+Shift+minus sign or -Shift-minus sign) comes in handy when you're entering chemical formulas. (You do enter chemical formulas a lot, don't you?) You can't use superscript and subscript simultaneously on the same letter or number.
Note: The keyboard shortcuts for text styles in FileMaker are non-standard. While in most programs Ctrl+B (-B) means Bold, in FileMaker it's Ctrl+Shift+B (-Shift-B). The same goes for Italic and Underline. This change takes a little getting used to. Basically, take the keyboard shortcut you use in all your other programs, and add the Shift key.
2.5.4.4. Text Color
The miniword processor wouldn't be complete without colors. The Format Text Color menu gives you a handful of colors to choose from. If you dont like those options, you can select Other Color (located below all the little color squares in the menu) to pick any color you want, as described in Figure 2-14.
If you don't like the assortment of colors FileMaker provides, you can change them in the Edit Preferences (Windows) or FileMaker Pro images/U2192.jpg border=0> Preferences
images/U2192.jpg border=0> Layout panel (Mac). You get three choices: System subset, Standard system palette, and Web palette (see Figure 2-14). The normal palette (System subset) gives you 88 colors, which most FileMaker mavens find more than sufficient. Its also nice because it's small enough for you to remember what color you've been using ("the third red from the top").
If you find the System subset palette too limiting though, feel free to try one of the others. The Standard system option displays the color palette built into your computer's operating systemWindows or Mac. Since you've probably seen this color arrangement elsewhere on your computer, you may find it easiest to use.
|
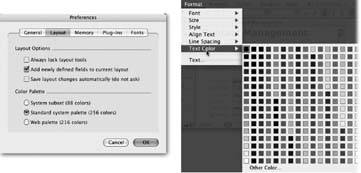
The Web palette lets you choose from the set of 216 colors commonly considered Web safe; that is, they're guaranteed to look pretty much the same in any browser on any computer. At one time, you needed to stick to only these colors if planning to publish your database on a Web site (Chapter 18), but the truth is you don't really need to worry about Web safe colors anymore. Every computer sold since, oh, about 1997 can display more colors than you ever dreamed of.
Note: The Format Text Color menu is just one of several places where a color palette shows up in FileMaker. Youll see the others in Part 2. Just remember that if you change the color palette selection in preferences, the change affects the color palettes throughout FileMaker.
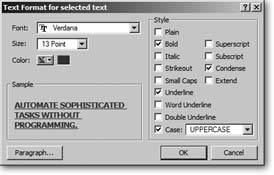
2.5.4.5. The Text Format Dialog Box
FileMaker provides one-stop shopping for all your text-formatting needs. Suppose you want to change a word to red 13-point bold-italic-underline-uppercase-condensed. That looks to be about seven trips to the Format menu. Instead, choose Format images/U2192.jpg border=0> Text to summon the Text Format dialog box (Figure 2-15). This one little window combines the Font, Size, Style, and Color menus described in the previous pages into one convenient place, turning seven menu commands into one. (Now if only it had a keyboard shortcut.)
Note: The Paragraph button reveals the Paragraph dialog box. It's covered on Section 2.6.4.
|
Part I: Introduction to FileMaker Pro
Your First Database
- Your First Database
- An Very Quick Database Tour
- Creating a New Database
- Opening and Closing Database Files
- Saving Your Databases
- Adding Records to Your Database
- Navigating Your Database
- Same Database, Multiple Windows
Organizing and Editing Records
- Organizing and Editing Records
- Views
- Advanced Find Mode
- Changing Multiple Records
- Sorting Records
- Editing Whats in Your Fields
- Paragraph Formatting
- Beyond Text: Container Fields
- Checking Spelling
- Printing and Preview Mode
Building a New Database
- Building a New Database
- Tables and Fields
- Defining Fields
- Advanced Field Options
- Bringing It All Together
Part II: Layout Basics
Layout Basics
Creating Layouts
Advanced Layouts and Reports
- Advanced Layouts and Reports
- Setting up Field Controls
- Adding Field Controls to Layouts
- Field Behavior
- Tab Order
- Print-Related Layout Options
- Format the Number/Date/Time/Graphic
- Adding Buttons
- Tab Panels
- Reports and Summary Fields
Part III: Multiple Tables and Relationships
Multiple Tables and Relationships
- Multiple Tables and Relationships
- Relational Databases Explained
- Modeling Your Database
- Creating a Relational Database
- Relational Databases
Advanced Relationship Techniques
- Advanced Relationship Techniques
- Creating Related Records
- Table Occurrences
- Managing Data with Data Tunneling
- Building a Data Tunneling Interface
- Connecting Databases
- Lookups
- Advanced Relationships
Part IV: Calculations
Introduction to Calculations
- Introduction to Calculations
- Understanding Calculations
- The Structure of a Calculation
- Creating a Calculation Field
- Auto-Enter Calculations
- Validate Data Entry with a Calculation
- Replacing Data Using a Calculation
- Comments
Calculations and Data Types
- Calculations and Data Types
- Number Crunching Calculations
- Going Beyond Basic Calculations
- Text Parsing Calculations
- Date and Time Calculations
- Containers in Calculations
Advanced Calculations
- Advanced Calculations
- Stored, Unstored, and Global Fields
- Logical Functions
- The Let Function and Variables
Extending Calculations
Part V: Scripting
Scripting Basics
- Scripting Basics
- Your First Script
- The Importance of the Layout
- Running Scripts
- Branching and Looping in Scripts
Script Steps
- Script Steps
- Go to Layout
- Scripting for Fields
- Working with Records
- Finding Records
- Sorting Records
- Working with Windows
- Working with Files
- Printing
- Other Script Steps
Advanced Scripting
- Advanced Scripting
- Commenting Scripts
- Asking and Telling the User
- Organizing Complex Scripts
- Handling Errors
- Putting a Complex Script Together
Part VI: Security and Integration
Security
Exporting and Importing
- Exporting and Importing
- Exporting a File
- Export Formats
- Importing Data
- Import Data Sources
- Importing and Exporting in a Script
Sharing Your Database
- Sharing Your Database
- FileMaker Network Sharing
- Sharing Over the Internet
- FileMaker Server
- Server Hardware
Developer Utilities
- Developer Utilities
- Script Debugger
- Disable Script Steps
- The Database Design Report
- Tooltips
- Copying Database Structure
- Custom Menus
- Developer Utilities
- File Maintenance
Part VII: Appendixes
Appendix A. Getting Help
EAN: 2147483647
Pages: 176
