What Makes a Layout
A layout is made up of layout partssections that each behave a little differently when displaying or printing multiple records. Even the simplest layout has at least one part, and each part has objects on it. One kind of object is a field, which you've seen plenty of so far in this book. Each field in your database has a little label beside it that tells you which field it is. These labels are another kind of object: they're text objects. It just so happens those objects all belong to a part called the body, and if you need to talk about your layout, you'd say they are on the body.
Parts tell FileMaker how to treat the objects inside them when it displays or prints the layout. One part might show just once at the top of the window, while another shows over and over again for each record. This section tells you exactly what each part type does and when to use it. Finally, you'll learn how they work together and how they behave in each mode.
4.3.1. Layout Parts
FileMaker has eight different kinds of parts in all. Every layout uses at least one of these parts, and often severalalthough not all databases need all eight kinds of parts. Most types can occur only once on each layout (like a header), while others can appear several times.
- Title Header. The Title Header part holds things you want to appear only at the top of the very first printed page. Use it for a descriptive title, larger column labels, a company logo, or you can even make it the height of your paper, and it acts as a cover page.
- Header. The Header part prints at the top of every pageunless you also use a Title Header, in which case the Title Header is on page one and the regular Header is at the top of all other pages. In Browse mode, the Header shows up at the top of the window. This part is where you might put a date and time, small title, smaller column labels, and anything else that you want on every page of the printout.
- Leading Grand Summary. This part prints below the header but above the records themselves. It's meant to contain totals and similar fields that add up, average, or in some way round up the results of your records, which FileMaker calls summarizing.
Note: Leading Grand Summary and all the other "summary" parts are how FileMaker creates reports. Reports, which help you compile and analyze your data, are nothing more than a special kind of layout, as you'll learn in Chapter 6. - Body. The body shows the actual record information. In list view, or when printed, it repeats once for every record.
- Sub-Summary. These parts help you add things like subtotals to complex reports. You'll learn all about this layout in Chapter 6.
- Trailing Grand Summary. If you prefer totals and overall summary information at the bottom of a report, it would go in this part.
- Footer. The footer prints at the bottom of every pageunless you also use a Title Footer, in which case, the Title Footer appears on page one and the regular Footer appears on all other pages. The Footer also appears at the bottom of the window in Browse mode. The footer's a perfect place for page numbers, copyright notices, and anything that ought to appear at the bottom of every page of your printout.
- Title Footer. The Title Footer part shows at the bottom of just the first page. Use it for special footer info that only needs to show once.
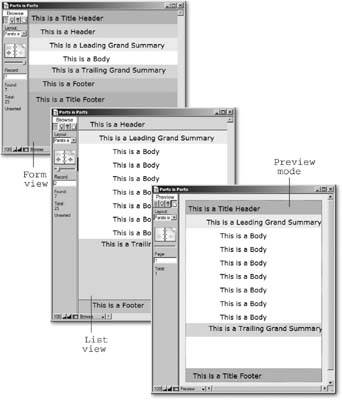
Figure 4-4 shows a layout with seven partsone of each type except sub-summary.
|
4.3.1.1. Parts in form view
When in Browse mode, and viewing the layout as a form, you see every part except sub-summary parts. As Figure 4-4 shows, the parts go in the same order as in the list on the previous page. In practice, you'll probably never use all these parts on a layout you plan on viewing this way. In fact, if you only ever want to view a layout as a form in Browse mode, you really need only a body part.
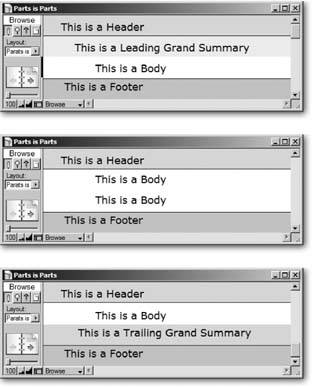
If the window isn't big enough to show every part, you get scroll bars as usual. In form view, the entire layout scrolls up and down, as shown in Figure 4-5.
|
4.3.1.2. Parts in list view
In list view, the header is anchored to the top of the page and the footer to the bottom. When you use the scroll bars, the header and footer stay in place and the body part scrolls. If you resize the window, the footer moves with it so that it is always the same height, and always at the very bottom.
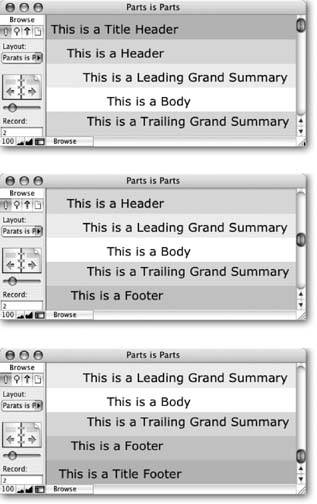
List view is a list because it shows several records at once. FileMaker accomplishes this magic by repeating the body part once for each record. The database in Figure 4-2 has three records, so in effect, the body part repeats three times.
The leading grand summary shows directly below the header, and before the body part's first appearance. The trailing grand summary, on the other hand, shows right after the last record's body part.
Scrolling in List view is altogether different from Form view, as shown in Figure 4-6.
|
4.3.1.3. Parts in Preview mode
Figure 4-6 might lead you to believe that Preview mode shows only the title header and footer (exactly the opposite of list view) but that's not the whole story. Turn your eyes to Figure 4-7 for the whole story.
|

Just like list view, the grand summary parts place themselves before the first record and after the last record. Finally, scrolling in Preview mode just scrolls the current page. If you need to see other pages of your report while you're in Preview mode, use the Book icon to move around.
4.3.1.4. When to use 'em
While it's perfectly legal to put any parts on any layout, you can probably tell from the discussion above that some arrangements are more common than others:
- Detail layouts usually have just a body part, or some combination of header, body, and footer. These layouts may show only a single record, so there isn't much point to summary parts since there's no list of data to summarize.
- List layouts usually have a header and a body, and sometimes a footer. Occasionally, you want a trailing grand summary on your list layout as well, since it can show summary information after all the records without taking up precious space like a footer.
- Printed reports come in many forms. People often use all the parts shown above on a report: a large title header for the first page, and a smaller header for each additional page; a leading grand summary that shows below the title header and before the first record; a body part for each record; a trailing grand summary to show totals from all records, and a footer to show page numbers and the like.
- Envelope and label layouts often need headers and/or footers just to get the record data to align properly on the printed page. These parts are generally empty.
- You may have a list layout that you use to browse your records, but you often print it as well. Make the layout do double duty by adding a title header or title footer. They'll show only when you print, and you can save valuable screen real estate.
4.3.2. Layout Objects
Parts aren't so useful by themselves. They control how the items in your layout arrange themselves on screen or on the page, but they need to have things in them to be really useful. You call those things layout objects. Layout objects come in six flavors: Text objects, lines and shapes, images, fields, portals, and tab controls.
Note: Portals are all about relationships, and you won't learn about relationshipsor portalsuntil Part 4. You'll take up tab controls a little sooner. Look for them in Chapter 6.
4.3.2.1. Text objects
Almost every layout ever created has included text objects: little blocks of text that are the same on every record displayed using that layout. Think about what happens when you move from record to record. The text labels for each field stay the same, even though the data inside each field changes with every record. Text objects give you one form of stability in the ever-changing world of database records.
When you design a layout, you can control every aspect of a text object, from the words in it to the font, size, style, color, line spacing, tab stops, and so on. (In fact, everything you learned in Chapter 2 related to formatting text in fields applies to text objects on layouts as well.)
Tip: FileMaker's spell checker works in layout mode too. Just choose Spelling  Check Layout. It looks and works just as it does in Browse modeexcept that it checks text objects on the current layout. Also, the
4.3.2.2. Lines and shapes
If you need simple graphic embellishments in your layouts, FileMaker has built-in tools. For example, you might want to put a box around a person's address information, and another around the Notes field, so they are visually separated. You can draw lines, rectangles, ovals, and round-cornered rectangles right on your layout. You can also control the line color, thickness, and pattern for lines and shapes; and the fill color and pattern for shapes.
4.3.2.3. Images
If simple shapes can't properly convey your artistic vision for your layout, you have recourse: You can paste any picture right on to the layout. You can also insert a picture from a file on your hard drive. Database developers often add icons, logos, and other decorations this way. For example, you might add your company logo to the top-right corner of your layout, or put a cute little envelope icon by the Email Address field. Just remember a little of this "eye candy" goes a long way. If you get carried away, you can actually create so much visual clutter that people using the program are confused, instead of enlightened.
4.3.2.4. Fields
A layout without fields is just a picture. Perhaps it's a very complex picture that changes as you switch from list view to form view, and has an entirely different effect when printed (thank you, parts!), but it's a picture nonetheless.
To get data into your layout, you add field objects. For instance, if you make a new layout in the People database, and you want to show the person's address, you can add the Street Address, City, State, and Zip Code fields to the body part of the layout. If the field is in the body part (the most common place), then it shows data from the current record (or each record when you view the layout as a list). In list view, fields in header, footer, or grand summary parts show the values from the first or last record in the found set. In Preview mode (or when printing), headers and footers show data from the first or last record on each page.
Note: You won't usually put ordinary fields in header, footer, and grand summary parts. These parts usually contain global fields, summary fields (see Section 6.9), page numbering, dates, or just text and pictures.
With a firm understanding of layouts, views, parts, and objects, you're ready to get down to business. The next section shows you how to put all these ideas to work in your own databases.
Part I: Introduction to FileMaker Pro
Your First Database
- Your First Database
- An Very Quick Database Tour
- Creating a New Database
- Opening and Closing Database Files
- Saving Your Databases
- Adding Records to Your Database
- Navigating Your Database
- Same Database, Multiple Windows
Organizing and Editing Records
- Organizing and Editing Records
- Views
- Advanced Find Mode
- Changing Multiple Records
- Sorting Records
- Editing Whats in Your Fields
- Paragraph Formatting
- Beyond Text: Container Fields
- Checking Spelling
- Printing and Preview Mode
Building a New Database
- Building a New Database
- Tables and Fields
- Defining Fields
- Advanced Field Options
- Bringing It All Together
Part II: Layout Basics
Layout Basics
- Layout Basics
- What Is a Layout?
- Switching Between Layouts
- What Makes a Layout
- Layout Mode
Creating Layouts
Advanced Layouts and Reports
- Advanced Layouts and Reports
- Setting up Field Controls
- Adding Field Controls to Layouts
- Field Behavior
- Tab Order
- Print-Related Layout Options
- Format the Number/Date/Time/Graphic
- Adding Buttons
- Tab Panels
- Reports and Summary Fields
Part III: Multiple Tables and Relationships
Multiple Tables and Relationships
- Multiple Tables and Relationships
- Relational Databases Explained
- Modeling Your Database
- Creating a Relational Database
- Relational Databases
Advanced Relationship Techniques
- Advanced Relationship Techniques
- Creating Related Records
- Table Occurrences
- Managing Data with Data Tunneling
- Building a Data Tunneling Interface
- Connecting Databases
- Lookups
- Advanced Relationships
Part IV: Calculations
Introduction to Calculations
- Introduction to Calculations
- Understanding Calculations
- The Structure of a Calculation
- Creating a Calculation Field
- Auto-Enter Calculations
- Validate Data Entry with a Calculation
- Replacing Data Using a Calculation
- Comments
Calculations and Data Types
- Calculations and Data Types
- Number Crunching Calculations
- Going Beyond Basic Calculations
- Text Parsing Calculations
- Date and Time Calculations
- Containers in Calculations
Advanced Calculations
- Advanced Calculations
- Stored, Unstored, and Global Fields
- Logical Functions
- The Let Function and Variables
Extending Calculations
Part V: Scripting
Scripting Basics
- Scripting Basics
- Your First Script
- The Importance of the Layout
- Running Scripts
- Branching and Looping in Scripts
Script Steps
- Script Steps
- Go to Layout
- Scripting for Fields
- Working with Records
- Finding Records
- Sorting Records
- Working with Windows
- Working with Files
- Printing
- Other Script Steps
Advanced Scripting
- Advanced Scripting
- Commenting Scripts
- Asking and Telling the User
- Organizing Complex Scripts
- Handling Errors
- Putting a Complex Script Together
Part VI: Security and Integration
Security
Exporting and Importing
- Exporting and Importing
- Exporting a File
- Export Formats
- Importing Data
- Import Data Sources
- Importing and Exporting in a Script
Sharing Your Database
- Sharing Your Database
- FileMaker Network Sharing
- Sharing Over the Internet
- FileMaker Server
- Server Hardware
Developer Utilities
- Developer Utilities
- Script Debugger
- Disable Script Steps
- The Database Design Report
- Tooltips
- Copying Database Structure
- Custom Menus
- Developer Utilities
- File Maintenance
Part VII: Appendixes
Appendix A. Getting Help
EAN: 2147483647
Pages: 176
