Connecting Databases
In FileMaker, you can make two databases work together as easily as you work with any other multiple tables. Using the data tunneling techniques discussed in the previous section, you connect tables from another file (often called an external database) without the overhead of copying all that data into your file. You simply put a table occurrence from your external file onto your relationship graph, which defines its perspective in relation to all your other tables.
| POWER USERS' CLINIC Naming Table Occurrences |
|
When you create a new group of interrelated table occurrences, it's helpful to choose good names. There are many places in FileMaker where you see a list of occurrences on your graph. Although the list is always in alphabetical order, it gets lengthy once you start duplicating TOs, and it can be hard to find what you're looking for. It's extra confusing when you have several occurrences of the same table with similar names"Which Line Items am I supposed to use here?" A good way to keep things straight is to give the same prefix to every table occurrence in a group. The prefix makes them sort together in the list, and serves as a clear reminder of which occurrences go together. It's even better if the prefix also tells you what the group actually does. If you compare the two lists shown here, you can easily see the advantage of this technique. As helpful as long, prefixed TO names are in the list, they're not as much help in the graph, where FileMaker often cuts them off. Nothing's more confusing than three occurrences named "Expense Assign: …." Also, since you can name a table occurrence anything you want, it can be hard to remember which table it's an occurrence of. Luckily, FileMaker has good solutions to both these problems. First, you can easily resize any table occurrence. No matter how the table occurrence is configured, you can drag the right or left edge to make it wider or narrower. If it's set to show all its fields, you can also drag the top or bottom edge to change its height. A table occurrence that's too short to show all its fields has little arrow icons above and below the field list. Click these arrows to scroll the list. (When a table occurrence is set to show just the key fields, or no fields at all, its height is fixed.) To see which table an occurrence represents, just point to the arrow icon to the left of the occurrence name. FileMaker pops up an information window that tells you everything you need to know. And if long names and pop-up tips aren't enough, you can use the note tool (Section 7.3.4.2). Use the note as a reminder about the purpose of your new table occurrences that's more detailed than a naming prefix. Notes behave themselves, staying in the background behind all your TOs, so some designers make large notes that enclose a new TO group to visually unite them on the graph.  |
For example, suppose you want to connect the People database you created in Chapter 3 to your new system. You'd like a portal on the Customers layout to show all the people in the People database who live in the same state as that customer. After all, you never know when one of your leads will come in handy.
| POWER USERS' CLINIC The Secret Life of GTRR |
|
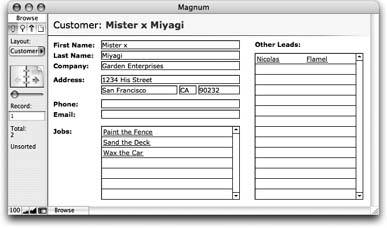
The layout in Figure 8-19 is pretty slick, but there's one problem. Suppose you're on the Expenses layout looking at an expense. You decide you want to assign an invoice line item to it, so you switch to the Attach Line Item layout. Unfortunately, when you do, you don't see the same record. Remember that each table occurrence has its own current record, found set, and sort order. You're forced to find the same record over again. It turns out the Go to Related Record command has an unexpected power: It can transfer a found setcomplete with current record and sort orderfrom one table occurrence to another. The Go to Related Record Options window has a "Get related record from" pop-up menu that shows every table occurrence in the database. When you select an occurrence, you get a list of layouts to switch to. But this list isn't restricted to layouts attached to the selected table occurrence. Instead, it shows layouts attached to any occurrence of the same table. In other words, when you ask to go to a record in the Expenses table occurrence, you can pick the Attach Line Item layout, even though it's associated with a different occurrence of the Expenses table. When you do, FileMaker shows the records dictated by the relationship, but uses the layout you choose. To make the connection, add a button to the Expenses layout that runs the Go to Related Record command. When you set up the button, choose the Expenses table occurrence and the Attach Line Item layout. Also, make sure you turn on "Show only related records." FileMaker does all the rest of the work for you. You can also add a button to the Attach Line Item layout that transports you back to the Expenses layout. This time you configure the Go to Related Record command to use the Expense Assign: Expenses table occurrence and the Expenses layout. In the picture shown here, the "Assign" button in the top window switches to the Attach Line Item layout, and the Done button switches back.  |
8.5.1. Adding a Table Occurrence from Another File
Creating a cross-database relationship is as easy as adding a table occurrence. Once you have the People table on the relationships graph (in the Define Database dialog box), it begins to act like a first-class citizen in its new environment: You can define relationships to it, attach layouts to it, and just about anything else you can do with the tables in this database. Here's how:
- In the Customers database, bring up the Relationships tab of the Define Database window. Click the Add Table Occurrence button.
The Specify Table dialog box appears.
- From the File pop-up menu, choose Add File Reference.
A standard Open File dialog box appearsjust like you see when you're opening a database. To use a table from another file, you have to add a file reference. A file reference is just a way to tell FileMaker where you store the external databases it needs to interact with.
POWER USERS' CLINIC
Defining File ReferencesNormally you define a file reference by choosing the file from your hard drive. If you want, though, you can type in a path instead (choose File
 Define File References, then click New). FileMaker looks for the file at the specified location. The format of a path varies depending on what platform youre using and how you're accessing the file. FileMaker gives you an example of each path format at the bottom of the Edit File Reference dialog box (shown here).
You can even give a file reference more than one path. When you do, FileMaker looks for the file at the first path. If it doesn't find the file, it tries the second path. The search continues until it finds the file or tries every listed path. (If it never finds the file, it shows an error message.) Using this technique, you can have a database that opens files from different locations depending on which computer it's opened on. Or you can ask FileMaker to use your local copy of the People database if it finds one, and to use the network copy otherwise (you'll learn about sharing databases on a network in Chapter 16).

- Browse to the People database, select it, and click Open.
The Specify Table dialog box now shows tables from the People database (it has only one).
Tip: File references aren't dynamic. That is, if you move the files from the location in your file reference, then you need to manually update the reference for the new location. Just choose File Define File References and double-click the file reference to edit it.
Select the People table and click OK.
FileMaker adds the new occurrence to the graph. As Figure 8-20 attests, you can tell at a glance that it's an occurrence of what FileMaker calls an external table because it shows you the table occurrence's name in italics.
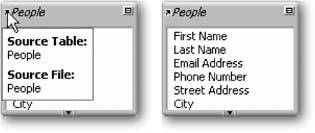
Figure 8-20. External tables' names display in italics. To find out which database it comes from, point to the little arrow to the left of the name to show the information window. FileMaker displays the source table's name as well as the source file's name.
UP TO SPEED
Empty LookupsLookup options give you some control over what happens when there's no matching related record. Normally, if FileMaker tries to find a related record to look up data from, and it can't find one, it just leaves the lookup field alone.
That's what happens when you choose "do not copy" in the "If no exact match, then" group of radio buttons. Here's what the others do:
- The "copy next lower value" option looks at the closest lower related record. For example, if you turn it on for the Invoices::Street Address field, and there's no matching related customer, FileMaker copies the address of the customer with the next lower Customer ID alphabetically. In this case, it makes absolutely no sense.
But what if you were looking up price information based on quantity? If the customer orders 38, but you have pricing for 30 or 40, you might want to get the price for 30 items: the next lower value.
- The "copy next higher value" option works just like its similarly named counterpart. It just copies the value from the next higher related record instead. People don't use these two options a lot, but they sometimes come in very handy.
- The "use" option lets you specify any value you want to substitute for a missing related value. For example, if you're looking up customer age information, and you don't have an age for one person, you can tell FileMaker to use "N/A" instead.
Tip: You can double-click the People table occurrence and change its name to Other Leads to better reflect its meaning in this table occurrence group.
- The "copy next lower value" option looks at the closest lower related record. For example, if you turn it on for the Invoices::Street Address field, and there's no matching related customer, FileMaker copies the address of the customer with the next lower Customer ID alphabetically. In this case, it makes absolutely no sense.
- In the relationship graph, drag the State field from the People table to the Customers::State field.
Now that the People table is in the graph, attaching it to the Customers table works just like every other relationship you've ever defined.
You can use this relationship like any other. For example, you could create a portal, as described in Figure 8-21.
|
Part I: Introduction to FileMaker Pro
Your First Database
- Your First Database
- An Very Quick Database Tour
- Creating a New Database
- Opening and Closing Database Files
- Saving Your Databases
- Adding Records to Your Database
- Navigating Your Database
- Same Database, Multiple Windows
Organizing and Editing Records
- Organizing and Editing Records
- Views
- Advanced Find Mode
- Changing Multiple Records
- Sorting Records
- Editing Whats in Your Fields
- Paragraph Formatting
- Beyond Text: Container Fields
- Checking Spelling
- Printing and Preview Mode
Building a New Database
- Building a New Database
- Tables and Fields
- Defining Fields
- Advanced Field Options
- Bringing It All Together
Part II: Layout Basics
Layout Basics
Creating Layouts
Advanced Layouts and Reports
- Advanced Layouts and Reports
- Setting up Field Controls
- Adding Field Controls to Layouts
- Field Behavior
- Tab Order
- Print-Related Layout Options
- Format the Number/Date/Time/Graphic
- Adding Buttons
- Tab Panels
- Reports and Summary Fields
Part III: Multiple Tables and Relationships
Multiple Tables and Relationships
- Multiple Tables and Relationships
- Relational Databases Explained
- Modeling Your Database
- Creating a Relational Database
- Relational Databases
Advanced Relationship Techniques
- Advanced Relationship Techniques
- Creating Related Records
- Table Occurrences
- Managing Data with Data Tunneling
- Building a Data Tunneling Interface
- Connecting Databases
- Lookups
- Advanced Relationships
Part IV: Calculations
Introduction to Calculations
- Introduction to Calculations
- Understanding Calculations
- The Structure of a Calculation
- Creating a Calculation Field
- Auto-Enter Calculations
- Validate Data Entry with a Calculation
- Replacing Data Using a Calculation
- Comments
Calculations and Data Types
- Calculations and Data Types
- Number Crunching Calculations
- Going Beyond Basic Calculations
- Text Parsing Calculations
- Date and Time Calculations
- Containers in Calculations
Advanced Calculations
- Advanced Calculations
- Stored, Unstored, and Global Fields
- Logical Functions
- The Let Function and Variables
Extending Calculations
Part V: Scripting
Scripting Basics
- Scripting Basics
- Your First Script
- The Importance of the Layout
- Running Scripts
- Branching and Looping in Scripts
Script Steps
- Script Steps
- Go to Layout
- Scripting for Fields
- Working with Records
- Finding Records
- Sorting Records
- Working with Windows
- Working with Files
- Printing
- Other Script Steps
Advanced Scripting
- Advanced Scripting
- Commenting Scripts
- Asking and Telling the User
- Organizing Complex Scripts
- Handling Errors
- Putting a Complex Script Together
Part VI: Security and Integration
Security
Exporting and Importing
- Exporting and Importing
- Exporting a File
- Export Formats
- Importing Data
- Import Data Sources
- Importing and Exporting in a Script
Sharing Your Database
- Sharing Your Database
- FileMaker Network Sharing
- Sharing Over the Internet
- FileMaker Server
- Server Hardware
Developer Utilities
- Developer Utilities
- Script Debugger
- Disable Script Steps
- The Database Design Report
- Tooltips
- Copying Database Structure
- Custom Menus
- Developer Utilities
- File Maintenance
Part VII: Appendixes
Appendix A. Getting Help
EAN: 2147483647
Pages: 176
