Running Scripts
At this point you're probably starting to see how scripts could be really useful in your database. The fact is, most large database systems are loaded with scripts that do all kinds of things. But the only way you've seen to run a script is pretty tedious: Chose Scripts  ScriptMaker, select the script, and then click Perform. Thats lots of clicks to run a script that's supposed to save you time! Thankfully, there are a few other ways to run scripts that are more convenient, and you can set them up when you first create a script. Here are the possibilities:
13.3.1. The Scripts Menu
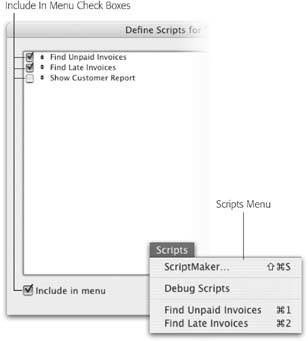
You can choose to show some or all of your scripts right in the Scripts menu. If you have a script or two that you want quick access to from anywhere, then it makes sense to put it in the Scripts menu. That way, anyone can run it by simply choosing it from the menu. There are even keyboard shortcuts for the first 10 scripts in the Scripts menu: Ctrl+1 ( -1) through Ctrl+9 (
 -9) for the first nine, and Ctrl+0 (
 -0) for number 10. Figure 13-8 shows how to assign a script to this menu in the Define Scripts dialog box (Section 13.1.3).
|
13.3.2. Buttons
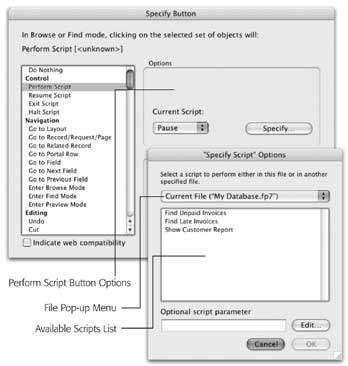
Throwing lots of scripts into the Scripts menu is a good way to give your users access to them no matter what context they're in. But what if you want to make a script available only on certain layouts? For scripts that apply only to the Invoices layout (like…oh…the Find Unpaid Invoices script), consider using buttons instead. When you add a button to the layout, FileMaker shows you the same Specify Button window you saw back on Section 6.6.5.3. Perform Script is the very first command available in the list (aside from Do Nothing). You can see the options associated with this button in Figure 13-9.
|
Using buttons, you can add one-click access to as many scripts as you want and you can place them where you want them. For example, you can put Invoice-related scripts on the Invoices layout and Payment-related scripts on the Payment layout. If you make sure your context-dependent scripts don't show up in the Scripts menu, you're adding another layer of assurance that FileMaker runs your scripts only from the right context.
Tip: If you want the ultimate in control over which of people get to see which scripts, and even which layout they can see them in, take a look at the Custom Menus section in Chapter 19. You need FileMaker Pro Advanced to create Custom Menus, but for many situations, this powerful feature alone is worth the price of admission.
13.3.3. Opening and Closing Scripts
Finally, you can tell FileMaker to automatically run a script when someone opens or closes the file. The opening script runs when you first open the file. You might use this script if you want to be greeted with the list of unpaid invoices first thing every morning. The closing script runs when you close the last window for an open file. This option is a little less common, but it has its uses: If you want to make sure other related files close whenever the main file closes (even if they have open windows), then you could write a script to close them all whenever you close the main file.
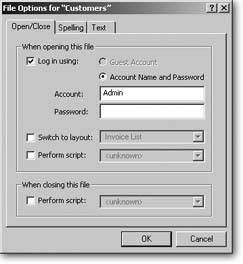
To make the selection, you need to visit the File Options dialog box (File  File Options). In the File Options window, make sure the Open/Close tab is selected. In this window, you first turn on one of the "Perform script checkboxes (there's one under "When opening this file" and another under "When closing this file"). Then you can select one of your scripts from the associated pop-up menu. Figure 13-10 shows the result.
|
Part I: Introduction to FileMaker Pro
Your First Database
- Your First Database
- An Very Quick Database Tour
- Creating a New Database
- Opening and Closing Database Files
- Saving Your Databases
- Adding Records to Your Database
- Navigating Your Database
- Same Database, Multiple Windows
Organizing and Editing Records
- Organizing and Editing Records
- Views
- Advanced Find Mode
- Changing Multiple Records
- Sorting Records
- Editing Whats in Your Fields
- Paragraph Formatting
- Beyond Text: Container Fields
- Checking Spelling
- Printing and Preview Mode
Building a New Database
- Building a New Database
- Tables and Fields
- Defining Fields
- Advanced Field Options
- Bringing It All Together
Part II: Layout Basics
Layout Basics
Creating Layouts
Advanced Layouts and Reports
- Advanced Layouts and Reports
- Setting up Field Controls
- Adding Field Controls to Layouts
- Field Behavior
- Tab Order
- Print-Related Layout Options
- Format the Number/Date/Time/Graphic
- Adding Buttons
- Tab Panels
- Reports and Summary Fields
Part III: Multiple Tables and Relationships
Multiple Tables and Relationships
- Multiple Tables and Relationships
- Relational Databases Explained
- Modeling Your Database
- Creating a Relational Database
- Relational Databases
Advanced Relationship Techniques
- Advanced Relationship Techniques
- Creating Related Records
- Table Occurrences
- Managing Data with Data Tunneling
- Building a Data Tunneling Interface
- Connecting Databases
- Lookups
- Advanced Relationships
Part IV: Calculations
Introduction to Calculations
- Introduction to Calculations
- Understanding Calculations
- The Structure of a Calculation
- Creating a Calculation Field
- Auto-Enter Calculations
- Validate Data Entry with a Calculation
- Replacing Data Using a Calculation
- Comments
Calculations and Data Types
- Calculations and Data Types
- Number Crunching Calculations
- Going Beyond Basic Calculations
- Text Parsing Calculations
- Date and Time Calculations
- Containers in Calculations
Advanced Calculations
- Advanced Calculations
- Stored, Unstored, and Global Fields
- Logical Functions
- The Let Function and Variables
Extending Calculations
Part V: Scripting
Scripting Basics
- Scripting Basics
- Your First Script
- The Importance of the Layout
- Running Scripts
- Branching and Looping in Scripts
Script Steps
- Script Steps
- Go to Layout
- Scripting for Fields
- Working with Records
- Finding Records
- Sorting Records
- Working with Windows
- Working with Files
- Printing
- Other Script Steps
Advanced Scripting
- Advanced Scripting
- Commenting Scripts
- Asking and Telling the User
- Organizing Complex Scripts
- Handling Errors
- Putting a Complex Script Together
Part VI: Security and Integration
Security
Exporting and Importing
- Exporting and Importing
- Exporting a File
- Export Formats
- Importing Data
- Import Data Sources
- Importing and Exporting in a Script
Sharing Your Database
- Sharing Your Database
- FileMaker Network Sharing
- Sharing Over the Internet
- FileMaker Server
- Server Hardware
Developer Utilities
- Developer Utilities
- Script Debugger
- Disable Script Steps
- The Database Design Report
- Tooltips
- Copying Database Structure
- Custom Menus
- Developer Utilities
- File Maintenance
Part VII: Appendixes
Appendix A. Getting Help
EAN: 2147483647
Pages: 176
- Integration Strategies and Tactics for Information Technology Governance
- An Emerging Strategy for E-Business IT Governance
- A View on Knowledge Management: Utilizing a Balanced Scorecard Methodology for Analyzing Knowledge Metrics
- Governing Information Technology Through COBIT
- The Evolution of IT Governance at NB Power


