Advanced Field Options
At this point your database is simple, but entirely usable. In fact, you could stop reading right now, and you'd be able to build super-simple databases to solve all kinds of problems. But FileMaker's Define Fields dialog box has lots more settings to make your database even smarter, easier to use, and more consistent.
3.3.1. Auto-Enter Options
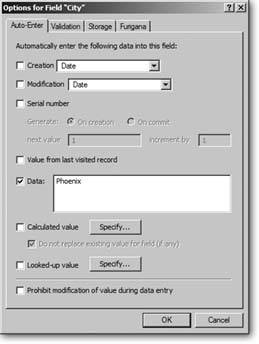
All your fields are completely empty when you create a new record. Often, but not always, that's what you wanta completely blank slate. With FileMaker, you have a handful of other possibilities. Suppose most of your clients are from North Dakota, for example. It would be nice if FileMaker could put ND in the State field for youyou can always change it later. In fact, this situation is so common that every field has a group of Auto-Enter settings where you can tell FileMaker exactly what to put in the field for you (Figure 3-6).
|
When you first create a field, all the Auto-Enter options are turned off, so the field stays empty. To turn one on, follow these steps:
- Choose File
 Define
 images/U2192.jpg border=0> Database.
Click the Fields tab. In the field list, select any field and then click Options.
Even quicker, just double-click the field. The Field Options dialog box emerges.
- In this window, click the Auto-Enter tab.
Now you plainly see all FileMaker's Auto-Enter options.
3.3.1.1. Creation values
When a record is first created, FileMaker can enter some information about the circumstances under which it was created. You can record the date, time, or timestamp at the moment of creation.
The Name option refers to the name of the person who created the record. FileMaker gets this information from your operating system. On most systems, you must log into the computer before you can run programs. FileMaker uses the name of the system account you logged in with.
The Account Name, by contrast, refers to the FileMaker account you used when you logged into the database. You can read about database accounts in Chapter 16.
In your People database, it might be helpful to keep track of the date you first add each record, so you can tell how long you've been working with someone. You can even use this information in Find mode to seek out new customers, old customers, or customers you met on a Tuesday. FileMaker has an Auto-Enter option for this very purpose. Here's how to set it up:
- In the Define Database window's Fields tab, type Creation Date in the Field Name box.
Since the date the record was created is a piece of information being tracked, it needs to go in a field.
- From the Type pop-up menu, choose Date.
This field holds a date, and FileMaker needs to know it.
- Click Create, and then click Options.
The Create button adds the field to the list and selects it, so you can click Options right away.
- In the Field Options dialog box's Auto-Enter tab, turn on the Creation checkbox.
This setting lets you store information about the creation of a record. Since you're working on a date field, only the Date option is available in the associated pop-up menu.
- From the Creation pop-up menu, choose Date.
In this case, you want the date the record is created. Figure 3-7 shows the finished product.
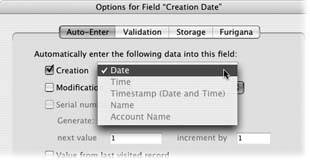
Figure 3-7. When you set the field options above, the dialog box shows you've turned on the Creation Auto-Enter option and selected Date. In English, that means you've told FileMaker to automatically record the date you add a new person to your database.
- Turn on the "Prohibit modification of value during data entry" checkbox.
Because this field always automatically gets the right value, you don't need to change it in Browse mode. Editing this data would probably be a mistake, so you can tell FileMaker not to allow it.
- Click OK, and then, in the Define Database window, OK again.
You're now ready to test your new field. The existing record won't have the current date in it, because it was created before you made the Creation Date field. Create a record and see how FileMaker automatically enters the current date.
3.3.1.2. Modification values
Sometimes you want to keep track of when you last changed the data in your records. FileMaker can track the same information when you modify a record as when you create one. So if you adjust an interest rate in your database, for example, you can tell how long ago the change occurred. Furthermore, because records can change often, more than once a day even, you may need to know what time a record changed, not just the date. The Timestamp field is just the ticket. Here are the steps:
- In the Define Database window's Fields tab, type Modification Timestamp in the Field Name box. From the Type pop-up menu, choose Timestamp.
Every field needs a name and a type, so you have to get those details out of the way first.
- Click Create, and then click Options.
The Field Options dialog box returns.
- In the Field Options dialog box's Auto-Enter tab, turn on the Modification checkbox.
Now you can use the Modification pop-up menu.
- From that pop-up menu, choose Timestamp.
As with record creation, you can have FileMaker enter any of several values when someone modifies the record. In this case, you want the program to make a Timestamp.
- Turn on the "Prohibit modification of value during data entry" checkbox.
Just like before, you don't want this field edited manually.
- Click OK, and then, in the Define Database window, OK again.
You're now ready to test your new field. Create a record and see how FileMaker automatically enters the current date.
Unlike the Data and Creation Auto-Enter options, the Modification setting affects the value of the field after you create a record. This option updates the value every time the record changes. In fact, if you don't select the "Prohibit modification of value during data entry" option, the Modification setting would overwrite whatever you type in your Modification Timestamp field, since the timestamp occurs when you commit the record (see the box on Section 3.3.1.4).
Note: If it sounds strange that you can use the "Prohibit modification of value during data entry" checkbox on a Modification field, never fear. FileMaker's Auto-Enter mechanism isn't considered data entry. Other times when records can change outside of data entry are when you're importing records (Chapter 17) or setting fields via a script (Chapter 13).
3.3.1.3. Serial number
You learned in Chapter 1 that record numbers can change as you delete or sort the records. If you want to assign a unique number to your record that always stays the same, you can use the "Serial number" Auto-Enter option. In the Field Options dialog box, you can specify the "next value," which is the value FileMaker uses for the next record that you create. The "increment by" value tells FileMaker how to change the number each time someone creates a record. For example, suppose "next value" is 1, and "increment by" is 2. If you create three records, FileMaker numbers them 1, 3, and 5.
You can specify non-numerical values for "next value" if you want. For example, if your field is a text field, you can put INV00001 in the "next value" box. Your first record would then get INV00001, followed by INV00002 and INV00003.
The Generate radio buttons under "Serial number" control when the serial number is assigned. If you select "On creation," then as soon as you create a record, FileMaker puts the serial number in the field. If you then decide you don't want the record, and you delete it right away, that serial number value has been used up, and the next record you make will have a new value. If you instead select "On commit," the serial number doesn't show up in the field until you exit the record. In other words, you can delete before you exit without using up any serial numbers.
| POWER USERS' CLINIC Embracing Commitment |
|
The word commit refers to a semi-technical database concept. When you create a new record, you haven't actually added a record to the table yet. Instead, you get a blank record on the screen, and the information you enter is stored in a temporary working area in your computer's memory. When you exit the record, the information in that working area is committedor writtento the database. When you edit a record, the same principle holds: As soon as you enter the record, it's copied to the working area. While you edit it, you're actually editing this copy. When you exit the record, FileMaker puts your edited copy back in the table. In general, think of committing a record as the same thing as exiting a record. When you exit the record, you commit it. |
You'll use serial numbers most often when connecting multiple tables (Part 4). Serial numbers also come in handy when the items in your database don't have a convenient name. In a database of invoices, it can be tough to talk about one particular invoice ("You know, that one we sent last Thursday. No, not that one, the other one"). People generally use serial numbers to clarify things.
3.3.1.4. Value from last visited record
For some databases, you need a lot of repetitive data entry. If you take a trip to Los Angeles, you might meet 12 people who should go into your People database. When you get home, you have to type them all in. Rather than type Los Angeles and California over and over again, you can tell FileMaker to automatically fill the City and State fields for you. If you turn on "Value from last visited record," you'll only need to type Los Angeles and California once. When you choose Records images/U2192.jpg border=0> New Record, FileMaker copies the city and state from the current record into the new record for you.
- Choose File Define
Select the City field, and then click Options.
The Field Options dialog box puts in an appearance. With this window, you can tweak several options for each individual field.
- Click the Auto-Enter tab, if necessary.
You see the same window shown in Figure 3-6 above.
- Turn on "Value from last visited record."
There are no additional settings for this option: Just turn it on. Here, you don't want to turn on the "Prohibit modification of value during data entry" option, because you want to keep the ability to change what's in the City field.
- Click OK. In the Define Database dialog box, select the State field, and then click Options.
This time you want to auto-enter California. Make the necessary settings and click OK.
- Click OK again to dismiss the Define Database dialog box.
You're back in your database. Notice that the City and State fields didn't get the new information, though. The Auto-Enter options tell FileMaker what to put in fields only when you create a record.
Now when you choose Records
Tip: "Value from last visited" record is really cool when you're entering a bunch of records one right after another, but it can cause confusion if you poke around in your database before you start creating records. FileMaker thinks of your "last record" as the last record you clicked in or opened, not the last one you looked at. (See Section 1.5.3 for the deal on opening records.) So make sure you open the record you want the value to come from just before you create a new record.
3.3.1.5. Data
This is the simplest Auto-Enter option. It puts some unchanging piece of information into the field every time you create a record. You can specify text, date, time, and timestamp values by entering the information just as you would type it in a field.
If 99 percent of your associates are from your home town, it makes sense to have your database automatically enter your city and state for you.
3.3.1.6. Calculated value
Sometimes you want to take advantage of the power of calculations, but you also want to be able to change the field if you need to. Since calculation fields always create their own (unchangeable) value, they don't work. Instead, you can create a normal field and have FileMaker automatically enter a calculated value into it. You can then change the value later if you want. You'll learn how to define calculations in Part 3.
3.3.1.7. Looked-up value
As you've already heard, FileMaker lets you connect multiple tables together in various ways. When you've done that, you can tell FileMaker to automatically fetch a value from some record in another table and plop it in the field. This feature is called lookup, and you'll learn about it in Part 4.
3.3.1.8. Prohibit modification of value during data entry
Usually, when you use an Auto-Enter option, it's just to save you some typing. You may end up needing to change the value to something else, though. But sometimes the value is automatically entered, and it should stay that way forever. The Creation and Modification options most often fall into this category. If you're trying to keep track of when the record was created, there's no reason to ever change the date field. If you turn on the "Prohibit modification of value during data entry" checkbox, FileMaker doesn't let you change the field's value at all.
3.3.2. Validation Options
Auto-enter options tell FileMaker to enter some things for you. Validation options sort of do the opposite: They tell FileMaker what not to let you put in a field. You decide what kind of information should go there, and FileMaker warns you when you enter something that doesn't look right. In your People database, you might want to make sure the Zip Code field always looks like a real Zip code.
- Open the Field Options dialog box for the Zip Code field.
You should be an expert at this by now. In the list, just double-click the field.
- Select the Validation tab.
As you can see in Figure 3-8, you have a lot of choices when it comes to field validation.
- Turn on the "Strict data type" checkbox, and from its pop-up menu, select Numeric Only.
These settings tell FileMaker to expect only numerals in this field.
- Click the "Maximum number of characters" checkbox and enter 5.
You can do better than just require numbers. The option tells FileMaker to accept no more five digits in the Zip Code field.
- Turn on the "Display custom message if validation fails" checkbox.
FileMaker automatically shows a message when a value in a field doesn't match the validation settings, but it's often more considerate to give the message in your own words. That's what this setting does.
- In the text box below this checkbox, type The Zip code you entered doesn't look right. Are you sure that's what you want?
FileMaker displays this message if the validation fails. (For a little guidance on what these messages should say, see the box on Section 3.3.2.1.)
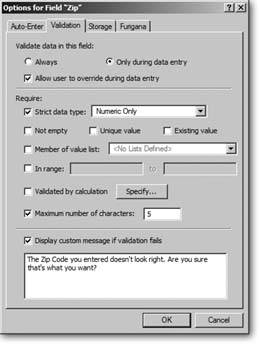
Figure 3-8. The Validation tab in the Field Options dialog box lets you check for errors before placing information into fields. You can, for example, make sure only numbers are entered, or that the first name is no more than 30 characters. You can apply as many validation rules as you want, and FileMaker checks each one whenever someone modifies the field.
- Click OK and OK again.
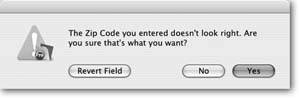
You're back in Browse mode and ready to test. Try entering too many characters into the Zip Code field, and you'll see your message when you exit the field, as shown in Figure 3-9.
|
Note: It's true that the validation settings you selected in the previous tutorial aren't perfect. They don't allow Zip+4 codes (46077-1039), but they would let you enter something like 123, which isn't a valid Zip code at all. To handle such nuances of the simple Zip code, you need to use the "Validate by calculation" option, which lets you set much more specific validation standards. You'll learn about FileMaker's calculation features in Part 3.
| FREQUENTLY ASKED QUESTION Numbers and Text |
|
You have to set an awful lot of validation options to make sure people enter only Zip codes into a text field. Can't I just make the Zip Code field a number field instead? No, you can't. Zip codes are numerical values, but they're not numbers, and that makes a big difference as far as FileMaker is concerned. For example, number fields don't recognize leading zeroslike the ones at the beginning of 00501 and scores of other perfectly valid Zip codes. If you enter 00501 in a number field, FileMaker thinks you meant to type the number 501 and helpfully removes those extra zeros when you exit the record. That's just not going to get your mail to Holtsville, New York anytime soon. The Numeric Only validation option lets the field stay a Text field (which preserves all entered characters), but still accept only numerical digits on entry, which is exactly what you want for a Zip code. Some people also assume that a phone number should be stored in a number field. Wrong again. Phone numbers contain not only numerals but also dashes, parentheses, and sometimes other special charactersall mere text to FileMaker. As a general rule, only make a field a Number field if you might have to perform some math with it. You'll learn all about using fields in calculations in Chapter 9. |
Now that you know how to set them, you can tailor validation options to all kinds of situations. Here are your many choices in greater detail:
3.3.2.1. When to perform validation
The first two choices let you control when validation is actually performed. Normally, you only want to validate what you put into fields when you're typing in Browse mode. If you import data (more on that in Chapter 17) or enter information from a script (Part 5), FileMaker completely bypasses the validation step. If you want to be strict about it, select the Always radio button under "Validate data in this field." FileMaker does as promised: it always performs the validation, even during automated processes.
3.3.2.2. Overriding validation
In the Zip code example, you were given the option of accepting a bogus Zip code if you wanted to. FileMaker simply warned you that things didn't look right. It was up to you to decide if it should be fixed. If you uncheck "Allow user to override during data entry," FileMaker takes away the choice. Instead, it simply refuses to accept invalid data.
3.3.3. Validation Requirements
To validate a Zip code (Section 3.3.1.8), you asked FileMaker to accept only numbers and allow only five digits.
| UP TO SPEED Validation Messages |
|
Custom validation messages (like the one in Figure 3-9), give you a chance to communicate directly with whoever uses your database. If you don't provide a custom message, when you set up field validation, FileMaker uses a generic message of its own. This message dryly explains the validation option that's being violated, but may not be much help to whoever's using your database. Once you understand how FileMaker's validation messages work, try to improve upon them. You'll make your database a pleasure to use and give it professional quality. For example, if you've turned on the "Allow user to override during data entry" option, FileMaker asks if the user wants to allow the value anyway (shown in the top image). Otherwise, it tells them to fix the field (shown in the bottom image). In either case, the message box includes a Revert Field button. This button takes away any changes someone's made to the field so that it returns to its previous valid value, but how's the user supposed to know that? Instead, phrase the custom message as a question where Yes means "I want to keep what I've entered" and No means "I'll change it." When it shows your message, FileMaker automatically provides the Yes and No buttons, along with the Revert button. If you turn off the ability to override the validation and you're showing a custom message, FileMaker replaces Yes and No buttons with just an OK button. In this case, the message should not be in question form. Instead, it should simply tell them what's wrong. Finally, if the field value violates several validation options, the user must click Yes to a message about each one before FileMaker allows the value. Since all these error messages are annoying, you're better off using a custom message that explains all requirements. 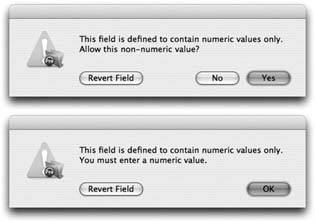 |
But data type and character count are just two of the eight kinds of validations FileMaker has up its sleeve. In the Validation tab of the Field Options dialog box, there are six more checkboxes. Most of them work much the same way: They check what you type against some specific condition. But one option, "Validate by calculation," offers a completely flexible way to describe exactly what you're looking for. Unfortunately, to use it, you need to learn how to perform calculations (mathematical or logical formulas) with your FileMaker data. They're covered in Part 3. Until then, here's what the other options do:
3.3.3.1. Strict data type
This option lets you pick four specific validations. You've already seen Numeric Only, which insists every character in your text field be a number. 4-Digit Year Date tells FileMaker to expect a date value, and that the year must be four digits long (2006 instead of 06). This choice works with text, date, and timestamp fields.
Finally, Time of Day tells FileMaker that only time values that represent real clock times are acceptable. Since time fields can hold any number of hours, minutes, and seconds, you can enter something like 237:34:11 to mean "237 hours, 34 minutes, 11 seconds." But if the field is supposed to be the time of your lunch meeting, that value doesn't make sense. This option prevents its entry. It applies to text and time fields (Timestamp fields always require a time of day).
3.3.3.2. Not empty
If you insist on having something in a field, select the "Not empty" validation option. That makes FileMaker complain if you try to exit the record without entering a value. This option is the only simple validation option for container fields.
3.3.3.3. Unique
The "Unique value" option prevents you from putting the same thing in a field for two different records. For example, if you set this option for the First Name field in your database, you can't enter two people with the name "Bill." You would typically use this option for ID numbers, usernames, or other things that are supposed to uniquely identify a single person.
3.3.3.4. Existing value
"Existing value" is just the opposite of "Unique value;" it doesn't allow any value that isn't already in that field on some record in the database. This option usually doesn't make much sense unless you turn it on after you've entered a representative amount of information into the database. Otherwise, the first record you enter would dictate the field value for every record created thereafter.
3.3.3.5. Member of value list
You often have a field that can contain any one of a predetermined set of things. In your database, for example, you might want to ensure that the State field contains one of the 50 real states. This is where the "Member of value list" option comes in.
FileMaker lets you define something called value lists. These lists are, quite simply, lists of values: Red, Green, Blue; or Small, Medium, Large, for instance. You can make as many value lists as you want.
Note: You can see a value list in action in your Contact Management database. Just click the Address Type field. The items in this list let you mark the kind of address you're storing in each record.
- Open the Field Options dialog box for the State field.
Your mouse is probably able to get there by itself by now.
- On the Validation tab, turn on the "Member of value list" checkbox. Then, from the associated pop-up menu, choose Define Value Lists.
FileMaker shows you the Define Value Lists dialog box.
- Click New.
FileMaker creates a new empty value lists and shows it to you in the Edit Value List window (shown in Figure 3-10).
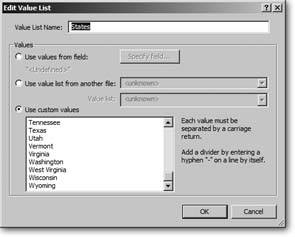
Figure 3-10. A value list lets you specify exactly what entries a field can accept. This value list defines the 50 states in the U.S.
- In the Value List Name field, enter States.
Each value list has a unique name.
- Make sure the "Use custom values" radio button is selected, and enter state names in the list box under it.
As usual, you'll need to ignore several available options for now, and focus on "Use custom values." Each item in a value list must be on its own line. You can paste into this box as well, so if you find a list of states on the Internet, you can save yourself a lot of typing.
- Click OK to close the Edit Value List window.
The Define Value Lists window now shows your new value list.
- Click OK again to close the Define Value Lists dialog box.
Back in the Field Options window, the value list you just created should now be selected in the "Member of value list" pop-up menu. If it isn't, select it now.
- Click OK to dismiss the Field Options and Define Database dialog boxes.
You can now try entering a value in the State field that isn't in the value list. FileMaker will let you know you've messed up.
Note: Value lists are actually used for more than just validation. You'll learn how to create and edit them outside this dialog box in Chapter 6. You'll learn other uses for value lists throughout the book.
3.3.3.6. In range
"In range" lets you specify a minimum and maximum allowable value. FileMaker then protests if you enter a value outside this range. This method works for all the standard data types, since they all have a concept of order. For example, if you specify a range of Adam to Johnson for a text field, validation fails for Schultz. Range validation is most common, however, with number, date, and time values. You might require the Age field to be between 0 and 100, for example, or the Birth Date to be between 1/1/1900 and 12/31/2003.
3.3.3.7. Maximum number of characters
As previously mentioned, this option enforces a limit on the number of characters you can enter into a field. FileMaker fields can normally hold a huge amount of text. This option lets you keep things under control. You can use it to require specific kinds of information, like the five digit Zip code above, or to prevent abuse of the database (by, for example, limiting the First Name field to 30 characters so someone doesn't get carried away and paste The Complete Works of Shakespeare into it).
3.3.4. Storage Options
It's time to get a little technical. Sorry. In the Field Options dialog box (Figure 3-11), the Storage tab lets you control aspects of a field related to the nebulous concept of storage. Like a highly organized attic, FileMaker both holds onto your information and makes it easy to take out again. There are lots of details involved in how FileMaker compartmentalizes and maintains that information.
| WORKAROUND WORKSHOP Minimum Number of Characters |
|
For some strange reason, FileMaker doesn't provide a simple validation option to enforce a minimum number of characters in a field. You often need to limit characters, but you have to dip into validation calculations to meet it. Luckily, the calculation to do it is really simple. Here's a validation calculation for requiring at least five characters in the field: Length(Field Name) >= 5 To use this calculation, turn on the "Validate by calculation" option. In the window that appears, type this calculation. You'll have to change "Field Name" to the name of your field. If you want a number other than five, simply change it in the calculation. When you're done, click OK. If you want more than five characters, change >= to simply >. If you want exactly five characters (no more, no less) then change >= to =. You don't need a lot of expertise for this calculation. (See Chapter 9 for much more on using calculations.) |
You can actually tell FileMaker to store only one value in a field, no matter how many records you have, or to allow one field to hold more than one value in each record. Strange, but true. Also, you get control over indexing, as described in the next section.
|
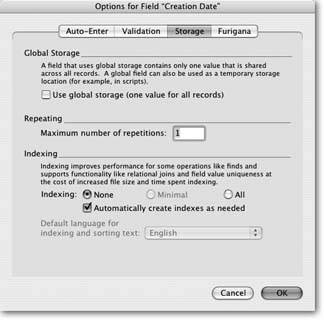
3.3.4.1. Global storage
"A field that uses global storage contains only one value that is shared across all records." So says the explanatory text in the dialog box, but what's that in English? When you use the "Use global storage" option, everything you learned about tables goes out the window. A global field isn't a column in the table at all. Rather, it's a single bit of storage that can hold one value, no matter how many records you have. In other words, if you change the contents of a global field on one record, FileMaker instantly changes it in every other record as well. Now every record has the same value for that field.
Suppose your company is planning a move or name change in the future, but you aren't ready to change your database just yet. In that case, you can make your company's name, address and phone number fields use global storage. You can even make a global container field and pop your company logo into it. Then, you'd just make your database's layouts display those fields instead of the actual company information. (See Chapter 4 for details on designing layouts.) When the company makes its move, you just place the new name, address, logo, and so on into your global fields, and voila! FileMaker changes them across the board.
If you use global fields for information that you might use throughout your database, you don't even have to remember every place you put the company information. When you update a global field, FileMaker finds every place that field shows up and makes the change consistently.
Note: There's an exception to everything, and indeed there's one situation where global fields don't instantly change everywhere for everybody. For details on how globals operate in shared files, see the box on Section 18.3.2.1.
3.3.4.2. Repeating fields
A field can only hold a single value, right? Erm…well, not really. If you want to, you can turn any field into a repeating field. These fields can hold more than one value, each kept in a separate spot (and each shown in its own little field in the database window). In the Field Options dialog box, you specify the maximum number of values the field can hold. When would you want to use this limit? Almost never. See the box on Section 3.3.4.2 for more info.
Note: The last tab in the Field Options dialog box applies only to Japanese text entry, and isn't covered in this book. Fortunately, should you ever need to add furigana to your kanji, you can read how right in the dialog box.
3.3.5. Indexing
Since you're reading this book, you're probably hoping FileMaker can help you search through volumes of information faster than you could do it yourself, especially as your database grows from a simple electronic Rolodex to a humungous mailing list. When you're looking for the three people out of 5,000 whose birthday is February 29, FileMaker can find them in an instant because it doesn't really look at the birthday field on each record one-by-one. Instead, it uses the field's index to skip straight to the appropriate records. It's much as you'd use a book's index to go directly to the pages that mention the topic you're interested in, rather than skimming every single page in the book.
| WORKAROUND WORKSHOP Repeating Fields Aren't Your Friends |
|
With very few exceptions, repeating fields cause more trouble than they're worth. The truth is, they only exist because years ago when FileMaker was a youngster, it wasn't a relational database. That means it didn't have any way to tie multiple tables together so that they can share information and make connections between things in each table. When you were learning about how to pick fields, you were introduced to the concept that you need a table for each kind of thing you're keeping track of. In a database that's not relational (called a flat file database), there's no good way to track lots of different kinds of things in one database, so FileMaker had repeating fields to let you store more than one thing in a single record. For example, you could have an Invoice table with one record for each invoice. The individual items on the invoice need a place to go too, so you would create repeating fields. That way, each individual invoice could hold, say, 20 items. But this is the 21st century, and FileMaker's come a long way. Nobody in her right mind would build an invoice database that way anymore (they'd hook together two tables insteadsee Part 4). Since FileMaker had repeating fields ten years ago, and since it's really friendly about supporting all your ancient databases, it still supports repeating fields today. That said, repeating fields are occasionally useful when writing calculations (Part 3) and scripts (Part 5). Other than that, you should avoid them like the plague for a few reasons:
Repeating fields are inherently limited: If you define a field to have 20 repetitions, you get 20 spots for data. If you need less, you're looking at empty fields all the time. If you need more, you have to modify your fields and make room in the window. A relational database, on the other hand, can grow and shrink as needed without modifying the database structure at all. |
Note: FileMaker uses a field's index in other ways too. You need an index if you want to use the "Unique value" option in the field Validation screen. You also need indexed fields to create relationships in your data, as explained in Part 3.
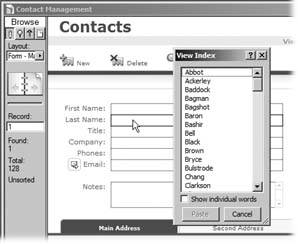
FileMaker's indexing feature takes its own computerized notes on your fields in advance, so that when you enter Find mode (Section 1.6.3), the hard work's already been done and your Finds go that much faster. To take a peek at what a field index might look like, see Figure 3-12.
Just like a book, you can have a field without an index. When FileMaker needs to find records based on what's in that field, it has to check every single recorda process that can take noticeably longer in big databases. On the down side, an index takes up space. If this book didn't have an index, it would be a fair bit shorter, and the same goes for a field's index. A database with indexed fields takes up significantly more space on your hard drive than one with no indexed fields. See the box below for more detail on this dilemma.
|
| FREQUENTLY ASKED QUESTION The Dark Side of Indexing |
|
If indexing makes searching faster, why not just index every field? Indexes have disadvantages as well. First, an index is only useful if it's up to date. When you change a field value, FileMaker has to store that new value in the table. If the field is indexed, it also has to update the index so that it knows about the changes to the field. Updating the index takes time (not much time, mind you, but it does take time). When you're editing records in Browse mode, you'll never notice because updating the index for a handful of fields takes FileMaker less time than it takes you to realize you've pressed Enter. But if you're entering lots of information (like when you're importing records, as discussed in Chapter 16), the index updating can slow things down noticeably. |
3.3.5.1. Automatic indexing
The good news is you almost never need to think about indexing. FileMaker has a really smart way of dealing automatically with indexing: Every field starts out with no index at all, to save space and keep things as fast as possible. Later, while you're working with your database, if you do something that would be made faster with an index, like use the field in a find request, FileMaker automatically turns indexing on for you. That first find is slow as FileMaker looks through records one-by-one and builds the index (showing a progress bar in really big files), but since the field is now indexed, subsequent finds happen quickly. You almost always want this automatic behavior.
3.3.5.2. Controlling indexing manually
In very large databases, there may come a time when you want to adjust indexing manually. For instance, if you never again plan to search for someone by Middle Initial, you can turn off that field's indexing to reclaim the space it's using. Click the None radio button to turn indexing off completely. If you want to be able to search efficiently in a field, turn on All instead. The third choiceMinimalcreates a smaller index for the field. This index has everything FileMaker needs for relationships and field uniqueness, but not enough for fast searching. If you don't need to search in a field, but you do need it indexed for other reasons, choose Minimal.
When None is selected, you can keep FileMaker's automatically-turn-it-on-when-I-need-it behavior by turning on "Automatically turn indexing on if needed."
Note: FileMaker uses the field index when you do a find from Find mode, but not when you use the Find/Replace command. The index points FileMaker to records, and since Find/Replace doesn't find records (as discussed on Section 2.5.1), the index does it no good. Therefore, when you do a Find/Replace, you don't make FileMaker automatically index a field. Only two actions trigger indexing: using the field in a find request, and using the field in a relationship. You'll learn about relationships in Part 4.
| POWER USERS' CLINIC Put Automatic Indexing to Use |
|
FileMaker's ability to automatically index a field when it becomes necessary doesn't just save you the trouble of thinking about all this stuff. You can also use it to your advantage in some situations. Sometimes people need to distribute databases full of information. For example, suppose you have a large parts catalog that's stored in a database, and you want your distributors to be able to use the database themselves to find parts. You can make a real FileMaker database available on your Web site for them to download, complete with your 10,000 parts records. If there's a lot of info about parts, that database is pretty big. To make the download more palatable, tell FileMaker not to index any of the fields. But leave "Automatically turn indexing on if needed" turned on, to make the database as small as possible when people download it. Once people get it, they can start performing finds. As they do, FileMaker automatically indexes fields, making searches faster, and ballooning the size of the database. |
3.3.5.3. Indexing language
In order to keep its indexes as small and tidy as possible, FileMaker doesn't actually store all a field's text in the index. Instead, it performs a little cleanup on the field values first. Most notably, it gets rid of the notion of upper case and lower case letters: Bill and bill become the same entry in the index. It also splits the field value up into individual words and removes any characters that aren't generally part of a normal word. In order to do that, it needs to know what language the text in the field is in. For example, if your field holds text in French, then you wouldn't want searches for "la" to match find records with "là," (in French, the accent mark makes those two different words entirely). But when indexing in English, FileMaker ignores those markings, since they don't matter. Normally, all indexes assume the language is English. You can select a different language from the dialog box's Indexing section's pop-up menu. You also use the language setting when you sort records. FileMaker decides what order words go in depending on the text language.
Note: If the Language pop-up menu is unavailable, the field is probably not a text field. You can specify the language only for text fields.
| POWER USERS' CLINIC Unicode Indexing |
|
One language option, called "Unicode," isn't a language at all. This setting tells FileMaker to forget everything it knows about languages and use the internal code numbers for each character as is. When indexing with this language option, FileMaker doesn't remove any special characters from the index, and it doesn't ignore upper and lower case letters. A find in such a field is case sensitive. When sorting, FileMaker also uses the character code numbers. Whichever code is lower comes first in the sort order, so capital Z comes before lowercase A. It's rare that you'll want your searches and sorts to be case sensitive, but if you do, you have the option. You're more likely to use Unicode indexing when you want to easily search for punctuation. For example, a field that holds text from a business-to-business EDI document might be well served by Unicode indexing so you can easily find the records that contain "~BIG." |
Part I: Introduction to FileMaker Pro
Your First Database
- Your First Database
- An Very Quick Database Tour
- Creating a New Database
- Opening and Closing Database Files
- Saving Your Databases
- Adding Records to Your Database
- Navigating Your Database
- Same Database, Multiple Windows
Organizing and Editing Records
- Organizing and Editing Records
- Views
- Advanced Find Mode
- Changing Multiple Records
- Sorting Records
- Editing Whats in Your Fields
- Paragraph Formatting
- Beyond Text: Container Fields
- Checking Spelling
- Printing and Preview Mode
Building a New Database
- Building a New Database
- Tables and Fields
- Defining Fields
- Advanced Field Options
- Bringing It All Together
Part II: Layout Basics
Layout Basics
Creating Layouts
Advanced Layouts and Reports
- Advanced Layouts and Reports
- Setting up Field Controls
- Adding Field Controls to Layouts
- Field Behavior
- Tab Order
- Print-Related Layout Options
- Format the Number/Date/Time/Graphic
- Adding Buttons
- Tab Panels
- Reports and Summary Fields
Part III: Multiple Tables and Relationships
Multiple Tables and Relationships
- Multiple Tables and Relationships
- Relational Databases Explained
- Modeling Your Database
- Creating a Relational Database
- Relational Databases
Advanced Relationship Techniques
- Advanced Relationship Techniques
- Creating Related Records
- Table Occurrences
- Managing Data with Data Tunneling
- Building a Data Tunneling Interface
- Connecting Databases
- Lookups
- Advanced Relationships
Part IV: Calculations
Introduction to Calculations
- Introduction to Calculations
- Understanding Calculations
- The Structure of a Calculation
- Creating a Calculation Field
- Auto-Enter Calculations
- Validate Data Entry with a Calculation
- Replacing Data Using a Calculation
- Comments
Calculations and Data Types
- Calculations and Data Types
- Number Crunching Calculations
- Going Beyond Basic Calculations
- Text Parsing Calculations
- Date and Time Calculations
- Containers in Calculations
Advanced Calculations
- Advanced Calculations
- Stored, Unstored, and Global Fields
- Logical Functions
- The Let Function and Variables
Extending Calculations
Part V: Scripting
Scripting Basics
- Scripting Basics
- Your First Script
- The Importance of the Layout
- Running Scripts
- Branching and Looping in Scripts
Script Steps
- Script Steps
- Go to Layout
- Scripting for Fields
- Working with Records
- Finding Records
- Sorting Records
- Working with Windows
- Working with Files
- Printing
- Other Script Steps
Advanced Scripting
- Advanced Scripting
- Commenting Scripts
- Asking and Telling the User
- Organizing Complex Scripts
- Handling Errors
- Putting a Complex Script Together
Part VI: Security and Integration
Security
Exporting and Importing
- Exporting and Importing
- Exporting a File
- Export Formats
- Importing Data
- Import Data Sources
- Importing and Exporting in a Script
Sharing Your Database
- Sharing Your Database
- FileMaker Network Sharing
- Sharing Over the Internet
- FileMaker Server
- Server Hardware
Developer Utilities
- Developer Utilities
- Script Debugger
- Disable Script Steps
- The Database Design Report
- Tooltips
- Copying Database Structure
- Custom Menus
- Developer Utilities
- File Maintenance
Part VII: Appendixes
Appendix A. Getting Help
EAN: 2147483647
Pages: 176
- Using SQL Data Definition Language (DDL) to Create Data Tables and Other Database Objects
- Using Data Control Language (DCL) to Setup Database Security
- Performing Multiple-table Queries and Creating SQL Data Views
- Understanding SQL Subqueries
- Understanding Transaction Isolation Levels and Concurrent Processing
