Navigating Your Database
As exciting as it is to enter data into a databasewell, the first time anywaychances are you'll also want to look at those records again at some point. In fact, some might say that's the whole point of building a database. But first, you need to learn how to navigate around the records in the database, which this section explains. Fortunately, moving around a database isn't nearly as tough as following maps and highway signs in a foreign country. FileMaker makes it easy to skip from one record to the next, all the while keeping you abreast of where you are.
Tip: As you go through this section on navigating, it helps to have a database open in front of you so you can follow along and try some of these techniques. Since you probably don't have many records in the Contact Management database you just created, there's a sample one for you to download on the "Missing CD" page at www.missingmanuals.com (Section 3.4.5).
1.6.1. Navigating Record by Record
In the Contact Management database, you can add as many records as you want. But you can view only one at a time in the window FileMaker displays. To tell FileMaker which record you want to look at, you have three options:
- The book icon lets you flip from record to record one at a time. Pretend your database is a book, with each record on its own page. To get to the next record, click the right-hand page. To go back, click the left-hand page. If you can't go any further in one direction, the appearance of the icon's "page" changes, as shown in Figure 1-10.
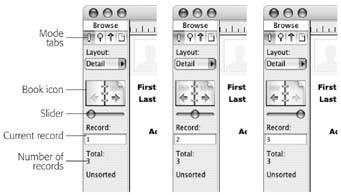
Figure 1-10. The status area is the key to record navigation. In addition to displaying the controls for switching records, the status area indicates where you are in the database. This series of pictures, for example, shows the status area when you're on the first record in the database (left), a record in the middle of the database (middle), and the last record (right). Notice how the appearance of the Book icon and slider changes in each picture.
- The slider is kind of a turbo-charged version of the Book icon. Instead of clicking once for each record, you can advance through a bunch of records by dragging. If you know approximately where you want to go (like "around half way" or "about one-third from the end") then the slider is the quickest way to get there. The slider is most handy when you want to get to the beginning or the end of the database. In that case, just drag the slider as far as it will go in either direction.
- The Current Record indicator serves two purposes. First, it shows you which record you're on. Second, if you know which record you want to be on, you can simply type in the record number to jump to it. Below the Current Record, the status area also shows you how many records are in your database.
1.6.2. Keyboard Shortcuts
FileMaker also has a few keyboard shortcuts to make record navigation painless. If you haven't used a database program before, you'll notice that some keys act in ways you might not expectlike the Enter key, as described below. Still, spending a little time getting used to using these keystrokes will save you hours of time down the road.
- To go to the next record, press Ctrl (Control)-Down Arrow.
- To move to the previous record, press Ctrl (Control)-Up Arrow.
- If you press Esc, you'll jump immediately to the Current Record field, ready to type in a record number. (This shortcut only works when you're not in the record; see Section 1.5.3.)
- Pressing the Enter key commits the record (Section 1.5.3), rather than inserting a new line in a field, as you might expect based on what the Enter key does in other programs. To insert a new line in FileMaker, press the Return key.
Note: On some keyboards, there isn't a Return keyinstead, two keys are labeled Enter. In this case, the Enter key that's near the number keypad commits the record, while the other (normal) Enter key enters a blank line in the field. - Pressing the Tab key moves you from one field to another. (To indent a line you have to type a tab character into a field, by pressing Ctrl+Tab [Option-Tab].)
Finally, bear in mind that you can change these things on a field-by-field basis when you're designing a database, as you'll learn in Chapter 3. For instance, FileMaker lets you decide that Returnnot Tabshould move you from field to field. If you make that choice, Tab types a tab into a field, and Return doesn't insert a blank line. There's unfortunately no way for you to tell which key does what by looking at a fieldyou just have to try some of these keys to find out.
1.6.3. Finding Records
When your database really gains some size, you'll realize that even keyboard shortcuts aren't the fastest way to get to the record you want. You need to tell FileMaker to pull up the record for you. For example, you have a season's ticket holder whose last name is Spinnet and who just renewed her subscription for a year. You need to find her record and make the update, and you don't have all day.
Suppose you have 126 records in your Contact Management database; it could take ages to find the one you want just by clicking the Book icon. Instead, switch to Find mode and tell FileMaker what you're looking for, and the program finds it for you. This section explains how to use Find mode to search for a record or group of records, and how to edit your search if you don't get the results you anticipated. (If you downloaded the example file discussed on Section 1.6.1, you can open it and try out Find mode now.)
You can get to Find mode in four ways:
- Select Find from the Mode Pop-up menu.
- Choose View
 Find Mode.
 - Press Ctrl+F (
 -F).
-F).
The Mode pop-up menu, Mode tabs, and View menu all indicate what mode you're currently in. Once you're in Find mode, your window should look like Figure 1-11.
|
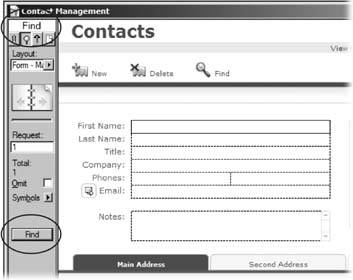
Find mode looks just like Browse mode (where you've spent all your time up until now). The best way to tell that you're in Find mode is to look for clues in the Status area or Mode pop-up menu. Find mode also seems to work the same wayyou can edit data in your fields and add, delete, or navigate through records. But don't be deceived: Find mode is very different from Browse mode.
Note: Another subtle clue indicates you're in Find mode: The borders around fields have a dashed-line appearance when the record is active. In Browse mode, active fields are bordered by a dotted line.
Even though it may seem like you're editing records in Find mode, you're actually notyou're editing requests instead. Requests describe what certain records look like, so FileMaker can find them for you.
| UP TO SPEED Numbers Sometimes Lie |
|
When you first create a database, FileMaker numbers each new record as you add itwith a record number that appears in the book icon (see Figure 1-10). You may think that this number is a great way to locate a particular record later: "I need to call and wish Mom happy birthday. I remember I put her contact information in record #79. I'll just go to that number." Since record numbers may change as you add and delete records from a database, though, the record number isn't necessarily a reliable way to identify one particular record. For instance, if you delete the first record in a database, every record below it moves up one slot. Now, what used to be record No. 2 becomes record No. 1, what used to be No. 3 is now No. 2, and so on. Your mom could have a few more candles on the cake before you find her number that way. If you want to assign every record its own number, and have that number stay with the record forever, then you want a serial number. They're discussed in Chapter 3. |
You just need to enter enough information to tell FileMaker what you want. It then looks for records that have the same information you entered, much like searches you conduct using other programs.
1.6.3.1. Performing a Find
Say you want to find every person in your Contact Managements database whose last name is Spinnet. Here's what you would do:
- Choose View Find Mode (or use any of the other methods described above to get to Find mode).
Type Spinnet into the Last Name field.
This works just like Browse mode: Simply click to place your cursor in the field and then type. (Remember, you aren't editing a recordyou're editing a request.)
- Click the Find button in the Status area.
(You can also choose Requests
images/U2192.jpg border=0> Perform Find or simply press Enter.)
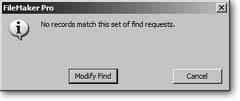
FileMaker then looks for any records that have "Spinnet" in the Last Name field. If the program doesn't find any, you see the message pictured in Figure 1-12. On the other hand, if FileMaker did find some records, you wind up back in Browse mode, presented with the records FileMaker found. (Technically, these records are called a found set. You'll learn much more about found sets in the next chapter.)
|
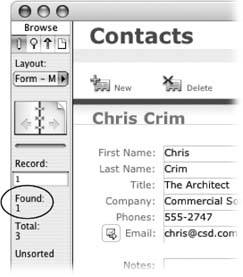
After you perform a find, FileMaker displays the set of records that matched your find request (in this case, all the records with the last name Spinnet). You can see how many records you found by looking at the count in the Status area, as shown in Figure 1-13.
Although you're in Browse mode, you can't look through every record in the databasejust the ones FileMaker found.
|
Tip: If your find didn't come out exactly the way you wanted, don't just return to Find mode. If you do, you'll have an empty request, and have to start all over again. Instead, choose Records Modify Last Find, which takes you to Find mode and displays the request you used last. Now you can simply make any necessary modifications and perform the find again.
GEM IN THE ROUGH
Don't Forget You're in Find Mode
Find mode looks so much like Browse mode that it's easy to forget which mode you're in. This may not seem like a big deal, but it can be a real drag if you think you're in Browse mode and you start entering data. Since find requests look a lot like records, you can make quite a bit of progress entering records and never realize your mistake. When you finally do figure it out, it's a rude awakening: None of the requests you've just entered can be turned into real records; you must re-enter them all in Browse mode.
Luckily, FileMaker is nice enough to give you a warning if it thinks you might be confused. If you create more than ten find requests while in Find mode, FileMaker shows this message. If you were entering data in Find mode by mistake (at least you're finding out now, not after you've typed for three hours), just click No, switch to Browse mode, and start over with your data entry. If you know you're in Find mode, and you really want to add all these requests, just click Yes. FileMaker won't bother you again.

Say you need a list of everybody in the Contact Management file who has an email address from Hogwarts School. Flip to any record with a Hogwarts.ac.uk email address. Drag to select the word "hogwarts." You can do the whole Hogwarts.ac.uk if you're feeling vigorous, but "hogwarts" is enough to find the records you need. Right-click the highlighted text (Control-click on the Mac).
From the shortcut menu that pops up, select "Find Matching Records (Figure 1-14)." Bam! FileMaker shows you a found set of all your Hogwarts email contacts.
Part I: Introduction to FileMaker Pro
Your First Database
- Your First Database
- An Very Quick Database Tour
- Creating a New Database
- Opening and Closing Database Files
- Saving Your Databases
- Adding Records to Your Database
- Navigating Your Database
- Same Database, Multiple Windows
Organizing and Editing Records
- Organizing and Editing Records
- Views
- Advanced Find Mode
- Changing Multiple Records
- Sorting Records
- Editing Whats in Your Fields
- Paragraph Formatting
- Beyond Text: Container Fields
- Checking Spelling
- Printing and Preview Mode
Building a New Database
- Building a New Database
- Tables and Fields
- Defining Fields
- Advanced Field Options
- Bringing It All Together
Part II: Layout Basics
Layout Basics
Creating Layouts
Advanced Layouts and Reports
- Advanced Layouts and Reports
- Setting up Field Controls
- Adding Field Controls to Layouts
- Field Behavior
- Tab Order
- Print-Related Layout Options
- Format the Number/Date/Time/Graphic
- Adding Buttons
- Tab Panels
- Reports and Summary Fields
Part III: Multiple Tables and Relationships
Multiple Tables and Relationships
- Multiple Tables and Relationships
- Relational Databases Explained
- Modeling Your Database
- Creating a Relational Database
- Relational Databases
Advanced Relationship Techniques
- Advanced Relationship Techniques
- Creating Related Records
- Table Occurrences
- Managing Data with Data Tunneling
- Building a Data Tunneling Interface
- Connecting Databases
- Lookups
- Advanced Relationships
Part IV: Calculations
Introduction to Calculations
- Introduction to Calculations
- Understanding Calculations
- The Structure of a Calculation
- Creating a Calculation Field
- Auto-Enter Calculations
- Validate Data Entry with a Calculation
- Replacing Data Using a Calculation
- Comments
Calculations and Data Types
- Calculations and Data Types
- Number Crunching Calculations
- Going Beyond Basic Calculations
- Text Parsing Calculations
- Date and Time Calculations
- Containers in Calculations
Advanced Calculations
- Advanced Calculations
- Stored, Unstored, and Global Fields
- Logical Functions
- The Let Function and Variables
Extending Calculations
Part V: Scripting
Scripting Basics
- Scripting Basics
- Your First Script
- The Importance of the Layout
- Running Scripts
- Branching and Looping in Scripts
Script Steps
- Script Steps
- Go to Layout
- Scripting for Fields
- Working with Records
- Finding Records
- Sorting Records
- Working with Windows
- Working with Files
- Printing
- Other Script Steps
Advanced Scripting
- Advanced Scripting
- Commenting Scripts
- Asking and Telling the User
- Organizing Complex Scripts
- Handling Errors
- Putting a Complex Script Together
Part VI: Security and Integration
Security
Exporting and Importing
- Exporting and Importing
- Exporting a File
- Export Formats
- Importing Data
- Import Data Sources
- Importing and Exporting in a Script
Sharing Your Database
- Sharing Your Database
- FileMaker Network Sharing
- Sharing Over the Internet
- FileMaker Server
- Server Hardware
Developer Utilities
- Developer Utilities
- Script Debugger
- Disable Script Steps
- The Database Design Report
- Tooltips
- Copying Database Structure
- Custom Menus
- Developer Utilities
- File Maintenance
Part VII: Appendixes
Appendix A. Getting Help
EAN: 2147483647
Pages: 176
- Physical (Environmental) Security
- Understanding Certification and Accreditation
- Initiation of the System Authorization Process
- Appendix C The Information System Security Architecture Professional (ISSAP) Certification
- Appendix E The Information System Security Management Professional (ISSMP) Certification
