Printing and Preview Mode
All this talk about the wonders of an electronic database may leave you thinking FileMaker has nothing to do with paper, but that's not true. It's a cruel fact of life that eventually you'll need to put your data on paper. You might want mailing labels for all your customers in Canada, or a special printed form prefilled with patient information for insurance filing. Sometimes you just need your data with you when you're away from your computer. As you'll learn in Part 2, you can arrange the data any way you want in FileMaker, and make certain layouts that are particularly suitable for printing. But for now, remember that FileMaker lets you print anything you see onscreen (just choose File images/U2192.jpg border=0> Print). Its Print dialog box has a few special options, as shown in Figure 2-25. (In Mac OS X, you have to choose FileMaker Pro from the pop-up menu to see them.)
|
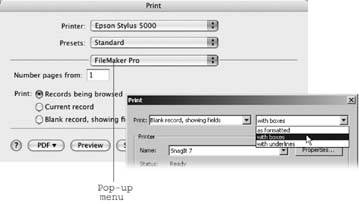
- Records being browsed tells FileMaker to print every record in the found set (Section 1.6.3.2). If you want to print all your Canadian customers, choose this option.
- Current record will print just the current record, which comes in handy when you just want to print one thing: your doctor's contact information to keep in the car, perhaps, or maybe Aunt Edna's candied yams recipe.
- Blank record, showing fields causes FileMaker to print what's onscreen with no data at all. You can change the look of each field to a box or an underline if you want (just pick your choice from the pop-up menu shown in Figure 2-25). You would choose this option if you wanted to hand out pages for people to fill out with a pen (it's a kind of antique writing device), and later type their responses into the real database.
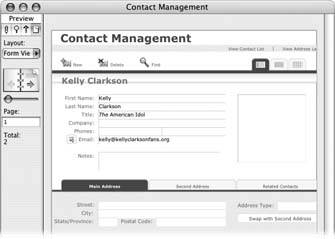
To see how the printout is going to look without committing trees to it, you can use Preview mode (Figure 2-26). You access Preview mode via the View menu, the Mode pop-up menu, or the Mode tabs.
Preview mode shows you what your database looks like as though it were printed on paper. For instance, you can see whether FileMaker's going to chop any information off to fit on the page (anything beyond the width of the page simply isn't printed). Preview mode also indicates the margins and lets you flip through the file page by page using the Book icon.
|
Note: When you first go to Preview mode, the page count says "?" instead of the number of pages. FileMaker actually doesn't know how many pages it's going to print until you force it to count them. To do so, just drag the Record Slider all the way to the right, which tells FileMaker you want to see the last page. On its way there, FileMaker counts the pages, too. The process may take some time but FileMaker will catch up eventually.
All the standard page-setup options (Section 2.9) affect what you see in Preview mode. For example, if you change the paper orientation, Preview mode reflects the change right away. On some computers and printers, you can reduce the printout by a percentage.
When you reduce or enlarge in the Page Setup dialog box, Preview mode shows the page proportionately larger or smaller so you can see how the content area will fit on the page. (Which of these options are available to you depends upon the computer, operating system, and printer you're using.) The Zoom controls (Section 1.1.2.2) work in Preview mode, too. If the full page is too big to fit on your screen, just zoom out a bit to see the whole thing.
Part I: Introduction to FileMaker Pro
Your First Database
- Your First Database
- An Very Quick Database Tour
- Creating a New Database
- Opening and Closing Database Files
- Saving Your Databases
- Adding Records to Your Database
- Navigating Your Database
- Same Database, Multiple Windows
Organizing and Editing Records
- Organizing and Editing Records
- Views
- Advanced Find Mode
- Changing Multiple Records
- Sorting Records
- Editing Whats in Your Fields
- Paragraph Formatting
- Beyond Text: Container Fields
- Checking Spelling
- Printing and Preview Mode
Building a New Database
- Building a New Database
- Tables and Fields
- Defining Fields
- Advanced Field Options
- Bringing It All Together
Part II: Layout Basics
Layout Basics
Creating Layouts
Advanced Layouts and Reports
- Advanced Layouts and Reports
- Setting up Field Controls
- Adding Field Controls to Layouts
- Field Behavior
- Tab Order
- Print-Related Layout Options
- Format the Number/Date/Time/Graphic
- Adding Buttons
- Tab Panels
- Reports and Summary Fields
Part III: Multiple Tables and Relationships
Multiple Tables and Relationships
- Multiple Tables and Relationships
- Relational Databases Explained
- Modeling Your Database
- Creating a Relational Database
- Relational Databases
Advanced Relationship Techniques
- Advanced Relationship Techniques
- Creating Related Records
- Table Occurrences
- Managing Data with Data Tunneling
- Building a Data Tunneling Interface
- Connecting Databases
- Lookups
- Advanced Relationships
Part IV: Calculations
Introduction to Calculations
- Introduction to Calculations
- Understanding Calculations
- The Structure of a Calculation
- Creating a Calculation Field
- Auto-Enter Calculations
- Validate Data Entry with a Calculation
- Replacing Data Using a Calculation
- Comments
Calculations and Data Types
- Calculations and Data Types
- Number Crunching Calculations
- Going Beyond Basic Calculations
- Text Parsing Calculations
- Date and Time Calculations
- Containers in Calculations
Advanced Calculations
- Advanced Calculations
- Stored, Unstored, and Global Fields
- Logical Functions
- The Let Function and Variables
Extending Calculations
Part V: Scripting
Scripting Basics
- Scripting Basics
- Your First Script
- The Importance of the Layout
- Running Scripts
- Branching and Looping in Scripts
Script Steps
- Script Steps
- Go to Layout
- Scripting for Fields
- Working with Records
- Finding Records
- Sorting Records
- Working with Windows
- Working with Files
- Printing
- Other Script Steps
Advanced Scripting
- Advanced Scripting
- Commenting Scripts
- Asking and Telling the User
- Organizing Complex Scripts
- Handling Errors
- Putting a Complex Script Together
Part VI: Security and Integration
Security
Exporting and Importing
- Exporting and Importing
- Exporting a File
- Export Formats
- Importing Data
- Import Data Sources
- Importing and Exporting in a Script
Sharing Your Database
- Sharing Your Database
- FileMaker Network Sharing
- Sharing Over the Internet
- FileMaker Server
- Server Hardware
Developer Utilities
- Developer Utilities
- Script Debugger
- Disable Script Steps
- The Database Design Report
- Tooltips
- Copying Database Structure
- Custom Menus
- Developer Utilities
- File Maintenance
Part VII: Appendixes
Appendix A. Getting Help
EAN: 2147483647
Pages: 176
