Analysis and Design
Overview
"Absolute certainty about the fail-proofness of a design can never be attained, for we can never be certain that we have been exhaustive in asking questions about its future."
— Henry Petroski
To Engineer Is Human
Test Analysis and Design is the process of determining test objectives and how to organize the test objectives in a manner that supports efficient execution. There are many different design techniques available to the tester, and the choice of what technique to use is typically based on the nature of the system, the overall risk of the implementation, the level of test, and the skill set of the testers. It's also likely that on any given system, more than one technique will apply. This chapter will introduce the reader to some of the available techniques and will explain, in detail, how to use one of these techniques: inventories. Using inventories to develop a test design actually embodies several different testing techniques.
| Key Point |
Test objectives are broad categories of things to test. Test objectives are to testing what requirements are to development. |
Creating Inventories
Test objectives are broad categories of things that need to be tested for any given application. For example, the testers of a car insurance program might determine that the following objectives exist: type of car, geographic region, age of driver, age of car, safety features of the car, security features of the car, deductible amount, primary use of the car, and so forth.
The inventory is the actual list of things that need to be tested for each of the test objectives. For example, the inventory for type of car might include SUVs, sports cars, vintage cars, off-road vehicles, sedans, etc., as illustrated in Figure 5-1. Many objectives will be unique to the application being tested. Our insurance example used type of car as an objective, but this would certainly not be a test objective for an ATM application, or a grocery store point-of-sale application.
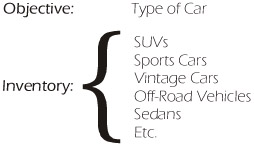
Figure 5-1: Inventory of Types of Cars
Some objectives, though, are universal enough that they can be called common. For example, one common objective is interfaces. It's highly likely that most applications would need to have all of their interfaces to other systems tested. Consequently, the testers of each application would need to create an inventory of interfaces unique to their particular application.
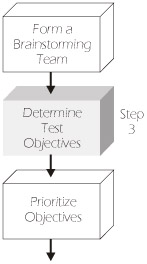
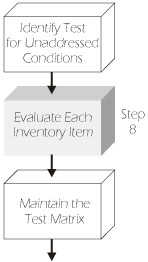
Creating inventories is a multi-step process that begins with gathering reference materials and "ends" with maintaining the testing matrix. We've developed a process, outlined in Figure 5-2, that uses objectives and inventories as the primary basis for test design.
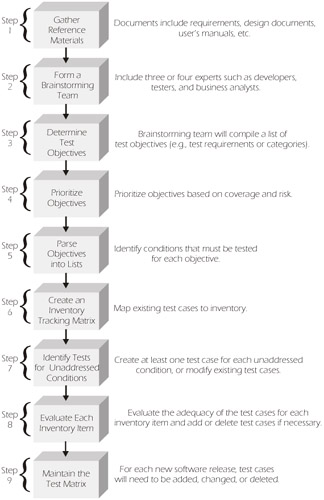
Figure 5-2: Process for Creating an Inventory
Step 1: Gather Reference Materials
The first step in creating an inventory is to gather all of the relevant documentation that you can find about the system. These may include:
- requirements documentation
- design documentation
- user's manuals
- product specifications
- functional specifications
- government regulations
- training manuals
- customer feedback
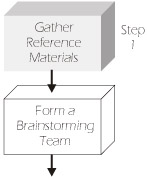
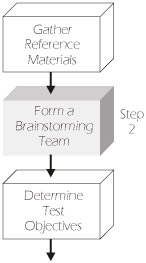
Step 2: Form a Brainstorming Team
The brainstorming team should ideally be made up of three or four subject-matter experts (but probably not more than seven or eight). Systems and business expertise are the two most sought areas of experience. Good brainstormers might include developers, testers, users, customers, business analysts, user representatives, system architects, and marketing representatives. The key is to get the people with the most knowledge of the business application and the systemic nature of the application (for existing systems). Our team might look like this:
|
Test Manager |
|
Systems Architect |
|
Senior Developer |
|
Business Analyst |
|
Marketing Representative |
Step 3: Determine Test Objectives
The idea behind the brainstorming session is to create lists of things to test. It's important not to scrutinize the list too closely up front and equally important not to get too detailed. In fact, we recommend that the team first just brainstorm the inventory topics (i.e., objectives). Examples of common requirements objectives include:
- Functions or methods
- Constraints or limits
- System configurations
- Interfaces with other systems
- Conditions on input and output attributes
- Conditions of system/object memory (i.e., states that affect processing)
- Behavior rules linking input and memory conditions (i.e., object states) to resultant functions
- Critical usage and operational scenarios
- Anything else to worry about, based on an external analysis of the system
Many other test objectives exist, and there will always be some that are unique to a particular system, but the above list gives you an idea of the kinds of things we're looking for. Another word of caution: don't be concerned about the overlap in the objectives or inventories. Remember, we're trying to determine what's possible to test by looking at the system from many viewpoints. We'll worry about eliminating redundancy in future steps.
The following list shows some of the test objectives that we compiled for an insurance company:
- Requirements
- Features
- Screens
- Error Messages
- Transaction Types
- Customers
- States (geographical)
- Type of Policy
- Type of Vehicle
- States (Effective)
Step 4: Prioritize Objectives
Once the high-level objectives have been determined, it's time to prioritize them. Normally we prioritize the objectives based on scope (i.e., breadth) and risk. It's always desirable to choose, as the highest priority, an objective (and its associated inventory) that has broad coverage of the system. Often, that will turn out to be the inventory of features, customer types, the requirements specification itself, or some other similar broad category. In our insurance company example, we took the requirements document and features as our two highest-priority objectives since they had the broadest scope.
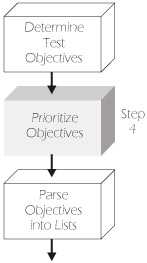
Step 5: Parse Objectives into Lists
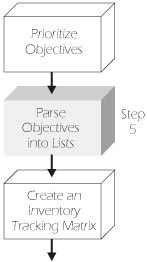
The next step in creating an inventory is to parse the objectives into lists (inventories). You should start with the highest-priority objectives and parse them into more detailed components. Lower-priority objectives will be parsed into more detail when, and if, time allows. The objective features, for example, can be parsed into the following inventory:
- Write a policy
- Add a driver
- Add a car
- Submit a claim
- Change address (same locale)
- Change address (different locale)
- Submit a bill
- Amend a policy
- Amend a bill
Later, if more time permits, the inventory could be expanded to a finer level of granularity:
- Write a policy
- Commercial
- Individual
- High-risk
- Stated Value
- Add a driver
- Under 16
- Over 16, under 65
- Male
- Female
- Driving School
- Record
- Good
- Bad
- Add a Car
- Type
- SUV
- Sports
- Pickup
- Type
- Security Devices
- Club
- Alarm
- Tracking Device
- Garaged?
- Etc.
Obviously, this inventory could be broken down even further. We recommend that you initially not try to make them too detailed, because creating the test cases can be overwhelming. If time allows, additional detail can always be added later.
Step 6: Create an Inventory Tracking Matrix
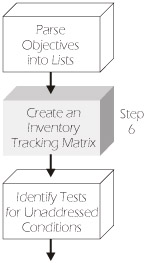
To create the matrix, list the objectives and their corresponding inventories down the left column of Table 5-1, starting with the number 1 priority objective, and then the number 2 objective, and so forth. Then, place any existing test cases from previous releases and testing efforts horizontally across the top of the table. This process of mapping existing test cases to the inventories is known as calibration because we are calibrating the test cases against a "known" entity (i.e., the inventories). If you think you have a pretty good set of test cases, but have never calibrated them, we believe most of you will be surprised to find that the coverage of your tests is not nearly as great as you might have imagined.
|
|

Notice that the first objective on our list is the requirements specification. The mapping of this inventory to the test cases is known as requirements traceability (shown in Table 5-1), which is a preferred practice of virtually every testing methodology. Notice that we've gone beyond just tracing to the requirements specification and have traced to the entire set of inventories. Most people will find that even if they have a good set of requirements, the additional inventories will identify many test scenarios that were "missed." Also note that one test case can cover multiple inventories. In Table 5-1, for example, Test Case #1 covers both Requirement 2 and Feature 4. This also demonstrates how the matrix can help reveal redundancies in the inventories and the test cases.
| Key Point |
Most people will find that even if they have a good set of requirements, the additional inventories will identify many test scenarios that were "missed." |
Step 7: Identify Tests for Unaddressed Conditions
In Table 5-2, you can see that existing test cases cover Requirements 2 and 3, and Features 1, 3, and 4. However, Requirement 1 and Feature 2 (refer to shaded rows) are not covered by any test. Therefore, it's necessary to create a test case or cases to cover these inventory items.
|
Objectives/Inventories |
Test Cases |
||||||
|---|---|---|---|---|---|---|---|
|
TC#1 |
TC#2 |
TC#3 |
TC#4 |
TC#5 |
TC#6 |
TC#7 |
|
|
Requirements |
|||||||
|
Requirement 1 |
|||||||
|
Requirement 2 |
X |
X |
X |
||||
|
Requirement 3 |
X |
X |
X |
||||
|
Features |
|||||||
|
Feature 1 |
X |
||||||
|
Feature 2 |
|||||||
|
Feature 3 |
X |
||||||
|
Feature 4 |
X |
X |
X |
||||
|
Objective A |
|||||||
|
Objective B |
|||||||
|
Objective C |
|||||||
|
NOTE: Objectives A, B, C, and so on may be other common objectives such as interfaces, configurations, etc. or they may be application-specific objectives. |
|||||||

In Table 5-3, notice that Requirement 1 is now covered by Test Case #1. It was possible to modify Test Case #1 to cover Requirement 1 and still cover Requirement 2 and Feature 4. It wasn't possible to modify an existing test case to cover Feature 2, so Test Case #8 was added and, later, Test Case #9 was added because we felt that Test Case #8 didn't adequately test Feature 2 by itself.
|
Objectives/Inventories |
Test Cases |
||||||||
|---|---|---|---|---|---|---|---|---|---|
|
TC#1 |
TC#2 |
TC#3 |
TC#4 |
TC#5 |
TC#6 |
TC#7 |
TC#8 |
TC#9 |
|
|
Requirements |
|||||||||
|
Requirement 1 |
X |
||||||||
|
Requirement 2 |
X |
X |
X |
||||||
|
Requirement 3 |
X |
X |
X |
||||||
|
Features |
|||||||||
|
Feature 1 |
X |
||||||||
|
Feature 2 |
X |
X |
|||||||
|
Feature 3 |
X |
||||||||
|
Feature 4 |
X |
X |
X |
||||||
|
Objective A |
|||||||||
|
Objective B |
|||||||||
|
Objective C |
|||||||||
|
NOTE: Objectives A, B, C, and so on may be other common objectives such as interfaces, configurations, etc. or they may be application-specific objectives. |
|||||||||
Rather than modify existing test cases, it's frequently easier to add new test cases to address untested conditions. Testers also have to be careful about making any one test case cover too many conditions. If the test fails, or has to be modified, it will possibly invalidate the testing of other conditions.
Step 8: Evaluate Each Inventory Item
Evaluate each inventory item for adequacy of coverage and add additional test cases as required – remember that this process will never truly be complete. The testers must use their experience and exercise their judgment to determine if the existing tests for each condition are adequate. For example, in Table 5-3 (above), we see that Requirement 1 is covered by test case #1. Does that one test case adequately cover Requirement #1? If not, Requirement 1 will have to be parsed into greater detail or more test cases will have to be created.
Case Study 5-1: These creative testers used ad hoc testing techniques to help evaluate their systematic testing process.
Bug Parties
I once had a student from a well-known company who said they used a similar process in their group. Testers were committed to developing and maintaining a systematic set of test cases. Testers also recognized, though, the value of creative or ad hoc testing, so they conducted something which they called a "bug party," every other Friday. At these bug parties, all test cases were thrown out for the day and the testers (and anyone else that wanted to "play") were urged to look for bugs. Prizes were awarded for the most bugs found, the biggest bug, and the most creative testing technique. The whole thing was a huge morale booster and resulted in finding many bugs, some of which were significant. But finding bugs, as important as it was, was not the purpose of the party. You see, they then wrote the test case that would have found the bug, which improved the coverage of their existing test set. But that wasn't the real reason they had the bug parties either. What they were really looking for were entire categories or lists (inventories) of things that they forgot to test. How interesting, they were using ad hoc testing techniques to validate the effectiveness of their systematic testing. Who says testers are not creative!
— Rick Craig
Step 9: Maintain the Testing Matrix
As the system matures and changes, so too should the testing matrix. The testing matrix is a reusable artifact that is particularly valuable in determining what regression tests to maintain and execute for any given release (at least which ones to begin with). The testing matrix is also a valuable tool to help in the configuration management of the test cases, since it helps relate the tests to the system itself. The maintenance of the matrix is a huge undertaking, but without it, the testers must virtually start over with the development of their tests for each new release. Not only is that a waste of time, but there's always the risk that some great test that was created for a previous release will not be remembered for this one.

Commercial tools are available to help document and maintain the inventories and test cases, but the effort required to maintain the testing matrix is still significant.
Design Analysis
The design can be subjected to the same process as described above. In fact, the design coverage can be added to the requirements traceability matrix as shown in Table 5-4.
|
Objectives / Inventories |
Test Cases |
||||||||
|---|---|---|---|---|---|---|---|---|---|
|
TC#1 |
TC#2 |
TC#3 |
TC#4 |
TC#5 |
TC#6 |
TC#7 |
TC#8 |
TC#9 |
|
|
Requirements |
|||||||||
|
Requirement 1 |
X |
||||||||
|
Requirement 2 |
X |
X |
X |
||||||
|
Requirement 3 |
X |
X |
X |
||||||
|
Features |
|||||||||
|
Feature 1 |
X |
||||||||
|
Feature 2 |
X |
X |
|||||||
|
Feature 3 |
X |
||||||||
|
Feature 4 |
X |
X |
X |
||||||
|
Design |
|||||||||
|
Design 1 |
X |
X |
|||||||
|
Design 2 |
X |
||||||||
|
Design 3 |
X |
X |
|||||||
Black Box vs White Box
Black-box testing or behavioral testing is testing based upon the requirements and, just as the name implies, the system is treated as a "black box." That is, the internal workings of the system are unknown, as illustrated in Figure 5-3. In black-box testing the system is given a stimulus (input) and if the result (output) is what was expected, then the test passes. No consideration is given to how the process was completed.
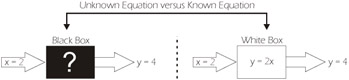
Figure 5-3: Black-Box versus White-Box Testing
| Key Point |
|
In white-box testing, an input must still produce the correct result in order to pass, but now we're also concerned with whether or not the process worked correctly. White-box testing is important for at least two reasons. Without peering inside the box, it's impossible to test all of the ways the system works (i.e., how the system works). While both black-box and white-box testing can determine if the system is doing what it's supposed to do, only white-box testing is effective at determining if the "how" part of the equation is correct. Generally speaking, if the result of a test is correct, we can assume that the process was completed successfully. This, however, is not always true. In some cases it is possible to get the correct output from a test for the wrong reason. This phenomenon is known as coincidental correctness and is not necessarily discovered using black-box techniques.
| Key Point |
White-box testing is also called structural testing because it's based upon the object's structure. |
Let's say that we have a system that's supposed to estimate hours based upon the complexity of the task being performed. As estimating experts (at least in this fictitious system), we know that the correct algorithm to predict the hours required to complete a certain task might be y=2x, where y is the time estimate and x is the complexity of the task. So, we know that if the complexity of a task has a value of 2, the task should take 4 hours to complete.
| Key Point |
Coincidental correctness describes a situation where the expected result of a test case is realized in spite of incorrect processing of the data. |
For example, if we input a value of 2 into the system and get an answer of 4, the system must be correct, right? It may be, or may not be. Suppose your programmer, for whatever reason, miscoded the algorithm and put in the formula y=x2 (instead of y=2x). If the poor tester is unfortunate enough to put in a test value of 2, the system will give the correct answer in spite of the bad code. However, this is only coincidental. If we run another test with a value of x=3, we would find that our system gives a result of 9 instead of 6!
To find bugs like these, we need to look inside the box. Whitebox testing would have been more effective in finding the sample bug than black-box testing (although probably the most effective way to have found the bug in the example would have been using code inspection). Another important point about white-box testing is that it allows the testers to use their knowledge of the system to create test cases based on the design or the structure of the code. However, in order to conduct whitebox tests, the testers must know how to read and use software design documents and/or the code.
| Key Point |
White-box is also known as clear-box, glass-box, translucent-box, or just about any other non-opaque box. |
Black Box Science
Several techniques fall into the category of black-box science. Some of these techniques include equivalence partitioning, boundary value analysis, design analysis, decision tables, domain analysis, state-transition diagrams, orthogonal arrays, and others. Some of these techniques are more useful at one level than another, while others can be used at any level of test. Table 5-5 lists the most appropriate use of the various techniques described in this chapter.
|
Method |
Unit |
Integration |
System |
Acceptance |
|---|---|---|---|---|
|
Equivalence Class Partitioning |
ü |
ü |
ü |
ü |
|
Boundary Value |
ü |
ü |
ü |
ü |
|
Inventories/Trace Matrix |
ü |
ü |
||
|
Invalid Combinations and Processes |
ü |
ü |
ü |
ü |
|
Decision Table |
ü |
ü |
ü |
ü |
|
Domain Analysis |
ü |
ü |
ü |
ü |
|
State-Transition Diagrams |
ü |
ü |
||
|
Orthogonal Arrays |
ü |
ü |
ü |
ü |
Equivalence Partitioning
Equivalence partitioning is a technique that is intuitively used by virtually every tester we've ever met. Basically we are identifying inputs that are treated the same by the system and produce the same results. Assume that Figure 5-4 represents a typical domestic passenger jet. We have been asked to help with testing some new software that helps gate agents assign seats. As you probably are aware, most U.S. domestic airlines have two classes of seats: First Class and Coach (or as our colleague Dale would say, "Cattle Class"). If a patron only cares about the class of service, there are only two (partitions) to consider: First Class and Coach. Every First Class seat is like every other First Class seat as far as assigning of seats is concerned. Therefore, if the only consideration for seating were class of service, we would only need two test cases since there are only two equivalence partitions. We would need to test any First Class seat and any Coach seat.
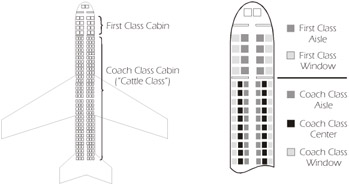
Figure 5-4: Equivalence Partitioning in a Typical Passenger Jet
| Key Point |
|
The world is seldom so simple, though. Most people have a preference not only for the class of service but also where they sit in a row: aisle, middle, window. So now we have several more partitions:
- First Class Aisle
- First Class Window
- First Class Middle (at least on some airplanes)
- Coach Aisle
- Coach Window
- Coach Middle
We now have 6 equivalence partitions and would need a minimum of 6 test cases. But wait, some people want the exit row! Now we have First Class or Coach, aisle, middle, window, and exit row, or not. The number of equivalence partitions has grown to 12! As you can see, it's possible that the number can get quite large. Actually, if the seating chart really needed to consider all of these attributes, we would also have to consider the back row (which doesn't recline), smoking or non-smoking (on many non-US carriers), over the wing, next to the lavatory, etc. At some point, we might just think it's easier to test every single seat!
Still, equivalence partitioning can help reduce the number of tests from a list of all possible inputs (e.g., 200+ on a modern jet) to a minimum set that would still test each partition. If the tester chooses the right partitions, the testing will be accurate and efficient. If the tester mistakenly thinks of two partitions as equivalent and they are not, a test situation will be missed. Or on the other hand, if the tester thinks two objects are different and they are not, the tests will be redundant.
As another example, suppose that an ATM will allow withdrawals of cash in $20 increments from $20 to $200 (inclusive). There are three equivalence partitions to consider: one is valid and two are invalid, as illustrated in Figure 5-5.

Figure 5-5: ATM Equivalence Partitions
Some testers might decide that since there are so few valid amounts, they will just try them all:
- TC 01 – Withdraw $20
- TC 02 – Withdraw $40
- TC 03 – Withdraw $60
- TC 04 – Withdraw $80
- …
- TC 10 – Withdraw $200
Unfortunately, a tester would have wasted her time if all of these test cases were created and executed. In this example, it's safe to assume that if our ATM can withdraw $20, it can surely withdraw $40, $60, $80, or $200 as long as there are sufficient funds in the account, the account has not already exceeded its daily limit, and there's money in the machine. This tester wasted precious time testing things that were part of an equivalence partition. Of course it's possible that the programmer created some abnormal (disjointed) code and using more than one test case might discover this fault, but there are other more effective techniques for finding this type of bug (such as a code inspection).
As far as equivalence partitioning goes, we would need only one valid and two invalid test cases for adequate coverage. Naturally there are other important test cases to try such as special characters and odd amounts (withdraw $145.78), but you would have to use another technique to discover them (such as error guessing).
Boundary Value Analysis
We know what many of you are thinking. What about the boundaries? In most cases when we use equivalence partitioning, we also use boundary value analysis. Boundary value analysis is important because we have learned from experience that the boundaries are often prone to failure. In the example above, the valid boundaries are $20 (the minimum amount we can withdraw) and $200, the maximum amount we can withdraw, and so we would create test cases for both of these values. You could (successfully) argue that both of these tests are part of the same equivalence partition of $20 to $200 and, therefore, if you test the boundaries you would not need any other tests for this partition. Most testers have been taught to test the boundaries and a valid value in the middle. While most of us were never told why we needed the value in the middle, we just did it. The reason we were taught to take a value somewhere in the middle of the partition is because if the valid boundary values fail, there will still be a test case for the valid partition.
| Key Point |
Boundary value analysis is important because we have learned from experience that the boundaries are often prone to failure. |
Actually, most experienced testers learn that testing the middle value has a fairly low ROI (i.e., it doesn't really improve the coverage and it has a low likelihood of finding the bug). Still, many of these same experienced testers insist on testing the value in the middle because that's the way they were trained.
Normally when conducting boundary value analysis, the exact boundaries are tested, the value immediately above the upper boundary, and the value immediately below the lower boundary. Some testers also choose a value just above the bottom boundary and just below the top boundary. We think this adds little value to the test coverage and, therefore, we don't recommend it. So for the ATM, we would test the following boundaries:
|
– Invalid |
|
– Valid |
|
– Valid |
|
– Invalid |
You could argue that the invalid boundaries are $19 and $201, or $19.99 and $200.01, but this doesn't make sense from a practical standpoint since we know that any amount that is not in $20 increments is invalid.
This turns out to be a rather trivial example, and in fact, if we were testing the ATM we might decide to test the withdrawal of all valid values, just because it's easy to do and because of the high risk associated with these transactions.
Decision Tables
Decision tables are tables that list all possible "conditions" (inputs) and all possible actions (outputs). Decision tables have been in use for many years. One of the earliest systems that we worked on over 20 years ago used decision tables as the primary design medium, that is to say, the entire system was described with decision tables in lieu of (or in addition to) other design mediums available in that era (i.e., HIPOs, flow charts, etc.). Most engineers today would not even consider using a laborintensive technique such as decision tables to document an entire system, but they're still particularly useful for describing critical components of a system that can be defined by a set of rules (e.g., payroll, insurance rules, amortization schedules, etc.).
Table 5-6 contains a decision table for computing payroll taxes. There is a "rule" for each possible combination of conditions. For each condition it's identified as a "Yes", a "No", or an "I" for immaterial.
|
Condition |
Rules |
|||
|---|---|---|---|---|
|
Rule 1 |
Rule 2 |
Rule 3 |
Rule 4 |
|
|
Wages Earned |
No |
Yes |
Yes |
Yes |
|
End of Pay Period |
I |
No |
Yes |
Yes |
|
FICA Salary Exceeded |
I |
I |
No |
Yes |
|
Action |
||||
|
Withhold FICA Tax |
No |
No |
Yes |
No |
|
Withhold Medicare Tax |
No |
No |
Yes |
Yes |
|
Withhold Payroll Tax |
No |
No |
Yes |
Yes |
To read the table, go to the first (top) condition and follow the row to the right until the rule that satisfies the condition is met. Then, go to each succeeding rule and follow the column down until the corresponding condition is satisfied. When the last condition is satisfied, apply the actions indicated by the column (rule) that you ended up in.
For example, if the answer to Wages Earned is "Yes," we go to Rule 2, 3, or 4. If the answer to the condition End of Pay Period is "Yes," then we now go to Rule 3 or 4. If the FICA Salary Exceeded condition is "Yes," then we follow the table down Rule 4 to the actions and know that we must:
- not withhold FICA tax
- withhold Medicare tax
- withhold payroll tax
Table 5-7 summarizes the input conditions for test cases 1 through 4 and lists the expected results.
|
Test Case |
Input Condition |
Expected Results |
|---|---|---|
|
1 |
No Wages Earned |
|
|
||
|
||
|
2 |
Wages Earned |
|
|
Not End of Pay Period |
|
|
|
||
|
3 |
Wages Earned |
|
|
End of Pay Period |
|
|
|
FICA Not Exceeded |
|
|
|
4 |
Wages Earned0 |
|
|
End of Pay Period |
|
|
|
FICA Salary Exceeded |
|
State Transition Diagrams
State-transition diagrams are an ancient (mid-1900s), but still effective, method of describing system design and guiding our testing. A state machine is a thing (e.g., system, subsystem, component, unit) whose functionality and output is dependent not solely on its current input, but also on its past input. The result of its previous input is called its state, and transitions are commands that cause changes from one state to another.
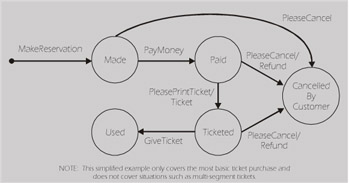
Case Study 5-2: State-transition diagrams are used in airline reservations systems.
Simplified State-Transition Diagram for a One-Way Ticket
I call Southwest Airlines to make a reservation. I provide information about the origin and destination of my travel, and the date and time that I wish to fly. A reservation is made for me and stored in their system. My reservation is now in the "Made" state.
Depending on the various fare rules, I'm given a certain amount of time to pay for the ticket. It could be within 24 hours; or it might be until 1 hour before departure. Once I pay for the ticket, my reservation changes state. It's now "Paid". On the day of travel, I arrive at the airport in plenty of time, stand in the incredibly long lines, and get a printed copy of my ticket. The reservation is now in the "Ticketed" state. When I give my ticket to the agent and get on the plane, the reservation changes to the "Used" state. Of course, I can cancel my reservation at any time before I get on the plane. If I've paid for it, I should be able to get a refund or at least a credit.
Now, let's use this state-transition diagram to guide our testing. At first glance we might decide that the appropriate level of coverage is to create the minimum number of test cases to visit every state (Made, Paid, Ticketed, Used, CancelledByCustomer) at least once. This approach will miss some of the possible execution paths. A second approach is to create the minimum number of test cases to exercise each transition (MakeReservation, PayMoney, PleasePrintTicket, PleaseCancel, GiveTicket) at least once. This approach will also miss some of the paths.
The recommended approach is to test every state-transition combination (i.e., every arrow on the diagram) at least once. This gives good coverage of the state machine, although it may not cover all the paths. If the diagram has loops back to previous states, then there can be a very large number (infinite) of paths – far too many to test.
— Lee Copeland
Orthogonal Arrays
The orthogonal array shown in our example in Table 5-8 is a two-dimensional array of integers with an interesting property: if you choose any two columns in the array, all of the combinations of the numbers will appear in those columns.
|
1 |
2 |
3 |
4 |
|
|---|---|---|---|---|
|
1 |
1 |
1 |
1 |
1 |
|
2 |
1 |
2 |
2 |
2 |
|
3 |
1 |
3 |
3 |
3 |
|
4 |
2 |
1 |
2 |
3 |
|
5 |
2 |
2 |
3 |
1 |
|
6 |
2 |
3 |
1 |
2 |
|
7 |
3 |
1 |
3 |
2 |
|
8 |
3 |
2 |
1 |
3 |
|
9 |
3 |
3 |
2 |
1 |
For example, consider the L9(34) orthogonal array shown in Table 5-8. The "9" indicates it has 9 rows. The "34" is not an exponent. It indicates the array has 4 columns and each cell in the array contains a 1, 2, or 3.
| Key Point |
Orthogonal arrays are curious mathematical oddities with an interesting property: if you choose any two columns in the array in Table 5-8, all of the combinations of the numbers will appear in those columns. |
Now, let's test this array. Choose any two columns at random (We'll pick columns 2 and 4, but you can choose another combination if you like). Can you locate all the pairs (1,1), (1,2), (1,3), (2,1), (2,2), (2,3), (3,1), (3,2), (3,3) looking at columns 2 and 4? Yes you can, so this is an orthogonal array.
Do all of the combinations of 1s, 2s, and 3s appear in the table? No, there are 81 combinations (3 x 3 x 3 x 3). For example, (3,3,3,3) is a valid combination, but it's not in the table.
Now, this is all very interesting but what does it have to do with testing? In many testing situations, there are simply too many test cases to write and execute. So, how do we choose a "good" subset? Orthogonal arrays are the answer. Whenever we have a number of variables and each of these variables takes on a defined state, we can map the problem onto an orthogonal array.
Consider the following situation. Suppose you have a Web site that is hosted on a number of servers and operating systems and viewed on a number of browsers with various plug-ins:
- Web Browser (Netscape 6.2, IE 6.0, Opera 4.0)
- Plug-in (None, RealPlayer, MediaPlayer)
- Application Server (IIS, Apache, Netscape Enterprise)
- Operating System (Win2000, WinNT, Linux)
How many distinct combinations should be tested? The answer is 81 (3x3x3x3 = 81). But what if you don't have enough resources to do this level of testing? What other choices do you have? You could test a few combinations chosen at random. Or, you could test a few that are easy. Or, you could test a few that you believe will work. Unfortunately, none of these approaches really inspire confidence.
So, let's map our problem onto the L9 orthogonal array as shown in Table 5-9. In the first column, let 1=Netscape 6.2, 2=IE 6.0, 3=Opera 4.0. In the second column, let 1=None, 2=RealPlayer, 3=MediaPlayer. In the third column, let 1=IIS, 2=Apache, 3=Netscape Enterprise. In the fourth column, let 1=Win2000, 2=WinNT, 3=Linux.
|
Test Case |
Browser |
Plug-In |
Server |
Operating System |
|---|---|---|---|---|
|
1 |
Netscape 6.2 |
None |
IIS |
Win2000 |
|
2 |
Netscape 6.2 |
RealPlayer |
Apache |
WinNT |
|
3 |
Netscape 6.2 |
MediaPlayer |
Netscape Enterprise |
Linux |
|
4 |
IE 6.0 |
None |
Apache |
Linux |
|
5 |
IE 6.0 |
RealPlayer |
Netscape Enterprise |
Win2000 |
|
6 |
IE 6.0 |
MediaPlayer |
IIS |
WinNT |
|
7 |
Opera 4.0 |
None |
Netscape Enterprise |
WinNT |
|
8 |
Opera 4.0 |
RealPlayer |
IIS |
Linux |
|
9 |
Opera 4.0 |
MediaPlayer |
Apache |
Win2000 |
Now, let's take a look at what we've achieved:
- Each browser is tested with every plug-in, with every server, and with every operating system.
- Each plug-in is tested with every browser, every server, and every operating system.
- Each server is tested with every browser, every plug-in, and every operating system.
- Each operating system is tested with every browser, every plug-in, and every server.
Not all combinations of all variables have been tested – that would be 81 combinations – but all pairs of combinations have been tested (and with only 9 test cases).
Orthogonal array testing is extremely useful because most compatibility defects are pair-wise defects. In recent weeks, we installed a commercial software package on Windows 95 (worked), Windows 98 (worked), Windows NT (worked), Win2000 (worked), and Windows ME (didn't work). The Windows ME problem is called a pair-wise defect.
Black Box Art
Ad Hoc Testing
Case Study 5-3: How can Mary Brown always find the bugs, just by looking at the system?
Mary Brown Always Finds the Bugs
I've been an advocate of systematic testing for years. In fact, one of the courses that I teach is even called Systematic Software Testing. Still, even in a class with a name like that, someone always asks me about ad hoc testing. The student will say, "Mary Brown can always find bugs, really big bugs, by just looking at the system." For years, I would steadfastly insist that testing should be systematic. Finally, though, a few years ago, I relented. If you have a Mary Brown in your company (and everyone does!), then she's too valuable an asset to waste.
I secretly believe that most of the Mary Browns in the world are actually very systematic in the processes that they employ. They just don't like to document their test cases and sometimes can't even remember how they found a bug. Then, if the situation that found the bug can't be replicated, the bug can't be fixed and everyone just ends up feeling badly because they know there's a bug, but they can't do anything about it.
In the case of Mary Brown, the company decided to install a capture-replay tool on her system so when she stumbled onto a bug, the scenario could be recreated. Unfortunately, the test manager didn't explain to Mary that everything she did would be recreated. When Mary found a bug while doing her ad hoc testing and the execution was replayed, the test manager discovered that Mary spent a great deal of time surfing the Internet (instead of working).
— Rick Craig
Most ad hoc testers will tell you that their tests are based upon experience and, indeed, that's true. However, if we were to analyze their thought processes, we believe it would look a lot like some of the "systematic" techniques addressed in this book. For example, most ad hoc testers focus on the things that have failed in the past (e.g., Pareto analysis), or things that they know are important to the user (e.g., risk analysis), or situations that are always problematic (e.g., zero sums, boundaries), etc. The key to successfully using ad hoc testing is to make sure that when a bug is found, the problem can be replicated. This usually means that when a bug is found using ad hoc methods, you should create the test case that would have found the bug. The test cases are needed to facilitate the debugging, and they'll also need to be rerun after the problem has been rectified.
| Key Point |
It's a good idea to add the test cases created during ad hoc testing to your repository. |
As many of you know, bugs seem to have a way of reappearing, so it's a good idea to add the test cases created during ad hoc testing to your test repository. Probably one of the most important aspects of ad hoc testing is that it allows you to use the expertise of some users/engineers who otherwise would not be willing and/or able to sit down and document tests. It can also be a useful reality check on your systematic testing process. If a bug is found in ad hoc testing, you should ask yourself, "Why didn't I have a test to find this?" Sometimes ad hoc testing will identify an entire class of tests that were missed using other testing strategies. And, finally, ad hoc testing is just plain fun!
Random Testing
Random testing means quite different things to different people. To us, random testing is creating tests where the data is in the format of real data but all of the fields are generated randomly, often using a tool. For example, if we were testing the name field of a system that is supposed to accept up to 20 characters, strings of 20 characters would be randomly generated and input into the system. One 20-character string might be:
ty5%,,ijs5ajU jjkk kkk
| Key Point |
Random testing is sometimes called monkey testing. |
Obviously, no one really has a name like that and, in fact, we probably don't even want to allow certain characters in the name field like the % sign. So we might refine the "random" set to omit certain characters that are not allowed, otherwise we'll end up with lots and lots of negative tests (definitely overkill). But as soon as we begin to refine the input stream, is the data really random? Now, we're beginning to generate test data with (minimally defined) parameters. Often when using random data, we don't necessarily figure out the expected results in advance. This means that we may be spending inordinate amounts of time reviewing the output of random tests to determine if the results are actually correct. Besides, if you remember equivalence partitioning, many of the random strings generated will be from the same equivalence partition, which means that we'll essentially be running the same tests over and over again.
| Key Point |
A negativetest is when you put in an invalid input and expect to receive an error message. A positive test is when you put in a valid input and expect some action to be completed in accordance with the specification. |
Let's recount some of the weaknesses of random testing:
- The tests are often not very realistic.
- There is no gauge of actual coverage of the random tests.
- There is no measure of risk.
- Many of the tests become redundant.
- A great deal of time may have to be spent in determining the expected results.
- The tests can't be recreated unless the input data is stored or a seed is used to create the random data.
This kind of random testing is really of little use most of the time and at best can be used for "crash-proofing" or to see if the system will "hang together" under adverse impact.
Semi Random Testing
Let's take the idea of random testing and refine it so that it is a little more useful. Let's say that we are testing an inventory system that has the following parameters:
- There are 400 stores.
- There are 12,000 different products in the stores.
- There are 8 different ways to bill for each product.
- There are 200 different suppliers of the various products.
Assuming that all four variables are mutually independent, the total number of different combinations of the four attributes results in an astronomically large number (in fact, our scientific calculator returned a 'memory overflow' error).
We could (and should) use techniques like equivalence partitioning to reduce the number of combinations to a workable number. Still, we might want to generate some random combinations of the four parameters listed above to possibly stumble onto a defect. Semi-random testing also gives us a little added confidence in our systematic techniques, and it's fairly easy to create large numbers of combinations. Remember, though, many of these semi-random tests probably add little to the functional coverage of the system.
Exploratory Testing
Exploratory testing is a term originally coined in 1988 by Cem Kaner in Testing Computer Software. Since that time, Cem Kaner, James Whitaker, James Bach, and others have refined the process and created an alternative (or a complementary process) to more traditional, structured techniques.
| Key Point |
The beauty of exploratory testing is that productive areas of test are expanded immediately. |
In exploratory testing, the test design and execution are conducted concurrently. The results of a test or group of tests will often prompt the tester to delve deeper into that area (i.e., explore). We think the beauty of exploratory testing is that productive areas of test are expanded immediately. In structured testing, the testers often create many tests that don't seem as useful during execution as they did during creation.
Exploratory testing is not the same thing as ad hoc testing. Just as its name implies, ad hoc testing is an unplanned, unstructured, maybe even impulsive journey through the system with the intent of finding bugs. Ad hoc testing, in fact, often does find bugs and can be a useful addition to structured testing, but should never replace structured techniques.
| Key Point |
"Always write down what you did and what happened when you run exploratory tests." – Cem Kaner |
Exploratory testing, on the other hand, can be a viable alternative to more structured testing techniques. Obviously, since we're writing a book that focuses primarily on systematic or structured techniques, we believe that these more traditional techniques are very important to most organizations, and we recommend that exploratory techniques be considered as a complement to (not a replacement for) structured testing. There are, however, many testimonials from testing groups that focus exclusively on exploratory testing techniques.
In fact, exploratory testing is neither ad hoc nor random. Exploratory testers are not merely keying in random tests, but rather testing areas that their experience (or imagination) tells them are important and then going where those tests take them. Even structured testers know that some of the best test cases they run are often precipitated by the results of other tests. This means, of course, that most good "traditional" testers do at least some exploratory testing.
| Key Point |
There are several excellent articles by James Bach on Exploratory Testing at: stickyminds.com satisfice.com |
Exploratory testers share some traits with traditional testers too. Good exploratory testers often keep notes or checklists of tests that appear to be useful, to reuse on future releases. These "notes" may (or may not) even look a lot like test scripts.
Case Study 5-4: A Successful Example of Unstructured Testing
Definitely Not Ad Hoc Testing
While teaching a testing course at Microsoft in the late 1980s, I remember one student describing the informal bug sessions they conducted in his group and I said, "Oh, ad hoc testing." He replied, "No, creative and unstructured, but not ad hoc testing." He went on to describe how the individual testers, without scripts, tested areas of the code that they thought might contain bugs and then launched the rest of the testing from there. He explained that the best bugsession testers actually had a pretty good testing strategy outlined in their minds when they began the session. As I recall, this group spent 1 day every two weeks or 10% of their time using this technique, and he reported that it was some of their most productive testing time. In spite of their ability to find bugs, these bug sessions didn't totally replace structured testing, because the test group needed the repeatability of an automated regression suite and a gauge of coverage, which was obtained by using the "systematic" test set.
— Rick Craig
White Box Science
Black-box test cases should be designed before attempting to design white-box test cases, because they can be created from the requirements and high-level design long before any code exists and they may help improve the detailed design and code. Some white-box techniques cannot be done until the code/detailed design exists. But if you wait to do them, you've lost the opportunity to prevent problems.
White Box Testing
White-box testing allows you to look inside a component being tested and create your test cases based on the component's implementation (code). Unfortunately, you can't see through the color white any better than you can see through black. So, technically, white-box testing should really be called "clear-box" or "glass-box" testing because you're able to see the code. Consider the code illustrated in Figure 5-6, which implements a software module.
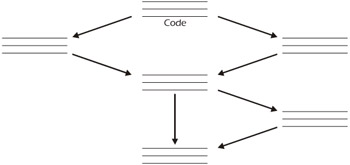
Figure 5-6: Code Implementing Module
How many paths do you see from the top to the bottom of this code? The correct answer is four (4), because you could move left-left, right-right, left-right, and right-left as you execute each statement from top to bottom. If your goal is to achieve path coverage and someone claims to be able to test this module with only three test cases, they're wrong! You must have at least four test cases in order to touch every path at least once.
This diagram was fairly simple to evaluate, but as the paths get more numerous and more complex, you need automated help in determining the number of paths and, thus, the number of test cases to create. There are a number of tools available to help you determine which paths need to be tested.
Cyclomatic Complexity
Tom McCabe developed a metric called Cyclomatic Complexity, which is derived from mathematical graph theory and used to describe the complexity of a software module. The complexity C is determined by the formula:
C = e – n+2p
|
e |
= |
the number of edges in the graph (i.e., the number of arrows) |
|
n |
= |
the number of nodes (i.e., the chunks of code that are executed without loops and/or branches) |
|
p |
= |
the number of independent procedures |
For this single-entry, single-exit example, p is equal to 1. The Cyclomatic Complexity of the example shown in Figure 5-6 is:
C = 7 – 6 + 2(1) = 3
The Cyclomatic Complexity metric provides a measure of the complexity of a software module. It also allows you to determine the maximum number of tests that are required to reach branch coverage. (Sometimes, branch coverage can be reached with fewer than C tests, but more tests are never needed.) McCabe suggests using the basis-path test model, which chooses C test cases for effective test coverage.
Scalability of White-Box Testing
Although white-box testing is almost always viewed as a technique for testing code as a part of unit testing, this approach can also be scaled to accommodate subsystem and system testing. Simply replace each of the chunks of code in Figure 5-6 with rectangles that represent subsystems.
White-box testing is really about path testing, and there are often a number of paths between subsystems. Using white-box techniques during integration testing can help you understand the flow of data and control through subsystems, which, in turn, will help you wisely choose integration test cases. Even at the system level, if the system under test interacts with other systems, white-box techniques can help you determine the number of paths and guide you in choosing test cases.
Coverage Techniques
| Key Point |
We're sensitive to the fact that some organizations become enamored with code coverage tools and lose sight of functional coverage and risk issues. |
We believe that many organizations can benefit from white-box testing, especially when using tools to measure code coverage. While obviously valuable for developmental testing (e.g., unit and integration), code coverage can also be useful for high-level testing (e.g., system and acceptance). However, we're sensitive to the fact that some organizations become enamored with code coverage tools and lose sight of functional coverage and risk issues. To avoid this pitfall, we offer the following strategy for testing organizations that use code coverage tools.
| Key Point |
Statement coverage measures are used to determine the number of lines of code that are invoked by the tests. Decision or branch coveragemeasures are used to determine the number of decisions or yes/no expressions that are invoked by the tests. Path coverage measures are used to determine the number of paths that are executed by the tests. |
Strategy for using "Code Coverage":
- Design test cases using techniques such as inventories, equivalence partitioning, etc. and the results of the risk analysis.
- Measure code coverage.
- Examine unexecuted code.
- If resources allow and risk dictates, create test cases to execute code previously unaddressed by tests. If the system is of lower risk or the code that is unaddressed is in a low-risk part of the system, the decision may be made not to test every line of code. This will, of course, introduce a risk that the unexecuted code may fail. It's really all about weighing the risk versus the resources available.
Test Design Documentation
Recall that in Chapter 3 we covered the Master Test Plan and, in Chapter 4, we covered the Detailed Test Plan. Here, we'll cover the Test Design Specification, Test Case Specifications, and Test Procedures.
IEEE Test Design Specification
Figure 5-7 shows all of the documents created on the front end (i.e., before execution) of testing using an IEEE Std. 829-1998 Standard for Software Test Documentation. The system test plan shown in this figure is supported by three test design specifications. The integration and acceptance test plans would also be supported by one or more test design specifications. For the sake of simplicity, the test design specifications for these plans are not shown in the diagram.
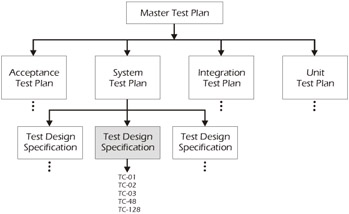
Figure 5-7: Test Design Specification
When many people think of a test plan, they think about a group of test cases. In this book, we've identified a test plan as a document that outlines the strategy, schedule, risks, responsibilities, and so forth (Refer to Chapter 3 – Master Test Planning). Nowhere in this plan did we include test cases. So where are the test cases? In the IEEE model, the test cases are described in a document known as a Test Design Specification. We like to think of the test design specification as a miniature test plan that does include the test cases necessary to test one or more features. The purpose of the test design specification is to group similar test cases together. Every level of test (except unit) will have one or more test design specifications.
| Key Point |
We like to think of the test design specification as a miniature test plan that includes the test cases necessary to test one or more features. |
Figure 5-8 shows the IEEE template for the Test Design Specification.
IEEE Std. 829-1998 for Software Test Documentation Template for Test Design Specification
Contents
- Test Design Specification Identifier
- Feature(s) to Be Tested
- Approach Refinement
- Test Identification
- Feature Pass/Fail Criteria
Figure 5-8: Test Design Specification Template from IEEE Std. 829-1998
Test Design Specification Identifier
This is the unique number (and date and version) of the test design specification, which will allow us to change and control the document. Each test design specification should be referenced to its associated test plan.
Feature(s) to Be Tested
This section of the test design specification is called Feature (or Features) to Be Tested. Each test design specification should contain a description of the group of test cases that must be executed in order to test a feature (or features). We've found that it's often useful to have a single test design specification for each feature identified in the section Features to Be Tested in the corresponding test plan. For example, there might be a series of test design specifications such as Withdraw Cash, Check Account Balance, etc. that refer back to the system test plan for our ATM. All of the features identified in the Features to Be Tested section of the test plan need to be included in a test design specification.
Approach Refinement
Remember the long explanation we had about the Approach section of the test plan in Chapter 3? Since the test design specification is a document that details a part of the system identified in the test plan, the Approach Refinement in the test design specification must support the approach in the test plan, but it usually goes into much greater detail. For example, the approach in an acceptance test plan might suggest that cash will be withdrawn from selected ATMs throughout the downtown San Francisco area. The test design specification for Withdraw Cash might specify exactly which ATMs will be used, which accounts need to be established or used, and what time of day the transactions will occur. This information provides additional detail that supports the original approach outlined in the test plan.
| Key Point |
The Approach Refinement in the test design specification must support the approach in the test plan, but it usually goes into much greater detail. |
Test Identification
In this section, the test case identifiers and a short description of the test cases are recorded. There is no need to describe the details of the test cases or their execution, since the test cases will be described in a separate document or program (if automated). The following test cases are used in our ATM example:
|
Withdraw $20 from valid account with $200 |
|
Withdraw $200 from valid account with $200 |
|
Withdraw $200 from valid account with $100 |
|
Withdraw $182.34 from valid account with $200 |
|
… |
|
… |
|
… |
Each of these test cases will be described in detail in a Test Case Specification. The test case specification will describe which account will be used for each test case, how to set up the test case, what the expected results should be, and so on.
Notice that some of the identified test cases are probably negative tests. Even though we don't have the requirements specification in front of us, TC 03 is probably a negative test or a test designed to do error checking, since it's unlikely that the bank will want someone with only $100 in their account to be able to withdraw $200.
Notice that the test cases are not necessarily sequential (i.e., we go from TC 05 to TC 28). That's because the test design specification describes all of the tests necessary to test a feature. Some of the tests necessary to test this feature (Withdraw Cash) will probably already have been created to test some other part of the system. For example, TC 28 may be a test that checks the validity of a user. This is important to the Withdraw Cash feature, but there's no reason to create a new test case if one was created for another feature such as Security. The test design specification describes a covering set of tests, but it does not describe how those tests will be executed. The Test Procedure Specification, which we'll explain in a moment, is used to actually execute the tests in an efficient manner.
| Key Point |
The test design specification describes a covering set of tests, but it does not describe how those tests will be executed. |
Feature Pass/Fail Criteria
The Feature Pass/Fail Criteria establish what constitutes success or failure for the testing of this feature(s). This is similar to the pass/fail criteria in the test plan, but the criteria in the test plan apply to the entire (product) item. The test design specification pass/fail will let us know if the Withdraw Cash feature is ready to be used.
We can use some of the same categories of metrics (used in the test plan) to establish the pass/fail criteria for the test design specification:
- The most common metric is the percentage of test cases that passed. For example, "all test cases must pass" or "90% of all test cases must pass, and all test cases that dispense money must pass."
- Criteria can also be built around the number, severity, and distribution of defects.
- Other criteria could include the results of a review, performance characteristics, security characteristics, etc. Remember, though, one good way to handle these other criteria is with performance test cases, security test cases, etc. That way the criteria can be limited to pass/fail of test cases, defects, and possibly a review.
IEEE Test Case Specification
Test cases are at the heart of all testing. They describe exactly what will be executed and what is being covered. How the test cases are described depends on several things such as the number of test cases, frequency of change, level of automation, skill of the testers, methodology chosen (i.e., exploratory testing, STEP, etc.), staff turnover, and risk.
| Key Point |
Test cases are at the heart of all testing. They describe exactly what will be executed and what is being covered. |
There are as many ways to document test cases as there are people testing. In this book, we focus on two approaches for documenting test cases: one approach uses the IEEE Std. 829-1998 Standard for Software Test Documentation for a test case, and the other approach uses a spreadsheet. Some of you will also be using automated test tools to describe your tests.
In the hierarchy of the master test plan, Figure 5-9 shows that the test case specification occurs immediately below the test design specification for the system test plan. The integration and acceptance test plans would also be supported by one or more test design specifications and associated test case specifications, but are not shown in the diagram for the sake of simplicity.
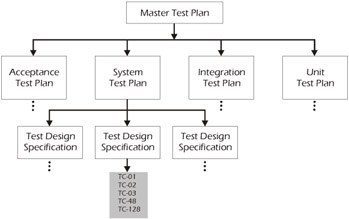
Figure 5-9: Test Case Specification
The IEEE template for test case specifications describes each test case in exact detail. It's especially useful for organizations that are working on high-risk, stable systems. It's also a good choice if the testers are less experienced or if there's rapid turnover of the testing staff. Figure 5-10 shows the IEEE template for the Test Case Specification.
IEEE Std. 829-1998 for Software Test Documentation Template for Test Case Specification
Contents
- Test Case Specification Identifier
- Test Items
- Input Specifications
- Output Specifications
- Environmental Needs
- Special Procedural Requirements
- Inter-Case Dependencies
Figure 5-10: Test Case Specification Template from IEEE Std. 829-1998
In particular, the IEEE approach for documenting test cases requires fairly complete documentation of each test case, which is one of the reasons that it's so useful for high-risk systems. This template is not as good a choice for systems that are undergoing rapid change and/or are unstable, since it requires significant effort to create each test case. Changes to the system might invalidate many test cases and require the creation of new tests. It's good, though, for companies that have a lot of rapid turnover or inexperienced staff, since the test cases are very detailed and can be handled by less experienced staff members.
| Key Point |
The IEEE approach for documenting test cases requires fairly complete documentation of each test case, which is one of the reasons it's so useful for high risk systems. |
Test Case Specification Identifier
This is the date, number, and version of the test case that identifies the test case and any subsequent changes to the test case specification.
Test Items
This describes the items (e.g., requirement specs, design specs, and code) required to run this particular test case.
Input Specifications
This describes what input is required for the test case. This will often describe the values that must be entered into a field, input files, completion of graphic user interfaces, etc. The input can be described in English, as a "picture" of a properly completed screen, a file identifier, or an interface to another system.
Output Specifications
This will describe what the system should look like after the test case is run. Normally, it can be described by examining particular screens, reports, files, etc. One test case may change many different outputs (i.e., multiple files, reports, etc.). The sample output can be a comparator file, screen image, copy of a report, English description, etc.
Environmental Needs
This describes any special environmental needs for this particular test case. Examples might include the need for stubs or drivers (especially at lower levels of test), tools, specific records or files, interfaces, etc.
Special Procedural Requirements
This section describes any special procedural requirements necessary to set up the test environment. For example, Y2K data might have to be converted into YYYYMMDD format before proceeding.
Inter-Case Dependencies
Experienced testers know that one way to set up the environment for a particular test is to run another test to set the state of the environment. In our ATM, for example, we might have a test that requires a deposit of $1,000 that needs to be run before we run another test case that requires a withdrawal, otherwise the account might not have sufficient funds.
Using a Spreadsheet
Table 5-10 shows what simplified test case specifications might look like if you chose to use a spreadsheet to manage your testing. Each of the test cases is listed sequentially along with special notes about how to run each test, what the input variables should look like, and what the acceptable results are.
|
Test Cases |
Special Notes |
INPUTS |
OK RESULTS |
||||
|---|---|---|---|---|---|---|---|
|
Var 1 |
Var 2 |
Var 3 …. |
Var X |
Var Y |
Var Z …. |
||
|
TC0401 |
|||||||
|
TC0402 |
|||||||
|
TC0501 |
|||||||
|
… |
|||||||
Using a spreadsheet is one of the most common methods used by our clients to record their test cases. This method is particularly valuable for testers who construct many small test cases where the input is often a few keystrokes and the result is a new screen or report (e.g., testing user interfaces).
As you can see, the template identifies each test case, describes the input required, and the desired results. Other sections included in the IEEE model, such as environmental needs, are handled on an exception basis in the Special Notes field. There's room at the end of the template to record the results, which may be recorded as pass/fail or may describe what the actual results were.
IEEE Test Procedure Specification
When all is said and done, the Test Procedure Specification is nothing more than a description of how the tests will be run. Test procedures can be described manually or they can be written into scripts using a tool. These scripts are actually code written in a high-level language, and the people who created them may be called testers, but now they're also coders. This may have far-reaching ramifications regarding who the testers can be, the skill sets required, and so on.
| Key Point |
We use the word scripts to describe automated test procedures. These scripts are actually code written in a high-level language. Some people use the word scripts to describe all test procedures (manual and automated). |
The structure that we recommend following when developing a test procedure is shown in Figure 5-11. After the test procedures are executed, the results should be evaluated and then the test environment should be restored to its initial condition. Test design procedures should be kept simple and they should use common sub-procedures.
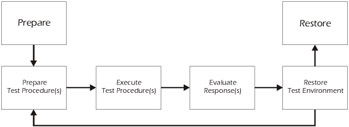
Figure 5-11: Structure of a Test Procedure Specification
Figure 5-12 shows the IEEE template for a test procedure.
IEEE Std. 829-1998 for Software Test Documentation Template for Test Procedure
Contents
1.0
Test Procedure Specification Identifier
Specify the unique identifier assigned to this test procedure.
Supply a reference to the associated test design specification.
2.0
Purpose
Describe the purpose(s) of the procedure and refer to the test cases being executed.
3.0
Special Requirements
Describe any special requirements such as environmental needs, skill level, training, etc.
4.0
Procedure Steps
This is the heart of the test procedure. The IEEE describes several steps listed below:
4.1
Log
Describe any special methods or formats for logging the results of test execution, the incidents observed, and any other events pertinent to the test.
4.2
Set up
Describe the sequence of actions necessary to prepare for execution of the procedure.
4.3
Start
Describe the actions necessary to begin execution of the procedure.
4.4
Proceed
Describe any actions necessary during execution of the procedure.
4.4.1
Step 1
4.4.2
Step 2
4.4.3
Step 3
4.4.4
Step Z
4.5
Measure
Describe how the test measurements will be made.
4.6
Shut Down
Describe the action necessary to suspend testing when unscheduled events dictate.
4.7
Restart
Identify any procedural restart points and describe the action necessary to restart the procedure at each of these points.
4.8
Stop
Describe the actions necessary to bring execution to an orderly halt.
4.9
Wrap Up
Describe the action necessary to restore the environment.
4.10
Contingencies
Describe the actions necessary to deal with anomalies and other events that may occur during execution.
Figure 5-12: Test Procedure Template from IEEE Std. 829-1998
In the IEEE template, it's not clear that somewhere between Steps 4.3 – Start and 4.6 – Shutdown, it's necessary to list all of the chronological steps that need to occur. Indeed, this is the key part of the entire test procedure and will normally make up the bulk of the document.
Example Test Procedure
Since we virtually live on airplanes, we decided to show an example from a (fictitious) frequent flyer system using the IEEE template for a test procedure (refer to Figure 5-13).
Example Test Procedure for a Frequent Flyer System
Using the IEEE Template
Request for Domestic Award
Contents
1.0
Test Procedure Specification Identifier
5.2
2.0
Purpose
This procedure will execute test cases 2, 28, 35, and 44 in order to validate requesting an award.
3.0
Special Requirements
It's necessary to have at least one record available for a super-duper frequent flyer who has adequate miles to request a domestic award.
4.0
Procedure Steps
4.1
Log. Results will be compared manually to predetermined responses calculated by customer service representatives.
4.2
Set up. The frequent-flyer program must be loaded and running and the client must be logged into the server.
4.3
Start. Logon to the frequent-flyer program using a password for a valid customer service representative. Note the system log time.
4.4
Proceed.
4.4.1
Go to screen 'X.'
4.4.2
Enter Frequent Flyer number for a super duper frequent flyer.
4.4.3
Double Click the "Check Miles" icon. Note the mileage.
4.4.4
Double click the "Request Domestic Award" icon (screen 'Y' displays).
4.4.5
Enter Tampa for departure city.
4.4.6
Enter San Francisco for destination city.
4.4.7
Enter 6/01/2002 for departure date.
4.4.8
Enter 6/05/2002 for return date.
4.4.9
Hit the Enter key (message "Request accepted" displays).
4.4.10
Go to screen 'X.'
4.4.11
Double Click the "Check Miles" icon.
4.5
Measure. The value for "Check Miles" should be reduced by 25,000 after the successful execution of this procedure. An e-ticket request should be processed. Check this by going to the reservation system.
4.6
Shut Down. Log off the frequent-flyer program.
4.7
Restart. If necessary, the test procedure will be restarted in Step 4.4.1.
4.8
Stop. Close the connection to the server.
4.9
Wrap up (restore). Restore the system to the state identified in Step 4.3.
4.10
Contingencies. If the frequent-flyer record specified is not available, use record locater 838.78.
Figure 5-13: Example Test Procedure for a Frequent Flyer System Using the IEEE Template
This test procedure or script describes how the tests will be executed. It may contain one or more test cases, each of which will describe something (what) that needs to be tested. For example, Test Case 2 might be a test case for something as simple as logging on to the system. Test Case 28 might be a test designed to test requesting a domestic award for a super-duper frequent flyer who has more than 25,000 miles in their account. Both of these test cases will be executed by the test procedure shown in Figure 5-13.
The test cases specify what needs to be tested and provide us with measures of coverage, but the test procedures specify how the test cases will be executed and provide us with efficiency of execution. As Figure 5-14 shows, one test procedure may execute test cases from a single test design specification or from many.
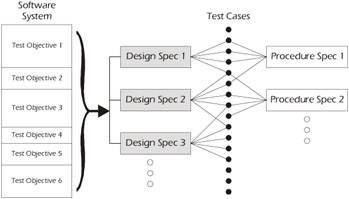
Figure 5-14: Specifications for a Typical System-Level Test
When developing the test design specification, you should start with the testing objectives. Since more than one procedure may be required to run the test cases contained in the test design specification, you may want to work on the test cases first in order to establish a baseline of coverage. Some companies (e.g., medical and pharmaceutical) buy the test design documentation from software developers in order to prove to various government agencies that the software actually meets requirements.
Preface
- An Overview of the Testing Process
- Risk Analysis
- Master Test Planning
- Detailed Test Planning
- Analysis and Design
- Test Implementation
- Test Execution
- The Test Organization
- The Software Tester
- The Test Manager
- Improving the Testing Process
- Some Final Thoughts…
- Appendix A Glossary of Terms
- Appendix B Testing Survey
- Appendix C IEEE Templates
- Appendix D Sample Master Test Plan
- Appendix E Simplified Unit Test Plan
- Appendix F Process Diagrams
EAN: 2147483647
Pages: 114
