Color, Light, and Focus
When you're compositing objects into a scene, you must make sure that they look like they really belong there, by concentrating on color and lighting as well as distance and focus. An object's placement needs to match the focal length of the original footage or it will stand out as fake.
Distance, Focus, and Light
When you add new objects in the distance in a scene, you need to study the footage to see what other effects the surrounding areas have. If you're putting mountains into a background, then they must match not only in scale but also in focus in proportion to the background. If the horizon is hazy and slightly blurry, then the added mountains should be also.
The same is true for moving objects, such as the planes I've added to this old film footage. I placed a DC-3 in the background and scaled it down to fit the approximate scale I wanted for the composite (Figure 13.1). Notice how crisp and clear the plane is in relation to the rest of the scene—let alone how hazy and blurred the buildings in the background are.
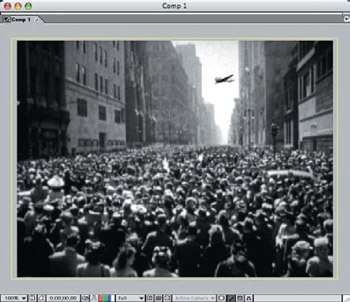
Figure 13.1: The DC-3 looks quite out of place in the background of this archival footage.
| Note |
You can open this project file, DistAirplaneProject.aep, in the Chapter 13 folder on the DVD and follow along with the production steps. You can also view the rendered QuickTime movie, City-Planes320.mov. |
Zooming in to 200% in the Comp window so the plane could be more easily viewed, I adjusted the exposure levels (Effects > Adjust > Brightness & Contrast) of the plane layer to have less-harsh contrast and be lighter, so it will better match the buildings in the background (Figure 13.2). I pushed the Brightness up to 50 and the Contrast down to –50 in this case.
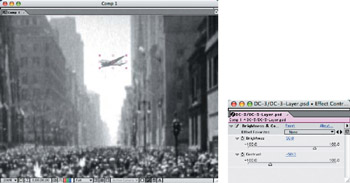
Figure 13.2: Lighten the plane to better match the background surroundings.
To further blend the plane image into its surroundings, I applied a Gaussian Blur (Effects > Blur and Sharpen > Gaussian Blur) with a Blurriness of 25.0 (Figure 13.3). This step combined with the lightening really makes it appear that the plane is part of the original footage.
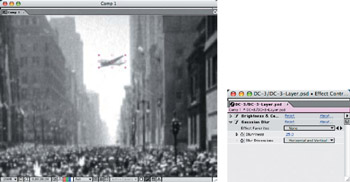
Figure 13.3: Add a Gaussian Blur to the plane to blend it into the background of the original scene.
I created a mask layer of the opening between the buildings in the horizon and made the flight path of the plane match the angle of its direction. I then duplicated this layer several times to create a few planes flying in the distance (Figure 13.4). The farther away a plane is in the scene, the lighter and blurrier it needs to be, as well as scaled down accordingly.
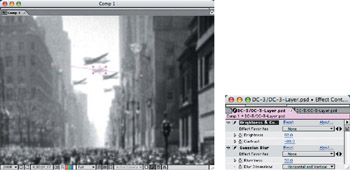
Figure 13.4: Duplicate the plane layer, and rescale the copied planes, lighten them, and blur them more.
I moved the plane layers in the same direction, though I moved the planes in the foreground slightly faster than those in the distance to add dimension (Figure 13.5). The final composite appears as if the planes were actually in the original footage.
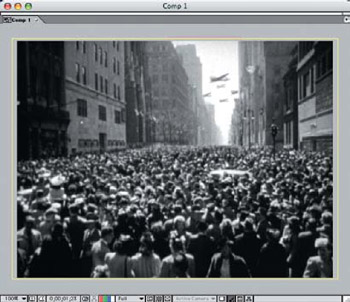
Figure 13.5: If only FedEx had a fleet of DC-3s back in the 1940s!
Matching Color, Lighting, and Focus
Colored objects composited into a scene require special attention because the colors need to be adjusted to match the surrounding area. The lighting and focus of the composited objects must also be modified to blend in well with camera zoom and scene depth. Composited objects and footage are often shot in different lighting situations, such as a studio, natural bright daylight, or overcast skies, and need to be color adjusted.
For this composite, I used the original footage of an old English castle on a hill that zoomed out, plus a layered Photoshop file with still images of sheep on a hill. These two shots were taken in different locations under different lighting conditions and resolutions. Fortunately, the smaller still images of the sheep to be composited into the video footage were of a higher resolution, so they could easily be altered to match.
I started with a new After Effects file and a composition 320240, 15 seconds in length (approximately the same as the original video footage). I imported the layered Photoshop file, placed the layers on top of the video footage layer in the Timeline, and resized them down to match the scale of the scene at Frame 1 (Figure 13.6). Notice how much bluer the grass and rocks around the sheep layers look against the original footage. This project file, Color_Focus.aep, can be found in the Chapter 13 folder on the DVD.
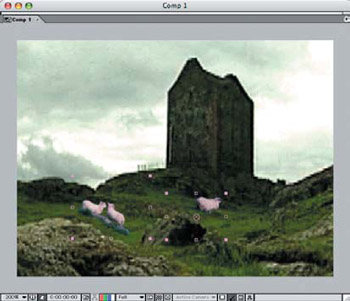
Figure 13.6: Composite the still images on top of the original footage and scale them to match.
Because the original footage has a greenish cast and spills on the rocks in the grass, I needed to adjust the color balance of the sheep layers to take on the same green spill. I applied the Color Balance effect (Effects > Adjust > Color Balance) to the two sheep layers and set the Shadow Blue Balance to –30 (Figure 13.7). This reduced the amount of blue in the low end of the RGB channels, which caused more yellow to appear—yet the warmer midtones and highlights remained the same.
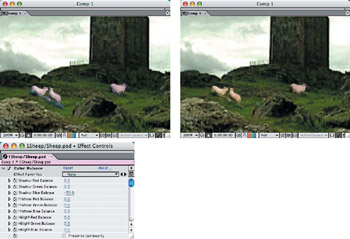
Figure 13.7: Use the Color Balance adjustment to remove blue from the shadow areas of the composited layers.
To match the resolution of the original footage, I applied a Gaussian Blur to the two sheep layers at Frame 1. Because these two layers are scaled independently, I needed to apply a slightly different amount of blur to each. The two-sheep layer received a Blurriness of 8.0 pixels, and the one-sheep layer received a 10.0 pixel setting (Figure 13.8). This amount would increase over time as the camera zoomed out and the scale became smaller.

Figure 13.8: Apply a Gaussian Blur to match the resolution of the composite layers to that of the original footage layer.
To match the camera zoom out of the original footage, I set the Stopwatch for both Scale and Position on the Timeline for each composite layer at Frame 1, and then I moved to a point where the camera stopped zooming out (Frame 15;01) and rescaled and repositioned both layers to match (Figure 13.9). Because the original camera zoom had an ease in and out with its movement, I applied the Easy Ease Out Keyframe Assistants for both Position and Scale on both layers at Frame 1 and Easy Ease In at Frame 15;01. I increased the Gaussian Blur on both layers by 2.0 pixels as well.
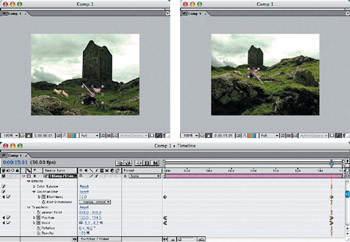
Figure 13.9: Use the Easy Ease In and Out Keyframe Assistants to match the camera zoom motion.
Exposure, Lighting, and Transparency
Some of the most difficult composites to "fake" are objects that need to be backlit by a light source in the background footage. In a sunset image or a shot that's looking directly into the light source, how do you handle the exposure and lighting of the foreground objects that you are compositing? Other than merely creating a complete silhouette of the object in front of the light source, you can light it in After Effects so it will show some of the details, edge glows, and transparency or translucency.
To illustrate this problem composite, I used a still image layer of a hot air balloon composited over stock footage of a high altitude shot (above the clouds), looking directly into the sun (Figure 13.10). As you can see from the initial placement, the balloon looks obviously out of place and not lit at all the same as the stock video footage.
| Note |
You can view the project file, BalloonColorProject.aep, in the Chapter 13 folder on the DVD. For this project, you will need to install the demo versions of the Shine and Starglow effects plug-ins from the Trapcode folder on the DVD. |
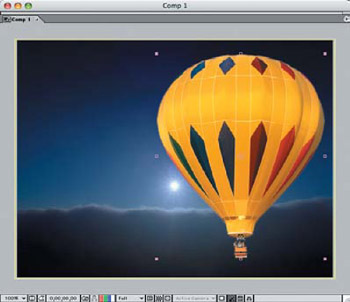
Figure 13.10: As is, the hot air balloon looks obviously out of place in this scene.
I used Levels to lower the exposure of the hot air balloon. I first brought up the Input Black level to 20.0 and the Gamma to 0.50. I then brought the Output White level down to 70.0 (Figure 13.11). This gave the basic overall exposure of the balloon surface that would correctly match what would be seen in the composite in a semisilhouette.
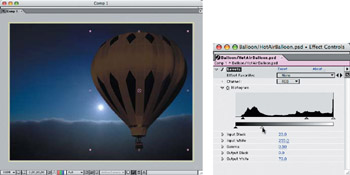
Figure 13.11: Adjust the Levels and Gamma to correct the base exposure.
Because the original footage is very cool and void of any warm spectral light, the balloon had to be desaturated to match the scene. I used Hue-Saturation (Effects > Adjust > Hue-Saturation) and set the Saturation down to –50 (Figure 13.12). Notice how the balloon takes on a colder look when the brighter warm colors are removed.
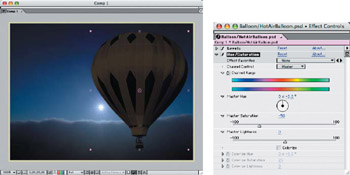
Figure 13.12: Desaturate the balloon of its warm colors.
Next, I wanted to select areas of the balloon that would be affected by passing in front of the sun as the balloon moved across the screen. The balloon's material is somewhat translucent, so it will show some light through it and cause it to slightly glow through the center and show some of its warmer colors. I duplicated the balloon layer and removed the Levels and Hue-Saturation effects from it. I then created a new solid layer that was the full size of the comp and applied an elliptical mask to it (Figure 13.13). I then feathered the mask 50.0 pixels and positioned it in the center of the balloon over the duplicated balloon layer.
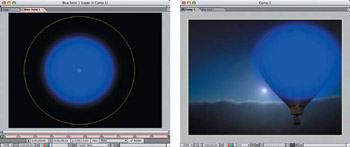
Figure 13.13: Create a feathered mask layer above a duplicate unadjusted balloon layer.
I used the new mask layer to matte the balloon layer (Layer > Track Matte > Alpha Matte), and I set the Blend Mode to Hard Light (Figure 13.14). I also set the Transparency of the balloon layer to 25% at the extreme left and right of the frame and 50% where it was directly in front of the sun.
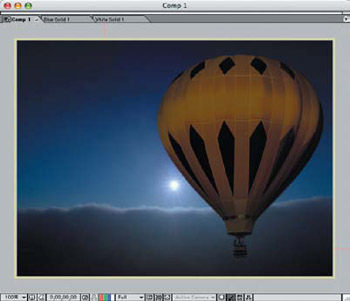
Figure 13.14: The balloon takes on a somewhat 3-D effect when the slight glow is added.
I wanted the balloon to travel from right to left, so I selected the two balloon layers and the mask layer and pressed the P key to make the layer Position visible on the Timeline. With the Indicator set at the first frame, I clicked the Stopwatch to set the right-most position for all three layers. I then moved the Indicator to the last frame and dragged the layers in the Comp window to the left where I wanted the balloon to end (Figure 13.15).

Figure 13.15: Set the balloon animation in the Timeline for all moving layers.
Creating a Backlit Glow
When the balloon is directly in front of the sun, it will take on a bright, harsh backlight and the edges will glow. I duplicated the second balloon layer and adjusted the Hue-Saturation to a maximum Master Saturation of 100 (Figure 13.16). I then added a Gaussian Blur of 2.0 to spread the glow layer. I positioned the layer underneath the original balloon layer, and I set the Opacity to 100% when the balloon passes in front of the sun. I set it to 0% when it reaches the far sides of the frame.
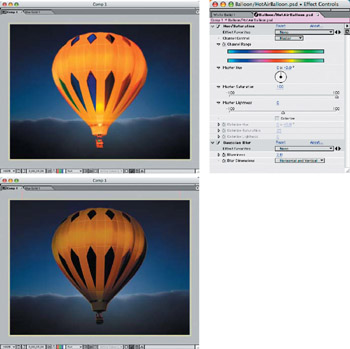
Figure 13.16: Create a glowing backlight layer by oversaturating the duplicate balloon layer.
To create a brighter glow directly in front of the sun as the balloon passes by, I duplicated the top balloon layer once again and positioned it above the solid mask layer. I set the Opacity to 100%. I then duplicated the matted solid layer and readjusted the size of the mask to a smaller diameter and positioned it at the top directly in front of the sun, clicking off the Position Stopwatch in the Timeline so it wouldn't move (Figure 13.17). The top balloon layer already had the Track Matte applied, so it will show the glow through the balloon as it moves by.
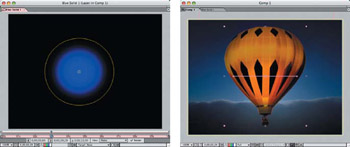
Figure 13.17: Make a direct glow pass with a duplicated balloon layer.
A pinpoint white light was needed to overlap the edges of the balloon as it passes in front of the sun, so I created a new solid layer in white and added an elliptical mask. I adjusted the mask shape to about 200 pixels in diameter and set the Mask Expansion to –60.0 pixels and the Mask Feather to 15.0 pixels (Figure 13.18). Next I set the Blend Mode to Screen and the Opacity to 100% at the sides, and then I reduced the Opacity to 65% when the balloon passes over the sun.
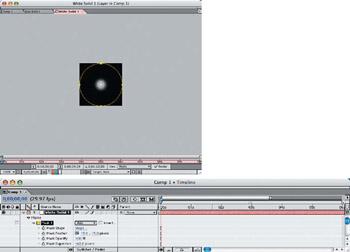
Figure 13.18: Add the pin light layer to enhance the sun's refracted glow around the edges of the balloon as it passes by.
Third Party plug ins Enhance the Effect
For a very realistic effect of the sun's light refraction and streaking as the balloon passes in front of it, I used Trapcode's Shine and Starglow plug-in effects. I rarely use third-party plug-ins in my example projects, but these really punch up the effect. The demo version of these plug-ins is available to you on the DVD.
I first applied the Shine effect to the white solid layer and adjusted the Ray Length to 3.0 (Figure 13.19). I then applied the Starglow effect and set the Streak Length to 25.0 to create a natural flare effect that would occur on film.
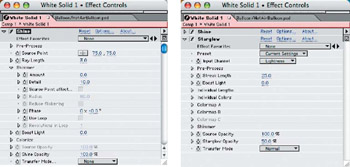
Figure 13.19: Apply the Shine and Starglow effects to give the bright sun a realistic streaking appearance.
The effect automatically softens as the balloon passes in front of the sun, since the Opacity of the white layer lowers to 65% (Figure 13.20).
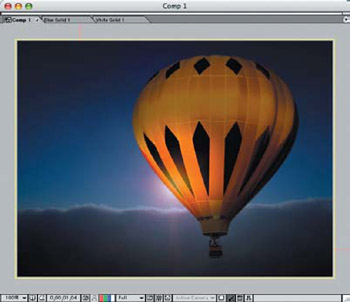
Figure 13.20: The realistic streaking and rays of sunlight soften as the Opacity of the layer lowers.
Using a Mask to Create Depth
Some footage may include both foreground and background points of interest, because of lighting and focus—which may make it hard to concentrate on the foreground objects. In some cases, de-accentuating the background elements with a depth of field blur and diffused lighting or exposure can rectify this.
This example footage is a beautiful shot of San Francisco, with the cable car coming toward the camera in the foreground. Unfortunately, because of the lighting of the scene, the focus is on the bay in the background, where the island of Alcatraz is sharply lit and detracts from the subjects in the foreground (Figure 13.21).

Figure 13.21: The background of this video footage detracts from the moving subjects in the foreground.
In After Effects, I duplicated the footage layer and manually applied a Bezier Mask to the top half with the Pen tool, separating the bay background from the foreground elements (Figure 13.22). I then applied a 50-pixel Feather to the mask and applied a 3.0 pixel Gaussian Blur to the layer to slightly diffuse it.
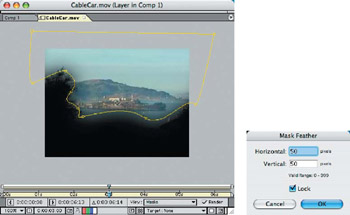
Figure 13.22: Use a Bezier mask to isolate the brighter background from the underexposed foreground areas.
To give the layer a more diffused appearance and create a little mist in the background, I set the layer's Blend Mode to Screen (Figure 13.23). At this point, it actually looks as if the foreground appears darker—almost a silhouette in front of the brighter, diffused background. But an adjustment to the foreground will balance it out.
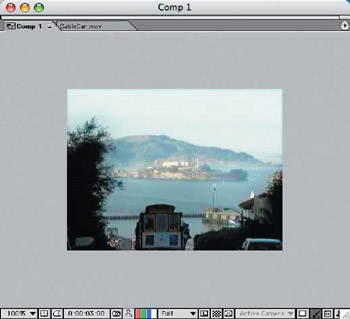
Figure 13.23: Set the Blend Mode of the diffused masked layer to Screen to create the misty bay.
I corrected the foreground color using Curves (Effects > Adjust > Curves), which balanced the lightness and color more closely with the background (Figure 13.24). This gave the cable car and foreground elements more definition against the lighter, diffused background.
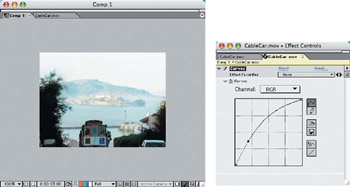
Figure 13.24: By adjusting the original footage layer with Curves, you place the focus on the approaching cable car instead of the background.
Part I - Connecting Photoshop, ImageReady, and After Effects
- Basic ImageReady Animation, Tweening, and Layer Styles
- Photoshop Layers and After Effects
- 3-D Layers from Photoshop Layers
Part II - Applying Animation Concepts
Part III - Clean-Up, Mattes, and Objects
- Blue-Screen Garbage Mattes
- Rotoscoping Techniques with Photoshop
- Matte and Keying Plug-ins
- Static Matte Painting in Photoshop
- Motion Matte Painting in Photoshop
- Making Movies from Stills
Part IV - Advanced Movie Magic
EAN: 2147483647
Pages: 104
