Motion Titling Effects
Titling is probably the most overlooked aspect in video production; producers often merely add some text to the screen with only dissolves or scrolling as an afterthought. Motion picture studios have been producing visually appealing and creative opening titles and credits—to entertain, open up the story of the picture, or just provide eye candy. What I hope to provide you in this chapter is a few ideas to get your creative juices flowing and make you think about how your next motion-titling project can be enhanced with simple techniques.
Titles from Photoshop Layers
I've seen a lot of opening titles in the movies, which obviously required thousands of man-hours to create with sophisticated motion-tracking hardware and 3-D software. But in many cases, you can create simple text layers with layer style effects in Photoshop and composite them into your After Effects project—giving you a very believable 3-D rendered title that can rival those of the big studios.
In this first project, I wanted to combine the classic feel of the kind of titling used in old western movies from the 1950s with a modern 3-D composite effect. The text is a simple Photoshop layer with layer style effects applied, but it is then transformed to match the angle of the scene in the background to give it a more integrated look. You can follow along with this project by using a font you prefer, since the licensed font I used cannot be legally provided to you on the DVD.
Open the QuickTime movie file Desert Vista Time Lapse.mov in the Chapter 15 folder on the DVD; copy and paste the first frame of the movie to the clipboard. You'll use this frame as a template for designing the 3-D title. Create a new file in Photoshop from the clipboard and add a large font title text layer. I used the font named Capitals for this example.
Apply a Drop Shadow layer style, with the Global Angle set to 135, the Distance to 25 pixels, and the Size to 5 pixels. For this example I added a Color Overlay of orange (Figure 15.1). Apply Bevel and Emboss with the default settings and set the Size to 1 pixel.
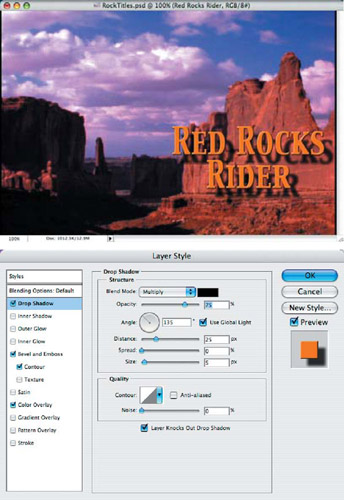
Figure 15.1: Apply drop shadows and bevels to the text layer.
Duplicate the text layer and rasterize it in the Layers palette so it can be transformed in any direction or shape. Apply the Perspective transform option (Edit > Transform > Perspective) and increase the right side of the text; then skew it down slightly to match the natural lines of the rock formations behind it (Figure 15.2). You will need to further flatten the text layer prior to importing it into After Effects or the layer style effects will not remain with the layer. Do this by creating a new layer and linking it with the text layer; then chose Link Merged from the Layers palette menu.
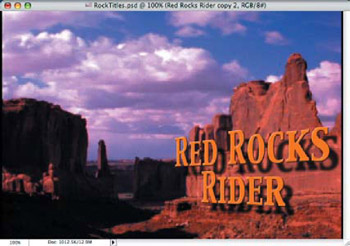
Figure 15.2: Rasterize the text layer and apply a Perspective transform to align it with the background layer.
Repeat this text layer process for subsequent titling, such as for actors, subtitle descriptions, and production companies. When you have finished, you can save the Photoshop file as it is for additional editing or save it as a copy and delete all of the nonmerged text layers (Figure 15.3). This will give you a simple layered Photoshop file that will be easy to import into After Effects.

Figure 15.3: Remove the unwanted layers and save the Photoshop file for easier layer import into After Effects.
Create a new project file in After Effects, NTSC 640480, and import the Quick Time movie footage file and the Photoshop text layer file as a composition to retain the individual layers. Stack the text layers in the order in which you want them to appear on the screen in the Timeline, and adjust the Opacity of each layer to create fade-ins and fade-outs (Figure 15.4). Since the text layers already have shadow transparency, you can leave the Blend Mode in Normal mode.

Figure 15.4: Adjust the Opacity of the text layers in the Timeline to create fade-in and fade-out keyframes.
You'll notice that as the clouds pass by the rocks they get darker and the text stands out more. When the clouds clear, the shadows are more predominant and the 3-D effect appears more integrated into the footage (Figure 15.5). You can review the rendered QuickTime movie of this titling composite in the Chapter 15 folder on the DVD.
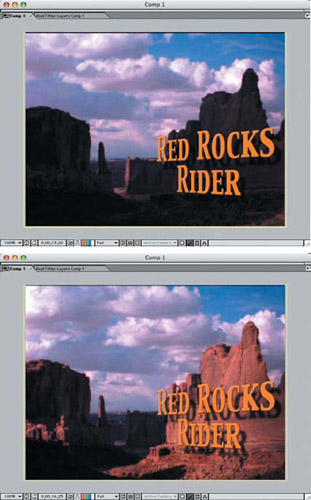
Figure 15.5: The 3-D effect is enhanced by the lighting and shadows on the rocks in the background.
Using 3 D Layers to Simulate 2 D Titling
Sometimes you have to animate text running at an angle or hugging the face of a building or wall. By making comps with animated text that gets integrated into the master composition, you can apply the 3-D layer option and rotate the text to match the footage below. This allows you to match perspectives without affecting the quality of the animated text layer, but it does not provide a 3-D effect since no lights, shadows, or layer movement are involved.
In this example, I wanted to create a Wall Street–style running ticker board sign that wraps around the building in the QuickTime movie footage. Since the footage was shot in a locked-off position and time-lapsed, it was a simple process of matching the text layer comps to the lines of the building.
I started by creating a narrow Photoshop file with a black background and applied a line of text with a dot-matrix style font in bright green (Figure 15.6). I then flattened the file and saved it as a single-layer JPEG.
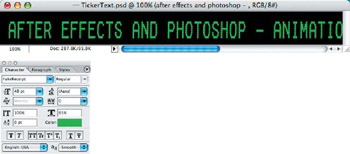
Figure 15.6: Create a flat text layer file that can be imported and animated in an After Effects comp.
After I created a project file in After Effects and imported the original footage, I placed it into Comp 1. I then created a new comp in which to animate the running ticker text, 640 pixels wide, 64 pixels high, and 20 seconds in duration. I added a new solid black layer for the background so it wouldn't appear transparent in the final composite. I then placed the text layer in the comp, positioned it off the right side at Frame 1, and clicked the Position Stopwatch in the Timeline. The duration for this animation was 10 seconds long, so I moved the Indicator to the 10-second mark and moved the text layer off the left side of the frame (Figure 15.7). This left 10 seconds of pure black at the end that I'd need for the final composite.
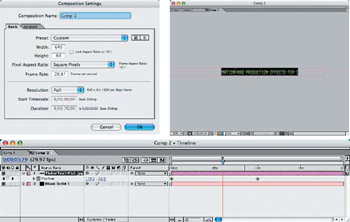
Figure 15.7: Create a separate comp in which to animate the text layer, prior to compositing with the main comp.
I returned to Comp 1 and created a new camera (Layer > New > Camera) and used the default setting with a 50mm lens preset to prevent too much distortion or excessive flattening (Figure 15.8). I then selected the Camera 1 view at the bottom of the Comp window.
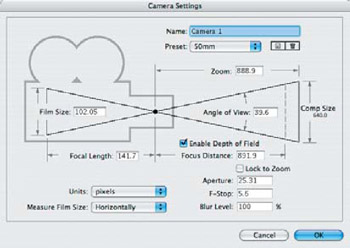
Figure 15.8: Create a new camera layer and use the default lens length of 50mm.
With the Comp 2 layer selected, I clicked the 3-D box in the Timeline to convert the layer to three-dimensional space so it could be rotated and moved along the X-, Y-, and Z-axes. I then rotated and moved the layer in all axis directions until I achieved the desired results of the layer fitting precisely onto the right side of the building in the original footage layer below (Figure 15.9). I used the sliders in the axis adjustments on the Timeline to fine-tune the positioning.
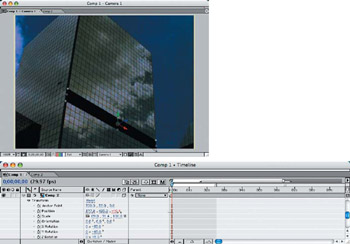
Figure 15.9: Convert the animated text comp to a 3-D layer and rotate and move it along the X-,Y-, and Z-axes to the desired angle.
I duplicated the Comp 2 layer and repositioned it for the left side of the building, making sure that the edges of the text comp layers just touched and did not overlap (Figure 15.10). I also had to resize the layer slightly to match the depth of the building.
By moving the Indicator down the Timeline a few seconds, I could see that the ticker board was starting at the same time on both sides of the building instead of wrapping around it in a continuous stream. To rectify this, I duplicated the Comp 2 layer and moved it along the Timeline to the left, just until the text animation was finished, leaving only the 10 seconds of black (Figure 15.11). I then moved the top Comp 2 layer to the right on the Timeline until the timing properly matched for the text to wrap around.
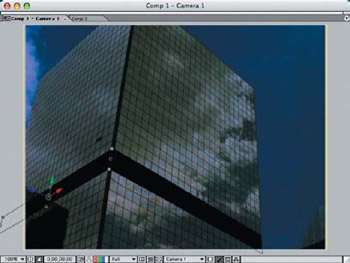
Figure 15.10: Duplicate the text comp layer and reposition and resize it to fit the adjoining side of the building.
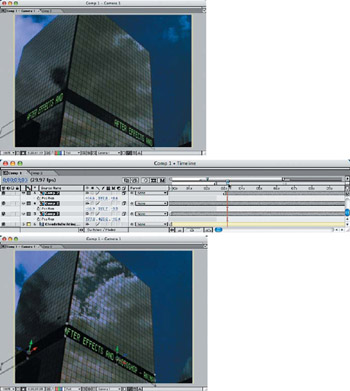
Figure 15.11: To correct the mismatched timing of the ticker board wrapping around the building, duplicate the text layer and adjust the start and end points on the Timeline.
For the finishing touch, I wanted the black areas to take on some of the shininess and reflectiveness of the glass on the building, to better blend them in. I duplicated the original footage layer and moved it to the top layer in the Timeline. I set the Blend Mode to Lighten and the layer Opacity to 25% (Figure 15.12). The end result was a slight reflection over the ticker board areas, and that completed the composite.
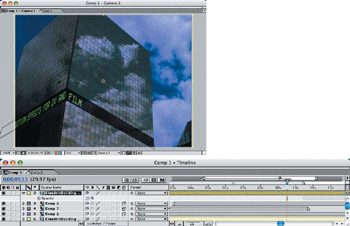
Figure 15.12: Create a slight reflection on the sign by duplicating the original footage, overlaying the text layers, and adjusting the Opacity and Blend Mode to Lighten.
Animating Text Layers in After Effects
After Effects has some powerful text animation capabilities that don't require any external resources or graphics in order to create eye-catching title animations. Using text layer animation tools, you can break up words into individual letters that can zoom, pan, wiggle, and fly around as if they were individually programmed in a 3-D application. The big difference is that the After Effects text animators are so simple and easy to use.
The examples I've chosen for this part of the chapter barely scratch the surface of the endless possibilities of the After Effects Wiggly and Range text animators. All of these example projects are easy to follow and reproduce and use no third-party plug-in effects or imported files. I wanted to demonstrate some production titling effects that may appear somewhat familiar to you but aren't the actual animations for the names or titles I've chosen. I hope they can spur you on to experiment with your own projects. You'll discover that making fine adjustments to the animation settings can produce very different results.
Fly In Zoom Titling
A simple yet effective motion-titling animation that works great with short titles or names, this effect looks much more difficult to produce than it really is. With only a couple of settings of the text animator, it will break up a word into separate letters and have them fly in from the camera's perspective and zoom down to form the word on screen:
- Start with a new After Effects project file and create a new composition, NTSC 640480.
- Use the Text tool to create a text layer by clicking in the middle of your Comp 1 window. Using a large sans-serif font, such as Arial, type a name or short title that fits well inside the width of the frame (Figure 15.13).
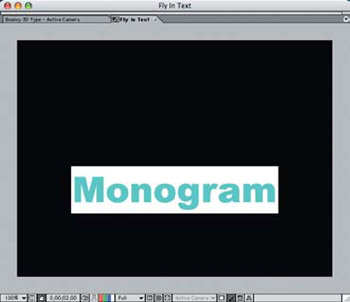
Figure 15.13: Type in a short name or title using a large sans-serif font.
| Note |
If you wish to simply review the following completed After Effects titling examples, you'll find them all inside one project file, Wiggly-Range.aep, located in the Chapter 15 folder on the DVD. |
- To set up the animation of the text, apply the Range text animator (Animation > Add Text Selector > Range). Spin down the text layer arrow on the Timeline and then the Range Selector arrow. Click the Add selector and choose the Scale property (Figure 15.14); then choose the Opacity property. These are the two parameters that will cause the text to zoom in.
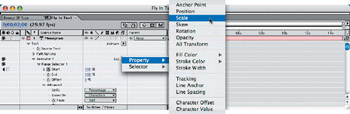
Figure 15.14: Apply the Range Text Selector, and select the Scale and Opacity properties from the text layer in the Timeline. - Spin down the Advanced arrow and set the Opacity to 0% and the Scale to 1000%. This will be the largest state of the letters prior to zoom in, because they will also fade in from 0% to 100%.
- Next, adjust the Ease High setting to 0%—which gives the animation its amount of motion (Figure 15.15).
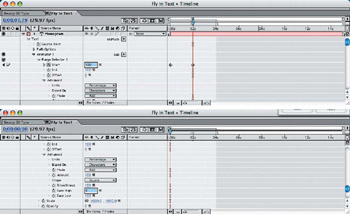
Figure 15.15: Set the parameters for the Range Selector to create this simple title animation. - Click the Range Selector Start percentage Stopwatch and set the amount to 0%. Move the Indicator down to the 2-second mark and set the Start amount to 100%.
- Render a RAM Preview to see the animation. To make speed adjustments, simply move the Start percentage keyframe back or ahead on the Timeline. Notice how the letters scale down and fade in to create the zooming effect (Figure 15.16).

Figure 15.16: Adjust the Start percentage keyframe to speed up or slow down the animation rate. - To finish off the title animation, make it fade out at the end by adding keyframes to the layer Opacity and setting them to fade from 100% to 0% (Figure 15.17).
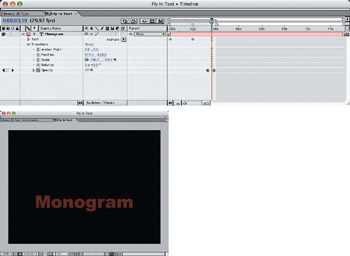
Figure 15.17: Create an Opacity fade-out at the end of the titling animation to finish it off.
Bouncy 3 D Titles
This is a fun titling effect that really shows off the 3-D effect because of the constant bouncing motion. By applying the Wiggly animator to the text you can make it bounce and wiggle slightly while the 3-D layer projects shadows on the wall behind it. This playful title animation can be used for a comedic effect or just an eye-catcher:
- In a new composition, create a text layer with the Text tool in the Comp window. Select a large fun-styled font (I used a TrueType font called Hasty Pudding for this example), and type in a title or name that fits within the width of the frame (Figure 15.18).

Figure 15.18: Create a colorful text layer with a fun font. - Apply a bright orange color for the text fill and a 2-pixel red outline to give the text definition from the background.
- Create a new solid layer with a light-green background to contrast with the orange and red text, and place it below the text layer. Set both layers to 3-D in the Timeline window.
- Apply the Wiggly text animator (Animation > Add Text Selector > Wiggly), and spin down the text layer arrow on the Timeline to make adjustments for the animation.
- Click the Add selector and choose the Position and Rotation properties. Set the Rotation for 0 +20.0, the maximum amount of rotation the letters will get, and set the Position to 5.0, 10.0 for X-and Y-axis movement (Figure 15.19). Set the Wiggles/Second to 6.0 for a gentle motion. Increase or decrease the amount, and then use a RAM Preview to see how the various amounts affect the type.
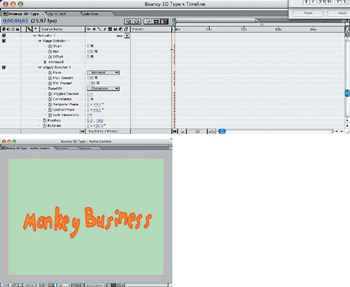
Figure 15.19: Apply a Wiggly text animator and set the parameters to create the animation. - Change the Comp view to Left view and position the two layers apart from each other. Check the positioning in the Active Camera view—if you move the green solid layer back too far, simply increase its scale in the Timeline.
- Create a new Light layer, a Spot light with a 90% Intensity, the Cone Angle set to 130, and a 50% Cone Feather. Set the Shadow Darkness level to 65%, and be sure that the Casts Shadows check box is selected (Figure 15.20).
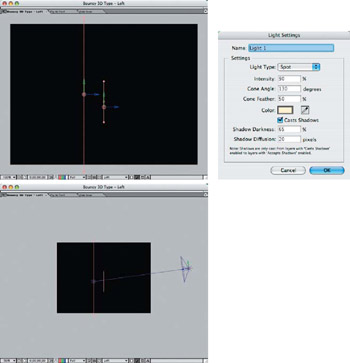
Figure 15.20: Move the 3-D layers apart to create depth and create a new Spot light to cast shadows. - Return to the Left view on the comp and reduce the view scale to 50% so you can move the light back away from the text and background.
Render a RAM Preview to see the animation in motion. Select the Motion Blur check box in the Timeline and see the effect it has on the rapidly moving letters—it helps give the animation a softer and gentler motion (Figure 15.21).
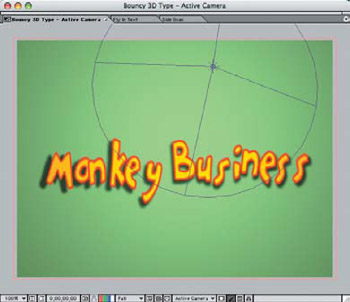
Figure 15.21: Apply Motion Blur to the text animation to give it a more realistic 3-D effect.
Horizontal Scanning Title
This is a popular effect for movie promos and titling, and it can be done with no third-party plug-in effects. The individual letters of the title do a random scanning along a horizontal line and slowly build up the title. Adding additional blurred layers gives the effect some smoothness and depth, while adding a light burst in motion finishes off the animation:
- Create a new comp and add a line of text for the title.
- Apply the Wiggly text animator and spin down the text layer arrows in the Timeline to make adjustments to the Wiggly animator settings. Click the Add selector and choose the Position parameter. To make the animation maintain its horizontal-only motion, set the Position X-axis to 300.0 and leave the Y-axis at 0.0 (Figure 15.22). Set the Wiggles/Second to 25.0 and the Correlation to 50% to keep the letters from moving around too wildly.
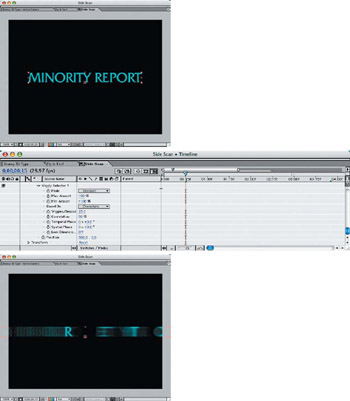
Figure 15.22: Create a text layer and apply the Wiggly text animator to it. - Add a Range Selector animator and move the Indicator on the Timeline to the 2-second mark. Click the Start Stopwatch and set the parameter to 0%. Move the Indicator down toward the 4-second mark and set the Start parameter to 100% (Figure 15.23). This will allow the animation to continue scanning back and forth for 2 seconds and then start to build in the title letter by letter.

Figure 15.23: Set the Range Selector to animate past 2 seconds and slowly build in the title. - Duplicate the text layer and move it below the original.
- Remove the Range Selector keyframes so the animation continues.
- Apply a 15.0-pixel Gaussian Blur to the duplicate layer to add a soft glow to the letters in motion (Figure 15.24). This gives the animation another level of depth and light.
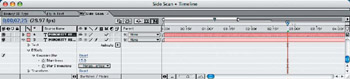
Figure 15.24: Duplicate the text layer, blur it, and position it below the original.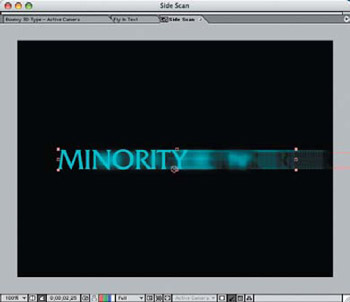
Figure 15.24: Continued - Create a new solid layer in white. Add an elliptical mask to the layer and set the Mask Feather to 100.0 pixels and the Mask Expansion to –80.0 pixels.
- Duplicate the original text layer and position it above the masked solid layer.
- Apply a Track Matte, Alpha Matte to the solid layer to constrain the glow to inside the title lettering (Figure 15.25).
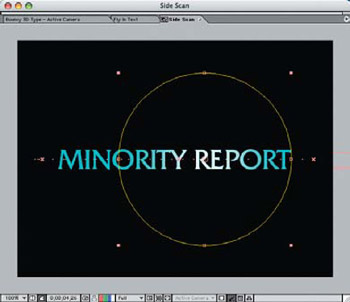
Figure 15.25: Add an internal glow to the text by masking a solid layer on top of the original text. - Duplicate the solid layer, position the duplicate at the top level, and rescale it down to 50% (Figure 15.26). Move the Indicator to Frame 04;23 and click the layer Scale Stopwatch to set the keyframe. Move the Indicator one frame to the left and set the Scale to 15%; repeat this one frame to the right.
To give the effect another layer of motion and interest, let's animate the solid burst layer to move along the length of the text layer and change the Opacity to create a single-frame "flash." The solid layer starts centered in the letter Y and remains there until Frame 04;02; then it moves to the left of the first letter and changes Opacity along the path (Figure 15.27). Apply the Position and Opacity settings from Table 15.1 to see how the patterns line up with the Scale of the layer.
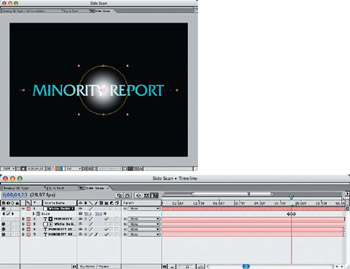
Figure 15.26: Create a light burst by duplicating the solid layer and positioning it on top.
|
Transform |
03;00 |
03;13 |
04;00 |
04;06 |
04;11 |
04;12 |
04;21 |
04;23 |
04;25 |
05;02 |
|---|---|---|---|---|---|---|---|---|---|---|
|
Position X,Y |
327.0,241.0 |
50.0,241.0 |
600.0,241.0 |
|||||||
|
Scale% |
15.0 |
50.0 |
15.0 |
|||||||
|
Opacity% |
0 |
100 |
0 |
0 |
100 |
100 |
0 |
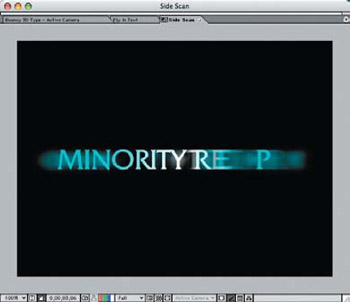
Figure 15.27: Animate the burst's movement along the length of the line of text, and adjust the Scale of the solid layer to correspond with the set Opacity.
What s the Buzz?
When you experiment with the Wiggly and Range text animators, you'll discover some really great effects that will spark your imagination. I stumbled across this next animation by accident and thought it would be great to create a title from an older classic movie opener. The pattern reminded me of a swarm of bees, so I thought the movie title The Swarm would be a great example. The buzzing, flying letters came to rest one at a time, but then I took one letter out of a name or the title to buzz back out quickly and return. I created the lead character actors' names in sequence before the actual title in this project. Follow along with the After Effects project file TheSwarm-Title.aep, and check out the final rendered QuickTime movie in the Chapter 15 folder on the DVD.
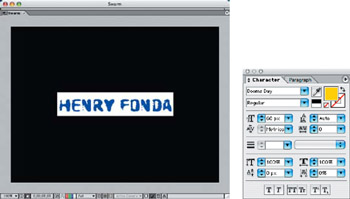
Figure 15.28: Create a new comp and place a line of bright text in a large font in the center.
I started with a new After Effects comp and placed a line of large text in the Comp window. For this title project, I chose a creative font called Dooms Day and gave it a yellow fill color (Figure 15.28). The text in this figure appears blue because it is selected and shows only the complementary color of the applied color.
I applied the Wiggly text selector to animate the text layer, and then I added a Position parameter of 400.0 horizontal and 300.0 vertical for movement that stays inside the Comp window frame (Figure 15.29).
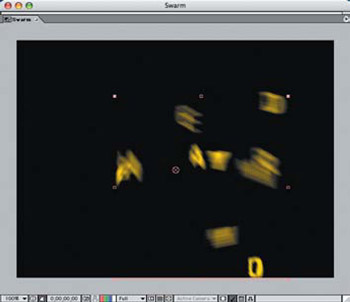
Figure 15.29: Add a Wiggly text selector to animate the letters.
I then adjusted the Start range to 0% for the first couple of seconds and set keyframes for the letters to end at 100%, for about 15 frames (Figure 15.30). I wanted the last letter to quickly fly up and buzz around for a few frames and then get back in line again, so I added some keyframes and set the next keyframe to 90% and then switched back to 100% a few frames later. I also added an Opacity fade-out to the end of each name in the sequence.
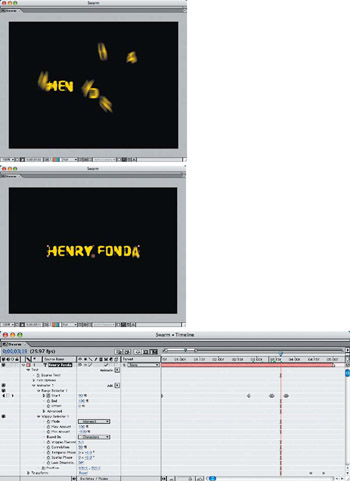
Figure 15.30: Set the Start range keyframes to control the amount of "flight" the letters take.
In order to keep from repeating the same animation pattern on every actor's name in the title sequence, I varied the Offset rate by sliding the amount on the Time line until only one letter at a time moved (Figure 15.31). I then changed this amount for each of the names and the main title.
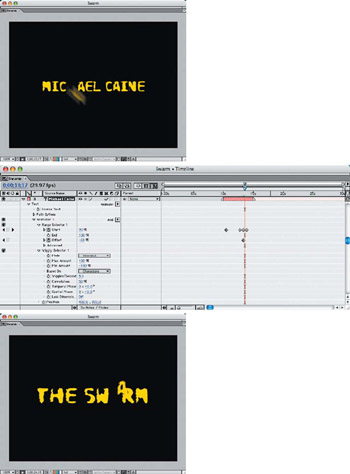
Figure 15.31: For variation in the title sequence, adjust the Offset rate to select different letters to animate.
Part I - Connecting Photoshop, ImageReady, and After Effects
- Basic ImageReady Animation, Tweening, and Layer Styles
- Photoshop Layers and After Effects
- 3-D Layers from Photoshop Layers
Part II - Applying Animation Concepts
Part III - Clean-Up, Mattes, and Objects
- Blue-Screen Garbage Mattes
- Rotoscoping Techniques with Photoshop
- Matte and Keying Plug-ins
- Static Matte Painting in Photoshop
- Motion Matte Painting in Photoshop
- Making Movies from Stills
Part IV - Advanced Movie Magic
EAN: 2147483647
Pages: 104
