Motion Matte Painting in Photoshop
Motion mattes are those that move, pan, zoom, or track along with footage, or mattes where simulated motion is created in the background from a still photograph. Another popular technique used in film and television today is the layering of several still images that are cut out and set into motion to create a complete moving scene.
Background in Motion
This process of creating a background matte that has elements in motion provides a realistic setting for a blue-screen composite. Oftentimes, an entire background matte does not lend enough detail and believability to a scene, especially if it's a setting that should show some activity.
In this example, I used a single frame from a digital video clip of a Manhattan cityscape that I shot from the observation deck in Tower 1 of the World Trade Center in 1998 (Figure 10.1). It seemed like a perfect angle for the blue-screen footage I had from another client's project—the blue-screen rotoscope project in Chapter 7, "Rotoscoping Techniques with Photoshop."

Figure 10.1: Use a single frame from a digital video clip for the background matte base.
| Note |
If you would like to follow along with this project, you can find the Photoshop file (BSCompBG.psd) and the After Effects file (NewComposite6.0.aep) in the Chapter 10 folder on the DVD. |
To turn this still image into a believable background, I had to put several small elements in motion. The obvious choices were the cars, trucks, and buses on the streets below. I chose the larger items such as trucks and buses first, selecting them with the Marquee tool and copying and pasting them to a new layer (Figure 10.2). I then moved the large vehicles to another unoccupied portion of the street for easy reference later in After Effects. I continued with some of the taxis and cars on the left side of the frame, producing several items that would be put in motion at various intervals, speeds, and directions.
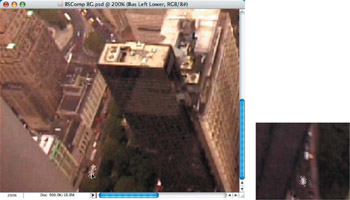
Figure 10.2: Duplicate individual vehicles and place them in empty areas on the streets below.
I used the composite frame of the actors walking on the blue screen from the garbage matte project in Chapter 6, "Blue-Screen Garbage Mattes," and centered them in the frame. I then created a new layer below them and painted a rough perspective guide for the path they would be walking on in the final composite (Figure 10.3).
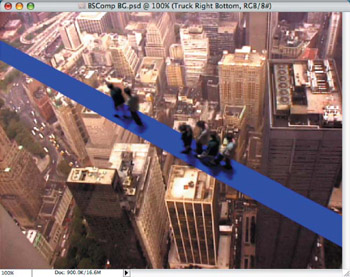
Figure 10.3: Add a rough guide layer for the path the blue-screen actors will walk on.
For the plank I wanted the actors to walk on, I used digital image samples of rusted metals and applied several Transform functions to make them match the rough perspective layer created in the previous step (Figure 10.4). I used the Perspective, Skew, and Distort options to position the layer as close to the rough layer as possible.
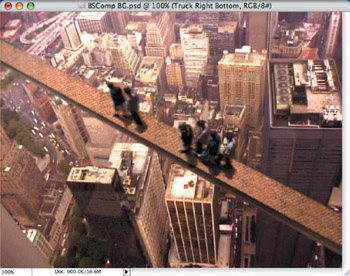
Figure 10.4: Combine several building material images to create the plank base the actors will walk across.
I then created another layer and painted in some steel poles and cable for safety railings in the foreground of the actors layer. Next I duplicated this layer, positioned it behind the actors layer, and modified it to match the correct perspective and scale in the scene (Figure 10.5).
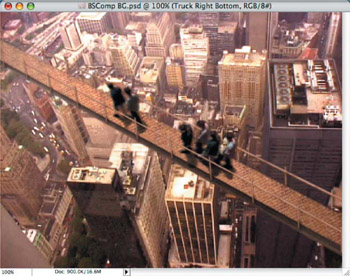
Figure 10.5: Add layers of rusted steel poles and cable as a safety railing.
Adding a Foreground Matte
Another moving matte technique commonly used is an atmosphere matte, where a still image of clouds, fog, or rain is often screened over a scene to produce a more realistic outdoor effect. For this project, I created a clouds layer in Photoshop, reduced it in opacity, and changed the Blend Mode to Screen to add a "haze" to the atmosphere overall.
I started by adding a new layer to the Photoshop file and filled it with the foreground color (though any solid color will do). I then applied the Clouds filter to the layer (Filter > Render > Clouds; Figure 10.6). I set the layer's Opacity to 25% and the Blend Mode to Screen. These settings were only temporary so I could see the effect the layer would eventually have on the underlying layers in the final composite.

Figure 10.6: Add a clouds layer in Screen Mode to create a hazy atmosphere that will be set in motion in After Effects.
| Note |
Learn more about the technique of adding clouds, noise, and film grain in Chapter 14, "Atmosphere, Film, and Noise Effects." |
Putting the Elements in Motion
All of the motion matte elements were contained in layers in the one Photoshop file. So using it in conjunction with the one blue-screen file with the actors on it, I could create a multilevel composite in After Effects.
I imported the Photoshop file into After Effects as a composition to retain all of the layer data, and then I dragged the entire folder from the Project window to the Timeline to ensure the proper alignment of the layers.
Starting with one vehicle at a time and the Indicator set at zero, I moved each vehicle along the streets and around the other cars and trucks as if they were in traffic. As with the truck in Figure 10.7, I played with the rate of speed and with the position and rotation of the layer elements to simulate realistic travel. I gave this truck a course to move forward and then pull over to the curb and park.
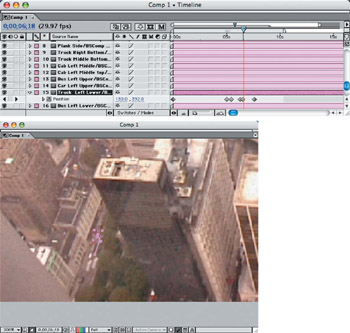
Figure 10.7: Move and rotate the truck layer to simulate parking alongside the curb.
I continued with all of the other vehicle layers, viewing RAM previews to test for speed; I did catch a few exceeding the speed limit quite a bit, so I had to adjust the keyframe markers. Some of the cars had "happy accidents," including the cab in Figure 10.8. I used the Rotate tool to make slight movements, but it had a mind of its own and ended up spinning out around the corner. I left it in the final project file and QuickTime movie, so you can see what's happening with it.
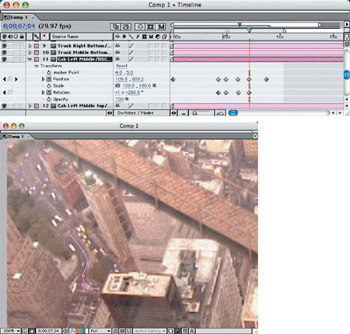
Figure 10.8: A cab lost control and spun out around a corner unintentionally, but I left it in for comedic effect.
After completing all of the vehicle layers, I scaled down the imported blue-screen footage layer to fit the plank the actors were to walk on. I used Keylight to provide the keying composite (Figure 10.9). Some additional foreground color adjustments were necessary to match the color hues of the background layers.
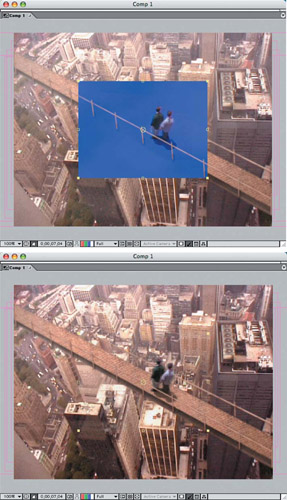
Figure 10.9: Use Keylight to provide the chroma keying.
Using techniques covered in Chapter 14, I added a noise movie to create a simulated film grain over the static images below and animated the clouds layer. I placed the noise movie I used, Noise.mov, above all of the layers except the blue-screen video footage layer. I set the Opacity to 50% and the layer Blend Mode to Multiply (Figure 10.10).

Figure 10.10: Add a grainy effect to the static layers to provide a believable film grain to the static layers below
I placed the clouds layer on top of all other layers, including the blue-screen movie layer. I stretched out the clouds layer to over 150% in width, while retaining its height at 100%. I could then place it at the extreme left side of the screen and move it horizontally across the frame during the length of the running footage (Figure 10.11). I set the Opacity to 25% and the Blend Mode to Screen, as I did in the Photoshop file.
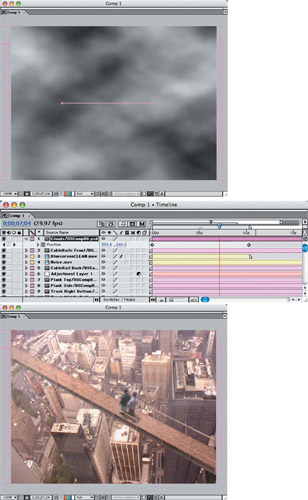
Figure 10.11: Stretch out the clouds layer and slowly move it horizontally across the screen.
Masks and Mattes in Motion
There will be times that you will have some footage that just needs some "pop" in the background—especially the sky, shot on a hazy day. But how do you replace a sky in running footage when there's no defining color in the sky to key out? This is when painting a mask can help. Using a painted mask on a locked-off shot will allow you to replace a background with either a footage clip or still mattes in motion.
This project encountered many of the problems you may face with ordinary video footage, including stabilizing a handheld shot to lock it off and create a mask for it. In addition, I used two layers of clouds as background motion mattes for the sky effect.
| Note |
To follow along with this project, you can find the QuickTime footage file, JF-NYC1.mov, and the After Effects file, NYC1-Stablz-Project.aep, in the Chapter 10 folder on the DVD. |
Although this project is a "worst-case scenario," it's a perfect example of just how powerful the tracking and stabilization tools are in After Effects 6. The first step in stabilizing this clip was to lock the jumping motion of the camera (Figure 10.12). I simply found a point on the image I wished to stabilize with the tracker and adjusted the box to fit tightly around that point.
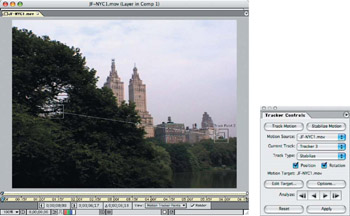
Figure 10.12: Use the Motion Tracker in After Effects to stabilize the jumpy video clip.
The next requirement was to stabilize this clip to eliminate the rotation of the camera motion (Figure 10.13). I selected two definitive points on opposite sides of the frame so that the After Effects tracker could analyze the footage and correct the problem.
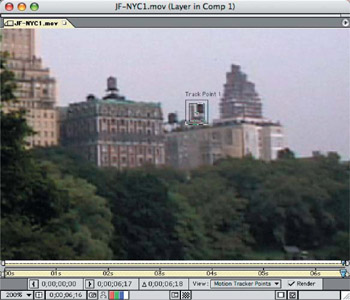
Figure 10.13: The Motion Tracker does a great job with the rotation of the footage.
Once the stabilization was applied, I increased the Scale to about 110% so the old edges would be cropped off.
Creating the Mask
If you open a movie in QuickTime Pro, you can go to any frame and copy that single frame to the clipboard. You can then paste that frame into a new file in Photoshop that will become the mask used in the project.
Since the pasted layer was "floating" in Photoshop, I just deleted the background layer, since I wouldn't need it later. Using the Magic Wand tool, I selected most of the sky to delete it. I then finished the detail areas with a small Eraser tool (Figure 10.14). When you try this procedure on your projects, make sure to remove all instances of the sky that are visible through the trees.
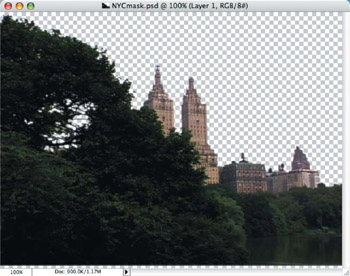
Figure 10.14: Edit a single frame of the video on a layer in Photoshop to use as a static mask for the video clip.
Once the mask was completed, I imported it into the After Effects file with transparency. I then aligned the mask layer with the stabilized video footage layer and increased the scale to 110% so it matched the resolution of the video layer. With the mask layer directly above the video footage layer in the Timeline, I selected the video footage layer and applied a track matte (Layer > Track Matte > Alpha Matte), which provided a clean mask of the sky (Figure 10.15).
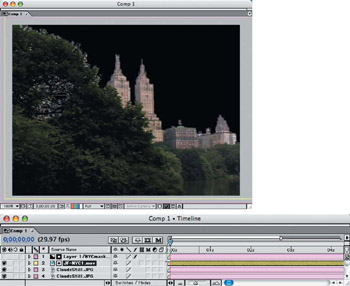
Figure 10.15: Use a track matte of the video footage to create a clean void for a new sky.
Creating Still Mattes in Motion
Instead of using stock video footage for a replacement sky, you could use a single still image and slowly "scoot" it along in the background. Or you can layer it, vary the motion between the two layers, and get very realistic results. This very simple method of creating mattes in motion is an effective replacement for video footage. By duplicating the sky layer, flipping it horizontally, and adjusting the Blend Mode, the clouds will look as if they intersect in three-dimensional space.
I started with an image file that was slightly larger than the 640480 NTSC composition window, since it needed to be stretched, zoomed, and panned across the frame (Figure 10.16). I placed this layer just below the masked video layer.
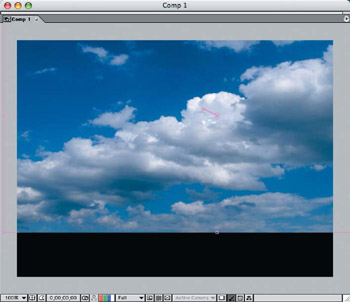
Figure 10.16: Use an image file size slightly larger than the composition if you will be zooming or panning the background matte.
To give the first clouds layer variable motion, I moved its position along the Timeline slightly, but I also zoomed in on the layer to give it the illusion that the clouds were traveling from left to right and toward the screen approximately 100 pixels (Figure 10.17). Over the duration of the 6-second Timeline, I moved the clouds layer and increased the scale from 100% to 103%.
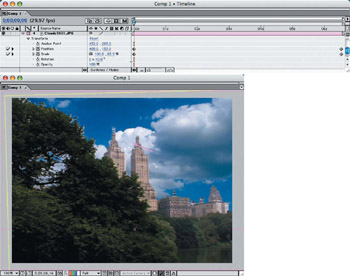
Figure 10.17: In addition to panning the clouds layer, add a slight zoom to create another dimension.
Next, I duplicated the clouds layer in the Timeline and flipped the image horizontally by adjusting the X-axis scale to a negative (–) amount. So as not to merely "mirror" the motion of these clouds with the previous clouds layer, I did not move the position. I applied only a small amount of scale, in reverse, starting with –92.0% and ending with −90.0% (Figure 18). Then I set the layer's Blend Mode to Lighten so the clouds would intersect between the layers.
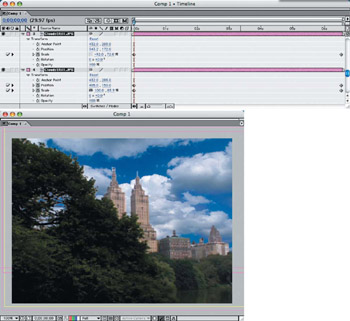
Figure 10.18: Invert the duplicated clouds layer and very slightly zoom it to create a 3-D effect in the sky.
Simulated 3 D Mattes and Layers
A popular effect in television commercials uses still images that are arranged and layered so that they appear to be all from the same image setting, but panned and zoomed to the camera to give the illusion of depth and realism. The reason this effect appears to be three-dimensional is not only that the layers pan and zoom against the background and other layers, but also that the focus of the individual layers is softened with a blur when each gets closer to the "camera."
This short six-second animation project demonstrates how simple this effect is to produce for your own projects. I started with a very large Photoshop file, because it would be zoomed into very deeply (toward 100%). First, I needed to copy and paste foreground sections of the original image into layers; this would later allow for slight movement between the individual kids layers in the flower field (Figure 10.19). I used the Lasso tool to select sections of the floral image and copied and pasted them to create a new layer. I saved this as a Photoshop file with layers.
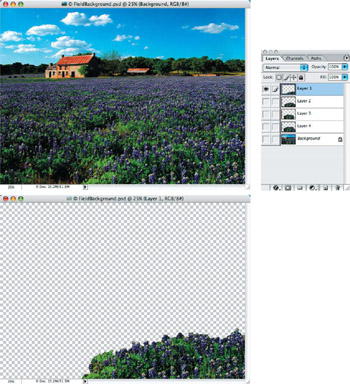
Figure 10.19: Start with a background scene that is intentionally very large so it can be zoomed into in the composition.
| Note |
To follow along with this project, you can find the background Photoshop file, FieldBack ground.psd, and the After Effects file, KidsZoom.aep, as well as the stock library TIFF images of the kids in the Chapter 10 folder on the DVD. |
I used pre-matted images from PhotoSpin.com's library of kids’ perspectives. These pre-matted TIFFs are extremely handy when you need just the subject and don't have time to manually create your own masks (Figure 10.20).
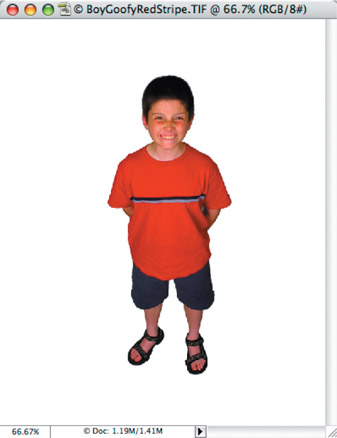
Figure 10.20: Use pre-matted objects in this project so that importing them directly automatically sets their background to transparent.
I then placed the individual images on the Timeline and positioned and scaled them to their initial size as they would appear at the start of the composition (Figure 10.21). I've provided a chart of the precise scale and positioning of the individual layers (Table 10.1).
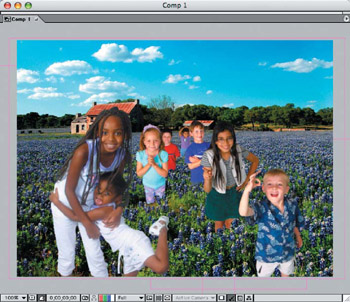
Figure 10.21: Position and scale the object layers at the start of the Timeline.
|
Transform |
Scale% |
Position X,Y |
|---|---|---|
|
TwoGirlsPlaying… |
85.0 |
196.0,358.0 |
|
LittleBoyBlonde… |
55.0 |
534.0,399.0 |
|
Layer 1/Field… |
25.0 |
324.0,240.0 |
|
GirlPointingGlass… |
55.0 |
429.0,307.0 |
|
Layer 2/Field… |
25.0 |
324.0,240.0 |
|
LittleGirlBlonde… |
40.0 |
281.0,276.0 |
|
GoofyFaceBoy… |
35.0 |
373.0,240.0 |
|
Layer 3/Field… |
25.0 |
324.0,240.0 |
|
BoyGoofyRed… |
25.0 |
301.0,230.0 |
|
Layer 4/Field… |
25.0 |
324.0,240.0 |
|
LittleGirlHands… |
15.0 |
343.0,214.0 |
|
Background/Field… |
25.0 |
324.0,240.0 |
The characters and floral layers were individually "zoomed into" down the Time-line by changing their position, scaling them up, and applying a subtle Gaussian Blur that increases over time the closer they get to the "camera lens" (Figure 10.22 and Table 10.2). It's easiest to start with the farthest character and build up from there.
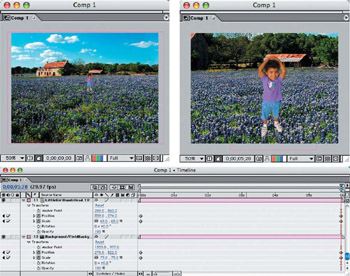
Figure 10.22: Reposition, scale, and blur each character layer as it appears to be passing up the "camera"or viewing plane.
|
Transform |
Scale% |
Position X,Y |
|---|---|---|
|
TwoGirlsPlaying… |
375.0 |
-490.0,886.0 |
|
LittleBoyBlonde… |
260.0 |
1312.0,1057.0 |
|
Layer 1/Field… |
180.0 |
242.0,-62.0 |
|
GirlPointingGlass… |
200.0 |
819.0,599.0 |
|
Layer 2/Field… |
100.0 |
234.0,354.0 |
|
LittleGirlBlonde… |
150.0 |
-9.0,502.0 |
|
GoofyFaceBoy… |
140.0 |
527.0,404.0 |
|
Layer 3/Field… |
90.0 |
224.0,414.0 |
|
BoyGoofyRed… |
110.0 |
171.0,324.0 |
|
Layer 4/Field… |
75.0 |
288.0,35.0 |
|
LittleGirlHands… |
65.0 |
359.0,274.0 |
|
Background/Field… |
75.0 |
278.0,322.0 |
As the layers of a project start to stack up, you may experience a slower response from your animation if you are previewing at the highest resolution and full quality (Figure 10.23). If you turn the resolution to Quarter, your speed will be acceptable and you can then "scrub" the Timeline Indicator over periods of time to see how your animation is moving.
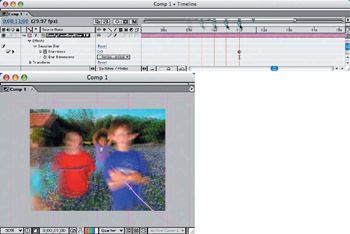
Figure 10.23: Lowering the resolution to Quarter will speed up the positioning and scaling process and will allow you to "scrub"preview the Timeline.
Next I applied a Gaussian Blur over time in the Timeline for each layer to give the appearance of forced depth of field (Figure 10.24). I adjusted all the layers individually to control the effect (Table 10.3).
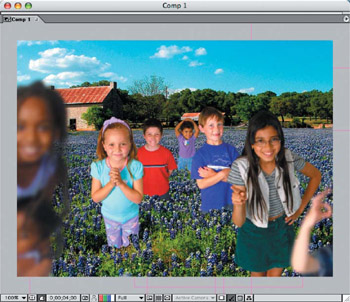
Figure 10.24: Increase the Gaussian Blur over time to help reinforce the 3-D effect of the zoom-in.
|
Keyframe |
0;00 |
3;00 |
3;22 |
4;08 |
4;21 |
5;29 |
|---|---|---|---|---|---|---|
|
TwoGirlsPlaying… |
0.0 |
8.0 |
||||
|
LittleBoyBlonde… |
0.0 |
8.0 |
||||
|
Layer 1/Field… |
0.0 |
8.0 |
||||
|
GirlPointingGlass… |
0.0 |
8.0 |
||||
|
Layer 2/Field… |
0.0 |
8.0 |
||||
|
LittleGirlBlonde… |
0.0 |
7.0 |
||||
|
GoofyFaceBoy… |
0.0 |
3.0 |
||||
|
Layer 3/Field… |
0.0 |
5.0 |
||||
|
BoyGoofyRed… |
0.0 |
2.0 |
||||
|
Layer 4/Field… |
0.0 |
2.0 |
||||
|
LittleGirlHands… |
N/A |
|||||
|
Background/Field… |
N/A |
Because the zoom effect starts out with characters in the foreground, it will appear as if it zooms in very fast and then slows down. To help fool the eye in making a smoother zoom in animation, apply an Easy Ease Out on all of the keyframes for Scale, Position, and Gaussian Blur at the first frame (Figure 10.25). Adjust the Key frame Velocity to 100% to make a longer Ease Out duration.
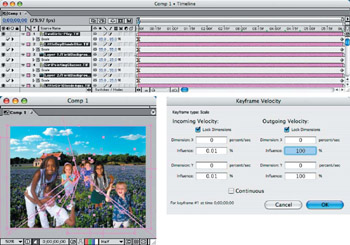
Figure 10.25: Adjust the Keyframe Velocity of the Ease Outs at frame 0;00.
Part I - Connecting Photoshop, ImageReady, and After Effects
- Basic ImageReady Animation, Tweening, and Layer Styles
- Photoshop Layers and After Effects
- 3-D Layers from Photoshop Layers
Part II - Applying Animation Concepts
Part III - Clean-Up, Mattes, and Objects
- Blue-Screen Garbage Mattes
- Rotoscoping Techniques with Photoshop
- Matte and Keying Plug-ins
- Static Matte Painting in Photoshop
- Motion Matte Painting in Photoshop
- Making Movies from Stills
Part IV - Advanced Movie Magic
EAN: 2147483647
Pages: 104
