Scale and Speed
It takes more than just well-blended pixels to make a composite of motion layers believable. Perspective, scale, and speed of the object layers all need to be taken into consideration as well. Moving objects in the distance will appear slower than those in the foreground at the same speed. Larger characters will appear to be more lumbering and lethargic than smaller characters in the same scene. This is in part why Godzilla actually looks like a man in a rubber suit next to all the tall buildings with tiny people running around, but the T-Rex in Jurassic Park appears more lifelike in its movements. The man in the Godzilla suit was filmed at the same speed as the people running around, so no matter how well the building models were made, how the set was lit, or even how detailed the monster suit was, the speed of the motion did not match the scale of the creature.
Distance, Perspective, and Speed
What happens to an object in the distance that is traveling at the same rate of speed as another identical object closer to you? If you look up a city street and watch the cross traffic several blocks away, you will see that the perspective view not only makes the cars appear smaller, but it makes them appear to travel a shorter distance.
Look at the diagram of three cars in Figure 12.1. If you draw perspective lines that represent approximately the same distance of travel for the car in the background as the car in the foreground, this will help you determine what the rate of speed should be to correctly match them.

Figure 12.1: Determine the distance a far object travels to match its rate of speed with that of the foreground objects.
By setting the position keyframes for the beginning and end points of all three cars along the same amount of time on the Timeline, you apply the appropriate speed to each layer (Figure 12.2). I've animated this simple three-car scene in DistanceRelativity.mov, which is included on the companion DVD. This is a pretty easy method of figuring a layer object's motion in perspective when you have a similar foreground object to compare it with.
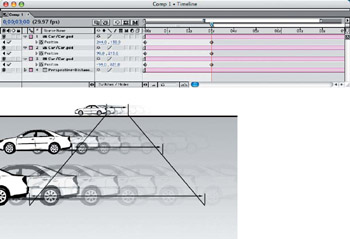
Figure 12.2: Set the beginning and end position keyframes for all layers in motion along the Timeline to determine the rate of speed.
| Note |
You can view the example After Effects projects from this chapter, and their completed QuickTime movies, in the Chapter 12 folder on the DVD. |
Size, Mass, and Speed
Why do larger objects and characters have to appear to move slower than smaller ones? It's because of the effect that the Earth's gravity and atmospheric pressure have on objects that have a large mass. Ever notice how easy it is for a hummingbird to fly and dart around? Imagine a condor trying to keep up with a hummingbird! Or picture an elephant trying to keep up with a cheetah. Size, mass, and weight affect how we perceive visual scale and speed of motion in special effects and composite shots.
In the DinoCity.mov example, I added a layer of DV footage of a dinosaur puppet to a cityscape foreground and background. To make the small puppet appear to be a huge and ominous creature, I slowed down the playback speed of the footage. By selecting the layer and adjusting the Time Stretch amount (Layer > Time Stretch), you can increase or decrease the playback speed of any motion layer (Figure 12.3). In this case, I adjusted the Stretch Factor to 200%; it could be slower, but then it might not appear as smooth in movement because of the lower playback frame rate. If you have no reference to match the scale and speed to, then you'll need to make adjustments until they look right to you.
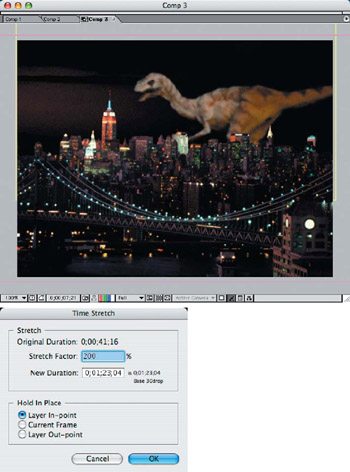
Figure 12.3: Adjust the Time Stretch on a motion layer to set the correct speed for the scale of the object in motion.
It is common practice to adjust motion layers to account for the scale of creature effects in motion pictures. However, these are normally shot at a higher film speed to create a smoother motion at a reduced speed.
My next example (Small-LargeDinos.mov) uses the same dinosaur puppet footage to simulate both an adult and a juvenile raptor in a cave. The original Scale of the puppet was actually about three feet in height, but it had to appear to be about five or six feet in height for the adult in this example composite (Figure 12.4). I adjusted the Scale of the two layers of puppet footage accordingly, as well as the Stretch Factor for the speed in which they appear to move in playback. I set the adult layer to 150%, while setting the juvenile raptor to 50% of the original footage length. The adult raptor appears to move slower than the original footage to give it some visual mass, while the juvenile raptor's motions, in comparison, appear rapid and darting.
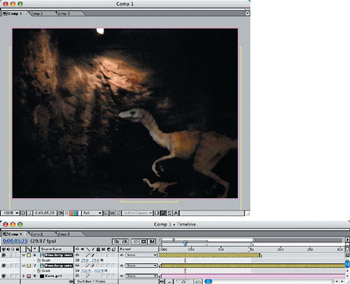
Figure 12.4: Adjust the Time Stretch and Scale of duplicate layers of the same footage to make it appear that both the adult and juvenile dinosaurs are in the same scene.
Distance and Speed
Have you ever noticed, while driving down a long straight road, that a sign or landmark doesn't appear to be getting closer until you are almost right upon it? It's as if you aren't traveling very fast until the last couple of hundred yards. Though objects in the distance don't really move slower, it often appears that they do—especially if they are moving toward the camera.
If you examine my video footage of Times Square in New York City, you'll notice that the truck and bus that I've placed arrows over appear to be moving very little for the first half of the clip. You can find this QuickTime movie, DistanceSpeed.mov, in the Chapter 12 folder on the DVD.
This clip shows two one-way streets of oncoming traffic at a steady pace, with no slowing or stopping. The first 8 seconds of the 15-second clip show very little travel in the two marked vehicles (Figure 12.5). Only slight variations in movement and scale are apparent.
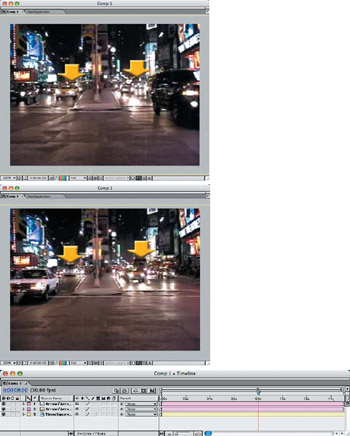
Figure 12.5: Between the first frame and the 8-second mark, very little travel distance or increased scale is apparent.
Between the 8-second and 12-second marks, the rate of travel for both the truck and the bus increases dramatically (Figure 12.6). Notice that they're increasing in scale as well as speed as they approach the camera, and more details on both vehicles become visible.

Figure 12.6: The vehicles appear to be approaching faster in the next 4 seconds of the clip.
In the last 3 seconds of the 15-second clip, the truck and bus run off the edges of the screen (Figure 12.7). This is the greatest amount of increase in scale and motion of the entire piece of footage.
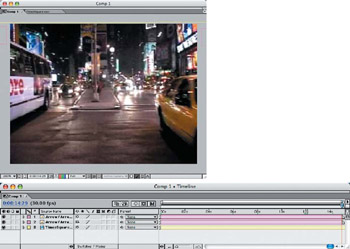
Figure 12.7: The final few seconds of the clip show the greatest amount of motion and increased scale.
Water Mass and Distance
Using the Psunami plug-in for After Effects, you can study how water moves in relation to the distance from the camera and its mass. You can also see how environmental conditions such as wind and swells can affect the appearance of the surface of the water. The examples I used in this section were all derived from the same basic Psunami plug-in settings, including water color, light source, and atmospheric conditions. The only changes I made were in the height and size of the waves, as well as wind speed and camera height.
| Note |
You can install and use the Psunami Demo plug-in, available on the DVD, to follow along and make adjustments to the After Effects file, WaterMassProject.aep, and view the appropriate Quick Time movies mentioned in each example. |
This first example makes the water surface appear as if it's a calm lake with gentle ripples and filmed only a couple of feet above the water (Figure 12.8). In fact, the camera was set at 10 meters above the water and angled down about 110 in most of these examples. What makes this example appear so smooth is that the Smoothness was set at 1.000 and the Vertical Scale of the wave was set at 0.500. Also, the wave Grid Size was set larger so the wave appears to be closer to the camera. You can view the QuickTime movie of this effect by opening the file Psunami-test1.mov in the Chapter 12 folder.
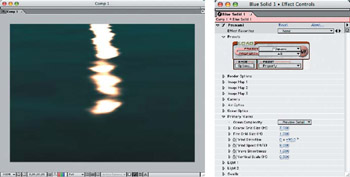
Figure 12.8: Even though the camera is 10 meters above the water surface, it appears as though it is zoomed in only a foot or two above a calm lake surface.
When I reduced the wave Grid Size to 1.000 and 0.300 and the wave Smoothness to 0.500, the camera seemed to be higher from the water's surface—though it still appears to be a lake or small body of water instead of an open ocean (Figure 12.9).
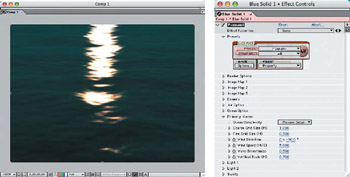
Figure 12.9: Reducing the wave Grid Size gives the appearance of more distance and adds more mass to the water surface.
Next, I increased the wave Vertical Scale to 3.000 and the Wind Speed to 8.000, and the waves started to really swell up and roll. This is definitely starting to look like a larger body of water, such as a large lake or ocean surf (Figure 12.10). Notice, though, that the camera still appears to be fairly close to the water's surface. View the QuickTime movie of this stage of the effect, Psunami-test2.mov, in the Chapter 12 folder. Adding more height and a swell to the waves increased the ocean-like appearance in the QuickTime movie sample Psunami-test3.mov.
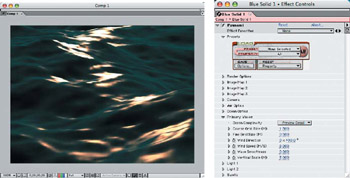
Figure 12.10: Increasing the height of the waves and the wind speed makes them roll more violently.
Increasing the camera Elevation to 100.000 meters and decreasing the Grid Sizes gave the appearance of a more distant body of water, such as an ocean or a large flowing river (Figure 12.11). Notice that there is still an active swell applied to the effect, which causes the motion to be more ocean-like. View the QuickTime movie Psunamitest4.mov to see the effect in motion.
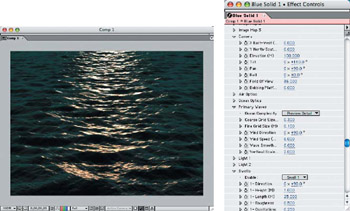
Figure 12.11: Moving the camera up and away gives you a better view of a rapidly moving larger body of water.
Moving the camera to an even higher elevation of 500.000 meters revealed an even greater expanse of flowing water (Figure 12.12). The QuickTime movie Psunamitest5.mov shows you how slow the wave motion is, which would dictate either an ocean current or a very large river flowing rapidly from a distance. This is similar to the settings that I used to create flowing water in the example movie, Water-Matte.mov, in Chapter 9, "Static Matte ‘Painting’ in Photoshop."
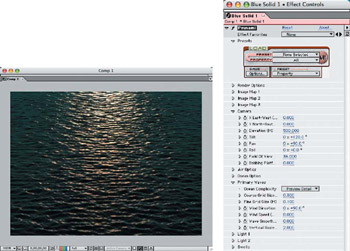
Figure 12.12: Higher camera elevation with a constant wave speed and regeneration gives the appearance of a rolling river or ocean current.
Creating Time Lapse Footage
You can easily use digital video footage to create the speed-up effect of time-lapse shots, provided you have enough source footage to supply for it. It is often necessary to have more than 5 minutes of video footage to get only 10 seconds of time-lapse. This source video needs to be shot from a locked-off position on a tripod so it doesn't appear jumpy when played back in fast motion.
The sample footage I chose was a 51/2 minute shot I took from the roof of a building right after a storm, when the clouds were beautiful (Figure 12.13). I wasn't able to include the original footage because it was too large for the enclosed DVD.
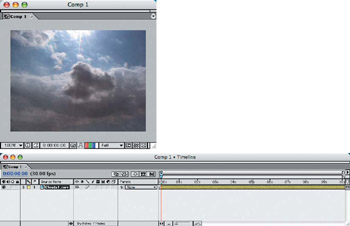
Figure 12.13: The original footage for the time-lapse example was over 5 minutes in length.
I applied Time Stretch to the movie layer and set the Stretch Factor to 3.5%, which made the new duration of the video clip just over 10 seconds (Figure 12.14). This is a fairly exaggerated amount, but it lends itself well to the subject matter. You can view the resulting QuickTime movie in the Chapter 12 folder on the DVD.
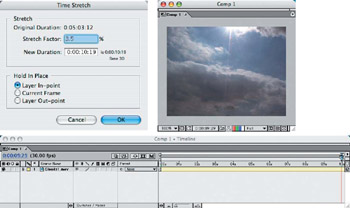
Figure 12.14: Use Time Stretch to modify the movie clip to a fraction of its original length.
Sometimes, you can use a shorter clip to create a fast-motion or time-lapse clip that can be looped to simulate a longer piece of footage. This works especially well for repeating traffic patterns such as those seen on a freeway or at a traffic signal.
This original footage was only 45 seconds long, but when I applied the Time Stretch at 10%, it ended up only 41/2 seconds in length (Figure 12.15). I then looped the final rendered QuickTime movie and played it back as a fast-motion clip, TimeLapse-Traffic1.mov, available on the DVD in the Chapter 12 folder. Notice how the traffic signal changes in the loop.
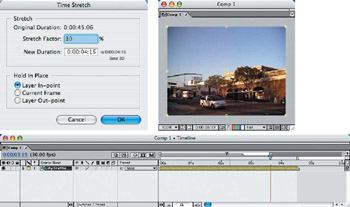
Figure 12.15: Apply Time Stretch and loop the QuickTime movie to create a longer clip.
To create a better time-lapse effect of the same footage, I applied a Time Stretch of 5% and created a clip that was just over 2 seconds in length (Figure 12.16). Even being that short of a clip, the motion is so fast that when the QuickTime movie is looped, you can't tell right away—even the traffic signal is still legible.
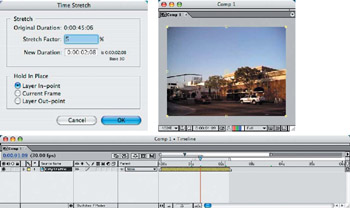
Figure 12.16: Looping a small time-lapse clip can still work visually.
Part I - Connecting Photoshop, ImageReady, and After Effects
- Basic ImageReady Animation, Tweening, and Layer Styles
- Photoshop Layers and After Effects
- 3-D Layers from Photoshop Layers
Part II - Applying Animation Concepts
Part III - Clean-Up, Mattes, and Objects
- Blue-Screen Garbage Mattes
- Rotoscoping Techniques with Photoshop
- Matte and Keying Plug-ins
- Static Matte Painting in Photoshop
- Motion Matte Painting in Photoshop
- Making Movies from Stills
Part IV - Advanced Movie Magic
EAN: 2147483647
Pages: 104
