Custom Scene Transitions
Video and film transitions have been traditionally achieved by making quick cuts and fades between camera positions or scenes. Since the introduction of desktop video, we've been inundated with a myriad of transition wipes, grids, multipliers, and so forth, but all of those start to look the same after a while. What I'd like to introduce to you in this final chapter are a few creative concepts that you can run with, modify, and customize to create your own original transitions.
Luminance Mattes from Movies
This is a great effect to use as a transition or just a composite. Similar to applying an Alpha Matte with a mask layer, using a high-contrast movie as a luminance matte allows the top and bottom layers to show through in the highlights. You can achieve this effect with both video and still image layers.
I used two video clips and one still image for this example, which you can follow along with or review in the After Effects project file LuminanceMatteProject.aep in the Chapter 16 folder on the DVD:
- Start with a new AfterEffects project file, create a comp (320240, 15 seconds), and import the three source files from the Chapter 16 folder on the DVD (Figure 16.1): CloseFireClip.mov, FirefighterClip.mov, and BurntWood.jpg.
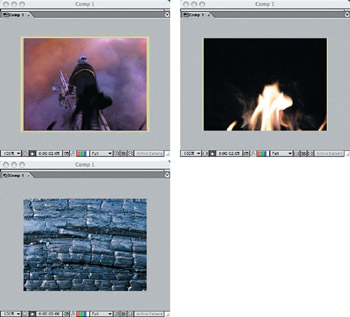
Figure 16.1: Import the source files into a new After Effects project. - Drag all three files into the Comp window, rescale them to fit, and set them in order with the close-up fire clip on top and the burnt-wood image on the bottom.
- Select the firefighter layer in the Timeline and apply a Luma Matte (Layer > Track Matte > Luma Matte). The shape of the fire in the top layer will now be the mask for the firefighter layer (Figure 16.2). Though the effect isn't all that impressive at first in single-frame mode, you can run a RAM Preview to see the effect in motion.

Figure 16.2: Apply the Luma Matte to the middle layer to be masked, and allow the flames to mask the image.
You can use this as an interesting transitional effect, but since the flames aren't very large and are moving quite rapidly, the section of the middle layer isn't exposed long enough to distinguish what it is right away. Another technique is to reverse the Luma Matte (Layer > Track Matte > Luma Inverted Matte), which shows the firefighter layer below in the black space of the close-up fire clip (Figure 16.3).
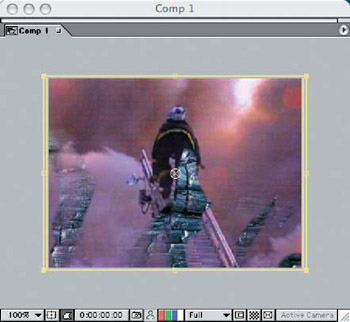
Figure 16.3: Apply a Luma Inverted Matte to make the background behind the flame be the mask.
To get the most out of the close-up flame clip, you need to zoom in on it over the Timeline to make it take up more space inside the frame. To turn this into a transition, you need to zoom up the scale of the flame until it takes up nearly the entire frame. This requires applying an increase in scale as well as a change in position over time:
- Select the top fire layer and move the Timeline Indicator just past the 2-second mark, and click the Scale and Position Stopwatches to set the current keyframe for both.
- Move the Indicator down just before the 4-second mark, rescale the layer to about 250%, and position it until the flame covers most of the frame (Figure 16.4).
Figure 16.4: Resize and reposition the flame mask layer over time to create a transition motion in the matte.
Next, to create a smooth transition, you'll need to fade the mask layer into the matte effect and then back out at the end, revealing the background layer in its entirety. At approximately 1 second before the layer starts its increase in scale, you'll need to fade in by making the layer start out black and then ease into the full exposure. You can do this most easily by changing the Channel values in Hue/Saturation:
- Go to about the 1-second mark in the Timeline and apply the Hue/Saturation and adjust the Master Lightness to −100. Click the Stopwatch in the Timeline to set the keyframe.
- Move the Indicator up to the 2-second mark and set the Master Lightness back to 0 (Figure 16.5).
- Move the Indicator down to the 4-second mark and click the Set check box to set the keyframe at 0; then move it down to the 5-second mark and set the Master Lightness to 100.
Render a RAM Preview to see the finished effect. Refer to Table 16.1 for all of the fading, Scale, and Position settings used in this project example.
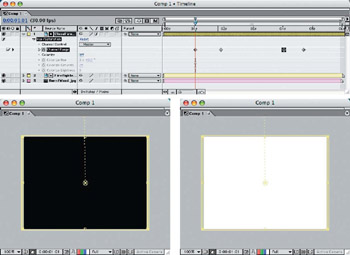
Figure 16.5: Use Hue/Saturation over time to create a fade-in and fade-out of the transition.
|
Transform |
01;01 |
01;26 |
02;05 |
03;27 |
04;02 |
04;23 |
|
Master Lightness |
−100 |
0 |
0 |
100 |
||
|
Scale% |
50% |
250% |
||||
|
Position X,Y |
160.0,120.0 |
154.0,-283.0 |
Painting a Transition
After Effects has a paint layer capability, where you can animate the brush strokes from the start of a stroke to the finish over time. Using this animated paint layer as a mask and some imagination with your brush strokes will provide you with an unlimited amount of creative custom transitions.
Start with an After Effects project, 320240, 8 seconds in length. Import two clip layers (BostonChurch.mov and Lighthouse.mov) or open the project file PaintTransProject .aep from the Chapter 16 folder on the DVD.
Create a solid-black layer on top and apply the paint layer effect (Effects > Paint > Paint). Open the Paint palette (Window > Paint), select white for the paint color, and select the Paint On Transparency option. Select the Paintbrush from the Tools palette and create an angled, feathered brush of about 45 pixels. Draw a squiggly line from the upper-left corner down through the middle, increasing in size and thickness if you are using a drawing tablet (Figure 16.6).

Figure 16.6: Use a soft brush to paint a squiggly line down through the center of the frame.
| Note |
Have you ever tried to draw or paint with a bar of soap? I find it easiest to use a drawing tablet with a pen to draw the lines instead of using a mouse.Select Pen Pressure for the Size, Angle, and Flow settings, and you'll have natural, smooth strokes. |
Each brush stroke you make becomes independently animatible over time in the Timeline. There's a start and end of each stroke and a path that represents the direction of the stroke (Figure 16.7).
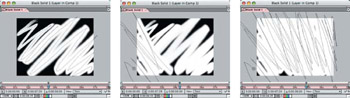
Figure 16.7: Each stroke has its own path that can be animated.
Spin down the paint layer, then the Brush 1 settings, and then the Stroke Options. Move the Indicator down to the 1-second mark and click the End Stopwatch. Adjust it to 0.0%, which is actually the very beginning of the stroke—or 0% of the finished stroke. Move the Indicator down to over 3 seconds and adjust the End setting to 100.0%—the end of the stroke (Figure 16.8). For a smoother, more natural brush stroke, apply an Easy Ease Out and Ease In on the beginning and end of the stroke path animation. Move down the Timeline and apply the beginning and end keyframes for the additional brush strokes.
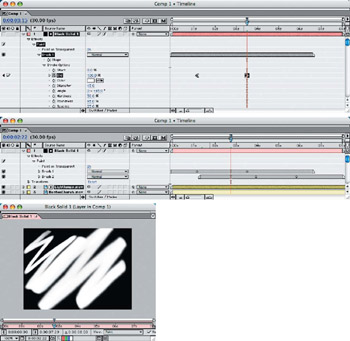
Figure 16.8: Create keyframes for the beginning and end of the stroke path animation.
Select the top movie clip layer that is positioned just below the paint layer, apply the Alpha Matte (Layer > Track Matte > Alpha Matte), and move the Indicator down the Timeline to see the transition revealing the lower clip layer (Figure 16.9).
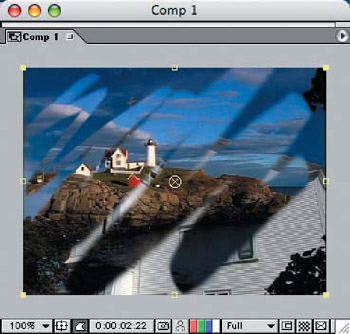
Figure 16.9: Apply the Alpha Matte to the top movie clip to reveal the animated paintbrush transition.
| Note |
The paint layer will automatically hide itself once you select the Alpha Matte option. |
Adjust the distance between the beginning and end keyframes for each brush stroke to control the playback speed of the strokes.
Animating 3 D Layers for Transitions
Utilizing some of the animation techniques we covered in Chapter 3, "3-D Layers from Photoshop Layers," you can create interesting scene transitions from one video clip to another. Depending on which shapes and how many layers you use to complete the transition, your animation possibilities are virtually limitless.
Animating only the movie layers in After Effects can also produce simple 3-D transitions. Similar to using some third-party Plug-ins, you can make a simple simulated cube rotation by connecting the two movie layers at right angles and rotating them in front of the camera. This example uses just two movie file layers and a single camera:
- Create a new After Effects comp, NTSC 640480, 10 seconds.
- Import the two movie files SkyClouds.mov and 747Airborne.mov, provided in the Chapter 16 folder on the DVD. Drag the movies to the Timeline, convert them to 3-D layers in the Timeline, and add a camera layer (Layers > New > Camera) using the default settings.
- Put the 747 movie on the bottom layer in the Timeline and set the Y Rotation to –90. Set the X-axis Anchor Point to 0.0 (Figure 16.10).
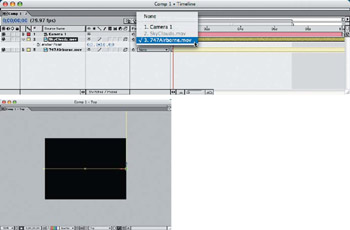
Figure 16.10: Select the Top view on the Comp window to see the joining angle of the two movie layers. - Set the X-axis Anchor Point for the clouds movie layer to 640.0 and the Y-axis Orientation to 270.0. Select the 747 movie layer as its parent. This will group the two layers in this configuration so that whatever movement is applied to the parent layer, the child layer will automatically follow.
- Move the Indicator to the 2-second mark and click the Y Rotation Stopwatch on the 747 movie layer (Figure 16.11). Move the Indicator down to the 5-second mark and set the Y Rotation to 0.0.
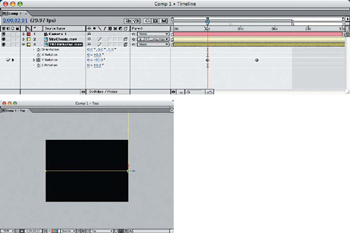
Figure 16.11: Set the Y Rotation keyframes for the parent movie layer, and the child layer will follow. - To make the transition rotate correctly in front of the camera, you need to reposition the movie layers along a straight X-axis path. Move the Indicator to the 2-second keyframe and click the Position Stopwatch on the 747 movie layer, which sets the current X-axis position at 640.0. Move the Indicator down to the 5-second keyframe and set the X-axis position to 0.0 (Figure 16.12).
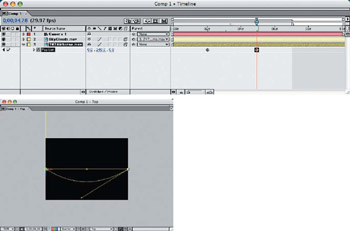
Figure 16.12: Adjust the curvature of the X-axis position path to create a smooth rotation around the imaginary "cube." - Grab the right-side path handle and pull down toward the bottom middle of the frame to create a smooth arc in the position path. This will give the illusion that the point of rotation is the center of the imaginary "cube" as the transition revolves.
- Position the camera so it is back far enough from the movie layers to fill the frame (Figure 16.13). Be sure that the camera is correctly centered and angled at 90 to the movie layers so the transition works smoothly. Select the Camera 1 view on the Comp window to check the alignment.
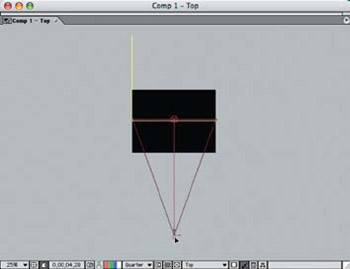
Figure 16.13: Center the camera to aim directly at the middle of the movie frames and fill the Comp window.
Render a RAM Preview to check the 3-D transition effect for timing and motion (Figure 16.14). You can add more movies to complete the cube or a larger geometric connected shape that can rotate. It's also possible to position this comp inside another comp containing other movies and traditional transitions or effects.
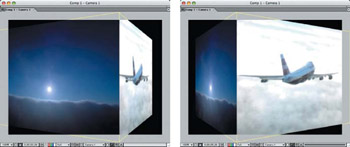
Figure 16.14: The rendered transition appears to be a 3-D rotating cube.
Animating Photoshop Layers for 3 D Transitions
You can use a multilayered Photoshop file to create individually masked movie comps. You can then place these comps inside a master comp and animate them independently, though the same running footage can be shown simultaneously on the individual pieces.
To demonstrate this, I've created a 30-piece puzzle file in Photoshop with each piece sequentially placed on its own layer (Figure 16.15). The layers are numbered by row and are in the correct position within the frame for easy alignment in After Effects.
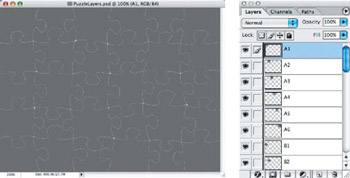
Figure 16.15: The 30-piece Photoshop puzzle has all of the layers aligned.
| Note |
You can follow along with the completed After Effects project file, 3-DPuzzleTrans.aep, which can be found in the Chapter 16 folder on the DVD—along with all of the required source files and rendered QuickTime movies. |
I created an After Effects project and imported the Photoshop puzzle file as a composition to retain the layers, plus the 747 Airborne.mov and SkyClouds.mov Quick Time movies. I then created a comp, NTSC 640480, 15 seconds, and dragged the 747 movie into the Timeline. I opened the Photoshop puzzle layer file folder in the Project window and dragged the first puzzle piece, A1, into the Timeline on top of the movie clip (Figure 16.16). I then applied an Alpha Matte to the movie layer to create a mask of the puzzle piece.
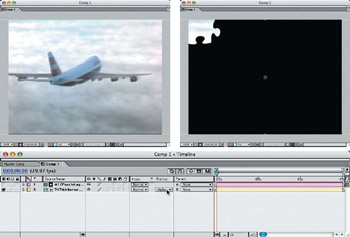
Figure 16.16: The puzzle piece becomes a mask for the movie layer and is correctly aligned in the frame.
I duplicated Comp 1 and replaced the A1 puzzle layer with A2, and I repeated this process until I had all 30 comps created (Figure 16.17). Everything lined up perfectly for each layer and it was a quick process, since the movie layer already had the Alpha Matte applied in each duplicated comp.
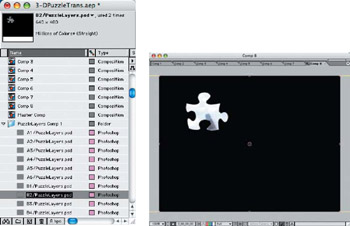
Figure 16.17: Repeatedly duplicate Comp 1 and replace the puzzle layer for each comp until all the pieces are used.
I created a new master comp and dragged the puzzle comps into the Timeline in sequential order (Figure 16.18). This made it much easier to keep track of the layers and puzzle pieces as they were animated. Once I placed all of the comps in the Time line, I dragged in the clouds movie and placed it at the bottom. I then converted all of the comps and movie layers to 3-D layers by clicking the check box in the Timeline.
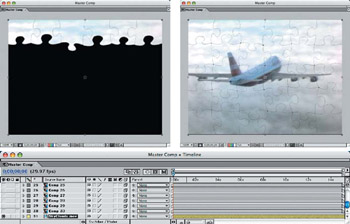
Figure 16.18: Sequentially drag the comps into the Timeline and convert them to 3-D layers.
I created a new Spot Light, increased the Intensity to 100% and the Cone Angle to 150, and made it white in color. I then selected all of the comp layers, spun down the Material Options settings, and turned on the Casts Shadows option (Figure 16.19). Even though I changed the setting on only one layer, all of the selected layers responded to the setting. I then set the Master Comp view to Left and dragged the light up and to the right so it would shine down on the center of the layers.
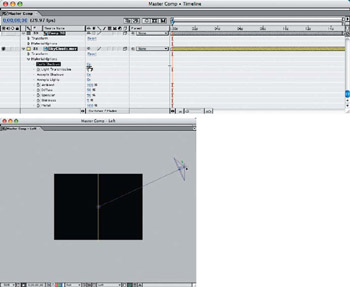
Figure 16.19: Create a new Spot Light and turn on the Casts Shadows option on all comp layers.
Next, I selected all of the comp layers in the Timeline (excluding the bottom clouds movie layer and the light layer) and dragged the Z-axis direction slightly to the right in the Master Comp window (Figure 16.20). This would be the final state of the 3-D layer transition, though the keyframes would be moved independently to create the animation.
Figure 16.20: Select all comp layers and move the Z-axis to separate them from the background layer.
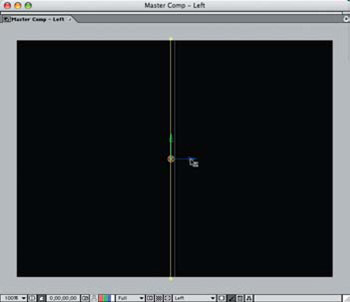
Figure 16.20: (Continued)
Since it's easier to take a puzzle apart than it is to line it all up in the end, I made the animation in reverse. With the comp layers still selected, I moved the Indicator down to the 10-second mark and pressed P to spin down the Position settings. I clicked the Stopwatch to set the final keyframe for the transition animation (Figure 16.21). I then selected only the A1 comp layer, moved the Indicator back to the 3-second mark, and moved the layer up and to the left of the frame. I continued with the remaining layers, moving ahead a few frames for each layer and moving the layers outside the frame.
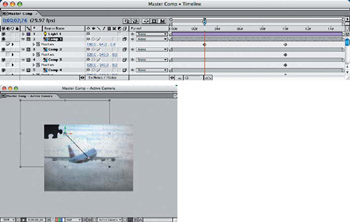
Figure 16.21: Set the final keyframe and move back in the Timeline to position the layers outside the comp frame one at a time.
I moved back the last keyframe for each layer so they would animate at a rate of about 2 seconds each—creating a cascading effect. I needed to make the 3-D layer effect more predominant, so I had to adjust the height of each puzzle piece so that it would fly down onto the background, casting shadows on the pieces below as they fall in sequence. I then applied a Z-axis position of –200.0 at the beginning keyframe for each layer animation (Figure 16.22). I set them all to return to 0.0 at the end keyframe and appear to be on the same plane.
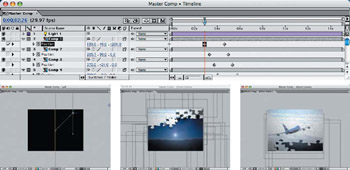
Figure 16.22: Set the Z-axis position at the beginning of each layer animation to give the effect of flying in to the scene.
To create a smooth transition out of the puzzle composites and into the running footage of the 747 in flight, I added the movie layer to the top in the Timeline and created an Opacity fade-up from the layers below (Figure 16.23). Since the movie layer covers all of the layers below, I did not have to covert it to a 3-D layer.
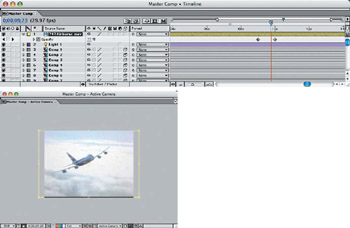
Figure 16.23: Add a new movie layer to the Timeline and fade up the Opacity to complete the transition effect.
Using other 3-D layer animation techniques covered in Chapter 3, such as moving cameras or spinning layers, you can come up with an unlimited number of 3-D layer transitions for your projects.
Part I - Connecting Photoshop, ImageReady, and After Effects
- Basic ImageReady Animation, Tweening, and Layer Styles
- Photoshop Layers and After Effects
- 3-D Layers from Photoshop Layers
Part II - Applying Animation Concepts
Part III - Clean-Up, Mattes, and Objects
- Blue-Screen Garbage Mattes
- Rotoscoping Techniques with Photoshop
- Matte and Keying Plug-ins
- Static Matte Painting in Photoshop
- Motion Matte Painting in Photoshop
- Making Movies from Stills
Part IV - Advanced Movie Magic
EAN: 2147483647
Pages: 104
