Application Development Tools
Overview
Programmers are familiar with various integrated development environments. Many of these environments run on a client workstation and provide a superb level of features and robustness. Still, many problems lend themselves simply to an editor plus a robust command-line development environment. In addition, some programmers actually prefer a powerful editor plus a robust command-line environment for programming. (Gasp!)
If you would like to use Qshell for your Java, C, or C++ development environment, you're in luck. IBM has moved support for various compiler technologies and tools into the Qshell environment.
You have many choices for a source-code editor. On the server side, you can use the Edit File command (EDTF), covered in chapter 3. There are many more client-side alternatives, ranging from simple programs like Notepad to industrial-strength editors such as SlickEdit's Visual SlickEdit (www.slickedit.com). Regardless of which editor you choose, you need to know some basics about the compiler utilities and tools provided in Qshell to get started.
Although this chapter cannot cover all the amazing things you can do with the various compiler and build tools available in Qshell, it will provide you with enough information to write simple applications. From there, you will be able to move to larger projects.
This chapter also provides a foundation for the Perl, Java, and C/C++ development techniques that are presented in chapters 22 through 24. Those chapters provide example programs to illustrate how development in Qshell works. Some of the examples use an input data file, goodoleboys.txt, which is shown in Figure 21.1.
cat goodoleboys.txt


Name Born Phone Dog Wife Shotgun Paid


========= ======== ======== ======== ========= ======= =====


Chuck Dec 25 444-2345 Blue Mary Sue 12 .50


Bubba Oct 13 444-1111 Buck Mary Jean 12


Billy Bob June 11 444-4340 Leotis Lisa Sue 12


Amos Jan 4 333-1119 Amos Abigail 20


Otis Sept 17 444-8000 Ol'Sal Sally 12


Claude May 31 333-4340 Blue Etheline 12


Roscoe Feb 2 444-2234 Rover Alice Jean 410


Arlis June 19 444-1314 Redeye Suzy Beth 12 .75


Junior April 30 BR-549 Percival Lilly Faye 12


Bill Feb 29 333-4444 Daisy Daisy 20


Ernest T. ?? none none none none
Figure 21.1: The goodoleboys.txt file is used in examples in the remaining chapters of this book.
The SQL script in Figure 21.2 is used to create database data for the example programs. Run the script using the iSeries Client Access "Run SQL Scripts" action from the popup menu associated with the DataBase object in the navigation tree.
cat goodoleboys.sql


CREATE SCHEMA JSMITHQ;


CREATE TABLE JSMITHQ.CUSTOMERS


(NAME CHAR(15), PHONENUMBER CHAR(8), WIFE CHAR(15));


DELETE FROM JSMITHQ.CUSTOMERS;


INSERT INTO JSMITHQ.CUSTOMERS VALUES('Chuck', '444-2345', 'Mary Sue');


INSERT INTO JSMITHQ.CUSTOMERS VALUES('Bubba', '444-1111', 'Mary Jean');


INSERT INTO JSMITHQ.CUSTOMERS VALUES('Billy Bob','444-4340', 'Lisa Sue');


INSERT INTO JSMITHQ.CUSTOMERS VALUES('Amos', '333-1119', 'Abigail');


INSERT INTO JSMITHQ.CUSTOMERS VALUES('Otis', '444-8000', 'Sally');


INSERT INTO JSMITHQ.CUSTOMERS VALUES('Claude', '333-4340', 'Etheline');


INSERT INTO JSMITHQ.CUSTOMERS VALUES('Roscoe', '444-2234', 'Alice Jean');


INSERT INTO JSMITHQ.CUSTOMERS VALUES('Arlis', '444-1314', 'Suzy Beth');


INSERT INTO JSMITHQ.CUSTOMERS VALUES('Junior', 'BR-549', 'Lilly Faye');


INSERT INTO JSMITHQ.CUSTOMERS VALUES('Bill', '333-4444', 'Daisy');


INSERT INTO JSMITHQ.CUSTOMERS VALUES('Ernest T.', NULL, NULL);
Figure 21.2: Use this script to create the example database.
The iSeries Tools for Developers
The iSeries Tools for Developers product (product number 5799-PTL) includes many useful open -source Qshell and PASE utilities. PASE utilities are AIX binary utilities that run in the Portable Application Solution Environment (product number 5722-SS1, option 30). Some of the iSeries Tools for Developers utilities are most useful for C and C++ development, but others are general-purpose tools.
You can order iSeries Tools for Developers or its source code from IBM for a nominal price. Its Web page is www-1.ibm.com/servers/enable/site/porting/tools.
To use the Tools for Developers utilities described in this chapter from Qshell, use CL's Start Tools for Developers command (STRPTL) before you run Qshell. In the following examples, the client workstation is named "elmstreet." The user is running a free, open-source window manager (XFree86) to display the graphics generated by applications started in Qshell. You do not need a window manager if you are not going to run graphical X- windows applications (discussed later in this chapter). For now, all you need to know is that the CLIENT parameter of the STRPTL command requires the workstation's host name or IP address followed by a colon and a zero, :0 , as shown here:
STRPTL CLIENT('elmstreet:0')
Although the STRPTL command is the IBM-supported way to initialize the iSeries Tools for Developers, it simply sets some environment variables and, optionally , allows you to run utilities from a menu. If you prefer, you can perform a similar setup for command-line access to the iSeries Tools for Developers by adding appropriate Qshell commands to your $HOME/.profile file. If you want to enable access to the developer tools for all Qshell users on the system, add the lines to the /etc/profile file instead.
Figure 21.3 provides an example of commands added to a startup script file to provide the same type of functionality as STRPTL. If you have problems, use the STRPTL command and start Qshell after invoking the command.
# Add the Qshell binary locations to the path
export PATH="$PATH:/QIBM/ProdData/DeveloperTools/qsh/bin"
# Add the PASE binary locations to the path
export PATH="$PATH:/QIBM/ProdData/DeveloperTools/pase/bin"
# Add the Andrew Toolkit settings that will allow use of
# the graphical applications
export ANDREWDIR=/QIBM/ProdData/DeveloperTools/atk
export ALTMACROPATH=/QIBM/ProdData/DeveloperTools/atk/sample/macro
export ATKSHELL=/QOpenSys/usr/bin/sh
# Add other miscellaneous settings as set by STRPTL CL command
export QIBM_IFS_OPEN_MAX=33000
# Individual users must set DISPLAY to be the location of
# their X-Windows display (this example uses a system of elmstreet
# and display number 0 on elmstreet)
export DISPLAY="elmstreet:0"
Figure 21.3: Inserting these statements in your Qshell resource file ($HOME/.profile or /etc/profile) will enable access to the Tools for Developers utilities in a Qshell resource file, similarly to the STRPTL CL command.
The Tools for Developers product contains a large number of utilities, including command-line compiler utilities, open-source scripting and build utilities, and X-windows graphical utilities. There is even a graphical editor.
Yes, you read that correctly: Your iSeries has a graphical editor and other graphical tools.
Qshell and ASCII Data
One very important thing to remember is that PASE applications are ASCII applications that deal with ASCII files. With the appropriate steps, you can deal with ASCII data in files easily from Qshell.
Qshell automatically translates data from the CCSID of the IFS file to the CCSID of the job when reading the data. The result is that, in many cases, Qshell and Qshell applications will deal natively with ASCII files and data. However, some applications, like the Andrew Toolkit discussed later in the next section, open files in binary mode, disabling the automatic translation. Those applications therefore require ASCII files.
The following command uses a PASE utility called perl (described in more detail in chapter 22):
perl -e 'perl-commands-here' customers.txt
Since perl is a PASE application, it expects ASCII files. Therefore, this command would not work if the customers.txt file were EBCDIC.
When using PASE applications from inside Qshell, you can take advantage of some of the built-in support in the system to translate EBCDIC to ASCII. If you are going to run PASE applications, you should learn some strategies for working with ASCII data.
One strategy is to use the QIBM_CCSID variable, which became available in V5R2. The QIBM_CCSID variable tells Qshell which CCSID should be used to translate data from the CCSID of the job. The following example illustrates this strategy of converting an EBCDIC file to an ASCII file using Qshell statements:
export QIBM_CCSID=819
cat customers.txt > ascii-customers.txt
perl -e 'perl-commands-here' ascii-customers.txt
A second strategy, shown in the following example, is to use the -C option for the touch utility:
# Remove the ASCII file (touch only sets the CCSID on file creation)
rm ascii-customers.txt
touch -C 819 ascii-customers.txt
cat customers.txt >> ascii-customers.txt
perl -e 'perl-commands-here' ascii-customers.txt
The append operator (>>) is used here to translate the data to the CCSID of the target file. Some other utilities, such as nohup and rexec , also support a -C option for setting the CCSID.
Alternatively, you can rely on the fact that the PASE runtime support automatically converts standard input and output as appropriate for ASCII-based PASE applications:
cat customers.txt perl -e 'perl-commands-here'
Graphical Utilities
A set of graphical utilities from the Andrew Toolkit ( ATK ) is part of the iSeries Tools for Developers. Most of these utilities are PASE utilities, because the ATK is a UNIX-based set of applications. With the proper configuration (with STRPTL or the setup described at the beginning of this chapter), those utilities can also be used transparently from Qshell.
The Andrew Toolkit (also known as the Andrew User Interface System , or AUIS ) was created in 1982 by a joint venture of IBM and Carnegie Mellon University. The goal of the venture was to form an advanced, distributed computing environment. The full ATK consists of many diverse applications, including advanced mail, document, editing, and help facilities, and a distributed file system. Transarc Corporation eventually took over the now-famous Andrew File System (AFS).
The set of modified graphical ATK utilities included with the iSeries Tools for Developers remains small and focused on application development. The following sections explain how to run these graphical applications from the iSeries.
Getting an X Windows Server
If you run a Unix- or Linux-based workstation with a graphical user interface, you probably already run an X-Windows server ( X-Server ) on your workstation.
If you run Windows or another operating system, various commercial and free X-Servers are available. Choose one that fits your budget and your usage characteristics. The following two might be of interest:
- Hummingbird Exceed is a full-blown, commercial X-Server that comes packaged with many other networking tools. It is very easy to use and quite full-featured , but its price might put you off if you are just experimenting. As of the writing of this book, prices for a full version of Hummingbird Exceed 8.0 are around $300 “$350.
- If you would like to invest a little time and energy instead of money, XFree86 is an open-source X-Server software package that might fit your needs. It is free software, packaged with Cygwin utilities for windows. Cygwin is an open -source, Linux-like environment for Windows, composed of a shell, compilers, many utilities, and programming APIs. Cygwin can give you an almost full Linux-like environment on your Windows platform. The XFree86 X-Server is completely customizable, but also has some potentially complex setup requirements as part of that customization.
If you choose to use XFree86, be prepared to do some research at www.cygwin.com/. To get started, read the FAQ and the Users Guide , and then run the Cygwin setup program. Choose to install the applications from the XFree86 category. When setup is finished, simply start your newly installed Cygwin bash shell and use the following command to start your X-Server:
startx &
On the iSeries, set the environment variables (including the DISPLAY environment variable) as shown in Figure 21.3, and give the iSeries Tools for Developers graphical application a test drive.
Using an X Windows Server
An X-Windows server runs on your workstation and allows remote applications (the X-Windows clients ) to display their graphical interfaces on your workstation.
Typically, on the remote system (your iSeries), the only setup required (beyond having the X-Windows client runtime) is setting the DISPLAY environment variable to point to your X-Windows display system. Figure 21.4 illustrates this process. Note that the third invocation of ez fails because DISPLAY was set to a host that was not present or not running an X-Windows server. The systems must be running an X-Server.
export DISPLAY=elmstreet:0


ez /home/jsmith/customers.txt


Starting ez


export DISPLAY=11.22.33.44:0


ez /home/jsmith/notes.txt


Starting ez


export DISPLAY=blah:0


Starting ez


Xlib: connection to

"

blah:0.0" refused by server


Xlib: No protocol specified


Could not open the display; this program will not run without a window


system.


Could not create new window.


exiting.
Figure 21.4: In Qshell, set the DISPLAY variable so that two separate Qshell X-Windows applications (both ez) show their graphical user interface on different client systems (host name elmstreet and host 11.22.33.44 ).
Using VNC
Virtual Network Computing (VNC) is open-source software that provides remote access to graphical environments. VNC is an alternative to running an X-Server on your workstation.
The VNC software consists of two parts : the VNC server and the VNC viewer. The VNC server, the X-Windows session (the window manager), and the graphical applications are run on a host computer ”in this case, the iSeries. The iSeries Tools for Developers provides a VNC server and window manager that run in PASE.
The graphical applications (PASE- or Qshell-based) display their user interfaces on that X-Windows session directly on the iSeries. From your workstation, you run the VNC viewer application to provide a view of the graphical user interfaces on your workstation. These graphical applications may be Qshell or PASE.
First, configure and start the VNC server on the iSeries, as shown here:
MKDIR '/home//.vnc'
QAPTL/VNCPASSWD PASSWORD(yourpassword) VERIFY(yourpassword)
USEHOME(*NO) PWDFILE('/home//.vnc/passwd')
Configure the VNC Server password using these CL commands. You only need to do this one time. The X-Server manages the graphical applications you are going to run.
You can start the VNC server and the X-Windows desktop using the STRPTL CL command, as shown in Figure 21.5. Alternatively, start the VNC server and X-windows desktop using a Qshell command. Figure 21.6 shows the start of a graphical edit session ( ez ).
STRPTL CLIENT(*VNC)


No running Xvnc jobs found for jsmith, exiting -1...


Could not find running server, starting new server...


New 'X' desktop is CORP1.RCHLAND.IBM.COM:1


Creating default startup script /home/jsmith/.vnc/xstartup


Starting applications specified in /home/jsmith/.vnc/xstartup


Log file is /home/jsmith/.vnc/CORP1.RCHLAND.IBM.COM:1.log


Returned from starting vncserver...


Running Xvnc job found, exiting 1...


DISPLAY=CORP1:1


Press ENTER to end terminal session.
Figure 21.5: Use this CL command to start the VNC server and the X desktop, in addition to setting up the iSeries Tools for Developers environment variables.
/QIBM/ProdData/DeveloperTools/pase/bin/vncserver


New 'X' desktop is CORP1.RCHLAND.IBM.COM:1


Starting applications specified in /home/jsmith/.vnc/xstartup


Log file is /home/jsmith/.vnc/CORP1.RCHLAND.IBM.COM:1.log


export DISPLAY=corp1:1


ez test.txt


Starting ez
Figure 21.6: Use these Qshell commands to start the VNC server and then run a graphical application. Note that if directory /QIBM/ProdData/DeveloperTools/pase/bin were in the PATH variable, the user would not need to type the full path in the command. Use the value for the "export DISPLAY" command that is output from the vncserver command.
You can safely start the graphical application before running the viewer. The graphical application will wait for user input. A major usability feature of VNC is that the connection between the VNC server and the display (the VNC viewer) is not permanent. Therefore, you can end and restart the viewer as many times as you like, even on different workstations, while leaving your server-side applications up and active.
At this point, you have started an X-Windows desktop and one or more graphical applications. The graphical applications use the value of DISPLAY to find the X desktop. The graphical applications will continue to run until ended. You will use the value of DISPLAY (or the X desktop value shown) and the VNC password when you run the VNC viewer on your workstation to view the graphical applications. The VNC password is required, to protect your application sessions from access by other users.
Next, connect your VNC viewer on your workstation to the VNC server so you can view the iSeries graphical applications. If you do not have a VNC viewer, download one from www.realvnc.com. You can also download the VNC server for your client platform if you want to enable remote access to that workstation from another system running the VNC viewer (your home machine, for example).
When you run the VNC viewer on your workstation, you will be prompted for the VNC server and the VNC password. Enter the value for the DISPLAY variable that you were shown when the VNC server started (in the previous examples, "corp1:1"), and the password you configured when you used the VNCPASSWD CL command. The result is that your VNC viewer session should connect to the server and show you the X-Windows desktop, as in Figure 21.7.

Figure 21.7: The VNC viewer shows the X-Windows desktop that was configured and started in this section.
Closing the VNC viewer window will not end the window manager and graphical applications. To end, click the iSeries button in the taskbar and select LogOut. You will still need to end the VNC server that is running on the iSeries. Use the -kill option of the vncserver utility to do this:
/qibm/proddata/developertools/pase/bin/vncserver -kill :1


Killing Xvnc process ID 21240
The Ez Utility
The ez editor is an X-Windows text and document editor provided with the Andrew Toolkit. This graphical editor extends a simple text editor with some features usually found in higher-cost editors or development environments.
The ez utility is a PASE application, and therefore creates ASCII files. In many cases, using ASCII files in Qshell will be transparent to Qshell applications; Andrew applications however, require ASCII files.
Key Bindings
The ez utility really shows its Unix heritage when considering the key bindings available for use. There are many key bindings in a standard ez session, and you may add still more. Many of these key commands are multi-key combinations, and are case-sensitive. In some cases, however, a command in lowercase will also work in uppercase.
Use the Ctrl-b-K key combination to list all of the current key bindings. Table 21.1 shows the key bindings associated with ez menu choices.
|
Key Sequence |
Description |
|---|---|
|
Esc ? |
Describe a key binding. A description of the next key you hit will be displayed. |
|
Ctrl-g |
Cancel the current operation. Many ez operations, such as a search, result in a prompt. Press Ctrl-g to cancel the operation. |
|
? |
Prompt. In many cases, when being prompted for a value in the status bar, typing a question mark will display a list of acceptable values or more information. For example, press Ctrl-b Ctrl-v to open a new file, then type a question mark to list the files that might match the name currently being entered. |
|
Esc - (Escape Dash) |
Show the current list of editor procedures. Editor procedures can be bound to keys, menu items, or toolbar items. |
|
Ctrl-b-K |
Show the current key-binding list. Describe the current key-combination mnemonics and the editor procedures to which they are assigned. |
|
Ctrl-b Ctrl-s |
Save the current file. |
|
Ctrl-b Ctrl-x |
Exit the current ez session. |
|
Ctrl-b Ctrl-v |
Open (visit) a new file. |
|
Ctrl-b Ctrl-w |
Save (write) the current edit buffer as a new file. |
|
Ctrl-b Ctrl-m |
Save all (many) open files. |
|
Ctrl-w |
Cut the selected text to the current "cut buffer." |
|
Esc-w |
Copy the selected text to the current cut buffer. |
|
Ctrl-y |
Paste from the current cut buffer. |
|
Esc-y |
Move (cycle) to the previous cut buffer. Ez maintains separate buffers for copied and cut text. |
|
Ctrl-b Tab |
Insert the contents of a file at the cursor. |
|
Esc-q |
Query (search) and replace a regular expression. |
|
Esc-' Esc-p |
Remove one style from some stylized text. |
|
Esc-' Esc-P |
Remove all styles from some stylized text. |
|
Esc-l |
Convert the selected text to lowercase. |
|
Ctrl-B-v |
Compose a character. |
|
Esc-r |
Redo all styles. Use this to beautify source code that isn't formatted correctly. |
|
Tab |
If the cursor is at the beginning of a line or multiple lines of text are selected, indent the text appropriately for source code formatting; otherwise , insert a tab. |
|
Esc-^R |
Format a line or region appropriately for source code. |
|
Esc-Q |
Rename an identifier in the selected region of source code. |
|
Ctrl-b-2 |
Open a second window for the same file. |
|
Ctrl-b Ctrl-d |
Close the current window. |
|
Ctrl-b Ctrl-b |
List all of the currently open buffers. |
|
Ctrl-b-b |
Switch to a different open buffer. |
|
Ctrl-b-k |
Delete (kill) the current buffer. (Close the currently open file.) |
|
Ctrl-b-d |
Open a directory for browsing |
|
Esc-^D |
Start graphical difference (ezdiff) processing on the current buffer. Switch buffers (with Ctrl-b-b) and then use Esc-^D again in the second buffer to continue. |
|
Esc-^N |
Highlight the next difference in the two ezdiff buffers. |
|
Esc-^P |
Highlight the previous difference in the two ezdiff buffers. |
|
Esc-^U |
Change the selected difference in the current buffer to the contents of the difference in the other buffer. |
|
Ctrl-b-u |
Highlight the URL at the current cursor position. |
When you have found a match with the query (search) and replace command (Esc-q), the editor will look like it's not doing anything. In fact, ez is waiting for your commands. Type a question mark to be prompted for a response to your query-matching string. Table 21.2 shows the responses.
|
Response |
Description |
|---|---|
|
Space |
Replace the current match and find the next match. |
|
(period) or - (dash) |
Replace the current match and quit searching. |
|
n or , (comma) |
Do not replace the current match and find the next match. |
|
Q or = (equal) |
Quit searching immediately; do not replace the current match. |
|
! |
Replace the current and subsequent matches. |
Editor Customization
At startup, the ez editor searches for several initialization files, listed here:
$HOME/.ezinit
/QIBM/ProdData/DeveloperTools/atk/lib/global.ezinit
$HOME/.atkinit
/QIBM/ProdData/DeveloperTools/atk/lib/global.atkinit
Ez executes the first initialization file it finds.
All ATK applications follow the same initialization model. By using the appropriate initialization file, you set options for an ATK application (in this case, ez ) with the corresponding scope:
- Using $HOME/.ezinit sets options for only one user of that application.
- Using global. ezinit sets options for any user of that application.
- Using $HOME/.atkinit sets options for only one user of any ATK application.
- Using global. atkinit sets options for any user of any ATK application.
An initialization file can perform many different customization steps, but the most important step may be the "include" initialization step. Each time you create a $HOME/.ezinit file (or an init file for other applications), the first thing you should do is include the global version of that file. Failure to do this will remove required system-wide customization.
The recommended initial steps when customizing ez or other ATK applications are to create user-specific files that do nothing but include the global files. First, create the user-specific application-initialization file. For ez , the $HOME/.ezinit file should start with these two statements:
include $HOME/.atkinit
include /QIBM/ProdData/DeveloperTools/atk/lib/global.ezinit
Add ez customizations after these two include statements.
Next, create the user-specific ATK initialization file. The $HOME/.atkinit file starts with this include statement.
include /QIBM/ProdData/DeveloperTools/atk/lib/global.atkinit
Add customizations intended for all ATK applications after this statement.
The most common ez customizations are those that change the behavior of keys, add menu choices, and add buttons to the button bar.
When creating your own customizations, be sure to use the global initialization files as representative customization examples. Similarly, use On Keys and On Procs in the Help menu to get a list of the keys you can bind and the procedures you can bind to those keys.
The first keys that you will probably want to change will be those for cutting, copying, and pasting, as shown here:
# Use Ctrl-C for copy
addkey textview-copy-region ^c
# Use Ctrl-x for cut
addkey textview-zap-region ^x
# Use Ctrl-v for paste
addkey textview-yank ^v
Add key bindings in ATK applications using the addkey customization statement in the initialization file ~/.ezinit or ~/.atkinit. The addkey statement takes the procedure and a textual representation of the key to be changed.
Adding menu choices and buttons to the button bar is also an easy task. The addmenu and addbutton statements are similar to the addkey statement. Use the third parameter for the addmenu and addbutton statements to both name and position the menu or button. Position an item in a menu or toolbar using a positioning number separated from the item name by a ~ (tilde) character. Use lower numbers to move the item to the left or upward. Use higher numbers to move the item to the right or downward.
The following example creates a menu item and buttons in ATK applications using the addmenu and addbutton customization statements in the initialization file ~/.ezinit. The third parameter names the menu or toolbar that the button is added to:
# Create a menu and a button on the button bar to uppercase
 selected text.
addmenu textview-uppercase-word "My Customizations~45,UpperCase
 Selected~10"
addbutton textview-uppercase-word "ez.toolbar,UpperCase
 Selected~90"
After the customizations, end and restart the ez session. The new ez session will have new menu choices, toolbar button, and key bindings, as shown in Figure 21.8.

Figure 21.8: The ez editor customizations have been applied to the session.
File Formats
The ez editor supports many file formats, so it is useful for editing text files, Web pages, source code, and even word-processing documents. You can customize or browse the initialization files that control the way ez treats various files. The file /QIBM/ProdData/DeveloperTools/atk/lib/global.filetypes describes the file types that the editor supports.
The global.filetypes file (or one of your personal initialization files) sets up associations between file extensions, the type of file, and the template used to edit the text. The association can also include parameters that override the behavior of the editor.
The first parameter to the addfiletype initialization statement indicates the file extension. The second parameter indicates the general file type. The third parameter is the interesting one because it indicates which template file should be used. Template files control the color , fonts, and formatting that is used to display parts of the file (for example, keywords versus variables in source code). You can also use the third parameter to override specific settings for that template.
Figure 21.9 is a partial excerpt from the ATK global.filetypes file, these lines set up an association between file extensions, the type of text, and the template used to edit the test. The first statement in Figure 21.9 sets all files to rawtext, and the subsequent statements specialize file types.
addfiletype * rawtext "template=rawtext"
addfiletype .txt rawtext "template=rawtext"
addfiletype .c ctext "template=c"
addfiletype .cpp ctext "template=c"
addfiletype .h ctext "template=h"
addfiletype .hpp ctext "template=h"
addfiletype .java xxxxx "template=java;ctext-use-tabs=0"
addfiletype .d text "template=default"
addfiletype .doc text "template=default"
Figure 21.9: These lines set up an association between file extensions, the type of text, and the template used to edit the test.
ATK applications use template files to determine formatting characteristics of displayed files. The global template files are stored in the /QIBM/ProdData/ DeveloperTools/atk/tpls directory, while user-customized template files are stored in the $HOME/tpls directory. Change a template file to control the font, size , color, or other display characteristics of your ez sessions. Here are some possible customizations:
cp /QIBM/ProdData/DeveloperTools/atk/tpls/java.tpl $HOME/tpls
ez $HOME/tpls/java.tpl
When you edit a template file, the ez utility presents you with a style editor session. A style in the template file represents a name for a category of text. The ATK applications associate displayed text with a particular style, and then display it according to the formatting characteristics defined for that style. The template file contains a global style that applies to all text in the edited document. In addition, there are many other styles in the template file.
To configure a style in the template file, select the style that you would like to change in the upper frames of the window. Use the lower frames to set the formatting characteristics of that style.
In the image in Figure 21.10, the ez session is editing the $HOME/tpls/java.tpl file. Selecting the menu card of "no menu" and the name-on-menu-card value of "global," displays the global characteristics for all styles described in the file.

Figure 21.10: You can use the ez editor to edit a template file.
The style editor selects the attributes that represent the current characteristics of the global style. The style editor in Figure 21.10 shows a font of "AndyType," and enables the "tab by spaces," "fixed width," and "continue indent" characteristics. The justification is "left flush," and the default color is "midnightblue." Modify the characteristics used for the style by selecting the appropriate attributes from the center frames. Deselect the attribute by clicking on the attribute again.
The bottom frame of Figure 21.10 shows the content of the file when creating a new Java file. Take note of the special template parameters in the file-content frame at the bottom of the window. You automatically enter data into a newly created file using text or template parameters in the new file.
Table 21.3 describes the available template parameters.
|
Parameter |
Description |
|---|---|
|
<@filename@> |
The <@filename@> tag expands to the full filename of the newly created file, for example, CustomerClass.java. |
|
<@name@> |
The <@name@> tag expands to the name without the extension of the newly created file, for example, CustomerClass. |
|
<@programmer@> |
The <@programmer@> tag expands to the name of the programmer as taken from the USER environment variable. You might have to manually set the USER environment variable. |
|
<@date@> |
The <@date@> tag expands to the current date. |
|
<@time@> |
The <@time@> tag expands to the current time. |
|
<@log@> |
The <@log@> tag expands to a recursive "change log" entry. The recursive nature inserts a new log entry each time the file is edited.The <@log@> entry expands to another <@log@> tag, plus the expanded values for the <@date@>, <@time@>, and <@programmer@> tags. In addition, the <@log@> tag inserts a brief placeholder for a reason, a version, and a description of the changes. |
Figures 21.11 and 21.12 provide examples of the use of template parameters. In Figure 21.11, the template parameters automatically insert replacement text into the file when it is created or opened. Figure 21.12 shows the results in a Java file.
/* File <@filename@> created by <@programmer@> on <@date@>. */
public class <@name@> {
 public static void main(String args[]) {
 }
}
/*
Change Log
<@log@>
*/
Figure 21.11: This is an example of template parameters in the file-content frame of the java.tpl template.
/* File Customer.java created by John Smith on Mon May 19 2003. */
public class Customer {
 public static void main(String args[]) {
 }
}
/*
Change Log
<@log@>

Mon May 19 2003 21:22:05 by John Smith

*/
Figure 21.12: This is an example of a newly created Java file after ez expands the template parameters.
The ez editor recognizes many source-code languages and formats the displayed text using color and indenting. As Figure 21.13 shows, you can use Qshell's ls command to find the supported formats.
ls /QIBM/ProdData/DeveloperTools/atk/tpls


ald.tpl dialog.tpl m3.tpl


asm.tpl filecmplistview.tpl mod.tpl


bufferlist.tpl findall.tpl pascal.tpl


c.tpl h.tpl perl.tpl


changes.tpl hpp.tpl rawtext.tpl


compile.tpl html.tpl review.tpl


contents.tpl htmltag.tpl rexx.tpl


cpp.tpl i3.tpl rxm.tpl


cwn.tpl java.tpl symbol.tpl


def.tpl jde.tpl typescript.tpl


default.tpl lisp.tpl
Figure 21.13: Use the Qshell ls command to list the names of the source-code language templates supported by the ez editor. The editor uses some of the displayed templates for other document types.
Figure 21.14 shows a newly created, empty Java file named Customer.java. The file shows the default text formatting and color, and the expanded template parameters from the java.tpl file. The View->Line Display menu item enables the display of line numbers in the edit session.
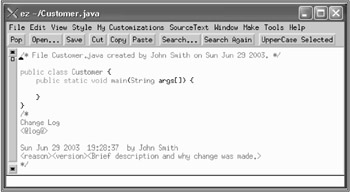
Figure 21.14: Ez has applied customization to an empty Java source file.
Directory Browsing
The ez editor can also serve as a graphical directory browser. Using the ez utility, specify a directory name as the parameter. For example, the following command edits a directory named src , where source files are typically stored:
ez /home/jsmith/src
When editing a directory, double-click an object to open it, or right-click it and choose Edit. As shown in Figure 21.15, use the Pop button on the toolbar to move back to the previous (higher-level) directory.
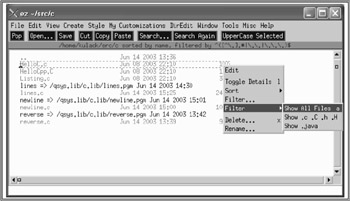
Figure 21.15: Here, ez is being used as a graphical directory browser.
Hex Edit
Use the View->Hex Edit menu choice to open a hexadecimal editor view of the current buffer. This view supports both ASCII or EBCDIC files; choose View->ASCII or View->EBCDIC to switch between them. Ez disables some capabilities in a hex editor session, as shown in Figure 21.16.
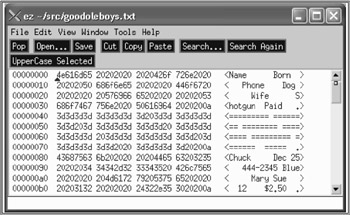
Figure 21.16: Ez permits editing in hex mode.
The mrhex utility is a shortcut for creating an ez session and starting the hexadecimal edit mode.
Undo Capability
The ez editor has no undo capability, so changes you make accidentally or intentionally are permanent. It does, however, create checkpoint files to help you recover from crashes or unsaved edit sessions. Look for files named OriginalName.CKP in the same directory as the original file you were editing. In some cases, you can use the CKP files to recover lost data.
Summary
The iSeries Tools for Developers product provides basic command-line and graphical utilities that enable application development in a Qshell environment. Some initial setup is required to run the tools. After the setup is complete, Qshell's command-line, graphical, or PASE applications run as if they were built into the Qshell environment.
Preface
- Introduction to Qshell
- Running Qshell
- The EDTF Text Editor
- Scripting
- Parameters and Variables, Defined
- Using Parameters and Variables
- The Exit Status and Decision-Making
- Additional Control Structures
- The Integrated File System
- Input and Output
- Command-Line Arguments
- Commands
- Functions
- Path-Name Expansion
- Scripts - Debugging, Signals, and Traps
- Archives and Compression
- Grep
- Sed
- Writing Programs for Qshell
- Accessing OS/400-Specific Objects
- Application Development Tools
- The Perl Utility
- Java Development Tools
- C and C++ Development Tools
- Appendix A Summary of Changes by Release
- Appendix B Qshell versus DOS
- Appendix C Qshell and CL Commands for the IFS
EAN: 2147483647
Pages: 219
