Format the Number/Date/Time/Graphic
Format the Number Date Time Graphic
All this talk about how fields look and work is well and good, but what if you want to change how the data inside them looks? A price and a weight both go in a Number field, but they are different types of values and should look different. FileMaker provides a series of formatting options for the data inside fields, giving you loads of control over how numbers, dates, times, and pictures look.
FileMaker has a special formatting dialog box for each kind of data a field can hold: Text, Number, Date, Time, and Container. (Timestamps are just a date and a time together, so you can format both parts separately.) You've already seen one of these dialog boxesText Formatin Chapter 4 (Section 4.4.6.3). It's the thing you see when, in Layout mode, you choose Format images/U2192.jpg border=0> Text.
Below this menu command, you find four others, each of which accesses a dialog box specific to the type of information in your field.
6.6.1. Number Formatting
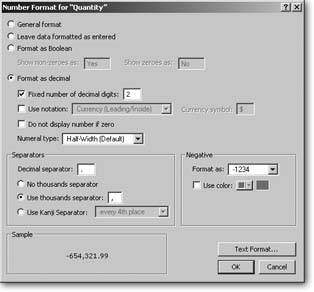
Select a number field and choose Format images/U2192.jpg border=0> Number to control how the number inside the field is displayed. The Number Format dialog box has a lot of options, as you can see in Figure 6-20. You can use most of these in any combination, so the possibilities are vast.
Note: As with most layout settings, if you choose this command without selecting a field, FileMaker lets you edit the default formats. In other words, the settings you pick apply to every number field you create on the layout thereafter.
|
6.6.1.1. General Format
If you don't tell it otherwise, FileMaker assigns the General Format to any new number fields you create. Usually, this format means, "show numbers the same way someone types them." But if your number has too many digits (either a very large number, or a number with lots of decimal places), FileMaker rounds the number or uses scientific notation to shorten it.
6.6.1.2. Leave data formatted as entered
If you don't want the automatic rounding and scientific notation you get with General Format, choose "Leave data formatted as entered" instead. FileMaker leaves your numbers alone, so they appear exactly as typed.
6.6.1.3. Format as Boolean
Sometimes you use a number field simply as a Boolean value. For instance, pretend you have a field that flags customers who get holiday cards. You could use a number field for this one, with a 1 in it if you want to send a card, and a 0 if you don't. But someone looking at the layout later might mistake all those 1's and 0's for so much computer gibberish (even if that someone is yourself).
For this reason alone, the Number Format dialog box has a choice called Format as Boolean. With this setting, a number field shows one of two text values. The first ("Show non-zero as") shows if the number field has any non-zero value. The second ("Show zero as") shows only when the field has a zero in it.
6.6.1.4. Format as decimal
The most flexible setting is called "Format as decimal." When you choose this option, you activate a host of new settings.
Fixed number of digits. Turn on "Fixed number of decimal digits" if you want to force every number to have the same number of decimal places. FileMaker also lets you say how many decimal places you want. If the number in the field doesn't have a decimal part, FileMaker just fills in zeros after the decimal point.
Notation and symbols. The "Use notation" checkbox lets you add currency symbols, units, or other labels to your numbers:
- Choose Percent to turn the number into a percent value. FileMaker automatically multiplies the number by 100 and puts a percent sign after it. That way, your users can enter .1 for 10 percent, and you can later have your database multiply the percent value by another number. If the field held the value 10% instead, you wouldn't be able to use that number to do any math.
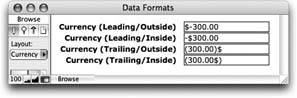
- Choose one of the Currency options to format the number as a monetary value. When you do, you can supply an appropriate currency symbol as well. The four currency options in the pop-up menu have to do with where the symbol is placed, as explained in Figure 6-21.
|
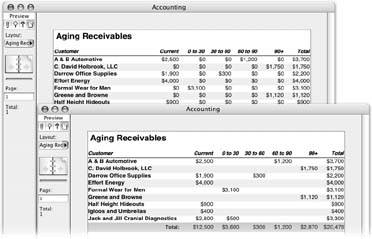
Do not display number if zero. Suppose you have a report with lots of numbers, where many of those numbers are zero. If you don't enter anything in a number field, FileMaker displays a value of zerowhat else? But not every record needs every field filled in. In fact, it's quite common to have a lot of empty fields in financial databases, resulting in a teeming mass of meaningless zeros. So turn on the "Do not display number if zero" option, to make the zeros go away. Figure 6-22 shows a classic aging receivables report with and without zeros.
|
| WORKAROUND WORKSHOP Currency-ish |
|
The currency symbol is, in a sense, just an expression of units. It isn't at all uncommon to want to put other unit labels on your numbers too. But FileMaker doesn't have an option for this variation. It seems hopelessly in love with currency. But don't let the word currency in the "Use notation" popup menu get you down. Since you can type anything you want for the currency symbol, you're welcome to use one of the currency options for any other kind of unit too. In this picture, the Cost field is formatted with normal currency settings. The Height field uses the Trailing/Outside option with " cm" as the currency symbol, to display a number with centimeter units. Weight uses a similar approach, with a currency symbol of " lbs." (Note there's a space before the abbreviations here, so they don't crash into the field's actual number.) The Part Number field shows another creative use of the currency formatting options. This time, "PN/" is inserted before the number value, using the Leading/Outside option. Every one of these fields really has 233 in it, but through number formatting they show very differently. The currency symbol box accepts only up to five characters and that includes the leading space if you want one so it isn't perfect. But in many cases it gets the job done. 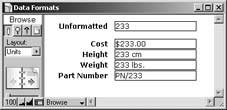 |
Separators. It's no surprise to you that numbers use special symbols to separate their parts. For example, you usually see a decimal point between the whole and fractional parts of a number, and a comma after the thousands place. FileMaker uses whatever symbols your operating system dictates for these special purposes, but you're free to override them if you want. For instance, you can use a space instead of a comma between each third digit.
In the "Decimal separator" box, type the character you want in place of a decimal point. The box accepts only a single character. FileMaker calls the comma between every third digit a "thousands separator" and you can opt to leave them out by turning on "No thousands separator." Turn on "Use thousands separator" if you want them, and feel free to enter something other than a comma in the associated box.
Formatting negative values. The last thing you get to control with the "Format as decimal" option is the way FileMaker represents negative numbers. In the "Format as" pop-up menu, you can choose any one of six negative number formats:
- -1234 puts a negative sign before the number in the usual fashion.
- 1234- puts the sign on the end instead, if that's the kind of thing that makes your socks go up and down.
- For that oh-so-financial look, choose (1234) instead. It puts negative numbers in parentheses.
- <1234> is similar, but it uses angle brackets instead of parentheses.
- If you're an accountant, hold onto your hat. The 1234 CR option will make you feel right at home when crediting those accounts.
- The last choice, (1234 with a black triangle before it) puts that funny triangle before negative numbers. No idea what that's all about. If you know, more power to you.
To draw more attention to a negative number, you can have FileMaker automatically color it. Turn on "Use color" and pick a color by clicking the little icon button to its right.
Formatting a number's text. At the end of the day, a number is text too, really. It's made up of numbers and symbols using some font, size, style, and color. As such, you can choose the Format  Text command with a number field selected. If youre already in the Format Number dialog box and you want to format the text as well, the Text Format button serves as a shortcut to the Text Format dialog box.
Note: This window has two more choices"Numeral type" and "Use kanji separator." These options are specific to Japanese numbers and aren't covered in this book.
6.6.2. Date Formatting
The Date Format dialog box works a lot like its number-oriented brother. This time, though, you tell FileMaker how you want dates to look. This date could be the value in a date field, or the date part of a timestamp field. For example, the date at the top of a letter might look best spelled out, while the due date on a list of 25 invoices might best be served by an abbreviated numbers-only format. Figure 6-23 shows the Date Format dialog box (no surprises here: just choose Format images/U2192.jpg border=0> Date).
|
6.6.2.1. Leave data formatted as entered
When you choose "Leave data formatted as entered," FileMaker shows the date just almost the same way your users type it. If they type a two-digit year, the program changes it to four digits. Otherwise, it leaves the data alone.
6.6.2.2. Format as
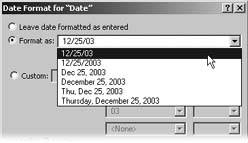
If you choose "Format as" instead, you can pick from six common date formats in its pop-up menu, as shown in Figure 6-24.
6.6.2.3. Custom
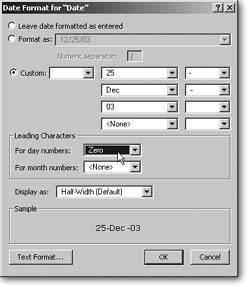
For the ultimate in control, choose Custom. When you do, the mysterious unlabelled boxes, buttons, and pop-up menus to the right become usable. By selecting different parts of a date from the pop-up menus and adding your own text as appropriate to the boxes, you tell FileMaker exactly how you want the date formatted. You would use this option when none of the Format As formats (Figure 6-25) are exactly right. For example, if you're in the U.S., FileMaker suggests date formats that follow typical U.S. standards (month, then day, then year). But if people in England use your database, you might want to construct a custom format in line with their expectations (day, then month, then year).
|
|

When FileMaker formats a date with the Custom option turned on, it assembles the final date value piece by piece according to your specifications. Whatever you type in the Start Text box comes first, followed by the first date value. FileMaker then adds the text from the top Between Text box. Next comes another date value and more between text. This process continues until the last text box is added to the result. By mixing and matching text and date values, you can make a date look any way you want.
If you don't want to use one of the date values, choose "" from the relevant pop-up menu. Likewise, to skip a between text value, clear its text box. The pop-up menu buttons to the right of each text box give you a choice of common date-related symbols for easy picking. The have a "" option as well, if you want to quickly clear the associated box.
In addition to "", the date value pop-up menus all have identical choices, divided into four sections, as shown in Figure 6-26.
|

As with the "Format as" option, you can use the pop-up menus in the Leading Characters area of this window to tell FileMaker how to handle single-digit month and day numbers. If you want them left alone, choose "." To insert a leading space, choose Space, and for a leading zero, choose Zero.
Note: The "Display as" pop-up menu only applies to Japanese dates. And if you don't recognize these characters, you probably don't need to use this pop-up menu.
6.6.3. Time Formatting
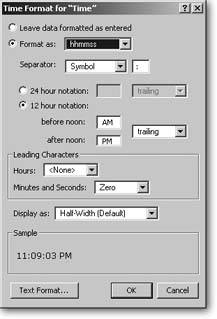
Compared to dates and numbers, formatting time values is a breezeFileMaker gives you just a few simple choices. Figure 6-27 shows the Time Format dialog box (Format images/U2192.jpg border=0> Time).
6.6.3.1. Leave data formatted as entered
This time, "Leave data formatted as entered" really means it. The time value shows exactly as you typed it.
|
6.6.3.2. Format as
The only other formatting option you get with time values is "Format as" and its related options. From the "Format as" pop-up menu, choose what time information you want to include:
- hhmmss tells FileMaker to show hours, minutes, and seconds.
- hhmm says you want hours and minutes, but no seconds. If your time value has seconds, FileMaker just ignores them.
- mmss limits the display to just minutes and seconds. If the time value has hours, the minutes are increased accordingly. For instance, if your field has 1:13:27 and you format it without hours, you see 73:27each hour adds 60 minutes.
- hh gives you a field that shows just the hours. Any minutes and seconds are left off.
- mm tells FileMaker to show the number of minutes. Again, any hours in the time value are counted as 60 minutes, and any seconds are ignored.
- ss shows a time as just a number of seconds. Every minute counts as 60 seconds, and every hour as 60 minutes. They're added up along with the seconds themselves to produce the final number.
Normally time values show a colon between each number. You can change this look if you want by typing something else in the Separator box. To leave out the separator entirely, clear the box. (This method lets you make military style times: 0730.)
| POWER USERS' CLINIC International Super-Date |
|
If people all over the world use your database, you quickly discover that date formats can lead to unending confusion. A date like 1/11/05 could mean January 11 or November 1, depending on your persuasion. To avoid all this confusion, consider a date format that strikes a nice balance between efficient display and unambiguous interpretation: 11-Jan-05. To get this format, select a date field, choose Format
Now click OK and switch to Browse mode. Your date field should show this svelte-yet-satisfying format. 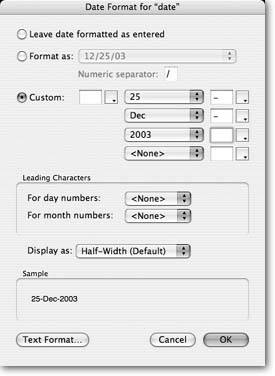 |
Note: As with date formatting (Section 6.6.2.1), the pop-up menu between this box and its label lets you opt for a Japanese time separator instead.
When displaying clock time, FileMaker can use 24-hour or 12-hour notation. In other words, do you want to see 14:23 or 2:23 PM? When you choose "24 hour notation," you can add some arbitrary text before or after the value (23:00UTC, for instance). When using 12-hour notation, you get to decide what text you want to represent a.m. and p.m. by typing in the "before noon" and "after noon" boxes.
You can choose from the pop-up menu to the right of these labels to put them on either side of the time value.
Like a date value, you get to tell FileMaker how to handle single-digit numbers. Again, you can leave them a single digit, add a leading space, or add a leading zero.
| FREQUENTLY ASKED QUESTION Formatting Fractional Seconds |
|
I have times in my fields that have a decimal part in the seconds. Is there any way for me to control how these fractions-of-a-second show up in FileMaker? For most people who actually care about fractions of seconds (you nerds know who you are) the visual appeal of your database is the least of your worries. But for the guy out there with a double major in nuclear physics and interior design, FileMaker has just what you need. The Time Format dialog box doesn't give you options for fractional seconds, leading many people to believe you have no control over how these are formatted. In fact, you do have control. Just select your time field, then choose Format There's an important caveat to this tip, though. If you have your time field set to "Leave data formatted as entered" in the Time Format dialog box, nothing you do in the Number Format window works. You must explicitly format the time value if you want to use number formatting on the seconds. |
6.6.4. Timestamp Formatting
Although FileMaker has a timestamp field (Section 3.2.6.5), there's no Timestamp option in the Format menu. Remember that timestamp fields really contain two values: a date and a time. So, you use the Format images/U2192.jpg border=0> Date command to control how the date part of a timestamp looks, and the Format
images/U2192.jpg border=0> Time command for the time portion. Like time values, you can also use Format
images/U2192.jpg border=0> Number to control decimal places and points in the seconds part.
In order for a timestamp field to show your settings, though, you have to format both the date and time parts. If either is set to "Leave data formatted as entered," the timestamp field just puts its hands over its ears and hums so it can't hear you trying to format it. Once you enter both the date and the time formats, the timestamp field straightens up and follows your formatting instructions.
You do not have to set the number format if you don't want to. If you don't choose a number format, FileMaker leaves the decimal part of your time values formatted as your users enter them.
Tip: Timestamp formats are a little tough to read because the date and time just kinda run together with a scrawny single space separating them. Make a custom format with " at" (that's space-a-t) in the last placeholder, and you get "Fri, May 6, 2005 at 12:30 pm." Much better.
6.6.5. Graphic Formatting
When your users want to put pictures or movies in a container field, they can use the Format Graphic command to crop, scale, or otherwise control how it looks. If youd like some control over how much formatting they can do, you can set some limits in the Graphic Format dialog box, as shown in (Figure 6-28).
Note: If someone puts a sound file in your container field (using Insert File), you have no control over how FileMaker displays it. FileMaker automatically shows the appropriate icon and leaves it at that.
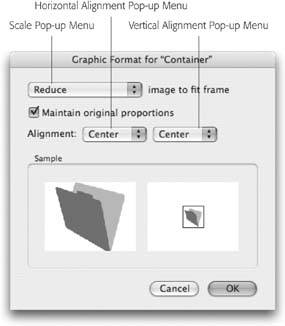 |
Figure 6-28. With the Graphic Format dialog box you can tell FileMaker to shrink and/or enlarge a picture to fit the field boundaries, or to crop itshowing only what fits. You also get to decide where the picture lives inside the field, or what part gets cropped. If you don't mind wildly skewed images, you can also tell FileMaker to stop keeping your pictures properly proportioned. |
Basically, you're taking control of what happens when folks use FileMaker's usual image display commands. For example, when FileMaker shows a big picture in a container field, it normally shrinks it down so the whole thing fits inside the field. Smaller pictures are left at their normal size, and centered in the field. But this command isn't the only way to work it. Here are all the settings you can bend to your wishes:
6.6.5.1. Scale
The Scale pop-up menu lets you decide how FileMaker should handle pictures that aren't exactly the right size:
- Choose Crop if you want FileMaker to crop large pictures, showing only what fits. Figure 6-29 shows how this method works.
- Choose Reduce if you want FileMaker to shrink large pictures to fit, but leave small pictures alone. This setting is what you automatically get if you don't change it yourself.
- Choose Enlarge to grow small pictures so they fit the field but are as big as possible. Large pictures get cropped.
- Choose Reduce or Enlarge if you want FileMaker to shrink big pictures and grow small ones. This setting ensures that every picture in the field (on each record) is the about the same size.
|
6.6.5.2. Alignment
If the picture is small and hasn't been enlarged, the alignment pop-up menus control where in the field the picture appears. For example, choose Right from the Horizontal Alignment pop-up menu and Top from the Vertical Alignment pop-up menu to nestle the picture in the top-right corner of the field.
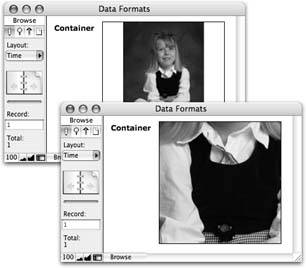
If a picture has been reduced or enlarged so that it fills the field, it might still be smaller than the field in one dimension. In this case, the alignment pop-up menus tell FileMaker where to put the picture along this dimension. Figure 6-30 shows this process in action.
Note: When FileMaker reduces or enlarges a picture, it keeps the picture's aspect ratio the same. In other words, a picture that's four inches by six inches may not be that size in the container field, but its height is 2/3rds of its width. If you'd rather FileMaker make the picture exactly the size of the container field, even if it means distorting it, turn on "Maintain original proportions."
|

6.6.5.3. Cropping
Finally, when the picture is cropped, the alignment pop-up menus tell FileMaker which part of the picture to show. You can see the same cropped picture with each possible alignment in Figure 6-31.
Part I: Introduction to FileMaker Pro
Your First Database
- Your First Database
- An Very Quick Database Tour
- Creating a New Database
- Opening and Closing Database Files
- Saving Your Databases
- Adding Records to Your Database
- Navigating Your Database
- Same Database, Multiple Windows
Organizing and Editing Records
- Organizing and Editing Records
- Views
- Advanced Find Mode
- Changing Multiple Records
- Sorting Records
- Editing Whats in Your Fields
- Paragraph Formatting
- Beyond Text: Container Fields
- Checking Spelling
- Printing and Preview Mode
Building a New Database
- Building a New Database
- Tables and Fields
- Defining Fields
- Advanced Field Options
- Bringing It All Together
Part II: Layout Basics
Layout Basics
Creating Layouts
Advanced Layouts and Reports
- Advanced Layouts and Reports
- Setting up Field Controls
- Adding Field Controls to Layouts
- Field Behavior
- Tab Order
- Print-Related Layout Options
- Format the Number/Date/Time/Graphic
- Adding Buttons
- Tab Panels
- Reports and Summary Fields
Part III: Multiple Tables and Relationships
Multiple Tables and Relationships
- Multiple Tables and Relationships
- Relational Databases Explained
- Modeling Your Database
- Creating a Relational Database
- Relational Databases
Advanced Relationship Techniques
- Advanced Relationship Techniques
- Creating Related Records
- Table Occurrences
- Managing Data with Data Tunneling
- Building a Data Tunneling Interface
- Connecting Databases
- Lookups
- Advanced Relationships
Part IV: Calculations
Introduction to Calculations
- Introduction to Calculations
- Understanding Calculations
- The Structure of a Calculation
- Creating a Calculation Field
- Auto-Enter Calculations
- Validate Data Entry with a Calculation
- Replacing Data Using a Calculation
- Comments
Calculations and Data Types
- Calculations and Data Types
- Number Crunching Calculations
- Going Beyond Basic Calculations
- Text Parsing Calculations
- Date and Time Calculations
- Containers in Calculations
Advanced Calculations
- Advanced Calculations
- Stored, Unstored, and Global Fields
- Logical Functions
- The Let Function and Variables
Extending Calculations
Part V: Scripting
Scripting Basics
- Scripting Basics
- Your First Script
- The Importance of the Layout
- Running Scripts
- Branching and Looping in Scripts
Script Steps
- Script Steps
- Go to Layout
- Scripting for Fields
- Working with Records
- Finding Records
- Sorting Records
- Working with Windows
- Working with Files
- Printing
- Other Script Steps
Advanced Scripting
- Advanced Scripting
- Commenting Scripts
- Asking and Telling the User
- Organizing Complex Scripts
- Handling Errors
- Putting a Complex Script Together
Part VI: Security and Integration
Security
Exporting and Importing
- Exporting and Importing
- Exporting a File
- Export Formats
- Importing Data
- Import Data Sources
- Importing and Exporting in a Script
Sharing Your Database
- Sharing Your Database
- FileMaker Network Sharing
- Sharing Over the Internet
- FileMaker Server
- Server Hardware
Developer Utilities
- Developer Utilities
- Script Debugger
- Disable Script Steps
- The Database Design Report
- Tooltips
- Copying Database Structure
- Custom Menus
- Developer Utilities
- File Maintenance
Part VII: Appendixes
Appendix A. Getting Help
EAN: 2147483647
Pages: 176
