Working with Windows
Scripts give you complete control over the database windows on the screen. You can create new windows, close existing windows, bring any window to the front, and move or resize any window. (Why would a script need to monkey with someone's onscreen windows? See the box on Section 14.6.3 for some ideas.)
14.6.1. Creating Windows
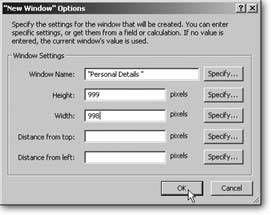
To make a new window on the screen, you use the New Window script step. With this step selected in your script, you see a Specify button in ScriptMaker's Script Step Options area. Clicking this button brings up the New Window Options dialog box, pictured in Figure 14-14.
The first boxWindow Namegives your script control over the name of the window. (Window name is something you can control only from a script. When you create the window from the Window menu, FileMaker assigns it a name for you.) You can also tell FileMaker how big the window should be (Height and Width), and where to put the window on the screen ("Distance from top" and "Distance from left").
Here are some tips on using the New Window Options dialog box:
- If you leave any of the values blank, FileMaker uses the same value from the current window (it adds a number to the end of the window name so the new name is different). For example, if the current window's called "My Database" and you run the New Window script step without specifying a name, the new window's name is "My Database 2."
- If you also don't specify a size and position, FileMaker puts it right over the top of the current window (with the same size and position).
Tip: To avoid confusing your user, it's usually best to offset the new window at least a little so he can see that there's a new window on top of his old one. - You can directly set each of the values by typing in the box in the New Window Options dialog box or set them from a calculation by clicking the Specify button by any box. See the box on Section 14.6.3 for more detail.
|
14.6.2. Bringing a Window to the Front
In ScriptMaker parlance, you bring a window to the front by selecting it. As such, you use the Select Window script step. It has one option, which lets you specify a window by name, or select the current window, as shown in Figure 14-15. You also use the Select Window script step to show a hidden window and bring it to the front.
|
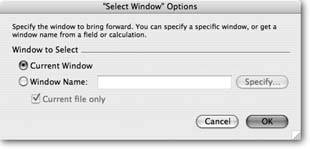
Note: Usually, the current window is already in the front, and you don't have to worry about this step. But when you run scripts that involve more than one database, as you'll learn in Chapter 15, you may need this step to bring forward the current window from another file.
| POWER USERS' CLINIC Window Size and Position Calculations |
|
The fact that you can set a new window's size and position using a calculation might seem a little strange. After all, do you really need a bigger window for someone named Bill? Do you want your windows in a different place on Thursdays? In fact, though, you can do a lot of interesting things with window size and position calculations. FileMaker provides a handful of functions that let you find out about the size and position of the current window, and of the computer screen, and use that information in calculations:
By combining these functions in creative ways, you can make your scripts smart about how they size and position windows. For example, to make the new window appear slightly offset from the current window, use these settings: Distance from top: Get ( WindowTop ) + 20 Distance from left: Get ( WindowLeft ) + 20 If you're paranoid, and you want to make sure the new window never hangs off the bottom of the screen, use this calculation for the "Distance from top" value: Similarly, you can use the "Distance from left" value to make sure it doesn't hang off the screen's right edge. Just substitute WindowDesktopWidth, WindowWidth, and WindowLeft for WindowDesktopHeight, WindowHeight, and WindowTop. |
14.6.3. Closing a Window
The Close Window script step has the same options as Select Window. You tell FileMaker which window to close: the current window, or one you specify by name.
14.6.4. Moving and Resizing Existing Windows
FileMaker has three ways to move and resize a window. You can opt for one of its canned window maneuvers or you can set the exact pixel size and location of the window just like you can with the New Window step. You can also hide the current window.
14.6.4.1. Adjust Window
The Adjust Window script step always operates on the current window, and it gives you just five simple choices:
- Choose Resize to Fit, and FileMaker makes the window exactly the right size to fit its contents.
- Choose Maximize to make the window as large as possible.
- Choose Minimize to shrink the window to a little bar (Windows) or a Dock icon (Mac OS X).
- Choose Restore to switch a window back to the last size it was, just before it was most recently resized.
- Choose Hide to hide the window (just like the Window
images/U2192.jpg border=0> Hide Window command).
Note: The Maximize options have slightly different behavior on Mac OS X and Windows. For example, when you maximize a window in Windows, and then select a different window, the second window also gets maximized. On Mac OS X, on the other hand, the second window keeps its original size. Also, a maximized window on Mac OS X fills as much of the screen as possible. On Windows, it fills FileMaker's outer application window, whatever size it may be, and there's no way to adjust the application window from a script.
14.6.4.2. Arrange All Windows
The Arrange All Windows script step is the equivalent of the four window arrangement options in the Window menu. You can choose to tile windows horizontally or vertically, or cascade them (see Section 1.7.2.1). On Mac OS X, you can also choose to bring all FileMaker windows to the front.
14.6.4.3. Move/Resize Window
For the ultimate in window control, call upon the Move/Resize Window script step. It can move and/or resize any window with pixel-perfect precision. Its Specify button shows the dialog box in Figure 14-16, where you can choose the window's size and position. As with New Window, you can leave any of the size or position values empty. When you do, FileMaker leaves that part of the window's size or position alone. For example, if you specify a new Width but leave Height blank, FileMaker makes the window wider or narrower, but its height doesn't change.
|
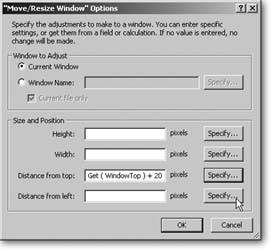
Note: Move/Resize Window also selects the window it acts on, which always brings the window to the front, and, if it's a hidden window, shows it.
14.6.5. Other Window-Related Script Steps
FileMaker has a handful of other window-related script steps, listed below. They come in handy if you need to exert more control over what your users see. (Not to imply that you're a control freak or anything.)
- Freeze Window tells FileMaker to stop showing changes in the window while the script runs. For example, if your script is looping through all the records in the found set, you normally see each record on the screen as it runs. If you add a Freeze Window script step before the loop, the user sees only the first record while it runs. When the script is finished, FileMaker updates the window again. Looping scripts that have to visit lots of records run decidedly faster when the window is frozen.
- Refresh Window forces FileMaker to update what's inside the window when it normally wouldn't. This can be because you previously ran the Freeze Window step, or because FileMaker's simply being conservative. If you want to make sure the user sees a particular record or filed value on the screen while a script is running, add a Refresh Window step after making the change.
- Scroll Window lets you simulate a vertical scroll bar click in a window. You can scroll to the Home (top) or End of a window, or move up or down one screen-ful. You also get a To Selection option, which scrolls the window so that the selected record and field value both show. You'll design most of your window so that scrolling isn't necessary, which means you may never need this step.
- Show/Hide Status Area lets you decide if the user should see the status area or not. You can explicitly show or hide the status area, or ask that it be toggled (shown if it's hidden, and hidden if it's showing). You can also turn on the "Lock" option to prevent the user from manually changing the status area. For example, if you never want the user to see the status area at all, Hide and Lock it in the script that runs when your database opens. Then the status area is locked, its toggle icon and menu command are grayed out. More commonly, though, the status area's turned off and locked during a process, such as a scripted find. You don't want your users using the Cancel button during a Pause step to cancel a script and then end up dumped on a layout that you meant them to see only while a script is running.
POWER USERS' CLINIC
Controlling the InterfaceIf you want to pull out all the stops, you can use a combination of layouts, custom menus (Section 19.5.3), tooltips (Section 19.4) and scripting to almost completely take over control of your database. You can hide and lock the status area, then give the user buttons to go to the next, previous, first, and last records. You can make it so that when you click a Customer on the list layout, a new Detail window pops up named after that particular customer. You can even make your script so smart that it selects an existing detail window for the customer if one exists, and makes a new one otherwise.
In this way, you give the user the impression that each customer has his own window, and you make comparing customers side by side a breeze.
This kind of high-level window management takes a fair amount of work, so most people stick with the normal every-layout-in-one-window approach and let the user create windows as needed. Which approach you use depends entirely on how much time you want to spend writing scripts and how important the multiple-window interface is to you.
- Show/Hide Text Ruler can toggle, show, or hide, the Text Ruler. Unlike Show/Hide Status Area, this step doesn't have a Lock option. The user can always override your setting, so this step is rarely worth the trouble.
- Set Window Title lets you change any window's name. You can specify the current window, or any window name, as well as the window's new name. FileMaker normally names a window with the file's name, but you can tailor each window to your user. Write a script that runs when the file is opened and use the Set Window Title script step with this calculation: Get ( FileName & " " & Get ( AccountName ). See Section 16.2.3.7 to learn about Account Names.
- Set Zoom Level sets the window zoom level, just like the zoom controls in the bottom-left corner of the window. You can pick a specific zoom level, or choose to zoom in or out to the next level. Again, you get a Lock option. If you set the zoom level and turn on the Lock checkbox, the user can't manually change the zoom level.
- View As step is in the Windows section of the script step list, but it isn't really a window-related step. It changes the view option for the current layout. You can pick Form View, List View, or Table View. You also get a choice called Cycle that tells FileMaker to switch to the next view setting in the list. If you really want to control how your users see your database, use Layout
 Layout Setting (View Tab) to turn off the views you dont want them seeing. You can then let users override those settings with this script step.
Part I: Introduction to FileMaker Pro
Your First Database
- Your First Database
- An Very Quick Database Tour
- Creating a New Database
- Opening and Closing Database Files
- Saving Your Databases
- Adding Records to Your Database
- Navigating Your Database
- Same Database, Multiple Windows
Organizing and Editing Records
- Organizing and Editing Records
- Views
- Advanced Find Mode
- Changing Multiple Records
- Sorting Records
- Editing Whats in Your Fields
- Paragraph Formatting
- Beyond Text: Container Fields
- Checking Spelling
- Printing and Preview Mode
Building a New Database
- Building a New Database
- Tables and Fields
- Defining Fields
- Advanced Field Options
- Bringing It All Together
Part II: Layout Basics
Layout Basics
Creating Layouts
Advanced Layouts and Reports
- Advanced Layouts and Reports
- Setting up Field Controls
- Adding Field Controls to Layouts
- Field Behavior
- Tab Order
- Print-Related Layout Options
- Format the Number/Date/Time/Graphic
- Adding Buttons
- Tab Panels
- Reports and Summary Fields
Part III: Multiple Tables and Relationships
Multiple Tables and Relationships
- Multiple Tables and Relationships
- Relational Databases Explained
- Modeling Your Database
- Creating a Relational Database
- Relational Databases
Advanced Relationship Techniques
- Advanced Relationship Techniques
- Creating Related Records
- Table Occurrences
- Managing Data with Data Tunneling
- Building a Data Tunneling Interface
- Connecting Databases
- Lookups
- Advanced Relationships
Part IV: Calculations
Introduction to Calculations
- Introduction to Calculations
- Understanding Calculations
- The Structure of a Calculation
- Creating a Calculation Field
- Auto-Enter Calculations
- Validate Data Entry with a Calculation
- Replacing Data Using a Calculation
- Comments
Calculations and Data Types
- Calculations and Data Types
- Number Crunching Calculations
- Going Beyond Basic Calculations
- Text Parsing Calculations
- Date and Time Calculations
- Containers in Calculations
Advanced Calculations
- Advanced Calculations
- Stored, Unstored, and Global Fields
- Logical Functions
- The Let Function and Variables
Extending Calculations
Part V: Scripting
Scripting Basics
- Scripting Basics
- Your First Script
- The Importance of the Layout
- Running Scripts
- Branching and Looping in Scripts
Script Steps
- Script Steps
- Go to Layout
- Scripting for Fields
- Working with Records
- Finding Records
- Sorting Records
- Working with Windows
- Working with Files
- Printing
- Other Script Steps
Advanced Scripting
- Advanced Scripting
- Commenting Scripts
- Asking and Telling the User
- Organizing Complex Scripts
- Handling Errors
- Putting a Complex Script Together
Part VI: Security and Integration
Security
Exporting and Importing
- Exporting and Importing
- Exporting a File
- Export Formats
- Importing Data
- Import Data Sources
- Importing and Exporting in a Script
Sharing Your Database
- Sharing Your Database
- FileMaker Network Sharing
- Sharing Over the Internet
- FileMaker Server
- Server Hardware
Developer Utilities
- Developer Utilities
- Script Debugger
- Disable Script Steps
- The Database Design Report
- Tooltips
- Copying Database Structure
- Custom Menus
- Developer Utilities
- File Maintenance
Part VII: Appendixes
Appendix A. Getting Help
EAN: 2147483647
Pages: 176
