Domain 5 Printers
CompTIA A+ Exam Objectives Covered in This Chapter
- 5.1 Identify printer technologies, interfaces, and options/ upgrades.
- 5.2 Recognize common printer problems and techniques used to resolve them.
You will likely encounter many printer-related questions when you take the A+ exam, especially regarding laser printing. Objective 5 tests your knowledge of the printing process, your ability to identify printer interfaces, and your troubleshooting and preventive maintenance skills for printers.
Identifying Printer Technologies, Interfaces, and Options Upgrades
Objective 5.1 tests your knowledge of how printers work and how they connect to computers. Although the A+ exam has traditionally focused on laser printers most heavily, you may also see questions about other printer types.
Critical Information
The two major areas of study for this objective are printer technologies and printer interfaces. The technologies include laser, ink-jet (sometimes called ink dispersion), dot matrix, solid ink, thermal, and dye sublimation. The interfaces include parallel, network, and USB, among others.
The following sections provide details about various technologies of printers. These printers may be differentiated from one another in several ways, including the following:
Impact vs. Non-ImpactImpact printers physically strike an inked ribbon, and therefore can print multipart forms; non-impact printers deliver ink onto the page without striking it. Dot matrix is impact; everything else is non-impact.
Continuous Feed vs. Sheet FedContinuous-feed paper feeds through the printer using a system of sprockets and tractors. Sheet-fed printers accept plain paper in a paper tray. Dot matrix is continuous feed; everything else is sheet fed.
Line vs. PageLine printers print one line at a time; page printers compose the entire page in memory and then place it all on the paper at once. Dot matrix and ink-jet are line printers; laser is a page printer.
Dot-Matrix Printers
A dot-matrix printer is an impact printer; it prints by physically striking an inked ribbon, much like a typewriter. It is an impact, continuous-feed line printer.
The print head on a dot-matrix printer consists of a block of metal pins that extend and retract. These pins are triggered to extend in patterns that form letters and numbers as the print head moves across the paper. Early models, known as NLQ (near letter quality), printed using only nine pins. Later models used 21 pins and produced much better LQ (letter quality) output.
The main advantage of dot matrix is its impact. Because it strikes the paper, you can use it to print on multipart forms. Non-impact printers can’t do that. Dot-matrix printers are not commonly found in most offices these days because of their disadvantages, including noise, slow speed, and poor print quality.
Ink-Jet Printers
Ink-jet printers are one of the most popular types in use today. This type of printer sprays ink on the page to print text or graphics. It is a non-impact, sheet-fed line printer.
Figure 5.1 shows an ink cartridge. Some cartridges, like this one, contain the print head for that color of ink; you get a new print head each time you replace the cartridge. On other printer models, the ink cartridge is just an ink reservoir, and the heads do not need replacing.
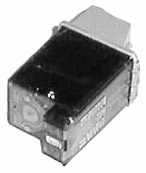
Figure 5.1: A typical ink cartridge (size: approximately 3 inches by 11/2 inches)
There are two kinds of ink-jet printers: thermal and piezoelectric. These terms refer to the way the ink is sprayed onto the paper. A thermal ink-jet printer heats the ink to about 400 F, creating vapor bubbles that force the ink out of the cartridge. Thermal ink-jets are also sometimes called bubble-jets. A piezoelectric printer does the same thing but with electricity instead of heat.
Ink-jet printers are popular because they can print in color and are inexpensive. However, their print quality is not quite as good as that of a laser printer, and the per-page cost of ink is much higher than for a laser printer. Therefore most businesses prefer laser printers for their main printing needs, perhaps keeping one or two ink-jet printers around for situations requiring color printing.
Laser Printers
Laser printers are referred to as page printers because they receive their print job instructions one page at a time. They are sheet-fed, non-impact printers. Another name for a laser printer is an electrophotographic (EP) printer.
| Note |
LED printers are much like laser printers except they use light-emitting diodes (LEDs) instead of lasers. Their process is similar to that of laser printers. They are covered in more detail later in this chapter. |
Parts of a Laser Printer
An electrophotographic laser printer consists of the following major components:
Printer ControllerA large circuit board that acts as the motherboard for the printer. It contains the processor and RAM to convert data coming in from the computer into a picture of a page to be printed.
Toner Cartridge and DrumA powdery mixture of plastic resin and iron oxide. The plastic allows it to be melted and fused to the paper, and the iron oxide allows it to be moved around via positive or negative charge. Toner comes in a cartridge, like the one shown in Figure 5.2.
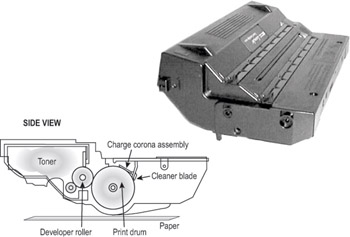
Figure 5.2: An EP toner cartridge
The drum is light sensitive; it can be written to with the laser scanning assembly. The toner cartridge in Figure 5.2 contains the print drum, so every time you change the toner cartridge, you get a new drum. In some laser printers, the drum is a separate part that lasts longer, so you don’t have to change it every time you change the toner.
Primary Corona (Charging Corona)Applies a uniform negative charge (around –600V) to the drum at the beginning of the printing cycle.
Laser Scanning AssemblyUses a laser beam to neutralize the strong negative charge on the drum in certain areas, so toner will stick to the drum in those areas. The laser scanning assembly uses a set of rotating and fixed mirrors to direct the beam, as shown in Figure 5.3.
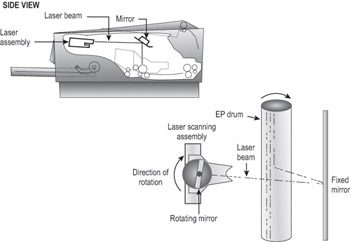
Figure 5.3: The EP laser scanning assembly (side view and simplified top view)
Paper Transport AssemblyMoves the paper through the printer. The paper transport assembly consists of a motor and several rubberized rollers. These rollers are operated by an electronic stepper motor. See Figure 5.4 for an example.
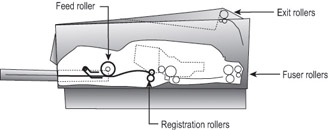
Figure 5.4: Paper transport rollers
Transfer CoronaApplies a uniform positive charge (about +600V) to the paper. When the paper rotates past the drum, the toner jumps off the drum and onto the paper. Then the paper passes through a static eliminator that removes the positive charge from it. (See Figure 5.5.) Some printers use a transfer corona wire; others use a transfer corona roller.
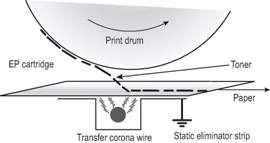
Figure 5.5: The transfer corona assembly
High-Voltage Power Supply (HVPS)Delivers the high voltages needed to make the printing process happen. It converts ordinary 120V household AC current into high DC voltages used to energize the primary and transfer corona wires (discussed later).
DC Power SupplyDelivers lower voltages to components in the printer that need much lower voltages than the corona wires do (such as circuit boards, memory, and motors).
Fusing AssemblyMelts the plastic resin in the toner so that it adheres to the paper. The fusing assembly contains a halogen heating lamp, a fusing roller made of Teflon-coated aluminum, and a rubberized pressure roller. The lamp heats the fusing roller, and as the paper passes between the two rollers, the pressure roller pushes the paper against the hot fusing roller, melting the toner into the paper. (See Figure 5.6.)
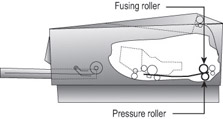
Figure 5.6: The fusing assembly
The Laser Printing Process
The laser (EP) print process consists of six steps. Here are the steps in the order you will see them on the exam:
- Cleaning
- Conditioning (or charging)
- Writing
- Developing
- Transferring
- Fusing
Step 1: Cleaning
In the first part of the laser print process, a rubber blade inside the EP cartridge scrapes any toner left on the drum into a used-toner receptacle inside the EP cartridge, and a fluorescent lamp discharges any remaining charge on the photosensitive drum (remember that the drum, being photosensitive, loses its charge when exposed to light). This step is called the cleaning step (Figure 5.7).
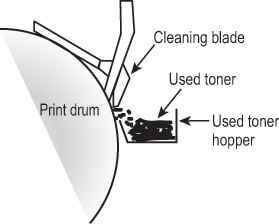
Figure 5.7: The cleaning step of the EP process
The EP cartridge is constantly cleaning the drum. It may take more than one rotation of the photosensitive drum to make an image on the paper. The cleaning step keeps the drum fresh for each use. If you didn’t clean the drum, you would see ghosts of previous pages printed along with your image.
| Note |
The actual amount of toner removed in the cleaning process is quite small. The cartridge will run out of toner before the used toner receptacle fills up. |
Step 2: Conditioning
In the conditioning step (Figure 5.8), a special wire (called a primary corona or charging corona) within the EP toner cartridge (above the photosensitive drum) gets a high voltage from the HVPS. It uses this high voltage to apply a strong, uniform negative charge (around –600VDC) to the surface of the photosensitive drum.
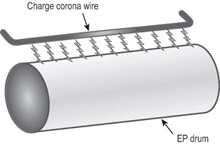
Figure 5.8: The conditioning step of the EP process
Step 3: Writing
In the writing step of the EP process, the laser is turned on and scans the drum from side to side, flashing on and off according to the bits of information the printer controller sends it as it communicates the individual bits of the image. In each area where the laser touches the photosensitive drum, the drum’s charge is severely reduced from –600VDC to a slight negative charge (around –100VDC). As the drum rotates, a pattern of exposed areas is formed, representing the images to be printed. Figure 5.9 shows this process.
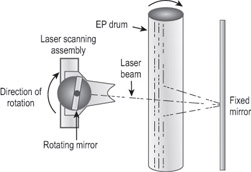
Figure 5.9: The writing step of the EP process
At this point, the controller sends a signal to the pickup roller to feed a piece of paper into the printer, where it stops at the registration rollers.
Step 4: Developing
Now that the surface of the drum holds an electrical representation of the image being printed, its discrete electrical charges need to be converted into something that can be transferred to a piece of paper. The EP process developing step accomplishes this (Figure 5.10). In this step, toner is transferred to the areas that were exposed in the writing step.
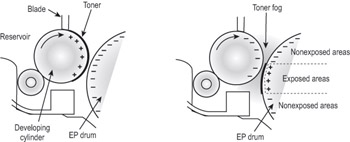
Figure 5.10: The developing step of the EP process
A metallic developing roller inside an EP cartridge acquires a –600VDC charge (called a bias voltage) from the HVPS. The toner sticks to this roller because there is a magnet located inside the roller and because of the electrostatic charges between the toner and the developing roller. While the developing roller rotates toward the photosensitive drum, the toner acquires the charge of the roller (–600VDC). When the toner comes between the developing roller and the photosensitive drum, the toner is attracted to the areas that have been exposed by the laser (because these areas have a lesser charge, of –100VDC). The toner also is repelled from the unexposed areas (because they are at the same –600VDC charge, and like charges repel). This toner transfer creates a fog of toner between the EP drum and the developing roller.
The photosensitive drum now has toner stuck to it where the laser has written. The photosensitive drum continues to rotate until the developed image is ready to be transferred to paper in the next step.
Step 5: Transferring
At this point in the EP process, the developed image is rotating into position. The controller notifies the registration rollers that the paper should be fed through. The registration rollers move the paper underneath the photosensitive drum, and the process of transferring the image can begin, with the transferring step.
The controller sends a signal to the corona wire or corona roller (depending on which one the printer has) and tells it to turn on. The corona wire/roller then acquires a strong positive charge (+600VDC) and applies that charge to the paper. The paper, thus charged, pulls the toner from the photosensitive drum at the line of contact between the roller and the paper, because the paper and toner have opposite charges. Once the registration rollers move the paper past the corona wire, the static-eliminator strip removes all charge from that line of the paper. Figure 5.11 details this step. If the strip didn’t bleed this charge away, the paper would attract itself to the toner cartridge and cause a paper jam.
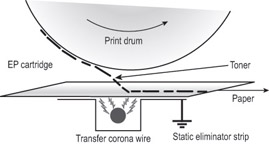
Figure 5.11: The transferring step of the EP process
The toner is now held in place by weak electrostatic charges and gravity. It will not stay there, however, unless it is made permanent, which is the reason for the fusing step.
Step 6: Fusing
In the final step, the fusing step, the toner image is made permanent. The registration rollers push the paper toward the fuser rollers. Once the fuser grabs the paper, the registration rollers push for only a short time more. The fuser is now in control of moving the paper.
As the paper passes through the fuser, the fuser roller melts the polyester resin of the toner, and the rubberized pressure roller presses it permanently into the paper (Figure 5.12). The paper continues on through the fuser and eventually exits the printer.
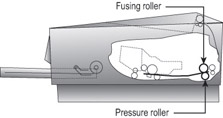
Figure 5.12: The fusing step of the EP process
Once the paper completely exits the fuser, it trips a sensor that tells the printer to finish the EP process with the cleaning step. At this point, the printer can print another page and the EP process can begin again.
Summary of the EP Print Process
Figure 5.13 summarizes all the EP process printing steps. First, the printer uses a rubber scraper to clean the photosensitive drum. Then the printer places a uniform, negative, –600VDC charge on the photosensitive drum by means of a charging corona. The laser paints an image onto the photosensitive drum, discharging the image areas to a much lower voltage (–100VDC). The developing roller in the toner cartridge has charged (–600VDC) toner stuck to it. As it rolls the toner toward the photosensitive drum, the toner is attracted to (and sticks to) the areas of the photosensitive drum that the laser has discharged. The image is then transferred from the drum to the paper at its line of contact by means of the corona wire (or corona roller) with a +600VDC charge. The static-eliminator strip removes the high, positive charge from the paper, and the paper, now holding the image, moves on. The paper then enters the fuser, where the fuser roller and the pressure roller make the image permanent. The paper exits the printer, and the printer starts printing the next page or returns to its ready state.
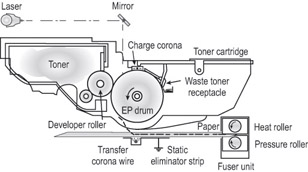
Figure 5.13: The EP print process
LED Printers
An LED printer uses a light-emitting diode instead of a laser. The LED is not built into the toner cartridge; it is separate, so that when you replace the toner cartridge, all you get is new toner.
The LED printing process uses a row of small LEDs very close to the drum to expose it. Each LED is about the same size as the diameter of the laser beam used in a laser printer. Except for the writing stage, the operation is the same as the laser printing process.
LED printers are cheaper and smaller than lasers. However, they are considered lower-end printers, and they have a lower maximum dots per inch (dpi)—under 800dpi versus 1,200 or more for a laser printer.
Other Printer Technologies
Besides the aforementioned technologies, you might see a question or two about several less popular ones on the A+ exam. They are all high-end color graphics printers designed for specialty professional usage:
Color LaserWorks much like a regular laser printer except that it makes multiple passes over the page, one for each ink color. Consequently, the printing speed is rather low.
Thermal Wax TransferA color non-impact line printer that uses a solid, wax-like ink. A heater melts the wax and then sprays it onto the page, somewhat like an ink-jet. The quality is very high, but so is the price ($2,500 or so). However, the wax is cheaper per page than ink-jet ink. The quality is as good as a color laser, but the speed is much faster because it needs only one pass.
Dye SublimationAnother color non-impact line printer. This one converts a solid ink into a gas that is then applied to the paper. Color is applied in a continuous tone, rather than individual dots, and the colors are applied one at a time. The ink comes on film rolls. The paper is very expensive, as is the ink. Print speeds are very low. The quality is extremely high.
Printer Interfaces
Besides understanding the printer’s operation, for the exam you need to understand how the printer talks to a computer. A printer’s interface is the collection of hardware and software that allows the printer to communicate with a computer. Each printer has at least one interface, but some printers have several, in order to make them more flexible in a multiplatform environment. If a printer has several interfaces, it can usually switch between them on the fly so that several computers can print at the same time.
Communication Types
When we say communication types, we’re talking about the hardware technologies involved in getting the printed information from the computer to the printer. There are eight major types:
Legacy SerialThis is the traditional RS-232 serial port found on most PCs. The original printer interface on the earliest computers, it has fallen out of favor and is seldom used anymore for printing because it is so slow.
Legacy ParallelUntil recently, the parallel port on a PC was the overwhelming favorite interface for connecting printers, to the point where the parallel port has become synonymous with printer port. It sends data 8 bits at a time (in parallel), and uses a cable with a male DB-25 connector at the computer and a 36-bin Centronics male connector at the printer. Its main drawback is its cable length, which must be less than 10 feet.
Universal Serial Bus (USB)The most popular type of printer interface as this book is being written is the Universal Serial Bus (USB). It is actually the most popular interface for just about every peripheral. The benefit for printers is that it has a higher transfer rate than either serial or parallel and it automatically recognizes new devices. USB is also fully Plug-and-Play, and it allows several printers to be connected at once without adding additional ports or using up additional system resources.
NetworkMost large environment printers (primarily laser and LED printers) have a special interface that allows them to be hooked directly to a network. These printers have a network interface card (NIC) and ROM-based software that let them communicate with networks, servers, and workstations.
The type of network interface used on the printer depends on the type of network the printer is being attached to. For example, if you’re using a Token Ring network, the printer should have a Token Ring interface.
SCSIAlthough it is not a common interface for printers, external SCSI can be used for a printer. See Objective 1.7 for more information about SCSI.
IEEE 1394/FireWireThis is a high-speed serial alternative to USB. It is less commonly used for printers than USB is, but FireWire printer interfaces do exist.
InfraredBlueTooth is an infrared technology that can connect a printer to a computer at a range of about 35 feet, provided there is an unblocked line of sight.
WirelessA network-enabled printer that has a wireless adapter can participate in a wireless Ethernet (IEEE 802.11b, a, or g) network, just as it would as a wired network client.
Exam Essentials
Know the common types of printers.Know and understand the types of printers such as impact printers, ink-jet printers, and laser printers (page printers), as well as their interfaces and print media.
Understand the process of printing for each type of printer.Each type of printer puts images or text on paper. Understand the process that each type of printer uses to accomplish this task.
Know the specific components of each type of printer.Each type of printer uses similar components to print. Know the different components that make up each type of printer and their job.
Know and understand the print process of a laser printer.You will almost certainly be asked questions about certain processes of a laser printer. Know and understand the different steps that make up the print process of a laser printer.
Know the possible interfaces that can be used for printing.The eight types are legacy parallel, legacy serial, USB, FireWire, network, wireless, infrared, and SCSI.
Recognizing and Resolving Common Printer Problems
Not only is printer troubleshooting on the test, but you may have to accomplish these tasks on a daily basis. Your ability to get a down printer working will make you more valuable to your employer.
Critical Information
In the real world, you will find that large portion of all service calls relate to printing problems. This section will give you some general guidelines and common printing solutions to resolve printing problems.
Printer Driver Issues
Many problems with a printer that won’t work with the operating system or that prints the wrong characters can be traced to problems with its software. Computers and printers can’t talk to each other by themselves. They need interface software to translate software commands into commands the printer can understand.
For a printer to work with a particular operating system, a driver must be installed for it. This driver specifies the page description language (PDL) that the printer understands, as well as information about the printer’s characteristics (paper trays, maximum resolution, and so on). For laser printers, there are two popular PDLs: Adobe PostScript and Hewlett Packard Printer Control Language (PCL). Almost all laser printers use one or both of these.
If the wrong printer driver is selected, the computer will send commands in the wrong language. If that occurs, the printer will print several pages of garbage (even if only one page of information was sent). This “garbage” isn’t garbage at all, but in fact the printer PDL commands printed literally as text instead of being interpreted as control commands.
| Note |
Although HP does not recommend using any printer driver other than the one designed for the specific printer, in some cases, you can increase the printing performance (speed) of HP LaserJet and DeskJet printers by using older drivers that do not support the newer high-definition printing. I have also had cases where software packages would not function with newer HP drivers. To increase speed or correct printing problems with HP LaserJet printers, try this rule of thumb: If you are using a 5 series printer (5Si), try a 4 series driver; if that does not work, reduce the driver by one series. If a LaserJet III does not work, try the LaserJet driver, which should be last on your list of the default drivers built into Windows. In 90 percent of cases, this driver will fix printing problems with some applications. |
Firmware Updates
A printer resembles a computer in many ways. Like a computer, it has its own motherboard, its own memory, and its own CPU. It also has firmware—that is, software permanently stored on a chip. If you are using an old computer with a new operating system, an update may be available for the printer’s firmware. You can find out that information at the printer manufacturer’s website, and download the update from there along with a utility program for performing the update.
Memory Errors
A printer can have several types of memory errors. The most common is insufficient memory to print the page. Sometimes this problem can be circumvented by doing any of the following:
- Turn off the printer to flush out its RAM, and then turn it back on and try again.
- Print at a lower resolution. (Adjust this setting in the printer’s properties in Windows.)
- Change the page being printed so it is less complex.
- Try a different printer driver if your printer supports more than one PDL. (For example, try switching from PostScript to PCL or vice versa.) Doing so involves installing another printer driver.
Printer Hardware Troubleshooting
This section covers the most common types of hardware printer problems you will run into. We’ll break the information into three areas, for the three main types of printers in use today.
Dot-Matrix Printer Problems
Dot-matrix printers are relatively simple devices. Therefore, only a few problems usually arise. We’ll cover the most common problems and their solutions here.
Low Print Quality
Problems with print quality are easy to identify. When the printed page comes out of the printer, the characters may be too light or have dots missing from them. Table 5.1 details some of the most common print-quality problems, their causes, and their solutions.
|
Characteristics |
Cause |
Solution |
|---|---|---|
|
Consistently faded or light characters |
Worn-out print ribbon |
Replace ribbon with a new, vendor-recommended ribbon. |
|
Print lines that go from dark to light as the print head moves across the page |
Print ribbon advance gear slipping |
Replace ribbon advance gear or mechanism. |
|
A small, blank line running through a line of print (consistently) |
Print head pin stuck inside the print head |
Replace the print head. |
|
A small, blank line running through a line of print (intermittently) |
A broken, loose, or shorting print-head cable or a sticking print head |
Secure or replace the print-head cable. Replace the print head or clean it. |
|
A small, dark line running through a line of print |
Print-head pin stuck in the out position |
Replace the print head. (Pushing the pin in may damage the print head.) |
|
Printer makes a printing noise, but no print appears on the page |
Worn, missing, or improperly installed ribbon cartridge, or the print head gap set too large |
Replace the ribbon cartridge correctly or adjust the print-head gap. |
|
Printer prints garbage |
Cable partially unhooked, wrong driver selected, or a bad printer control board (PCB) |
Hook up cable correctly, select the correct driver, or replace the PCB (respectively). |
Printout Jams inside the Printer
A paper jam happens when something prevents the paper from advancing through the printer evenly. Print jobs jam for two major reasons: an obstructed paper path or stripped drive gears.
An obstructed paper path is often difficult to find. Usually it means disassembling the printer to find the bit of paper or other foreign substance that’s blocking the paper path. A very common obstruction is a piece of the perf—the perforated sides of tractor-feed paper—that has torn off and gotten crumpled up and then lodged into the paper path. It may be necessary to remove the platen roller and feed mechanism to get at the obstruction.
Stepper Motor Problems
A stepper motor is a motor that can move in very small increments. Printers use stepper motors to move the print head back and forth as well as to advance the paper (these are called the carriage motor and main motor, respectively). These motors get damaged when they are forced in any direction while the power is on. This includes moving the print head over to install a printer ribbon as well as moving the paper feed roller to align paper. These motors are very sensitive to stray voltages. And, if you are rotating one of these motors by hand, you are essentially turning it into a small generator, thereby damaging it!
A damaged stepper motor is easy to detect. Damage to the stepper motor will cause it to lose precision and move farther with each step. Lines of print will be unevenly spaced if the main motor is damaged (which is more likely). Characters will be scrunched together if the print head motor goes bad. In fact, if the motor is bad enough, it won’t move at all in any direction. It may even make high-pitched squealing noises. If any of these symptoms show themselves, it’s time to replace one of these motors. Stepper motors are usually expensive to replace— about half the cost of a new printer. However, because dot-matrix printers are old technology and difficult to find, you may have no choice but to replace the motor if the printer is essential and is no longer available new.
Ink-jet Printers
Ink-jet printers are the most commonly sold printers for home use. For this reason, you need to understand the most common problems with ink-jet printers so your company can service them effectively.
Print Quality
The majority of ink-jet printer problems are quality problems. Ninety-nine percent of these can be traced to a faulty ink cartridge. With most ink-jet printers, the ink cartridge contains the print head and the ink. The major problem with this assembly can be described by “If you don’t use it, you lose it.” The ink will dry out in the small nozzles and block them if they are not used at least once a week.
An example of a quality problem is when thin blank lines or colored stripes appear on the page. This is caused by a plugged hole in at least one of the small, pinhole ink nozzles in the print cartridge. Replacing the ink cartridge solves this problem easily. You may also be able to clear the clogged ink jet by running the printer’s cleaning routine, either by pressing buttons on the printer or by issuing a command through the printer’s driver in Windows.
If an ink cartridge becomes damaged or develops a hole, it can put too much ink on the page, and the letters will smear. Again, the solution is to replace the ink cartridge. (However, a very small amount of smearing is normal if the pages are laid on top of each other immediately after printing.)
One final print quality problem that does not directly involve the ink cartridge is characterized by the print quickly going from dark to light, and then to nothing. As we already mentioned, ink cartridges dry out if not used. That’s why the manufacturers included a small suction pump inside the printer that primes the ink cartridge before each print cycle. If this priming pump is broken or malfunctioning, this problem will manifest itself and the pump will need to be replaced.
| Tip |
If the problem of the ink quickly going from dark to light and then disappearing ever happens to you, and you really need to print a couple of pages, try this trick I learned from a fellow technician: Take the ink cartridge out of the printer. Squirt some window cleaner on a paper towel and gently tap the print head against the wet paper towel. The force of the tap plus the solvents in the window cleaner should dislodge any dried ink, and the ink will flow freely again. |
Paper Jams
Ink-jet printers usually have very simple paper paths. Therefore, paper jams due to obstructions are less likely. They are still possible, however, so an obstruction shouldn’t be overlooked as a possible cause of jamming.
Paper jams in ink-jet printers are usually due to one of two things:
- A worn pickup roller
- The wrong type of paper
The pickup roller usually has one or two D-shaped rollers mounted on a rotating shaft. When the shaft rotates, one edge of the D rubs against the paper, pushing it into the printer. When the roller gets worn, it becomes smooth and doesn’t exert enough friction against the paper to push it into the printer.
If the paper used in the printer is too smooth, it causes the same problem. Pickup rollers use friction, and smooth paper doesn’t offer much friction. If the paper is too rough, on the other hand, it acts like sandpaper on the rollers, wearing them smooth. Here’s a rule of thumb for paper smoothness: Paper slightly smoother than a new dollar bill will work fine.
Laser and Page Printers
Most of the problems with laser printers can be diagnosed with knowledge of the inner workings of the printer and a little common sense.
Paper Jams
Laser printers today run at copier speeds. As a result, their most common problem is paper jams. Paper can get jammed in a printer for several reasons. First, feed jams happen when the paper feed rollers get worn (similar to feed jams in ink-jet printers). The solution to this problem is easy: Replace the worn rollers.
| Tip |
If your paper-feed jams are caused by worn pickup rollers, there is something you can do to get your printer working while you’re waiting for the replacement pickup rollers. Scuff the feed roller(s) with a Scotch-Brite pot-scrubber pad (or something similar) to roughen up the feed rollers. This trick works only once. After that, the rollers aren’t thick enough to touch the paper. |
Another cause of feed jams is related to the drive of the pickup roller. The drive gear (or clutch) may be broken or have teeth missing. Again, the solution is to replace it. To determine if the problem is a broken gear or worn rollers, print a test page, but leave the paper tray out. Look into the paper feed opening with a flashlight and see if the paper pickup roller(s) are turning evenly and don’t skip. If they turn evenly, the problem is more than likely worn rollers.
Worn exit rollers can also cause paper jams. These rollers guide the paper out of the printer into the paper-receiving tray. If they are worn or damaged, the paper may catch on its way out of the printer. These types of jams are characterized by a paper jam that occurs just as the paper is getting to the exit rollers. If the paper jams, open the rear door and see where the paper is. If the paper is very close to the exit roller, the exit rollers are probably the problem.
The solution is to replace all the exit rollers. You must replace all of them at the same time, because even one worn exit roller can cause the paper to jam. Besides, they’re inexpensive. Don’t be cheap and skimp on these parts if you need to have them replaced.
Paper jams can be the fault of the paper. If your printer consistently tries to feed multiple pages into the printer, the paper isn’t dry enough. If you live in an area with high humidity, this could be a problem. I’ve heard some solutions that are pretty far out but that work (like keeping the paper in a Tupperware-type of airtight container or microwaving it to remove moisture). The best all-around solution, however, is humidity control and to keep the paper wrapped until it’s needed. Keep the humidity around 50 percent or lower (but above 25 percent if you can, in order to avoid problems with electrostatic discharge).
Finally, a metal, grounded strip called the static eliminator strip inside the printer drains the corona charge away from the paper after it has been used to transfer toner from the EP cartridge. If that strip is missing, broken, or damaged, the charge will remain on the paper and may cause it to stick to the EP cartridge, causing a jam. If the paper jams after reaching the corona assembly, this may be the cause.
Blank Pages
Blank pages are a somewhat common occurrence in laser and page printers. Somehow, the toner isn’t being put on the paper. The toner cartridge is the source for most quality problems, because it contains most of the image-formation pieces for laser and page printers. Let’s start with the obvious. A blank page will come out of the printer if there is no toner in the toner cartridge. It’s very easy to check: Just open the printer, remove the toner cartridge, and shake it. You will be able to hear if there’s toner inside the cartridge. If it’s empty, replace it with a known, good, manufacturer-recommended toner cartridge.
Another issue that crops up rather often is the problem of using refilled or reconditioned toner cartridges. During their recycling process, these cartridges may be filled with the wrong kind of toner (for example, one with an incorrect charge). This may cause toner to be repelled from the EP drum instead of attracted to it. Thus, there’s no toner on the page because there was no toner on the EP drum to begin with. The solution is to replace the toner cartridge with the type recommended by the manufacturer.
A third problem related to toner cartridges happens when someone installs a new toner cartridge and forgets to remove the sealing tape that is present to keep the toner in the cartridge during shipping. The solution to this problem is as easy as it is obvious: Remove the toner cartridge from the printer, remove the sealing tape, and reinstall the cartridge.
Another cause of blank pages is a damaged or missing corona wire. If a wire is lost or damaged, the developed image won’t transfer from the EP drum to the paper. Thus, no image appears on the printout. To determine if this is causing your problem, do the first half of the self-test (described later in this section). If there is an image on the drum but not on the paper, you will know that the corona assembly isn’t doing its job.
To check if the corona assembly is causing the problem, open the cover and examine the wire (or roller, if your printer uses one). The corona wire is hard to see, so you may need a flashlight. You will know if it’s broken or missing just by looking (it will either be in pieces or just not there). If it’s not broken or missing, the problem may be related to the HVPS. The corona wire (or roller) is a relatively inexpensive part and can be easily replaced with the removal of two screws and some patience.
The HVPS supplies high-voltage, low-current power to both the charging and transfer corona assemblies in laser and page printers. If it’s broken, neither will work properly. If the self-test shows an image on the drum but none on the paper, and the corona assembly is present and not damaged, then the HVPS is at fault.
All-Black Pages
This happens when the charging unit (the charging corona wire or charging corona roller) in the toner cartridge malfunctions and fails to place a charge on the EP drum. Because the drum is grounded, it has no charge. Anything with a charge (like toner) will stick to it. As the drum rotates, all the toner will be transferred to the page, and a black page will form.
This problem wastes quite a bit of toner, but it can be fixed easily. The solution (again) is to replace the toner cartridge with a known, good, manufacturer-recommended one. If that doesn’t solve the problem, then the HVPS is at fault (it’s not providing the high voltage the charging corona needs to function).
Repetitive Small Marks or Defects
Repetitive marks occur frequently in heavily used (as well as older) laser printers. The problem may be caused by toner spilled inside the printer. It can also be caused by a crack or chip in the EP drum (this mainly happens with recycled cartridges). These cracks can accumulate toner. In both cases, some of the toner will get stuck onto one of the rollers. Once this happens, every time the roller rotates and touches a piece of paper, it will leave toner smudges spaced a roller circumference apart.
The solution is simple: Clean or replace the offending roller. To help you figure out which roller is causing the problem, the service manuals contain a chart like the one in Figure 5.14. To use the chart, place the printed page next to the chart. Align the first occurrence of the smudge with the top arrow. The next smudge will line up with one of the other arrows. The arrow it lines up with tells you which roller is causing the problem. (This chart in Figure 5.14 is only an example; your printer will have different-size rollers and will need a different chart. Also, this chart is not to scale.)
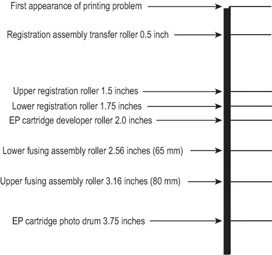
Figure 5.14: Laser printer roller circumference chart
Vertical Black Lines on the Page
A groove or scratch in the EP drum can cause the problem of vertical black lines running down all or part of the page. Because a scratch is lower than the surface, it doesn’t receive as much (if any) of a charge as the other areas. The result is that toner sticks to it as though it were discharged. Because the groove may go around the circumference of the drum, the line may go all the way down the page.
Another possible cause of vertical black lines is a dirty charging corona wire. A dirty charging corona wire will prevent a sufficient charge from being placed on the EP drum. Because the EP drum will have almost zero charge, toner will stick to the areas that correspond to the dirty areas on the charge corona wire.
The solution to the first problem is, as always, to replace the toner cartridge (or EP drum if your printer uses a separate EP drum and toner). You can also solve the second problem with a new toner cartridge, but in this case that would be an extreme solution. It’s easier to clean the charge corona with the brush supplied with the cartridge.
Vertical White Lines on the Page
Vertical white lines running down all or part of the page are relatively common problems on older printers, especially ones that see little maintenance. They are caused by foreign matter (more than likely toner) caught on the transfer corona wire. The dirty spots keep the toner from being transmitted to the paper (at those locations, that is), with the result that streaks form as the paper progresses past the transfer corona wire.
The solution is to clean the corona wires. Some printers come with a small corona-wire brush to help in this procedure. To use it, remove the toner cartridge and run the brush in the charge corona groove on top of the toner cartridge. Replace the cartridge and use the brush to brush away any foreign deposits on the transfer corona. Be sure to put it back in its holder when you’re finished.
Image Smudging
If you can pick up a sheet from a laser printer, run your thumb across it, and have the image come off on your thumb, then you have a fuser problem. The fuser isn’t heating the toner and fusing it into the paper. This could be caused by a number of things—but all of them can be taken care of with a fuser replacement. For example, if the halogen light inside the heating roller has burned out, that will cause the problem. The solution is to replace the fuser. The fuser can be replaced with a rebuilt unit, if you prefer. Rebuilt fusers are almost as good as new fusers, and some even come with guarantees. Plus, they cost less.
| Tip |
The whole fuser may not need to be replaced. You can order fuser components from parts suppliers and then rebuild them. For example, if the fuser has a bad lamp, you can order a lamp and replace it in the fuser. |
Another, similar problem happens when small areas of smudging repeat themselves down the page. Dents or cold spots in the fuser heat roller cause this problem. The only solution is to replace either the fuser assembly or the heat roller.
Ghosting
Ghosting means you can see light images of previously printed pages on the current page. This is caused by one of two things: bad erasure lamps or a broken cleaning blade. If the erasure lamps are bad, the previous electrostatic discharges aren’t completely wiped away. When the EP drum rotates toward the developing roller, some toner sticks to the slightly discharged areas. A broken cleaning blade, on the other hand, causes old toner to build up on the EP drum and consequently present itself in the next printed image.
Replacing the toner cartridge solves the second problem. Solving the first problem involves replacing the erasure lamps in the printer. Because the toner cartridge is the least expensive cure, you should try that first. Usually, replacing the toner cartridge will solve the problem. If it doesn’t, you will then have to replace the erasure lamps.
Printer Prints Pages of Garbage
This has happened to everyone at least once. You print a one-page letter and 10 pages of what looks like garbage come out of the printer. This problem comes from either the print driver software or the formatter board:
Printer DriverThe correct printer driver needs to be installed for the printer you have. For example, if you have an HP LaserJet III, then that is the driver you need to install. Once the driver has been installed, it must be configured for the correct page description language: PCL or PostScript. Most HP LaserJet printers use PCL (but can be configured for PostScript). Determine what page description your printer has been configured for and set the print driver to the same setting. If this is not done, you will get garbage out of the printer.
| Tip |
Most printers with LCD displays indicate that they are in PostScript mode with a PS or PostScript somewhere in the display. |
If the problem is the wrong driver setting, the garbage the printer prints looks like English. That is, the words are readable, but they don’t make any sense.
Formatter BoardThe other cause of several pages of garbage being printed is a bad formatter board. This circuit board takes the information the printer receives from the computer and turns it into commands for the various components in the printer. Problems with the formatter board generally produce wavy lines of print or random patterns of dots on the page.
It’s relatively easy to replace the formatter board in a laser printer. Usually this board is installed underneath the printer and can be removed by loosening two screws and pulling the board out. Typically, replacing the formatter board also replaces the printer interface; another possible source of garbage printouts.
Problems with Consumables
Just as it is important to use the correct printer interface and printer software, you must use the correct printer supplies. These supplies include the print media (what you print on) and the consumables (what you print with). The quality of the final print job has a great deal to do with the print supplies.
Paper
Most people don’t give much thought to the kind of paper they use in their printers. It’s a factor that can have a tremendous effect on the quality of the hard-copy printout, however, and the topic is more complex than people think. For example, if the wrong paper is used, it can cause the paper to jam frequently and possibly even damage components.
Transparencies
Transparencies are still used for presentations made with overhead projectors, even with the explosion of programs like Microsoft PowerPoint and peripherals like LCD computer displays, both of which let you show a whole roomful of people exactly what’s on your computer screen. PowerPoint has an option to print slides, and you can use any program to print anything you want on a transparent sheet of plastic or vinyl for use with an overhead projector. The problem is, these “papers” are exceedingly difficult for printers to work with. That’s why special transparencies were developed for use with laser and ink-jet printers.
Each type of transparency was designed for a particular brand and model of printer. Again, check the printer’s documentation to find out which type of transparency works in that printer. Don’t use any other type of transparency.
| Warning |
Never run transparencies through a laser printer without first checking to see if it’s the type recommended by the printer manufacturer. The heat from the fuser will melt most other transparencies, and they will wrap themselves around it. It is impossible to clean a fuser after this has happened. The fuser will have to be replaced. Use only the transparencies that are recommended by the printer manufacturer. |
Ink, Toner, or Ribbon
Besides print media, other things in the printer run out and need to be replenished. These items are the print consumables. Most consumables are used to form the images on the print media. Printers today use two main types of consumables: ink and toner.
To avoid problems relating to the ink, toner, or ribbon, use only brand-new supplies from reputable manufacturers. Do not use remanufactured or refilled cartridges.
Cleaning Pads
Some toner cartridges come with a cleaning pad. It’s a long, thin strip of felt mounted on a piece of plastic. If a toner cartridge includes one, that means that somewhere inside the printer is a dirty felt pad that needs to be swapped out with the new one. Failing to do this when you change toner cartridges can cause problems.
Environmental Issues for Printers
Just like computers, printers can suffer from operating in an inhospitable environment such as one that is extreme in temperature or very dusty or smoky. Printers work best in a cool, clean environment where the humidity is between 50 and 80 percent.
Exam Essentials
Know the common printing problems listed.Understand the most common problems that occur in an environment.
Know the possible fixes for the common problem types.Each type of printer has its own common issues. Be familiar with the most likely repair options for each common problem.
Know how to select good-quality, appropriate consumables.Using appropriate paper and new (not remanufactured) toner, ink, or ribbon can prevent many problems.
Review Questions
|
1. |
Give two examples of line printers. |
|
|
2. |
What advantage does dot matrix have over other printer technologies? |
|
|
3. |
What is the purpose of the primary corona in the laser printing process? |
|
|
4. |
List the six steps in the laser printing process in the correct order. |
|
|
5. |
If there is loose toner on the paper after a laser print, which part is defective? |
|
|
6. |
What are some advantages of USB as a printer interface, as opposed to legacy parallel? |
|
|
7. |
What do you need to do if there are stripes on an ink-jet printout? |
|
|
8. |
True or false: A laser printer that prints a completely black page may be suffering from a nonfunctioning fuser. |
|
|
9. |
Why should you not use transparency film designed for an ink-jet printer in a laser printer? |
|
|
10. |
What is the most common cause of small marks or defects in the same spot on every page of a laser printer’s printout? |
|

Answers
|
1. |
Ink-jet, dot matrix |
|
2. |
The ability to print on multipart forms |
|
3. |
It applies a uniform negative charge to the drum. |
|
4. |
Cleaning, conditioning, writing, developing, transferring, fusing |
|
5. |
Fuser |
|
6. |
USB is fully Plug-and-Play, it allows several printers to be connected at once without adding additional ports or using up additional system resources, and it is faster. |
|
7. |
Clean the ink jets; one or more is clogged. |
|
8. |
False. A completely black page results from the primary (charging) corona malfunctioning. |
|
9. |
Because the laser printer’s fuser will melt it |
|
10. |
A scratch on the drum |
Part I - A+: Core Hardware Service Technician Exam
- Domain 1 Installation, Configuration, and Upgrading
- Domain 2 Diagnosing and Troubleshooting
- Domain 3 Preventive Maintenance
- Domain 4 Motherboard/Processors/Memory
- Domain 5 Printers
- Domain 6 Basic Networking
Part II - A+ Operating System Technologies Exam
