Domain 4 Networks
CompTIA A+ Exam Objectives Covered in this Chapter
- 4.1 Identify the networking capabilities of Windows. Given configuration parameters, configure the operating system to connect to a network.
- 4.2 Identify the basic Internet protocols and terminologies. Identify procedures for establishing Internet connectivity. In a given scenario, configure the operating system to connect to and use Internet resources.
In preparing for a career as a computer technician, you may have already done a great deal of work putting together computers, troubleshooting hardware, and installing Windows and various software. If you are like most PC techs, the networking questions are probably the part of the A+ test you are most concerned about. Many companies draw a distinct line between PC techs and network techs—and for good reason. Both jobs require a high level of knowledge, and it is best to specialize to some extent.
In the modern computing environment, though, it is simply not possible for a tech to ignore networks. In troubleshooting and repairing computers, your concern with networking should focus on two very broad categories:
- Being able to troubleshoot a customer’s connection to a LAN or dial-up connection
- Being able to effectively use your local network or the Internet to gain access to needed software and information
The first of these requires that you know how to install and configure networking components and how to set up any shared resources that a particular computer needs to share with the network. The second looks at how you can use that connection to access a shared drive or information on the Internet.
Over the course of this chapter, we will examine the most critical aspects of networking— more specifically, of Microsoft networking, which is what the test covers. This information is relatively straightforward, and the A+ networking domain breaks it down into two simple parts: how to get a machine on the network (objective 4.1) and how to set up and use an Internet connection (objective 4.2).
Configuring the Networking Capabilities of Windows
Networking is a mixture of hardware and software. The Core Hardware exam tests your knowledge of the hardware part, and objective 4.1 in the OS Technologies exam tests your knowledge of the software part.
Critical Information
For this objective, you need to know how to configure network client options in Windows, how to select and install the needed protocols, how to use basic command-line networking utilities, and how to share resources.
Network Components
In order for a PC to communicate with another PC, the most basic criterion is that some sort of network-capable hardware be installed. This can be one of any of a number of things— modem, network interface card (NIC), infrared port, and so on. The key point is that the OS itself can’t do anything without help from the hardware.
Once you have a network connection device, that device needs to be configured for use by the OS. This requires the introduction of three software elements—adapter, client, and protocol—and allows for an optional fourth—service. Let’s take a brief look at each:
| Note |
The terms adapter and client also have hardware meanings. Adapter is a synonym for a circuit board in some cases, for example, and client is a synonym for an entire computer that participates in a network. In this objective, however, we are using the terms in a purely software sense, referring to specific drivers in Windows that help networking occur. |
AdapterThe adapter is the device driver for your network interface card or other networking device. Windows may automatically detect popular NICs and install the needed adapter files, or you may need to run the Setup utility that came with the NIC to install the adapter.
ClientThe client is software that allows your machine to talk to servers on the network. Each server vendor uses a different way of designing its network access, though; so if a computer needs to get to both a Novell and a Microsoft network, the computer must have two pieces of client software installed, one for each type of server. The two most popular clients (and the two that come with most versions of Windows) are Client for Microsoft Networks and Client for Netware Networks.
ProtocolOnce the client service and the adapter are installed, you have cleared a path for communication from your machine to the network servers. The protocol is the computer language you use to facilitate communication between the machines. If you want to talk to someone, you have to speak a common language. Computers are no different. The most popular protocol in use today—and the only one used on the Internet—is TCP/IP. Other protocols that you may occasionally encounter include IPX/SPX-compatible (for Netware networks) and NetBEUI (for small networks that do not include routers).
Service
A service is an optional component that gives a bit back to the network that gives it so much. Services add functionality to the network by providing resources or doing tasks for other computers. The most common service is File and Printer Sharing for Microsoft Networks.
Choosing a Network Type and Client
When you connect a computer to a network, you must decide on the networking technology— that is, which brand of client software you will use. The two main choices are Microsoft and Novell.
If you are setting up a client/server network (discussed in Chapter 6), the client software you install on the individual client PCs depends on your choice of server software. If the server is running Novell Netware, for example, you’ll install Client for Netware Networks in Windows. If the server is running Microsoft Windows Server, you’ll install Client for Microsoft Networks.
If you are setting up a peer-to-peer network, you’ll install the Client for Microsoft Networks on all the client PCs, because it is built into Windows and requires no additional third-party software.
| Tip |
The Client for Microsoft Networks installs by default when you first install an adapter. |
The Client for Microsoft Networks is probably already installed. To check, open the Properties dialog box for networking in Windows 9x, or for an individual adapter in Windows 2000/XP, and look for a client on the list that appears.
If you need to add a client in Windows 9x, follow these steps:
- Open the Network Properties box and click Add on the Configuration tab.
- Click Client, and then click Add.
- Select the manufacturer name (Microsoft) and then choose the client from the list.
- Click OK.
In Windows 2000/XP, Client for Microsoft Networks is always automatically installed. To add Client Service for Netware, do the following:
- From Control Panel, open Network Connections in Windows XP, or Network and Dial-up Connections in Windows 2000.
- Right-click the adapter and click Properties.
- Click Install, click Client, and then click Add.
- Choose Client Services For NetWare, and then click OK.
Once you have installed a client, a login screen for that network type appears each time you start the machine. This screen allows you to enter a network username and password that give you access to resources on that type of server.
Choosing a Protocol
In order for two people to communicate, they must speak the same language, and the same is true with computers. There are several protocols you should be familiar with: IPX/SPX (NWLink), NetBEUI, AppleTalk, and TCP/IP. TCP/IP is the most common, and also the most complex in terms of what you need to know for the exam, so we will save it for last.
Protocols are installed basically the same way as clients (as described in the preceding section). View the network properties in Windows 9x or the properties for a specific network connection in Windows NT/2000/XP; then click Add, select Protocols, and browse for the one you want.
NWLink/IPX/SPX
The Internetwork Packet eXchange/Sequenced Packet eXchange (IPX/SPX) protocol was adopted by Novell as the primary protocol for the NetWare server family. In order to connect Microsoft machines to older NetWare servers, the client had to use the IPX/SPX protocol— or its Microsoft equivalent, NWLink.
Now that NetWare is also going to a TCP/IP-based architecture, NWLink is quickly being made obsolete, but it is still installed by default whenever the Client for NetWare Networks or Client Service for NetWare is installed. If the NetWare server uses IP only, you need to add TCP/IP and remove the unneeded NWLink. If, on the other hand, the network runs on NWLink, setup is easy: Install the protocol through the network properties, and then set the network number to whatever value the network administrator specifies.
| Tip |
About the only configuration problems possible with NWLink are an incorrect network number or the wrong frame type. The network number is a way of grouping machines logically on a network. Machines with different network numbers cannot see one another. The frame type is best thought of as a protocol dialect for NWLink. If two machines are running NWLink to communicate, they both must be using the same frame type. |
NetBEUI
The NetBEUI protocol is insufficient on so many levels that discussing its faults is too big a job for this chapter. It is an extremely fast protocol for allowing a few computers on a single network to communicate, but due to the fact that it is not routable, it doesn’t scale well, which doomed it as networks grew and started to interconnect.
The death knell of NetBEUI wasn’t a problem, because TCP/IP and other protocols were ready to take over. The one thing that has continued to cause confusion and trouble, though, is that NetBEUI was tied to another Microsoft protocol called NetBIOS, which has been far more difficult to replace.
NetBEUI and NetBIOS are obviously similar-looking terms, and unfortunately, a certain amount of confusion surrounds them. Briefly, NetBEUI is a transport protocol. It is responsible for the way data is transmitted between two computers. It is not routable and is rarely used in modern computing. NetBIOS is a name-resolution system. It allows a computer to search for another computer on the network by its Microsoft computer name. It must be operational on every Microsoft-based network up to Windows 2000, or Microsoft OS-based machines cannot be able to communicate properly. The NetBIOS naming process can work with NWLink or TCP/IP, so NetBEUI is not required for it to function. You will hear more about how NetBIOS works in the next section.
AppleTalk
This protocol is used for Apple Macintosh networks. When a PC participates as a client in such a network, the AppleTalk protocol must be installed in Windows. It does not come with Windows; you get it from Apple. It installs like any other protocol.
TCP/IP
Developed in the late 1960s by the Department of Defense, and originally known as the DOD protocol, TCP/IP stands for Transmission Control Protocol/Internet Protocol. TCP and IP are actually just two of the many different protocols that make up the TCP/IP protocol suite.
This protocol is the standard communication language for the Internet and for Microsoft’s Windows Active Directory. Unix and Macintosh can use TCP/IP, as can NetWare and all Windows OSs. In most environments, this is the only protocol you need.
Understanding TCP/IP Addressing
An IP address consists of four numbers from 1 to 254, strung together by periods like this: 192.168.3.7. These numbers must be within this range because each is an 8-digit binary number, and binary 11111111 equals 255. The top number (255) is reserved, so that leaves a range of 1 to 254. Each computer’s IP address must be unique on the network.
Within an IP address are two separate addresses: the network address and the host address. The network address is the first part; it is like an area code. It’s the unique identifier of the network segment on which the PC resides. The host address is the unique identifier of the PC within that segment.
Unlike with area codes, however, the divider line between the network and host addresses is fluid. The exact dividing point depends on the subnet mask. A subnet mask of 255.255.0.0, for example, indicates that the dividing point is after the first two numbers. A subnet mask of 255.255.255.0 indicates that the dividing point is after the third number.
A particular network segment passes local traffic freely among all the connected nodes it includes, but for traffic to go to a different segment, it has to pass through a specific out port called a gateway. The gateway has its own IP address. Sometimes when you’re configuring a network IP address you will be asked to enter a default gateway. Your network administrator should provide this address.
Assigning and Resolving IP Addresses
There are two ways to manage TCP/IP. The manual way involves going to each machine and entering an IP address. This is called static addressing.
Another possibility is to use the Dynamic Host Configuration Protocol (DHCP). If your network is using DHCP, all you have to do is install TCP/IP and reboot. A special server called a DHCP server will then provide your machine with all the values it needs when it starts up again. The DHCP server gives leases to the IP addresses that the server manages and the clients must periodically renew their leases.
Finally, if your network does not contain a DHCP server, Windows will automatically assign an IP address to each PC within a specified reserved range beginning with 169.254. This is called Automatic Private IP Addressing (APIPA).
IP addresses are not the only way of referring to a network address, however. Another way is to use domain names, which is how the Internet does it. A domain name consists of text, so it’s easier to remember than an IP address. For example, Microsoft.com is a domain name. Special servers called Domain Name System (DNS) servers handle the translation between IP addresses and domain names. See objective 4.2 later in this chapter for more information.
TCP/IP Utilities
Several utilities in Windows can help you determine a PC’s TCP/IP status and IP address. They are summarized in Table 10.1. You can run them with the Run command or at a command prompt.
|
Utility |
Function |
|---|---|
|
WINIPCFG |
A graphical utility in Windows 9x that allows you to get information about your IP configuration. Also allows you to release a DHCP lease and request a new one. See Figure 10.1. |
|
IPCONFIG |
Does the same thing as WINIPCFG but for Windows NT/ 2000/XP. A command-line utility rather than a graphical utility. |
|
PING |
Allows you to test connectivity with another host by typing ping and the name or IP address of the machine you are trying to communicate with—for instance, ping www.sybex.com or ping 192.168.1.250. |
|
TRACERT |
Trace route utility that lets you watch the path information takes while getting from your machine to another one. Whereas PING just tells you if the path is possible, TRACERT shows you the path. |
|
NSLOOKUP |
Looks up the IP addresses of domain names, and also reports the local PC’s IP address. |
Using these utilities is pretty straightforward. You should work with each of them—and know what their options are—before you take the test. Remember that both WINIPCFG (shown in Figure 10.1) and IPCONFIG are essentially read-only utilities. Their only configuration option is to allow you to release or renew DHCP leases (if you are using DHCP). PING and TRACERT are troubleshooting tools.
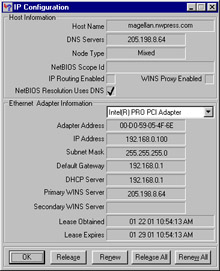
Figure 10.1: The Windows IP Configuration utility
Sharing Resources
You can set up Windows 9x/NT/2000/XP to share files and printers with other users on the network. This sort of networking, in which users share each other’s resources, is an example of the peer-to-peer network type discussed earlier, where each computer acts as both a client and a server.
In order to share, the machine must already have a working client configuration. This is a must, because file and printer sharing is possible only if the proper adapter, client, and protocol are already set up. Once they are in place, you need to enable file and printer sharing and then specify which resources you wish to share.
Simply enabling file and printer sharing does not make any folders or printers available on the network. You must specifically share any directory or printer that you want to make available on the network. We will look at the issues with both of these steps.
Setting Up Sharing
The first step in sharing resources is installing the File and Printer Sharing service in Windows if it is not already installed. On Windows 9x, you do this by clicking the File And Print Sharing button on the Network Properties tab. You can choose to enable either file or printer sharing (or both). In Windows 2000/XP, sharing is enabled by default when networking is installed, and this is reflected by the presence of File And Printer Sharing For Microsoft Networks in the Local Area Connection Properties page.
| Tip |
Besides enabling sharing, Windows 2000/XP also creates a number of default shares: printers, scheduled tasks, and a hidden administrative-only share of the root of each drive. Hidden drives in NT-based Windows versions are designated by a $ at the end of the share name. Therefore, the admin share of the C: drive would be C$ and of D: would be D$. |
Sharing Folders
Any folder can be shared (including the root of the C: drive). When you share a folder, the person you share it with can see not only the folder you’ve shared but also any folders inside that folder. Therefore, you should be certain that all subfolders under a share are intended to be shared as well. If they are not, move them out of the share path.
Once you have decided what to share, right-click the folder that is the start of the share and choose Sharing from the menu that pops up. This option brings up the Properties window of that folder with the Sharing tab in front. You can also access the Sharing tab (Figure 10.2) by right-clicking a folder, choosing Properties, and clicking the tab.
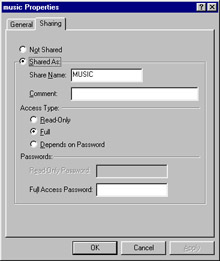
Figure 10.2: The Sharing tab of the Properties window
To enable the share, click the Shared As radio button. Two previously grayed-out fields become visible. The first field is Share Name. The name you enter here will be used to access this folder; it should be something that accurately represents what you are sharing. The second field allows you to enter a description of the share as a comment that helps identify the contents of the share to users. The share name is required, and the comment is optional.
| Note |
Remember that if the share name is more than eight characters long, many older OSs, such as DOS, will not be able to access it properly. That and other file-naming/file-recognition issues between Windows’ long filenames and DOS could easily come up in a test question. |
Windows 9x Share Security
Finally, you can specify the access rights and password(s) for the share. Two different security schemes are available: Share Level and User Level. Share Level security is the default selection.
There are three options for Windows 9x access rights when you’re using the share-level security scheme. Click the radio button next to the option you want to use:
Read-OnlyAnyone accessing the share can only open and read the files inside the folder and any subfolders. You must specify a password that users can use to access the share in read-only mode.
FullEveryone accessing the share has the ability to do anything to the files in the folder as well as any subfolders, including delete those files. You must specify a password that the users can use to access this share.
Depends On PasswordProbably the best option of the three. Users can use one password to access the share in read-only mode and a different password to access it in full-access mode. You can give everyone the read-only password so that they can view the files, and give the full-access password only to users who need to modify the files. Note, though, that this option uses only one password for each security level and does not require a username.
| Warning |
By default, a new share is a full-control share. This means anyone on the network can come in and view, modify, or even delete the files in the share. Often this arrangement is a bit too dangerous, so you should probably use a Read Only or Depends On Password security setting. |
The second security scheme option, User Level, requires that you have another machine available to provide a user/password database for the Windows 9x machine to draw from. Because 9x does not have a user database, it cannot authenticate users on its own, but it can be configured to authenticate through a Windows NT Workstation, Windows 2000 Professional, or NT/2000/NetWare server.
If you choose user-level security, you need to manually select the users or groups of users whom you want to have access to the folder and then also set the level of access you want them to have.
Windows 2000/XP Security
In Windows 2000/XP, sharing is enabled the same way as in Windows 9x. Shares can also be created in much the same way (right-click the folder that is the start of the share and choose Sharing from the menu that pops up).
| Warning |
Don't confuse sharing options (on the Sharing tab) with the NTFS Security options (on the Security tab). NTFS permissions affect local sharing as well as network sharing and are present only on drives that use NTFS. |
Depending on the filesystem you are using, your sharing options may include the following:
Share LevelNT/2000/XP can also use share-level security, but its definition of share level, oddly, is far closer to Windows 9x’s user-level security. With share-level security, Windows NT/2000/XP sets user/password security at the level of the shared folder, exactly as Windows 9x does. All files and folders under the share have the same access permissions through the share. Drives formatted with FAT or FAT32 can use only this level. This is handled on the Sharing tab for the folder’s properties.
File LevelIf the NT/2000/XP drive is formatted with NTFS, you have the option of setting files directly on the folder or specific files, rather than setting them on the share. This may seem like a small distinction, but it is actually a tremendous difference. Using file-level security, you can ensure that files always have the same level of access for a particular user, regardless of which share they come through. File-level security even protects files if the user logs on to the machine itself, something share-level protection cannot do. This is handled on the Security tab of the folder’s properties.
| Note |
There is no equivalent of Windows 9x’s share-level security in Windows NT/2000. |
Accessing a Shared Resource
You also need to know how to get to files shared on other machines. To access shared folders and printers, we’ll turn to the Network Neighborhood (or My Network Places) icon. When you double-click this icon, you can browse the network for resources.
You can double-click any computer to see the resources it hosts. Once you have found the share you require, using a shared folder is just like using any other folder on your computer, with one or two exceptions: First, the folder exists on the network, so you have to be connected to the network to use it. Also, for some programs to work properly, you must map a local drive letter to the network folder.
UNC Paths and Drive Mapping
This brings up a distinction you should be familiar with. Windows (and other systems) uses a standardized method called the Universal Naming Convention (UNC) to reference resources on the network. A UNC path provides an easy and exact reference format. UNC paths come in the form \machinenamesharepath, so a directory called JAN2000 under a share called Reports on a machine called MYPC would be expressed as \MYPCReportsJAN2000. Typing this at a Run prompt will take you directly to that directory (if you have permission to access it).
Although using UNC paths works well in most cases, there is another option for using network shares—drive mapping. Mapping a drive involves associating a UNC path to an alphabetical shortcut. Doing so makes it simpler and faster to access a resource regularly. For instance, by mapping MyserverReports to R:, a user can access the JAN2000 directory by typing R:JAN2000, rather than having to use the entire path. In addition, mapped drives are listed in the Explorer, meaning the user does not have to remember the path to access them. One important distinction is that the drive letter cannot be mapped directly to the MyserverReportsJAN2000 directory. Drive mappings go only to the share level, and any further levels must be appended onto the drive letter. To map a drive, you reach the share by browsing to it, and then right-click the share to get to the Map Network Drive option. You must then pick a drive letter (one that is not being used) and click OK to map the drive.
Drive mappings are often done through login (or logon) scripts if the machine is on a network, using the command-line NET utility. These scripts allow the network administrator to set up network resources for users, making them even more convenient to use. To map a drive, you need to type NET USE R: MyserverReports. As mentioned earlier, some programs work only if they are able to access files using a drive letter. Older DOS programs, for instance, are notorious for this. Most newer programs can use either option without problems.
Now that you can see all the resources the computer is hosting, you can map a drive letter to a resource by right-clicking the folder (REPORTS in this case) and choosing Map Network Drive. Doing so causes the screen shown in Figure 10.3 to appear. Remember that most Windows applications can use UNC paths and don’t need drive mappings, but even some newer applications still require a drive letter.
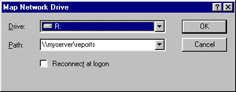
Figure 10.3: The Map Network Drive dialog box
Sharing Print Services
Sharing printers is similar to sharing folders. First, you must have the printer correctly set up to print on the machine that will be the print server. Second, print sharing must be enabled in My Network Places.
Once you’ve done this, follow these steps:
- Right-click a printer in the Printers folder and click Sharing. The Printer Properties page appears with the Sharing tab selected to allow you to share the printer.
- Click Shared As and specify a name for the share. The name defaults to a truncated version of the name you gave the printer when you installed it. The name you give this share (called the share name) should be something that everyone will recognize when they see it on the network and that accurately describes the printer. Good names are things like “Classroom printer” and “3rd floor conference room printer.” Note that you can use long names and spaces, as long as DOS or older 16-bit Windows applications do not need the printer.
Warning If older applications will be printing, you need to use a share name of eight or fewer characters, with no spaces.
- In addition to specifying the name of the printer share, you can also enter a comment that describes the printer accurately.
- To finish sharing the printer, click OK. If there is a password needed for the printer, Windows prompts you for the password. Type it in the box that appears and click OK, and the share will be active.
The Printers folder now has a hand under it, indicating that it is shared.
Exam Essentials
Know how to install and configure network components.This includes Windows 9x/2000/XP, as well as Windows NT 4.0. Also, know the available components for each OS and how they work together.
Understand how to share resources on Windows 9x/NT/2000/XP.You should be familiar with how the share-level and user-lever security schemes work on 9x and how share and file permissions interact on Windows NT/2000.
Be able to access network resources using a Windows client.Be able to get to network resources using Network Neighborhood (My Network Places in 2000/XP), or the NET command.
Understanding Basic Internet Protocols, Terminology, and Configuration
While many of the other content areas branch out widely in their coverage, domain 4.2 is extremely focused. This is, to be quite frank, an Internet-only zone. This objective tests your knowledge of Internet protocols and terminologies, connectivity technologies, and installing and configuring web browsers (mostly Internet Explorer).
Critical Information
In this section we will look at the following concepts:
- Internet concepts and terminology
- Ways to connect to the Internet
- Installing and using Internet applications
Internet Concepts and Terminology
There are some common terms and concepts every technician must understand about the Internet. First, the Internet is really just a bunch of private networks connected together using public telephone lines. These private networks are the access points to the Internet and are run by companies called Internet Service Providers (ISPs). They will sell you a connection to the Internet for a monthly service charge (like your cable bill or phone bill). Your computer talks to the ISP using public phone lines, or even using broadband technologies such as cable or wireless.
There probably won’t be any “What is an ISP?” questions on the test, because most of the exam centers on practical knowledge rather than vocabulary. Even so, you should be familiar with the following.
Web Browsers
A browser is software that allows you to view web pages from the Internet. The two browsers with the largest market share are Netscape Navigator and Microsoft Internet Explorer (IE), shown in Figure 10.4. Both work equally well for browsing the Internet. Microsoft includes its browser, IE, with all versions of Windows except the original Windows 95, whereas Netscape Navigator, which is free, must be downloaded separately.
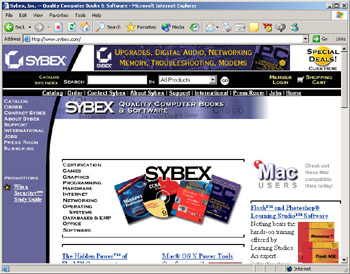
Figure 10.4: The Internet Explorer browser
Because Internet Explorer is installed by default (and is, according to Microsoft, “integral” to the OS), you don’t need to worry about installing/uninstalling it. However, if you are looking for a newer version of IE, you can go to Microsoft’s website, www.microsoft.com/windows/ie. Netscape Navigator is not installed by default, so to obtain—or upgrade—it, you should go to www.netscape.com. Once you are there, select the version you want and specify the type of machine you will be using it on. You can then download and install the software, just like any other application.
Web pages are typically written in a programming language called Hypertext Markup Language (HTML). An HTML document is a plain-text document containing embedded tags. A tag is a code enclosed in angle brackets, like this:
. Although a web page may contain complex programming such as Java applets, the core of most pages is an HTML document, in which those other codes are embedded.
The protocols involved in web browsing include the following:
HTTPHypertext Transfer Protocol, the main protocol for the Web. Does not provide security.
HTTPSSecure HTTP, a method of securing the transfer of web data by encrypting it.
SSLSecure Socket Layers, a method of securing the transfer of web data by using a different, secure socket (port number) than regular HTTP.
FTP
The File Transfer Protocol (FTP) is available to you either through the command-line FTP client, a third-party graphical FTP client, or through your browser. Most people are so accustomed to using FTP through a browser or a utility such as CuteFTP or WS_FTP that they forget command-prompt FTP access is available. For example, to access the Microsoft FTP site through the command prompt, open a prompt and type FTP ftp.microsoft.com. The site will respond with a request for your e-mail address, and you will then be given access. You can use standard DOS navigation commands to move between directories, and you can retrieve or send files using the GET <filename> or PUT <filename> command. When you are finished with your session, type QUIT.
Internet Explorer also supports FTP. To go to Microsoft’s website, you can type in http://www.microsoft.com, and you will be taken to a web page. If you change the first part of the name to ftp://, though, the system knows to look for an FTP resource instead. Typing ftp://ftp.microsoft.com will also take you to the Microsoft website, and you can then use all the standard Explorer GUI file-management techniques, just as you would if you were connecting to any other network drive.
| Note |
Because Microsoft’s FTP site is a public site, it allows you to use a special anonymous account that provides access. If you go to a site where that account has been disabled, you will need to provide another username and password, which should be provided by the site’s administrator, or you will not be allowed into the site. In addition, most FTP sites allow visitors only to download data, so PUT commands generally will be rejected unless you have a real (nonanonymous) account on the server. |
Another common use of the Internet is to send and receive electronic mail. E-mail allows you to quickly and inexpensively transfer messages to other people. To send and receive e-mail, you need to have only two things: an e-mail account and an e-mail client. A company can provide the account, or it can be associated with your ISP account. Either way, you have an address that looks like username@domain.com.
The last part of this address (after the @) identifies the domain name of the company or ISP that provides your e-mail account. The part before the @ is your username. A username must be unique on each domain. Two Bill the Bard users on a single network, for instance, might be billthebard@domain.com and billthebard1@domain.com.
Among the protocols associated with e-mail are Post Office Protocol (POP) and Simple Mail Transport Protocol (SMTP), which are types of e-mail servers. A POP server is a machine on the Internet that accepts and stores Internet e-mail and allows you to retrieve that mail when you are online. An SMTP server accepts mail you want to send and forwards it to the proper user. In order to send and receive mail, you need both.
An alternative to POP is Internet Mail Application Protocol (IMAP), which works better for situations where the user is accessing e-mail from various locations via a web interface.
| Tip |
Once you have the settings configured, you need to install an e-mail client or use the built-in client included with Windows 98 and higher. That client is called Outlook Express, and it’s a good, basic e-mail application. |
Telnet
Telnet is a rather old technology; it is used to simulate a point-to-point terminal connection between computers, much like the old-style Bulletin Board System (BBS) type. Telnet can be done through a web browser by preceding the URL with telnet:// rather than the usual http://, or at a command prompt with the Telnet command.
Types of Internet Connections
Until recently, most people connected to the Internet via slow dial-up modem connections. However, that is changing rapidly now that faster, broadband technologies are becoming widely available. For the exam, you should be able to name the major Internet connection methods, differentiate among them, and offer a professional opinion as to the correct technology to use in a given situation.
Dial-Up Networking (Modem and ISDN)
Dial-up connections such as connections via modem require you to use dial-up networking (DUN) to establish the connection. DUN is built into Windows.
DUN coordinates between the modem and the software to create a connection through Point-to-Point Protocol (PPP) or an earlier variant called Serial Line Internet Protocol (SLIP). A modem sends and receives data at up to 56Kbps over ordinary telephone lines.
| Note |
Ordinary telephone lines are sometimes called POTS (Plain Old Telephone Service). |
Although modems are the most common DUN device, an ISDN terminal adapter may also be used for a DUN connection. Integrated Services Digital Network (ISDN) is a special type of all-digital phone line that allows two data lines to operate simultaneously, plus a voice line, so you can connect to the Internet at up to 112Kbps while talking on the telephone at the same time. ISDN lines are rather expensive, and the speed gain is modest, so ISDN is not very popular.
Digital Services Line (DSL)
DSL uses regular telephone lines, but it takes advantage of unused portions of the line to send digital data at high speeds. It is an always-on connection that does not require dial-up, and it can achieve speeds of 1Mbps or more.
There are two varieties: Asynchronous (ADSL) and Synchronous (SDSL). Asynchronous carries uploads slower than downloads; SDSL is the same speed in both directions. ADSL is cheaper and more common in residential installations. The main drawback to DSL is that it is not available in all areas.
Cable
Cable Internet uses the cable TV line (digital cable areas only) to send and receive Internet data. Unlike the other technologies discussed so far in this section, cable Internet has nothing to do with the telephone line or phone company. Its speed is roughly equivalent to that of DSL (around 1Mbps). Cable is an always-on connection that does not require dial-up.
Satellite
Satellite Internet provides broadband access in areas that are not served by cable or DSL providers. Although it’s more expensive and slower than either of those options (generally around 500Kbps), it may be some users’ only choice.
There are two types of satellite: one way and two way. One-way satellite uses the satellite for downloading but uses a regular modem for uploading. It is a dial-up connection. Two-way satellite uses the satellite for both, and does not require a telephone line. It is an always-on connection.
Wireless
Wireless Internet service uses the same system that wireless telephone service uses. This type of Internet service is used with most Internet-enabled PDAs. Its primary advantage is its mobility; you aren’t tied to a specific location but can move around freely anywhere within the service area. The disadvantages are that it can be slower and more expensive than other broadband services.
LAN
Large companies typically get a full-time broadband T1 or T3 line that connects to the Internet, and then share that connection with all employees via the company’s LAN. The computer sees this as a network connection to the Internet—and indeed, that’s what it is. The speed is usually very good—1Mbps or more—and the cost per user is low in a large organization, and gets lower the more users you have.
Installing and Configuring Browsers
By browsers, this objective is really referring to Internet Explorer. Test-takers need to know how to change certain options in IE. The topics in the objective are by no means a complete list of settings a good technician should know how to change, but we’ll stick to the published ones in the following discussion.
Configuring Security Options
Web browsing is a compromise between staying safe from malicious scripts and applets and being able to fully enjoy the content. Different users have different ideas of the perfect balance.
For example, some web pages contain scripts, such as JavaScript, that perform functions HTML alone can’t handle. The trouble is, sometimes such scripts and applets contain viruses. For maximum security, some users prefer to disable their support. To do so, follow these steps:
- Choose Tools Internet Options and click the Security tab.
- Click the Custom button. The Security Settings dialog box opens.
- Click Enable or Disable for the various types of scripts and applets. For example, to change the script options, scroll down to the Scripting section.
- When you’re finished, click OK.
Configuring Proxy Settings
A proxy server sits between a user and the Internet at large. It caches frequently used pages for faster access to them, provides some security from hackers, and has other benefits as well. Some ISPs require users to use a proxy server, or at least highly recommend it.
To turn on/off proxy server usage:
- Choose Tools Internet Options and click the Connections tab.
- Click the LAN Settings button.
- Mark or clear the Use A Proxy Server For Your LAN check box.
- Click OK.
Firewall Protection under Windows XP
Windows XP has built-in firewall capability. To enable or disable it, do the following:
- Choose Start Connect To Show All Connections.
- Right-click the icon for the Internet connection and choose Properties.
- Mark or clear the check box under Internet Connection Firewall.
- Click OK.
Exam Essentials
Understand the functions for which the Internet is commonly used, and know about the software used in those functions.Be able to configure and use e-mail, FTP, and HTTP. This includes knowing about available software and how to install and set options on that software.
Understand how to install and use Windows’ dial-up networking.Be able to install dial-up networking and configure a connection to an ISP.
Know the features and advantages of Internet connection methods.Make sure you understand and can differentiate among cable, DSL, ISDN, dial-up, wireless, and satellite.
Be able to change Internet Explorer settings.Be familiar with security, privacy, and proxy server settings.
Review Questions
|
1. |
What is the driver called that makes Windows see the network interface card? |
|
|
2. |
What driver runs the Windows connection to a specific type of network, such as Microsoft or Netware? |
|
|
3. |
TCP/IP and NetBEUI are examples of what type of protocol? |
|
|
4. |
Which protocol is the dominant protocol on the Internet? |
|
|
5. |
Why is the NetBEUI protocol unsuitable for large networks? |
|
|
6. |
What type of server dynamically assigns IP addresses on a network to PCs that request them? |
|
|
7. |
What type of server translates between domain names and IP addresses? |
|
|
8. |
What utility shows you the complete path from one network location to another, including all the routing hops? |
|
|
9. |
Which Internet protocol is used for sending e-mail? |
|
|
10. |
Which of these is a dial-up Internet connection method?
|
|

Answers
|
1. |
The adapter is the NIC, and the driver that runs it is also called the adapter. |
|
2. |
The driver that runs the Windows connection to a network is called the client. Examples include Client for Microsoft Networks and Client for Netware Networks. |
|
3. |
Both of these are communications protocols. |
|
4. |
The Internet runs primarily on TCP/IP. |
|
5. |
NetBEUI is a nonroutable protocol and therefore is not scalable for larger networks. |
|
6. |
A DHCP server provides IP addressing services. |
|
7. |
A DNS server converts domain names to IP addresses that have been assigned to them. |
|
8. |
TRACERT is short for trace route, which is an apt description of what it does. |
|
9. |
SMTP is the protocol used for an outgoing e-mail server. |
|
10. |
A. ISDN, although digital, is a dial-up connection. The others are all always-on. |
Part I - A+: Core Hardware Service Technician Exam
- Domain 1 Installation, Configuration, and Upgrading
- Domain 2 Diagnosing and Troubleshooting
- Domain 3 Preventive Maintenance
- Domain 4 Motherboard/Processors/Memory
- Domain 5 Printers
- Domain 6 Basic Networking
Part II - A+ Operating System Technologies Exam
