Domain 2 Installation, Configuration, and Upgrading
CompTIA A+ Exam Objectives Covered in This Chapter
- 2.1 Identify the procedures for installing Windows 9x/Me, Windows NT 4.0 Workstation, Windows 2000 Professional, and Windows XP, and bringing the operating system to a basic operational level.
- 2.2 Identify steps to perform an operating system upgrade from Windows 9x/Me, Windows NT 4.0 Workstation, Windows 2000 Professional, and Windows XP. Given an upgrade scenario, choose the appropriate next steps.
- 2.3 Identify the basic system boot sequences and boot methods, including the steps to create an emergency boot disk with utilities installed for Windows 9x/Me, Windows NT 4.0 Workstation, Windows 2000 Professional, and Windows XP.
- 2.4 Identify procedures for installing/adding a device, including loading, adding, and configuring device drivers and required software.
- 2.5 Identify procedures necessary to optimize the operating system and major operating system subsystems.
Domain 2 gets into the heart of operating system usage. It covers skills related to selecting, installing, and booting various versions of Windows, as well as configuring hardware devices to run and making system changes to optimize performance. The one topic that is conspicuously absent from domain 2 is troubleshooting; that will be the subject of domain 3.
Installing Windows
The topics covered in this objective include all the skills required to take a system from empty (that is, a blank hard disk) to having a fully functional copy of an operating system installed. The study challenge here is that so many different OSs are covered, and each one works a little differently. One way to study is to focus on the differences between the two classes of Windows OSs—9x and NT/2000/XP—and not worry too much about the minor differences within a class.
Critical Information
The topic list for this objective is broken down into several conceptual areas, in roughly the order that you would tackle them in real life.
Verifying Compatibility and Requirements
Before installing an OS, you must make sure that the computer on which you will be installing meets the minimum system requirements. Table 8.1 lists the minimum requirements for the OS versions covered on the A+ exam.
|
Version |
CPU |
RAM |
Hard Disk |
Other |
|---|---|---|---|---|
|
NT Workstation 4.0 |
Pentium |
16MB (32MB recommended) |
110MB |
|
|
95 |
386DX (486 recommended) |
4MB (8MB recommended) |
50–55MB |
|
|
98 |
486DX 66 (Pentium recommended) |
16MB (24MB recommended) |
165–355MB |
|
|
Me |
150MHz Pentium |
32MB |
480–645MB |
|
|
2000 Professional |
133MHz Pentium |
64MB |
2GB with at least 650MB free |
|
|
XP |
233 MHz Pentium (300MHz recommended) |
64MB (128MB recommended) |
1.5GB |
Super VGA (800x600) |
In addition to basic system compatibility, you must also consider the compatibility of individual devices, such as printers, scanners, and so on. To check on the compatibility for a piece of hardware, consult the Microsoft Hardware Compatibility List (HCL) at www.microsoft.com/hcl.
Installation Options
Before beginning the installation process, you must make several key decisions:
Installation TypeThe types vary depending on the OS version, but there is usually a Typical option that installs the most common components and a Custom option that enables you to specify precisely which of the optional components you want. These optional components may include accessory programs, drivers, and so on.
Network ConfigurationYou must decide how this computer will interact with other computers via network. Will it be part of a peer-to-peer workgroup or a domain? Will it connect directly to the Internet? Will it share its Internet connection with other computers?
Filesystem TypeRecall from earlier chapters that valid filesystems include FAT, FAT32, NTFS 4.0, and NTFS 5.0. Not all OS versions support all types, as you saw in Table 7.1 (Chapter 7). NTFS is usually the best choice for Windows NT 4, 2000, and XP, unless you plan to dual-boot and need that drive to also be accessible from Windows 9x.
Dual-Boot SupportProvided you put them on separate partitions, multiple OS versions can peacefully coexist on a system. NT-based versions of Windows can support dual-booting and can provide a boot menu at startup to allow you to choose each time, but you must install the non-dual-boot-aware OS first (Windows 95, 98, or Me).
Disk Preparation Order
The published guidelines for this objective specifically mark this topic as “conceptual,” meaning that for this objective, you only need an overview of the topic. These skills are covered in greater detail under other objectives.
The required order for disk preparation for Windows 9x is as follows:
- Boot from a bootable floppy
- Partition using FDISK
- Reboot
- Format using FORMAT
- Start the Setup utility
Disk preparation prior to installing is necessary only with 9x versions of Windows; the Windows NT/2000/XP Setup programs can all partition and format drives automatically.
Selecting an Installation Method
There are several possible ways for Windows Setup to start.
Booting from CD
The Windows NT/2000/XP CDs are bootable, so installing them is pretty simple. Put the disk in, turn on the machine, and wait for Setup to start. The only catch is that if you have an older machine, its BIOS may not allow it to boot from a CD. In that case, you need to resort to another method for the install. Windows 95/98 CDs are not bootable.
| Tip |
If you have a newer system but it won't boot from a CD, check the CMOS Setup settings to make sure the CD drive is enabled as a boot device. |
Booting from Disk to Access a Local CD
With Windows 9x, you cannot boot from the CD; you must boot from a startup floppy and then access the CD from a command prompt.
In Windows 98, the startup disk automatically presents you with an option to load CD-ROM support on startup. Some Windows 95 startup disks also have this option, but if not, you can modify the AUTOEXEC.BAT and CONFIG.SYS files to load a CD-ROM driver. The exact modifications you need to make depend on the type and manufacturer of your CD-ROM drive, but a sample of some lines you may need to add to CONFIG.SYS and AUTOEXEC.BAT follow. In this case, the drivers are for a Panasonic CD-ROM. The drivers you need to load in the DEVICE and MSCDEX.EXE options depend on the drive you are using:
CONFIG.SYS:
 Files=25
 Buffers=9,256
 DEVICE=C:PANCD.SYS /D:PANCD001

AUTOEXEC.BAT
 PATH=C:;C:DOS
 MSCDEX.EXE /D:PANCD001
Notice that these aren’t big changes, but they are crucial to make the CD-ROM functional under DOS; once Windows 95 or 98 is loaded, these files won’t be needed because Windows has its own drivers for accessing the CD drive, and they will be loaded during the install. These lines can be added to and later removed from AUTOEXEC.BAT and CONFIG.SYS using any text editor.
Once you have gained access to the CD, you start the setup process by changing to the CD drive (type its letter and a colon and press Enter) and typing SETUP.
If you can’t boot from CD to install Windows NT/2000/XP, you can use a utility on the Setup CD to make a set of boot disks that will allow you to start up the PC, load the CD drivers, and start the Setup utility. Run the file MAKEBOOT.EXE in the BOOTDISK folder on the Setup CD.
Booting from Disk to Access a Network Install Share
If you are installing a number of machines with any OS, you may find it best to place the installation files on a network file server and then install the workstations over the network. To do this, you need a DOS or Windows 9x boot disk with the proper network interface card (NIC) and client software. This often means that you need to have a different boot disk for every type of network card on your network. Knowing how to access network resources by setting up client software is an important skill and will be covered in domain 4.
| Tip |
When you’re doing an install from the network, it is a good idea to copy the install files to the local hard drive and then start the install from there. |
Drive Imaging
A final way of installing Windows is to install it on one hard disk and then make a copy of that hard disk. This process is called drive imaging, and it can be an efficient way to set up many computers quickly. It is typically done with a third-party utility such as Norton Ghost.
| Note |
It is illegal to use the same copy of Windows on more than one machine. Most companies that employ drive imaging have a site license with Microsoft that permits them to install multiple copies from a single copy, and they have a procedure for entering a unique serial number on each copy post-installation. |
Running the Appropriate Setup Utility
Once you have the CDs, boot disks, and/or network shares ready, it’s time to start the installation.
Installing Windows 9x
Boot to the startup disk and either put the CD-ROM into the drive or connect to the appropriate network share. The program that performs the 9x installation is called SETUP.EXE, and it’s located in the root directory of the Setup CD. Run this program and then follow the prompts that appear onscreen to install Windows.
| Note |
A duplicate of SETUP.EXE is located in the WIN95, WIN98, or WIN9x folder on the CD. This enables you to copy the entire WIN95, WIN98, or WIN9X folder to a hard disk and install from there. Of all the content on the CD, that folder is the only one that contains files essential for installation. |
Once the install is over, or if you have a problem during the installation, there are two files you may want to take a look at: BOOTLOG.TXT and DETLOG.TXT. DETLOG.TXT is created during the install and is a record of all the hardware found in the machine, along with any problems encountered. BOOTLOG.TXT, on the other hand, is created during the system boot phase and records any problems during startup.
Installing Windows NT/2000/XP
Installing Windows NT/2000/XP begins with booting from the Setup CD or running the setup program. Windows 2000/XP have two different setup executables available on the CD: WINNT.EXE is used to start Setup from DOS or Windows 3.x, and WINNT32.EXE is used during an upgrade from an earlier NT-based version or other Windows 32-bit OS.
One major difference between the NT-based Setup and the one for Windows 9x is that you are offered the opportunity to create and delete partitions within Setup. You can specify the type of partition you want, the size, and the filesystem you will be using on it.
Device Driver Configuration
When Windows starts up for the first time, it loads drivers for all devices that it can identify (and for which it has a driver available).
| Note |
A driver is a small program or piece of program code that runs in the background and translates the information going to and from an application and a piece of hardware. |
For other devices, it does one of the following:
- It loads a generic driver for that device class, so the device has basic functionality. This is common for monitors, for example.
- It places the device in a class called Other Devices and marks it as having a problem in Device Manager. You must install a third-party driver for the device in order for it to function. This usually happens with Plug and Play (PnP) expansion cards for which Windows doesn’t have a driver, for example.
- It ignores the device completely. This happens with non-PnP devices in most cases.
After you install Windows, it’s a good idea to check out Device Manager and evaluate how well Windows has used PnP to identify and configure the drivers for your devices. From that point, you can choose to run the Setup utility for a device, update the driver for a device with one you have downloaded from the Internet, or troubleshoot a device to see why Windows is not detecting it (more about this in objective 2.4).
Restoring Data Files
After Windows has been installed, you can restore any data files that were backed up for the PC previously. They may have been copied to a removable disk such as a CD, backed up to a network location, or backed up using Microsoft Backup.
Troubleshooting Setup Problems
The following issues may arise when you’re installing Windows.
Hardware Problems
The most common reason for a Windows installation failure is incompatible hardware in the PC. Sometimes hardware that works (somewhat) under an existing installation of Windows halts the Setup process if it’s present during Setup.
Make sure that all installed hardware is on the HCL for the OS version (www.microsoft.com/hcl). If you have any noncompatible hardware, remove it from the computer before you retry the installation.
Incompatibility with essential components can sometimes be resolved with a firmware update for the component. Check the manufacturer’s website to see whether one is available.
Scandisk Problems
The 9x versions of Windows run Scandisk before the Setup program starts. If your drive is some special type that is incompatible with Scandisk, you can get around it with the /is switch, as in SETUP /IS.
CD Read Errors
If an error appears about not being able to read a certain file, try removing the CD, rotating it a quarter turn, and reinserting it. You can also try cleaning the CD to remove any particles or fingerprints.
Another way to circumvent CD problems is to copy the CD’s content to another drive (such as a hard disk), and then run Setup from there.
Exam Essentials
Know how to boot to an installation CD or a network share point.Understand how to access a CD-ROM from DOS or how to modify the BIOS to allow a bootable CD to start the system. Also, know the basics of how an installation can be done across a network and when a network install is appropriate.
Understand how partitioning and formatting work.With Windows 9x, this involves understanding how to create and format partitions before starting the install. With Windows NT and 2000, it involves understanding how to create and format partitions during the install.
Understand the hardware requirements of each Windows OS.Hardware requirements commonly show up on the test. Also, remember which type of tasks each OS was designed for so that you can answer “which OS should you use?” type of questions.
Work through the Setup of each Windows version.While Setup is automated enough that there are not a lot of things to quiz on, focus on what is happening during Setup, which files are created, and how Setup performs tasks such as hardware detection in each OS.
Upgrading from Windows 9x Me, Windows NT 4 0 Workstation, Windows 2000 Professional, and Windows XP
This subdomain looks at the various upgrade paths available within the Windows family of operating systems and examines how Setup is different when you are either upgrading or creating a dual-boot scenario.
Critical Information
An OS upgrade is a process by which the OS is updated to a newer or more powerful version. Upgrades can be preferable to a complete reinstall of the OS because they preserve the user’s settings as well as any applications that are currently installed on the older OS. Upgrades can also be a disaster, because older programs or device drivers may not be compatible with the new OS and need to be replaced anyway. Before you decide to do an upgrade, carefully research how the OS change will affect your hardware and software. Once you have decided that you do want to upgrade, the process in Windows is relatively straightforward. Here are the main things to review for the test.
Upgrade Paths Available
The upgrade process checks the current version of your OS and verifies that it can be upgraded. You can upgrade from an older OS version to a newer one, and from a 9x version to an NT-based version, but you cannot go backward in chronology, and you cannot go from NT-based to 9x-based.
Here are the valid upgrade paths:
- From 95 to: 98, Me, 2000, or XP
- From 98 to: Me, 2000, or XP
- From Me to: 2000 or XP
- From NT 4.0 to: 2000 or XP
- From 2000 to: XP
Selecting the Correct Upgrade Startup Utility
For Windows 9x, the SETUP.EXE file is the utility for both new installs and upgrades. For Windows 2000/XP, WINNT.EXE is the utility for new installs, and WINNT32.EXE is the utility for upgrades from 9x versions to 2000/XP and previous NT-based versions.
Hardware Compatibility and Minimum Requirements
Refer back to Table 8.1 for the requirements for each Windows version. Familiarize yourself with them, because there will likely be questions about the ability to upgrade a system given a certain hardware scenario.
Windows XP runs an Upgrade Wizard that checks hardware compatibility during the upgrade process. It produces a report telling you what problems you might be in store for if you proceed with the upgrade. Some of these problems can be fixed by downloading new drivers from the hardware manufacturer.
If you’re in doubt about a piece of hardware, check the Hardware Compatibility List (HCL) at www.microsoft.com/hcl.
Verifying Application Compatibility
The Upgrade Wizard in Windows 2000/XP checks the compatibility of all installed applications. For other versions, you must check the application compatibility yourself by visiting the websites for the applications and finding out whether they are specifically supported under the desired OS. A patch or update may be available that will make compatibility possible.
Although it is advantageous to check for compatibility of all applications before upgrading Windows, in reality doing so may not always be practical. You may have to go ahead with the upgrade and then check all applications after the fact, searching for patches and updates to correct any problems you find.
Installing Service Packs and Updates
Having the latest updates is important for any OS, especially in these days of virus infections and security exploits. An update is an enhancement or patch that makes the OS work better or closes up a security hole. A service pack is a collection of updates that brings the user’s system up to the most current level of functionality.
Later versions of Windows include a Windows Update feature that connects to the Internet and runs a wizard that checks for available Windows service packs and patches. In addition, Windows XP has an AutoUpdate Wizard that automatically downloads patches and offers to install them.
Installing Additional Windows Components
During the Setup process for many Windows versions, you can choose to do a Custom install. This allows you to specify which Windows components are installed. For example, on a notebook computer with a small hard disk, you might want to omit extra components like Paint, WordPad, and HyperTerminal. You can also install and remove Windows components later, through the Add/Remove Programs applet in Control Panel.
Exam Essentials
Know which upgrade paths are possible.Given a particular OS already installed, you should be able to tell which upgrades are possible and which are not.
Know the difference between an upgrade and a fresh install.Upgrades are installations that examine the existing environment and preserve it as closely as possible in the updated OS. Fresh installs cover up an older install but do not learn from it. Upgrade installs generally preserve existing software, user settings, and other configuration details.
Know the system requirements for each Windows version.This was a topic under objective 2.1, but it applies here as well. It’s best to memorize the specs.
Know how to gather compatibility information.Be aware of Microsoft’s Hardware Compatibility List (HCL) and how to access it.
Understand Basic System Boot Sequences and Boot Methods
This content area involves examining the key files needed to boot the various Windows versions, the alternative boot modes available, and the processes for creating startup disks and emergency repair disks.
Critical Information
In order to bring an OS up to an operational level, two types of files are required: boot files and system files. Boot files have the job of starting up the computer and preparing the system for the OS. System files then load the OS itself, including its graphic interface and other system components. Boot files are stored in the root of the active partition (generally C:), whereas system files are found in the place where the OS was installed, such as C:Windows or C:Winnt.
Windows 9x Boot Process Essentials
Because Windows 9x is a very different OS than Windows 3.x (which it replaced), most of its configuration is done using different tools than were used in Windows 3.x. Even so, Windows 9x shares a few configuration similarities with its ancestors (Windows 3.x and DOS) for compatibility’s sake. The AUTOEXEC.BAT and CONFIG.SYS files are used to a limited extent by some older programs, but they’re not actually needed and are available only for older hardware and software compatibility. In addition, INI files are still used for some Windows programs (generally, older 16-bit apps) to hold configuration settings.
The Windows 9x/NT/2000/XP Registry has taken the place of most INI files. In addition to software extension information, it also contains software configuration information and hardware configuration information. Generally speaking, most of the Windows 9x settings that were previously stored in INI files are now stored in the Registry.
Examining the Windows 9x Boot Process
Let’s look at the process you use when you boot the system. When Windows 9x first starts up, it goes through a number of steps before presenting you with a Desktop. The basic elements of a Windows 9x startup are as follows:
- System self-checks and enumerates hardware resources. Each machine has a startup routine called the POST (power on self-test), which is executed by the commands written in the motherboard’s BIOS. Newer PnP boards not only check memory and processors during this stage, but also poll the systems for other devices and peripherals.
- MBR loads and finds the boot sector. The master boot record (MBR) is located on the first hard drive and loaded into memory. The MBR finds the bootable partition and searches it for the boot sector of that partition. Information in the boot sector allows the system to locate the root directory of C: and to find and load into memory the IO.SYS file located there.
- IO.SYS loads into memory and starts the processor in real mode. The IO.SYS file performs a number of tasks, each of which is done in real mode. Real mode is simply a method of accessing the processor in 16-bit mode. Drivers loaded through the CONFIG.SYS file therefore can continue to function in real mode even after the next step, unless they are replaced by 32-bit Windows drivers. The IO.SYS file performs the following tasks:
- Provides basic filesystem access to allow the rest of the boot files to be found
- Accesses the MSDOS.SYS file to obtain boot configuration parameters
- Loads LOGO.SYS (Windows bitmap display) and DRVSPACE.BIN (compressed drive access) if they are present and needed
- Loads the Registry file SYSTEM.DAT into memory but does not access it
- Selects a hardware profile (or allows the user to do so)
- Processes the commands in the CONFIG.SYS and AUTOEXEC.BAT files if they are present
- WIN.COM loads and transfers the processor to protected mode. The WIN.COM file is automatically executed. This file then loads various drivers as instructed by the Registry. It also examines the SYSTEM.INI and WIN.INI files to obtain additional configuration information. Once the Registry files have been loaded, the processor is transferred into 32-bit protected mode.
- Virtual device drivers, the Windows kernel, and the GDI load. Various 32-bit virtual device drivers load to manage hardware resources, often replacing 16-bit real-mode drivers. The Windows kernel, which controls access to the processor from Windows 9x, is loaded into memory, and once the graphic display interface (GDI) loads to manage screen I/O, the system is ready to accept customers.
- The Explorer shell loads, and the user is presented with a Desktop. The last part of the boot process is the loading of the shell program: EXPLORER.EXE. The Explorer is the program that manages the graphical interface—the toolbar, the Desktop, and the Start menu. Once it loads, network connections are restored and programs in the STARTUP folder are run, all of which are determined by the USER.DAT Registry settings for that user.
Windows 9x Startup Files
We discussed a number of files in the section “Examining the Windows 9x Boot Process.” Now we will explain each one further (we’ve placed an asterisk next to the names of the files that are required in order to boot Windows 9x):
MSDOS.SYS*Primarily handles disk I/O; hence the name disk operating system (DOS). Just like IO.SYS, MSDOS.SYS is loaded into memory at bootup and remains in memory at all times.
EMM386.EXEProvides the OS with a mechanism to see additional memory. The memory space that EMM386.EXE controls has come to be known as upper memory, and the spaces occupied by programs in that region are known as upper memory blocks (UMBs).
HIMEM.SYSUsed to access upper memory.
IO.SYS*Allows the rest of the OS and its programs to interact directly with the system hardware and the system BIOS. IO.SYS includes hardware drivers for common hardware devices. It has built-in drivers for such things as printer ports, serial or communication ports, floppy drives, hard drives, auxiliary ports, console I/O, and so on.
WIN.INISets particular values corresponding to the Windows environment. It’s used extensively by 16-bit Windows 3.x applications; it’s almost entirely replaced by the Registry for Windows 9x 32-bit apps.
WIN.COM*Initiates the Windows 9x protected-load phase.
SYSTEM.INIUsed in DOS and Windows 3.1 to store information specific to running the OS. This and other INI files were used to configure 16-bit DOS and Windows apps.
COMMAND.COMCalled the DOS shell or the command interpreter. It provides the command-line interface the DOS user sees. This is usually, but not always, the C:> prompt.
CONFIG.SYSLoads device drivers and uses the information from the AUTOEXEC.BAT file to configure the system environment. Memory-management tools and DOS peripheral drivers can be added here.
AUTOEXEC.BATUsed to run particular programs during startup. Also declares variables (such as search paths).
| Tip |
A batch file, named with a .bat extension, is a set of commands that Windows can execute or run. These commands may run utilities, or they may point toward full-blown applications. AUTOEXEC.BAT is a batch file that is automatically executed when the system starts up. |
Windows NT/2000/XP Boot Process Essentials
NT-based versions of Windows use completely different startup procedures and different startup files than 9x versions. In this section, we will discuss how Windows 2000 boots and which files are needed to keep it running.
Key Boot Files
Almost all of the files needed to boot Windows 3.x/9x are unnecessary for Windows NT/2000/ XP. These versions require only a very few boot files, each of which performs specific tasks:
NTLDRBootstraps the system. In other words, this file starts the loading of an OS on the computer.
BOOT.INIHolds information about which OSs are installed on the computer.
BOOTSECT.DOSIn a dual-boot configuration, keeps a copy of the DOS or Windows 9x boot sector so that the Windows 9x environment can be restored and loaded as needed.
NTDETECT.COMParses the system for hardware information each time Windows is loaded. This information is then used to create dynamic hardware information in the Registry.
NTBOOTDD.SYSOn a system with a SCSI boot device, recognizes and loads the SCSI interface. On Enhanced IDE (EIDE) systems, this file is not needed and is not even installed.
System FilesBesides the previously listed files, all of which are located in the root of the C: partition on the computer, Windows also needs a number of files from its system directories (generally, WINNT and WINNTSystem32), including the Hardware Abstraction layer (HAL.DLL) and the Windows command file (WIN.COM). Numerous other DLL (dynamic link library) files are also required, but usually the lack or corruption of one of these will produce a noncritical error, whereas the absence of WIN.COM or HAL.DLL will cause the system to be nonfunctional.
The Boot Process
When Windows NT/2000/XP starts, the computer’s BIOS performs a number of system checks and then looks for an OS to load. It finds Windows’ NTLDR (NT loader) file, which is then read into memory. The NTLDR file (which does not have a file extension, by the way—it is just NTLDR) prepares the system for the boot process and invokes a rudimentary filesystem access that allows it to read the BOOT.INI file in the root of C:. This file is then used to construct a menu from which a user may select an OS. If Windows NT/2000/XP is the only OS installed on the machine, this is a non-issue; but if the system dual-boots, you may choose your OS at this point and boot directly into Windows 9x, Windows 2000, Linux, or whatever. The system waits a predetermined amount of time for a user choice and then loads the default OS. You can configure both the default option and the time in Windows’ System properties. Modifications to the menu itself can be made through the BOOT.INI file, which is a text file configurable with any editor.
Once you have chosen to start Windows NT/2000/XP, NTLDR invokes NTDETECT.COM to check the system’s hardware and loads NTBOOTDD.SYS if the system uses a SCSI boot device. NTLDR then passes control of the system to WIN.COM, and the graphical phase of startup begins.
During this time, you are presented with a series of screens that show the system’s progress during startup; the interface is initiated, and network connections and computer policies (if present) are loaded. Windows 2000 next presents you with a logon screen as discussed earlier, and you can begin to use the system.
| Note |
If you choose to boot back to a previous OS, NTLDR immediately passes control to BOOTSECT.DOS, and the other files mentioned are not used. |
Alternative Boot Modes
Depending on the Windows version, a number of alternative boot modes may be available. These are used almost exclusively for troubleshooting, in situations where Windows will not boot normally. To select an alternative boot mode, turn the computer on and press the F8 key when you see the words Starting Windows (roughly at the same time you hear the single beep that tests the speaker). You can also press and release F8 repeatedly as the computer boots, to avoid missing the right moment. Doing so presents you with a list of boot-up choices.
The exact boot modes available depend on the Windows version. Table 8.2 summarizes them, and the following list describes them in more detail:
|
Mode |
Description |
95 |
98 |
Me |
NT |
2000 |
XP |
|---|---|---|---|---|---|---|---|
|
Normal |
Normal Windows boot |
Yes |
Yes |
Yes |
Yes |
Yes |
Yes |
|
Logged (Bootlog.txt) or Enable Boot Logging |
Logs each step of the startup for later review |
Yes |
Yes |
Yes |
No |
Yes |
Yes |
|
Safe Mode |
Starts with a minimal set of drivers |
Yes |
Yes |
Yes |
No |
Yes |
Yes |
|
Safe Mode with Network Support |
Same as Safe Mode but includes networking |
Yes |
No |
No |
No |
Yes |
Yes |
|
Step-by-Step Confirmation |
Steps through the startup line by line |
Yes |
Yes |
Yes |
No |
No |
No |
|
Command Prompt Only |
Boots to a DPMI command prompt |
Yes |
Yes |
No |
No |
No |
No |
|
Safe Mode Command Prompt Only / Safe Mode with Command Prompt |
Boots to a command prompt; bypasses the startup files |
Yes |
Yes |
No |
No |
Yes |
Yes |
|
Previous Version of MS-DOS |
Boots to an old DOS version if available; otherwise, the same as Normal |
Yes |
No |
No |
No |
No |
No |
|
Enable VGA Mode |
Like Normal, but loads the standard VGA video driver |
No |
No |
No |
Yes |
Yes |
Yes |
|
Last Known Good Configuration |
Replaces the Registry with the last backed-up version of it that successfully booted |
No |
No |
No |
No |
Yes |
Yes |
|
Directory Services Restore Mode |
For domain controllers only; not used for workstations |
No |
No |
No |
No |
Yes |
Yes |
|
Debugging Mode |
For programmers' use only; not used for troubleshooting |
No |
No |
No |
No |
Yes |
Yes |
NormalThis is the default selection and loads both the graphical interface and all drivers.
Logged (BOOTLOG.TXT) or Enable Boot LoggingIf you are having problems starting, this option can help by saving all information about the boot process to a file. You can examine this file later for information that may help you identify the problem. In Windows 9x, it is BOOTLOG.TXT; in 2000/XP it is NTBTLOG.TXT.
Safe ModeThis option starts Windows using only basic files and drivers (mouse, except serial mice, monitor, keyboard, mass storage, base video, default system services, and no network connections). Once in Safe Mode, you can restore files that are missing or fix a configuration error. To exit Safe Mode, restart the computer. If you have fixed the problem, then upon reboot, the computer should operate normally.
Safe Mode With Network SupportThis option is the same as Safe Mode, but it tries to load networking components as well.
Step-By-Step ConfirmationIf you want to watch the entire boot process or selectively exclude lines from AUTOEXEC.BAT or CONFIG.SYS from the boot process, this option presents you with each option before Startup executes it and asks whether to perform that action.
Command Prompt OnlyThis option, which is for 9x versions of Windows only, starts Windows without the graphic interface and presents you instead with a DOS-like command-prompt shell. This can be helpful if you are having serious problems with the Windows interface files.
Safe Mode Command Prompt Only / Safe Mode with Command PromptThis is Windows at its most basic. Only essential drivers are loaded, and there is no GUI.
Enable VGA ModeThis option starts Windows NT/2000/XP using the basic VGA driver but loads the rest of the system as usual. If you install an incorrect video driver or a video driver becomes corrupted, this option allows you to get into the system to fix the problem.
Last Known Good ConfigurationThis option is useful if you have changed a configuration setting in the Registry, which then causes the system to have serious problems. However, it will not save you from a corrupt file or a deleted-file error.
Debugging ModeA sort of advanced boot logging, Debugging Mode requires that another machine be hooked up to the computer through a serial port. The debug information is then passed to that machine during the boot process. Technicians rarely use this option because it usually only solves problems involving poorly written applications. It is a great tool for developers, but for technicians, reinstalling and avoiding the offending application is far faster!
Creating and Using a Startup Disk (Windows 9x)
What happens when your Windows computer has a problem so severe that the computer won’t boot? Often, if the Registry is corrupt, the Windows interface won’t come up—not even in Safe Mode. All versions of Windows 9x come with a utility that allows you to create a disk that can be used to fix Windows. This disk is called the Windows startup disk. It contains enough of the Windows startup files to boot the computer from floppy disk, allowing you to perform various diagnostic and repair tasks. The disk contains files and utilities such as FDISK, ATTRIB, CHKDSK, DEBUG, EDIT, FORMAT, RESTART, SCANDISK, and SYS. These files are used to correct basic disk problems as well as file boot problems. However, the Windows 9x emergency disk cannot be used to restore a corrupt Registry (apart from copying the USER.DAT and SYSTEM.DAT files from their backup locations).
To create a startup disk, do the following:
- Select Start Settings Control Panel.
- Select Add/Remove Programs.
- Select the Startup Disk tab.
- Insert a blank floppy disk in your A: drive and click the Create Disk icon. Windows 9x starts the process of creating the disk.
- You are asked to verify that the disk in the A: drive should be overwritten, and then Windows 9x formats the disk and makes it bootable. It also copies numerous utilities to the disk so that you can use them to fix Windows 9x.
- When Windows 9x finishes copying files to the disk, remove the disk from the drive, label it “Windows 9x Startup Disk,” and put it in a safe place so that you can get to it easily if there is ever a problem.
If you have a problem with your Windows installation and you suspect the disk is the difficulty, you can boot to the startup disk and try to repair the hard disk. Insert the floppy you made into your floppy drive and boot to it. This startup disk creates a small, virtual disk drive (usually labeled D: or something similar) with all the repair utilities installed on it. You can then use these utilities to repair the disk or files. In addition, because you are booted up to a command line, you can copy new files over old, corrupt ones, if necessary.
| Tip |
There are differences between the Windows 95 and Windows 98/Me repair disks. Before you take the exam, create one of each and compare them. For instance, the Windows 98/Me disk has built-in CD support, but partly because of this it has little room for additional utilities you might wish to add. |
Windows NT/2000/XP Emergency Repair Disk
The Windows emergency repair disk (ERD) is a special disk you can create in Windows that can be used to repair the Registry as well as startup files. One important difference between the NT-based ERD and the Windows 9x startup disk is that the NT-based ERD contains only information—it is not a bootable disk. You must use this disk from a menu within the Setup utility, which means booting using a startup disk set or the NT installation CD itself.
The Windows NT ERD typically contains the following files:
- System Registry hive (SYSTEM.)
- Software Registry hive (SOFTWARE.)
- Default user profile (default.)
- New user profile (ntuser.da_) in Windows NT version 4.0 only
- Setup.log
- Autoexec.nt
- Config.nt
You can use these files to restore a Windows NT system to proper operation.
Windows NT 4.0 ERD
To create a Windows NT 4.0 Emergency Repair Disk, you must use the RDISK utility. This utility is installed with the default installation of Windows NT and by default is installed to the C: drive in the WINNTSYSTEM32 directory. Follow these steps:
- Click Start Run and type RDISK /S.
- Click the Create Repair Disk button.
- RDISK prompts you to insert a disk. Insert a blank 1.44MB floppy disk (or one that is okay to format) and click OK.
- RDISK formats the disk and copies the configuration files to it.
- Windows NT presents a screen telling you that this disk contains security-sensitive data and to store it in a safe location.
- Click OK to finish creating the disk, remove the disk from the drive, label it “Windows NT ERD for <WORKSTATION NAME>,” and put it in a safe place so that you can get to it easily if there is ever a problem.
Remember that the ERD is unique to each NT machine. Repeat this process at other NT Workstations as necessary.
A crucial part of the Registry is not backed up on the ERD by default: the security information, which includes the users, groups, passwords, and security structure of the local Windows NT Workstation. In order to back up this information, you must add the /S switch (RDISK /S), which adds the following critical security files:
- The Security Accounts Management database (SAM.)
- The Security Registry hive (SECURITY.)
To use an ERD under Windows NT Workstation 4.0, you must first boot the NT computer using either an NT Setup Boot Disk set or the Windows NT CD-ROM. When you get to the screen that asks you to Press Enter to install Windows NT or press R to repair a damaged installation, press R. Insert the ERD into your floppy drive when prompted by the Setup program. Once you have started the emergency repair, you have four options:
- Inspect Registry Files
- Inspect Startup Environment
- Verify Windows NT System Files
- Inspect Boot Sector
The option(s) you choose will depend on what you suspect is wrong with your computer, and we will look at this in domain 3.
Windows 2000/XP ERD
The Create Emergency Repair Disk option is part of the Windows Backup program in Windows 2000/XP. This program includes a wizard to help you create a disk to repair your system. Then, as in Windows NT, you can start the machine with either the startup disks or the Setup CD-ROM and use the ERD to restore the system files.
To create an ERD in Windows 2000/XP, use the following steps:
- Select Start (All) Programs Accessories System Tools Backup.
- From the Welcome tab, click Emergency Repair Disk.
- Backup prompts you to insert a disk. Insert a blank, formatted 1.44MB floppy disk into your floppy disk drive.
- Select the check box on this screen that will put a copy of the Registry in the C:WINNTREPAIR directory (assuming Windows 2000 was installed to C:WINNT).
- Click OK to start copying ERD files. Backup displays a progress bar as the files copy.
Warning When you finish installing Windows 2000/XP successfully, information about the setup is stored in the systemrootRepair folder on the system partition. Do not delete this folder. It contains the information the ERD requires to restore your system to its original state.
- When finished, Backup displays a message that the disk was created successfully. Remove the disk, label it as your Windows 2000 or XP ERD, and include the name of the computer it was created for. Put the disk in a safe place so it will be available if your computer has a problem.
To use or test a newly created ERD for Windows 2000/XP, boot to the Windows CD-ROM. When prompted, choose the Repair option by pressing R. You can also choose to either run a manual repair (by selecting M) or a fast repair (by selecting F). During this process, the selected portions of the system are restored from the disk to the setup of Windows. The system restarts automatically when the repair is successfully completed.
| Note |
Note that the ERD creation process also allows you to update the WINNTREPAIR directory on the hard drive. This keeps the same information as the ERD and may be more convenient. |
Booting to a System Restore Point
Windows Me/XP come with a System Restore utility that enables even the nontechnical end user to recover from Registry problems or bad installs of applications by restoring a backed-up copy of the Registry and other key system files. This utility can be found on the System Tools menu. See Figure 8.1.
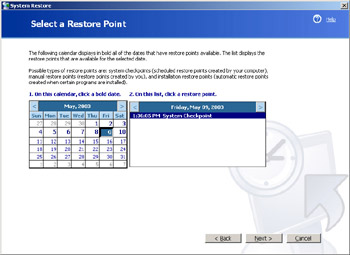
Figure 8.1: Selecting a restore point with System Restore
Every day, System Restore creates a restore point. Therefore, you always have at least two weeks of daily restore points to choose from when restoring. You can also manually create restore points at any time—for example, before you install a new application that you are uncertain about. The System Restore interface is simple and self-explanatory; you just follow the prompts to create a restore point or restore the system back to one of your restore points.
Using the Recovery Console
The Recovery Console is a command-line interface for troubleshooting Windows 2000/XP systems. You can use it to repair a damaged Windows installation that will not boot, or to retrieve important files before reformatting.
You can boot to the Recovery Console from the Windows 2000/XP CD-ROM. In the Setup program, choose R to Repair, and then C for Recovery Console.
If you are planning ahead, you can also install the Recovery Console on your hard disk. If you do this, it appears on the multiboot (BOOT.INI) menu each time you start up. To set this up, run the following command with the Run command, where X: is the CD drive containing the Windows Setup CD:
X:i386winnt32 /cmdcons
Once you get into the Recovery Console, you can use many of the standard command-prompt commands. Type HELP and press Enter to see a complete list of the available commands. Then, type a command followed by /? to get help on that specific command.
Table 8.3 lists some of the commands that are unique to the Recovery Console.
|
Command |
Purpose |
|---|---|
|
Batch |
Executes batch commands in a specified text file |
|
Disable |
Disables a particular Windows service or driver |
|
Diskpart |
A utility for managing partitions, somewhat like FDISK |
|
Enable |
Enables a particular Windows service or driver |
|
Fixboot |
Rewrites the boot sector |
|
Fixmbr |
Repairs the master boot record |
|
Listsys |
Lists all available drivers, services, and startup types |
Exam Essentials
Know the files necessary to boot Windows 9x and how the boot process works.Don’t get obsessive about the details, such as “How does WIN.COM transfer the processor into Protected Mode?” It doesn’t matter. Just know that it does it.
Know the files necessary to boot Windows NT/2000/XP and how the boot process works.Remember that Windows NT/2000/XP boot files are nearly identical, so any questions about “What does the BOOT.INI file do in Windows NT?” will have the same answer as “What does the BOOT.INI file do in Windows 2000?”
Understand Safe Mode.Both Windows 9x and 2000 have Safe Mode. Windows NT does not have this option. Know when it is appropriate to enter Safe Mode, how to do this, and what options are available.
Know how to create a startup disk (9x) or an ERD (NT/2000/XP).Know where to go within Windows to create these utility disks and how to use them. Make sure you know that you must use a different utility to create an ERD with Windows NT 4.0 versus 2000/XP.
Know what the Recovery Console is for.You should be able to boot into the Recovery Console, and you should know what commands you can execute there and for what purpose.
Installing Adding Devices
This objective focuses on making Windows interact nicely with hardware devices. The key to this smooth interaction is having the needed device drivers, so you need to be able to identify good drivers and to acquire them from the device manufacturer when necessary. You must also be able to install them both automatically and manually.
Critical Information
This objective focuses primarily on the procedures for installing device drivers. In many cases, Plug and Play makes driver installation a non-issue, but for those times when intervention is required, a good technician must know what to do.
Managing Hardware
There are three ways to install hardware. Knowing all of these is critical for understanding how Windows works with hardware:
Automatically, during the OS InstallIf a piece of hardware is in the computer when you install the OS and is supported by the OS’s default driver database, it will be installed and configured automatically during setup.
Automatically, through Detection by Plug and PlayIf hardware is installed after the installation of the OS, PnP can detect and automatically install the device when you restart the machine. In such a case, you can provide your own drivers, or you can often use standard drivers provided for you. PnP is an industry standard that allows peripheral devices to interact with the OS. The device can report on what it is and what resources it needs, and the OS and device can negotiate particular settings, such as IRQs.
Manually, through the Add/Remove Hardware Icon in Control PanelIf your hardware is not detected by PnP, it may be a legacy device. Such components are not designed to work with PnP and must be configured manually. To do this, you generally need to have information on the device’s IRQ and DMA settings. You also have to provide drivers or choose the proper driver from the default list.
Plug and Play
Among the most important enhancements debuted by Microsoft with Windows 95 was support for the Plug and Play standard (PnP). This meant that if a device was designed to be PnP, a technician could install the device into the computer and start the machine, and Windows 95 would automatically recognize and configure the device. This was a major advance; but for PnP to work properly, three things had to be true:
- The OS had to be PnP compatible.
- The computer motherboard had to support PnP.
- All devices in the machine had to be PnP compatible.
Unfortunately, at the time Windows 95 came out, many manufacturers were creating their hardware for use in DOS/Windows machines, and DOS did not support PnP; so most pre-1995 computer components were not PnP compliant. As a result, these components—generally referred to as legacy devices—often interfered with the PnP environment. Such devices cannot dynamically interact with newer systems. They require manual configuration or must be replaced by newer devices, which don’t usually need manual configuration. Due to problems managing legacy hardware under Windows 95, many people soured on PnP technology. Worse, they blamed Windows 95 for their problems, not the old hardware. “It worked fine in DOS” was the standard logic. Nearly a decade later, nearly all PC components are PnP compliant, and configuring computer systems is far easier than it was under DOS.
Windows 9x and 2000/XP work very similarly in dealing with hardware issues. Both rely on PnP and use all three of the methods we’ve described to install hardware. Windows NT 4.0, on the other hand, does not have PnP support, except for some rudimentary detection capability through the PNPISA utility. As such, NT is a different animal. Because it is not mentioned in the objectives, we’ll ignore Windows NT hardware management here, but you should note that it is different.
A number of tools and options let you install, update, and configure your system. We will first look at how you can examine the hardware that is installed on your machine, and then we’ll examine how to install a new device.
Device Manager
Device Manager is found on the Hardware tab of the System icon in Control Panel. It gives a graphical view of all the hardware installed in your computer that Windows has detected. (Device Manager is not available in Windows NT.)
Device Manager is used to display all the hardware that Windows knows about and to configure the hardware settings of those devices. If you click the plus sign (+) next to a category of devices, Device Manager will tree out that category and allow you to see the devices in the category, as shown in Figure 8.2.
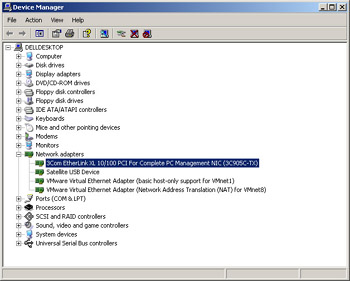
Figure 8.2: Device Manager under Windows XP
If you then select a device and click the Properties button, you can view the information about that device.
The Driver tab in the Properties box allows you to see the driver name for the device as well as the driver version, if available. (See Figure 8.3.) You can check whether any drivers have been loaded for a device or if drivers specified for a device are not compatible. If you need to load or update a driver, click the Update Driver button. Windows presents a list of drivers to select from or lets you install your own driver from floppy disk or CD-ROM. If you have upgraded to your current version of Windows, you may find that the system continues to use old drivers from the previous OS. A number of updated drivers are available on vendor websites, and these drivers often are far more efficient and stable than the older drivers.
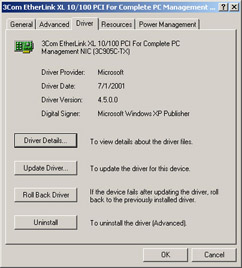
Figure 8.3: Examining the device driver settings
| Tip |
To add drivers available on the Web, you usually must download the compressed driver files and then expand them onto a floppy disk or into a hard drive folder. At that point, you can run the update and point to the location where you extracted the files. |
Most devices also have a Resources tab. From this tab, you can view and configure the system resources the device is using. Most often, the check box next to Use Automatic Settings is checked, meaning Windows PnP has determined the settings for the device and is managing it. However, if the device is not a PnP device and needs to be configured manually, simply uncheck the Use Automatic Settings check box. You can then select the setting (for example, Interrupt Request) and click the Change Setting button to pick the correct setting from a list. When you configure settings manually, Windows lets you know if the setting you have chosen conflicts with another device.
Installing a New Device
Adding new hardware devices is simple under Windows. When you start Windows after installing a new hardware device, it normally detects the new device using PnP and automatically installs the software for it. If it doesn’t, you need to run the Add New Hardware Wizard.
Installing a Device Using Plug and Play
When you install a new device, Windows will probably detect it automatically at startup. Or, in the case of a USB, PC Card, or FireWire device, Windows will detect it immediately when you plug it in. Windows may prompt you for a driver disk; insert the disk it calls for and work through the remainder of the prompts that appear.
If Windows does not automatically notice the new device, you can use the Add New Hardware Wizard from Control Panel to jump-start it. The Add Hardware Wizard works a little differently in each version of Windows, but in all versions it gives you a choice of detecting the device or letting you specify the device. Work through the prompts. If it can’t find the new device, see the next section.
Installing a Device Manually
Occasionally, you will find that when you install a new piece of hardware, it is not automatically detected. In this case, one of two things has happened: Either the device is not PnP-capable, or some sort of problem is keeping the device from being recognized. This could range from an interrupt conflict to a malfunction of the hardware itself. If there is an actual problem, you can find that information in domain 3. If the device is not PnP, though, all you need to do is go to Control Panel and run the Add New Hardware (or Add/Remove Hardware) program. This will let you try to force-detect the hardware; and if that does not work, you can manually install the driver and specify the needed resource settings for the device. If you have all the information, this process is easy. If you don’t, it can be extremely frustrating.
Before you try to install undetected hardware, be certain to go to the website of the vendor that made the device. Verify that the hardware is supported under the OS you are trying to install it on, and obtain any new drivers that are available. Also check the default IRQ/DMA settings. (Let’s hope no one changed them!) Some companies even have configuration programs that allow you to check for the settings on the device and test its functionality.
Signed and Unsigned Drivers
Windows XP makes extensive use of signed drivers. A signed driver has been certified to work with a particular version of Windows. When you attempt to install a driver that is unsigned, a warning appears, and you can either cancel the attempt or move past the warning to continue.
You should use signed drivers whenever possible. However, if you have an unsigned driver available and the device will not work otherwise, you can try the unsigned driver. The purpose of signed drivers is to minimize the problems caused by poorly written or inappropriate hardware drivers in earlier Windows versions.
Working with Permissions When Installing
Occasionally, when you’re installing software or drivers, you may get a message that says you do not have adequate permissions for doing so. This is more likely under WindowsNT/2000/XP than 9x. To get around this situation, you can:
- Log off the computer and then log on as Administrator.
- Right-click the installation program and choose Run As, and then run it as Administrator.
- Ask your network administrator to assign higher permissions to your account.
Exam Essentials
Know how Windows Plug and Play works.Understand how the PnP process manages hardware, and also know what its limitations are.
Know how to install and update hardware device drivers.Practice with Device Manager, and know how to find and add drivers for hardware that is detected but that Windows does not have standard drivers for.
Optimizing the Operating System
This is a newly added objective, covering some of the ways you can improve a system’s performance without adding or upgrading hardware.
Critical Information
There are two major ways to make a computer run better without adding new hardware: improve the efficiency of its memory handling, and improve the efficiency of its file management.
Virtual Memory Management
Virtual memory is a way of using the hard disk to simulate additional RAM so that Windows can use more memory than the system physically has. It works by swapping data into and out of a reserved area on the hard disk from RAM.
All versions of Windows configure virtual memory automatically by default, and in most cases that’s the best setting. However, you can sometimes enhance system performance by placing the paging file (the reserved hard disk area) on a certain physical hard disk—for example, one that is very fast, or one that does not compete with Windows program files for usage.
The procedure for accessing virtual memory settings is different among Windows versions:
Windows 95/98/MeFrom the System Properties, go to the Performance tab and click Virtual Memory.
Windows 2000From the System Properties, go to the Advanced tab and click Performance Options. Click the Change button under Virtual Memory.
Windows XPFrom the System Properties, go to the Advanced tab and click the Settings button in the Performance section. Go to the Advanced tab in the dialog box that appears, and click the Change button in the Virtual Memory section.
Disk Defragmentation
File fragmentation occurs when a change is made to a file that results in pieces of the file being stored in physically noncontiguous clusters on the disk. This impairs disk performance because the read/write heads must move around gathering up the pieces of the file whenever it is accessed.
To correct fragmentation, you use the Disk Defragmenter utility in Windows. It is found on the System Tools menu, and also on the Tools tab of the drive’s Properties box. Figure 8.4 shows it in action.

Figure 8.4: Defragmenting a drive
Disk Cleanup
Most versions of Windows include a Disk Cleanup utility that helps clear out unnecessary files. You can run it from the System Tools menu or from the Tools tab of the drive’s Properties box. It has a list of several categories of file types it can clean up, including temporary files, offline Internet content, and Recycle Bin contents. (See Figure 8.5.)
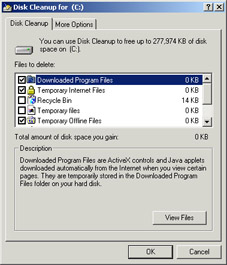
Figure 8.5: Removing unwanted files with Disk Cleanup
Adjusting System Performance Options
A number of Windows 9x settings can cause minor improvements to performance when they’re adjusted optimally. Most of these are accessed from the System Properties dialog box.
Open System Properties, and on the Performance tab you’ll find these buttons:
File SystemChoose a typical role for the machine: Desktop Computer, Mobile or Docking Station, or Network Server. The Network Server option results in better performance in most cases, even if the computer is not really a server. Also on this tab is a Read-Ahead optimization slider, which controls the buffer size. More is better.
GraphicsYou’ll find a Hardware Acceleration slider here. Full acceleration offers the best performance, but a lower setting can be useful when you’re troubleshooting graphics problems, especially with games.
Exam Essentials
Know how to change virtual memory settings.The procedure for accessing these settings differs among Windows versions; study it for all versions.
Understand the benefit of defragmenting.You should know how defragmenting improves system performance and how to run the Disk Defragmenter.
Review Questions
|
1. |
What is the RAM requirement for Windows 2000 Professional? |
|
|
2. |
Where can you find hardware compatibility information for various Windows versions? |
|
|
3. |
What is the correct order for disk preparation for Windows 98? |
|
|
4. |
Will FDISK work for NTFS partitions? |
|
|
5. |
What line added to the AUTOEXEC.BAT file on a Windows 95 Startup disk loads the real-mode Microsoft CD-ROM driver? |
|
|
6. |
What utility on the Windows 2000 CD-ROM enables you to make boot floppies that get the Setup process started on a PC that lacks a bootable CD drive? |
|
|
7. |
Which common Windows OS version cannot be upgraded to Windows Me? |
|
|
8. |
Which Windows versions do not allow the creation of an ERD? |
|
|
9. |
Which file loads first during Windows 2000/XP startup–NTLDR or NTDETECT? |
|
|
10. |
Windows NT 4.0 allows only one alternative boot mode; what is it? |
|

Answers
|
1. |
Windows 2000 requires 64MB. |
|
2. |
HCL stands for Hardware Compatibility List, where you can find compatibility information. |
|
3. |
For Windows 98, the disk must be prepared first by partitioning and then by formatting. |
|
4. |
No, it is only for FAT and FAT32 partitions. |
|
5. |
MSCDEX.EXE is placed in AUTOEXEC.BAT to load the real-mode Microsoft CD-ROM driver. |
|
6. |
MAKEBOOT is the utility that creates a set of Windows 2000 Setup boot floppies. |
|
7. |
You cannot upgrade an NT version of Windows to a 9x version, regardless of its age. |
|
8. |
ERDs are only for NT-based versions of Windows. 9x versions can create startup disks via Add/Remove Programs, however. |
|
9. |
NTLDR (NT Loader) is the first of the system files listed here to execute at startup. |
|
10. |
The only alternative boot mode in NT 4.0 is the ability to boot with a plain VGA driver. |
Part I - A+: Core Hardware Service Technician Exam
- Domain 1 Installation, Configuration, and Upgrading
- Domain 2 Diagnosing and Troubleshooting
- Domain 3 Preventive Maintenance
- Domain 4 Motherboard/Processors/Memory
- Domain 5 Printers
- Domain 6 Basic Networking
Part II - A+ Operating System Technologies Exam
