Domain 1 Operating System Fundamentals
CompTIA A+ Exam Objectives Covered in This Chapter
- 1.1 Identify the major desktop components and interfaces, and their functions. Differentiate the characteristics of Windows 9x/Me, Windows NT 4.0 Workstation, Windows 2000 Professional, and Windows XP.
- 1.2 Identify the names, locations, purposes, and contents of major system files.
- 1.3 Demonstrate the ability to use command-line functions and utilities to manage the operating system, including the proper syntax and switches.
- 1.4 Identify basic concepts and procedures for creating, viewing, and managing disks, directories, and files. This includes procedures for changing file attributes and the ramifications of those changes (for example, security issues).
- 1.5 Identify the major operating system utilities, their purpose, location, and available switches.
A good PC technician must be familiar not only with hardware, but also with a variety of operating systems. Objective 1.0 tests your ability to identify, navigate, and configure Microsoft Windows versions 95, NT 4.0, and higher, all the way up to Windows XP.
Understanding the Major Desktop Components and Interfaces
This objective deals with two basic questions:
- What desktop components and interfaces form the Windows GUI?
- What are the differences among the various Windows versions?
It’s essential to know the answers to both these questions, both for the A+ exam and for real-world work in the PC field. You need to be able to navigate confidently in any OS version and tailor your processes to the specific OS version present.
Critical Information
Some of this information about Windows functionality may be a review for you, but read through it anyway, to make sure nothing slips between the cracks in your education. Pay special attention to the material on differentiating the OS versions from one another, because you are sure to see some test questions on that topic.
Major Operating System Functions
The A+ exam focuses only on Windows-based OSs available from Microsoft, and we will give those systems the most time in this chapter. Although Macintosh has a strong following in certain niche markets, Intel/Windows machines dominate the corporate market almost completely.
The operating system provides a consistent environment for other software to execute commands. The OS gives users an interface with the computer so they can send commands to it (input) and receive feedback or results back (output). To do this, the OS must communicate with the computer hardware to perform the following tasks:
- Disk and file management
- Device access
- Memory management
- Input/output
Disk and File Management
The OS must be able to store and retrieve files on disks; this is one of its most primary functions. The system components involved in disk and file management include:
The FilesystemThe organizational scheme that governs how files are stored and retrieved from a disk. There are four major filesystems: the original 16-bit FAT system (a carryover from MS-DOS), the 32-bit version of it called FAT32, the NT File System (NTFS 4.0) supported by Windows NT 4.0, and the improved version of NTFS called NTFS 5.0, supported by Windows 2000/XP. Table 7.1 lists the filesystems and the OSs that support them.
|
OS |
FAT16 |
FAT32 |
NTFS 4.0 |
NTFS 5.0 |
|---|---|---|---|---|
|
Windows NT 4.0 |
Yes |
No |
Yes |
No |
|
Windows 95a |
Yes |
No |
No |
No |
|
Windows 95b |
Yes |
Yes |
No |
No |
|
Windows 98 |
Yes |
Yes |
No |
No |
|
Windows Me |
Yes |
Yes |
No |
No |
|
Windows 2000 |
Yes |
Yes |
No (must convert) |
Yes |
|
Windows XP |
Yes |
Yes |
No (must convert) |
Yes |
Windows ExplorerThe primary file-management interface in Windows. It displays the list of files in the current location at the right and a folder tree of other locations at the left. (See Figure 7.1.) It starts with the My Documents folder as its default location when opened. Windows Explorer is available in all Windows versions and works approximately the same way in each.
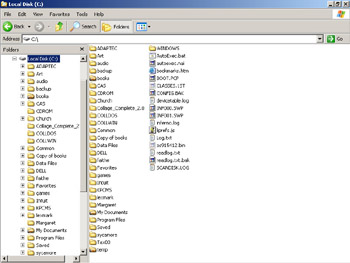
Figure 7.1: The Windows Explorer interface
My ComputerBasically the same interface as Windows Explorer, except it does not show the folder tree by default and it starts with a list of local drives. Originally the two were separate, but in modern versions of Windows you can click the Folders button on the toolbar to turn that folder tree on/off, making the two interfaces practically identical.
Network Neighborhood/My Network PlacesAgain this is basically the same interface as the others, except it is designed for browsing network computers and drives rather than local ones. In early versions of Windows it was called Network Neighborhood; starting with Windows 2000, the name was changed to My Network Places.
Objective 1.3 discusses the specific user interfaces and procedures involved in using them in more detail.
Device Access
Another responsibility of the OS is to manage the way that software on the system interacts with the computer’s hardware. More advanced OSs have the ability to avoid conflicts between devices and to prevent applications from interfering with each other.
Windows handles device management by itself in most cases. In instances where the user needs to get involved, he can use the Device Manager interface. Device Manager is covered in detail under objective 2.4.
One quirk about Device Manager is that the procedure for opening it differs among Windows versions. In Windows 95/98/Me, Device Manager is a tab in the System Properties box. (Right-click My Computer and choose Properties.) In Windows 2000/XP, you must display the System Properties box, click the Hardware tab, and then click Device Manager.
Memory Management
Computers are designed so that in order for information to be used by the processor, it must be in the machine’s memory (RAM). How the OS manages the transfer of information from storage on the hard drive to a place in RAM is referred to as memory management.
Back in the days of MS-DOS, applications could run only in conventional memory—the first 640KB of RAM in the system. This severely limited the size of the applications that could be written, so various schemes for getting around that limitation were devised. Windows 95 and higher get around it in the following ways:
Extended MemoryPCs today have many megabytes and even gigabytes of RAM, and everything except the first megabyte is considered extended memory. Windows can address extended memory and apportion it out to applications as needed.
Virtual MachinesWindows can multitask (that is, run more than one application at the same time) by creating a separate memory space for each application. It’s almost like each of the applications is running on a separate PC, with the OS interface tying them all together. The separate space in which an application runs is called a virtual machine.
Virtual MemoryWindows is such a large OS and requires so much overhead that sometimes a PC does not have enough RAM to accommodate its needs. Rather than giving an out of memory error message to the user, Windows has a workaround technique whereby it uses an unused part of the hard disk to simulate additional RAM, swapping data into and out of it from the real RAM. This is called virtual memory. The file on the hard disk used for the simulation is called a paging file or swap file.
Input/Output
Generally called I/O, this is the process by which the machine accepts instructions (from the mouse, keyboard, and so on) and provides output (to a monitor, file, or printer). These operations happen behind the scenes with no user intervention in most cases. The user clicks the mouse or types on the keyboard, and input happens. Keyboard and mouse settings can be fine- tuned through Control Panel.
Major Operating System Components
All Windows versions have a similar look and feel in their user interface. Figure 7.2 shows Windows 2000, for example.
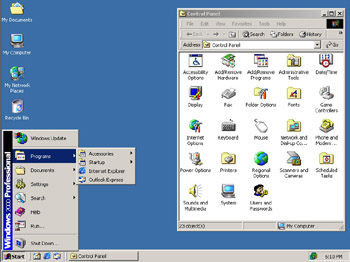
Figure 7.2: The Windows 2000 interface
The main differences between Windows XP and all other Windows versions are the redesigned Start menu and the rounded look of the dialog boxes. Figure 7.3 shows a typical Windows XP screen.
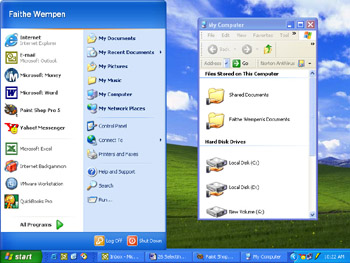
Figure 7.3: The Windows XP interface
Much of this information will be review for those of you who have experience using Windows OSs, but you may want to refresh your mind as to the specific names and attributes of these components.
The Desktop
The Desktop is the virtual desk upon which all of your other programs and utilities run. By default it contains the Start menu, the Taskbar, and a number of icons. The Desktop can also contain additional elements, such as web page content, through the use of the Active Desktop option. Because it is the base on which everything else sits, how the Desktop is configured can have a major effect on how the GUI looks and how convenient it is for users.
You can change the Desktop’s background patterns, screensaver, color scheme, and size by right-clicking any area of the Desktop that doesn’t contain an icon. The menu that appears allows you to do several things, such as create new Desktop items, change how your icons are arranged, and select a special command called Properties. Right-click the Desktop and choose Properties to work with display properties.
| Tip |
Windows is designed to allow each user to access information in the way they are most comfortable with, and as such there are generally at least two ways to do everything. When you’re getting ready for the test, try to make sure you know all the ways to perform a task, not just the way you are used to. |
The Taskbar
The Taskbar runs along the bottom of the Windows display. At the left is the Start button, which opens the menu system. At the right is the clock and the System Tray. The System Tray holds icons for programs that are running in the background, such as virus checkers, and also sometimes icons for frequently needed controls such as the sound volume.
| Tip |
Another name for the System Tray is notification area. That’s the terminology Microsoft appears to be switching to in its documentation. |
In its center, the Taskbar displays buttons for each of the open windows To bring a window or program to the front (or to maximize it if it is minimized), click its button on the Taskbar. As the middle area of the Taskbar fills up with buttons, the buttons become smaller so there is room to display them all.
| Tip |
There are different methods of managing situations where you have too many Taskbar buttons. One method is to drag the top border of the Taskbar upward, creating an extra row for the buttons. Another, which works only in later Windows versions like XP, is to allow Taskbar buttons to be grouped. For example, if you have four file-management windows open, they will appear as a single button on the Taskbar. You can click that button to see the windows in menu form and make your selection. To set this up, right-click the Taskbar and choose Properties, and then mark the Group Similar Taskbar Icons check box. If there’s no such check box, your version of Windows doesn’t support this feature. |
You can move the Taskbar to the top or sides of the screen by clicking the Taskbar and dragging it to the new location. This is important to know, because sometimes users accidentally do this and need help dragging the Taskbar back to the bottom.
The Start Menu
The Start button opens the Start menu, an entry point into a well-organized system of shortcuts to various utilities and applications you can run. Its top level has a few shortcut icons for some critical features, but most of the shortcuts are contained in a hierarchical system of submenus. To display a submenu, point at any item that has a right-pointing arrow to its right.
Programs Submenu
The Programs submenu holds the program groups and program icons that you can use. In Windows XP it is called All Programs rather than Programs, but it’s basically the same thing.
Shortcuts to programs are placed in the Programs menu when they are installed using a Windows-based setup utility, or when you manually place them there. There are a number of ways to create a new item on the Start menu or reorganize items that are already there:
- Right-click the Taskbar and choose Properties. Depending on the Windows version, different options may be available through this Properties box for customizing the Start menu.
- Right-click the Start button and choose Open. The Start menu’s content appears in a file-management window, and you can add and remove shortcuts to it.
- Drag-and-drop a shortcut from the Desktop. This works only in later Windows versions. Drag an icon to the Start menu, but don’t release the mouse button. Just pause, and the Start menu will open. Then, pause over the Programs menu, and it will open. Keep going until you find the right spot, and then release the mouse button.
Tip Within the Programs submenu is one especially important submenu that is specifically mentioned in the exam objective: the Accessories/System Tools submenu. This menu is important because it contains shortcuts to some of the utilities needed for troubleshooting and preventive maintenance of a system. See objective 1.5 for more details.
Documents Submenu
The Documents submenu has only one function: to keep track of the last 15 data files you opened. Whenever you open a file, a shortcut to it is automatically added to this menu. Click the document in the Documents menu to reopen it in its associated application. In Windows XP, this submenu is called My Recent Documents.
Settings Submenu
The Settings submenu provides easy access to the Windows configuration. It contains a shortcut to Control Panel, for example, and to the Printers folder. Additional menus are available depending on which version of Windows you are using. Windows XP has no Settings submenu; the shortcuts it would contain appear directly on the top level of the Start menu, instead.
Search (Find) Submenu
The name of this menu changes between Windows 98 and Windows 2000, but its purpose doesn’t. The Windows 98 Find submenu is used to locate information on your computer or on a network. The Search submenu of Windows 2000/Me/XP has the same functionality. In Windows XP, Search is a command that opens a Search window, rather than a submenu.
Help Command
Windows includes a very good Help system. Not only is it arranged by topic, but it is also fully indexed and searchable. Because of its usefulness and power, it was placed on the Start menu for easy access. When you select the Help command, it brings up Windows Help. From this screen, you can double-click a manual to show a list of subtopics and then click a subtopic to view the text of that topic. You can also view indexed help files or do a specific search through the help documents’ text.
Run Command
The Run command can be used to start programs if they don’t have a shortcut on the Desktop or in the Programs submenu. To execute a particular program, type its name and path in the Open field. If you don’t know the exact path, you can browse to find the file by clicking the Browse button. Once you have typed in the executable name and path, click OK to run the program.
Shut Down Command
You probably already know that you should never shut down a Windows-based computer by pressing the power switch, because of the possibility of file corruption. Instead you should shut it down through Windows’ Shut Down command.
When you select Shut Down, you are provided a choice of several shutdown methods. They vary depending on the Windows version:
Shut DownThis option writes any unsaved data to disk, closes any open applications, and either gets the computer ready to be powered off (on AT systems) or shuts off the computer’s power (on ATX systems).
RestartThis option works the same as the first option, but instead of shutting down completely, it automatically reboots the computer with a warm reboot.
Restart the Computer in MS-DOS Mode (Windows 9x Only)This option is special. It does the same tasks as the previous options, except upon reboot, Windows 9x executes the command prompt only and does not start the graphical portion of Windows 9x. You can then run DOS programs as though the machine were a DOS machine. When you have finished running these programs, type exit to reboot the machine back into the full Windows 9x with the GUI.
Log OffIf you have user profiles enabled, a Log Off option is available either from this menu or as a separate menu command. Profiles are automatic on NT/2000 and optional on 95/98.
Stand By
On laptops or other machines with power-management capability through their BIOS, the Stand By option may be available. It allows the machine to go into a sleep mode where it shuts down most functions to save energy. Utilizing Stand By can significantly extend battery time on laptops.
HibernateHibernate copies the content of RAM to a reserved area on the hard disk and then shuts down the computer completely. When you turn it back on, it copies the data back into RAM, and startup is much faster than normal. This option is available only in later Windows versions, and only on systems that support it through the BIOS.
Using a Command-Line Interface within Windows
Occasionally you may need to run commands from an MS-DOS–style command prompt. To do so, there is a special command: either MS-DOS Prompt or Command Prompt, depending on the OS version. It may be on the first-level Programs menu, or it may be on the Accessories submenu, depending on the version.
This command opens a window containing a command prompt. From there, you can type commands and press Enter to execute them. Objective 1.3 discusses some of these commands in detail.
Contrasts between Windows Versions
There are two main families of Windows versions: Windows 95, 98, and Me (collectively called Windows 9x); and Windows NT 4.0, 2000, and XP. They are all similar in their user interface, but the way they operate behind the scenes is substantially different. Each family has a very different startup process (see objective 2.3 in Chapter 8), and in some cases different troubleshooting utilities (see objective 1.5 later in this chapter and objective 3.2 in Chapter 9).
A Brief Version History
Early Windows versions had completely separate platforms for home and business use. Windows NT 4.0 offered stability and networking for the corporate world but lacked user-friendly features such as Plug and Play (PnP). Windows 95 was easy to install and configure but crashed frequently. Over the years, Windows 98/Me were incremental improvements on Windows 95, and Windows 2000 was an incremental improvement on Windows NT 4.0, adding some user- friendliness but retaining stability.
Today, Windows XP is the dominant OS; it is based on Windows 2000 (which, in turn, was based on Windows NT 4.0). So, the Windows 9x platform is essentially going away. Although Windows XP comes in both Professional and Home versions, both are NT-based. The Home version is just the Pro version with some features stripped off.
User Interface Differences
The user interface is virtually identical for Windows NT 4.0, 95, 98, Me, and 2000. Windows XP is the different one, and the main differences are in its Start menu and differently styled windows. However, Windows XP can be set up to look just like Windows 2000. In the Display Properties, choose the Windows Classic appearance theme. Then, in the Taskbar Properties, select the Classic Start menu.
System File Differences
The files required to start up Windows, access Registry settings, and run utilities are different between the 9x versions and the NT versions. These are covered in detail in objective 1.2.
Security and Networking Differences
The 9x versions of Windows have very little local security. A login box can be set up to appear, but users can bypass it by clicking Cancel. These versions also offer no security among multiple users who locally share a PC. For example, there is a single My Documents folder, and everyone has access to it.
The NT-based versions are much more flexible and robust in their security settings. Each user has her own settings and her own My Documents folder, and can hide or restrict files from other local users. The NT-based versions are also stronger in networking features, especially when connecting to a domain-based network.
Differences in Included Utilities
The newer the Windows version, the more and better utilities it has. For example, Windows Me/XP come with a System Restore utility for undoing bad Registry changes. Such utilities are addressed in greater detail in other objectives.
There is also a division of utilities between the 9x and the NT versions. For example, in the 9x versions, ScanDisk is the utility for checking hard disks, whereas in NT versions that utility is called Check Disk. In addition, Windows 2000/XP come with additional management utilities such as Computer Management, Disk Management, and an entire class of Administrative Tools in Control Panel.
Differences in Application Compatibility
Windows 9x is designed for backward compatibility with 16-bit Windows programs (for Windows 3.x) and MS-DOS, so it includes some features that help with that specifically, including MS-DOS Mode in Windows 95/98.
Although Windows 2000/XP make no claims about universal backward compatibility, in reality most MS-DOS and 16-bit Windows programs work fine under them. In addition, Windows XP comes with an Application Compatibility feature that helps the system emulate the earlier versions when needed.
Exam Essentials
Know the major functions of Windows.You should understand what an OS does, what systems it manages, and how it communicates with the human user.
Know which filesystems work with which Windows versions.Refer back to Table 7.1 if you need to review this.
Understand virtual memory.You should know the purpose of virtual memory and how it operates in terms of hard disk and physical RAM.
Be able to identify Windows display components. Make sure you can point out the Taskbar, Start button, System Tray, Desktop, and other key features of the OS interface.
Understand version differences.Be able to group the Windows versions according to similarity and explain how one group differs from the other in terms of system files (see objective 1.2) and functionality.
Understanding Major System Files
This is a new objective, which has been split off from objective 1.1 in the latest revision of the exam. It tests your knowledge of the names of the files that each version of Windows uses to start up and to operate.
Critical Information
By understanding the files used by various Windows versions for behind-the-scenes operations, you will be better able to troubleshoot problems when they occur. That’s the real purpose of memorizing all these filenames.
Windows 9x Major System Files
The following are important files for systems with a 9x version of Windows installed:
IO.SYSA startup file that interacts with the BIOS and the hardware. It is the first file executed at startup after the BIOS runs its POST test. See objective 2.3 (Chapter 8) for more detail about the boot process.
MSDOS.SYSUnder MS-DOS, this file shared startup duties with IO.SYS, but under Windows 9x it is a plain-text configuration file that works as a companion to IO.SYS.
SYSTEM.INI and WIN.INIInitialization files exist only for backward compatibility with 16-bit (Windows 3.x) applications.
| Note |
WIN.INI and SYSTEM.INI served the same function under Windows 3.x that the Registry serves in modern Windows versions. |
WIN.COMThe main executable program for the Windows 9x OS.
COMMAND.COMThe command interpreter, required for the user to interact with the OS via a command prompt.
CONFIG.SYSAn initialization file that loads real-mode device drivers at startup. This file isn’t required in most cases, because Windows handles its own device drivers.
AUTOEXEC.BATAn initialization file that loads Terminate and Stay Resident (TSR) programs at startup. It isn’t required anymore in most cases, because Windows loads the programs it needs at startup.
HIMEM.SYSThe extended memory-management utility, required for Windows to be able to handle extended memory. It can be loaded through CONFIG.SYS, but if it is not, Windows loads it automatically when it starts up.
EMM386.EXEAn expanded memory-management utility. It isn’t required for Windows 9x, because Windows handles memory management for itself, but it may still be loaded through CONFIG.SYS on systems that were upgraded from MS-DOS.
| Note |
Expanded memory (EMS) was originally a totally different type of extra memory above the 1MB mark, introduced in 80286 computers. It is now obsolete, but some very old programs require it rather than extended memory (XMS). The original purpose of the EMM386.EXE utility was to apportion out memory as needed to programs that required one type or another. |
USER.DATOne of the two files that compose the Registry. It contains environmental settings for each user who logs in to Windows 9x. By default, Windows 9x uses a single profile for all users, and in that case only a single USER.DAT is maintained in the Windows directory. If users each have their own profile, though, a separate USER.DAT file is created and maintained for each user. This file is stored in the user’s profile directory.
SYSTEM.DATThe other file that makes up the Registry. It contains information about the hardware configuration of the computer on which Windows is running. The SYSTEM.DAT file is stored in the Windows directory and is shared by all users of the computer.
USER.DAT and SYSTEM.DAT cannot be edited with a text editor because they aren’t text files (like AUTOEXEC.BAT, CONFIG.SYS, or the .ini files). To edit the Windows 9x Registry, you need to use a tool specifically designed for that purpose: the aptly named Registry Editor (REGEDIT.EXE). See objective 1.5 for more information about it.
Windows 2000 Major System Files
Almost all of the files needed to boot Windows 9x are unnecessary for Windows NT 4.0, 2000, and XP. Here are the files for those OSs:
NTLDRBootstraps the system. In other words, starts the loading of an OS on the computer.
BOOT.INIHolds information about which OSs are installed on the computer. Used when dual-booting, to display the boot menu.
NTDETECT.COMParses the system for hardware information each time Windows is loaded. This information is then used to create dynamic hardware information in the Windows Registry.
NTBOOTDD.SYSUsed to recognize and load the SCSI interface on a system with a SCSI boot device with the SCSI BIOS disabled. On EIDE systems or SCSI systems with the BIOS enabled, this file is not needed and is not even installed.
System FilesBesides the previously listed files, all of which are located in the root of the C: partition on the computer, Windows 2000 also needs a number of files from its system directories, including the hardware abstraction layer (HAL.DLL) and the Windows 2000 command file (WIN.COM).
Numerous other DLL (dynamic link library) files are also required, but usually the lack or corruption of one of them produces a noncritical error, whereas the absence of WIN.COM or HAL.DLL causes the system to be nonfunctional.
The Windows NT 2000 XP Registry
The Registry in Windows NT/2000/XP has the same purpose as the Windows 9x Registry. Unlike Windows 9x, though, NT/2000 and XP require that each user have their own profile and maintains that profile automatically for them. The current user’s settings are stored in the NTUSER.DAT file.
Instead of USER.DAT and SYSTEM.DAT, these Windows versions use the following files to store the Registry settings:
SAMStores the machine’s Security Accounts Management database, which is where the Registry stores information about user accounts and passwords.
SECURITYStores information about file and folder security on the machine.
SOFTWAREHolds configuration data for programs and utilities installed on the machine. Also has numerous areas corresponding to the OS itself.
SYSTEMHolds information that affects the OS’s operation, especially during startup.
Exam Essentials
Know the names of the system files for each Windows version. You should be able to list the files for a particular OS; or, given a filename, you should be able to say which OS it goes with.
Know the files that make up the Registry. They’re different for 9x versions versus NT versions; make sure you can differentiate between them.
Using Command Line Functions and Utilities
This is yet another objective that has been split off from objective 1.1 in the latest revision of the exam guidelines. It tests your ability to display a command prompt and enter common commands using the correct syntax.
Critical Information
Both for the test and for real life, you should know the various ways of displaying command prompts and the way that command syntax is constructed. For the exact syntax of individual commands, you can always get help by typing the command followed by /?.
Displaying a Command Prompt
Because 9x versions of Windows are much closer to MS-DOS (a command-prompt OS) than NT versions are, there are more ways of displaying a command prompt under Windows 9x. To display a command prompt from Windows 9x, you can:
- Boot from a startup floppy that you create with the Add/Remove Programs applet in Control Panel.
- Restart the PC in MS-DOS mode (Windows 95 and 98 only).
- Choose Start Run, type COMMAND, and click OK.
- Choose Start Programs MS-DOS Prompt, or Start Programs Accessories MS- DOS Prompt, depending on the Windows version.
To display a command prompt from Windows NT/2000/XP, you can:
- Choose Start Run, type CMD, and click OK.
- Choose Start Programs Accessories Command Prompt.
Most commands can be executed through the command prompt that appears with any of these methods. To return to Windows, type EXIT and press Enter. If that doesn’t work, restart the computer.
| Note |
When you start a command prompt from within Windows, it is sometimes called shelling out to DOS, which means you are creating a shell, or user environment, that resembles MS-DOS from within Windows. EXIT returns you to Windows from a shell in most cases. |
Using Wildcards at a Command Prompt
Many of the commands covered later in this section involve entering file specifications. This can be the name of an individual file or a combination of text and wildcard characters that have the effect of selecting multiple files.
The most common wildcard is the asterisk (*). It stands for any number of characters. So, for example, a file specification of *.TXT would include all files with a .TXT extension, whereas DOCUMENT.* would include all files named DOCUMENT regardless of their extension. One more example: D*.* would include all files that began with the letter D, regardless of extension.
The other wildcard is the question mark (?). It stands for any single character. So, for example, D????.* would find all files that begin with D and are exactly five characters in name length, with any extension.
Internal vs. External Commands
Internal commands are built into the command interpreter (COMMAND.COM), so they do not need any external files in order to work. DIR, DEL, and COPY are examples.
External commands are mini-programs that exist either in the current folder or somewhere within the search path. For example, FORMAT and FDISK don’t work unless FORMAT.COM and FDISK.EXE are available.
Under MS-DOS, all the external commands needed for the OS were stored in the C:MSDOS folder. Under Windows, the location of the external command-prompt commands depends on the OS version, but they are usually found in C:WindowsCommand.
| Note |
The search path is a list of locations where the OS looks for a command’s needed file when you try to execute it. You can set a path statement in AUTOEXEC.BAT with the PATH= command, with the names of the folders separated by semicolons. When you run a command prompt from within Windows, the folder containing the external OS commands is automatically included in the path for that prompt; so, you should not have any problem with errors due to the path statement. When you’re working at a command prompt from a startup floppy, however, you may need to remember to change to the folder containing the external command you want to run. |
Understanding Command Syntax
To issue a command from the command prompt, you need to know the structure that the command uses, generally referred to as its syntax. Over time, you will memorize the command syntax for the commands you use most often, but until that happens, you can rely on the Help system.
Type the command followed by a forward slash (/) and a question mark (?). Doing so displays all the options for that command and how to use them properly, as shown in Figure 7.4.

Figure 7.4: Options available for ATTRIB.EXE
Common Commands
The A+ objective’s topic list expects you to know how to use certain specific commands at a prompt. The following list summarizes them:
DIRDisplays the contents of the current folder. Can be used by itself or with a file specification to narrow down the listing. Here are some examples:
- DIRDisplays all files in the current folder.
- DIR ????.* Displays all files that are exactly four letters in name length, with any extension.
- DIR /wDisplays the listing in wide (multicolumn) format, with names only (fewer details).
- DIR /pDisplays the listing one screenful at a time. Press Enter to see the next screenful.
ATTRIBDisplays or changes the attributes for one or more files. Used by itself, it displays a list of all files in the current location with attributes set. The attributes are Read Only (R), Hidden (H), System (S), and Archive (A). They can be turned off with a minus sign or turned on with a plus sign. Here are some examples:
- ATTRIB -R TEE.DOCRemoves the read-only attribute from TEE.DOC.
- ATTRIB +H *.*Adds the Hidden attribute to all files in the current location.
VERDisplays the current OS name and version.
MEMDisplays memory usage data. If more than one screenful of data scrolls by quickly, try adding the /p switch for one screenful at a time. For example:
- MEMProvides standard memory information.
- MEM /CProvides more detailed memory information.
SCANDISKRuns the ScanDisk utility. Works only under MS-DOS or Windows 9x startup disks.
DEFRAGRuns the Disk Defragmenter utility. Works only under MS-DOS or Windows 9x startup disks.
EDITOpens the MS-DOS Editor utility, a text editor similar to Notepad. A filename can be added to open that file (if it exists) or create a new file (if it doesn’t exist). For example:
- EDIT CONFIG.SYSOpens CONFIG.SYS if it’s present in the current folder; otherwise creates it and opens it.
COPYCopies files from one location to another. If the location for either the source or the destination is not included in the command, it is assumed to be the current folder. Here are some examples:
- COPY *.* A:Copies all files from the current folder to the A: drive.
- COPY C:WindowsMyfile.txtCopies Myfile.txt from C:Windows to the current folder.
XCOPYLike COPY but also duplicates any subfolders. For example:
- XCOPY C:BOOKS A:Copies everything from C:BOOKS to the A: drive and also copies any subfolders and their contents.
FDISKUnder MS-DOS and Windows 9x, prepares a hard disk for formatting by creating one or more formattable partitions. Not for use with floppy disks, and not for use under Windows NT/2000/XP.
FORMATPrepares a floppy or hard disk for use by applying a certain filesystem to it.
SETVERAn older command that provided a way of tricking applications into running under versions of MS-DOS that they were not designed for. This command isn’t used much anymore. You can use it by itself to see a list of currently version-set commands. Use it with a command name and version number to add one to the list. For example:
SETVER RAIDER.EXE 5.0When the file RAIDER.EXE is run, the OS will report to the program that it is MS-DOS version 5.0.
SCANREGChecks the Registry for errors. Not usually necessary, because the Registry scans itself automatically at startup.
MD/CD/RDDirectory (folder) management commands. MD is Make Directory, CD is Change Directory, and RD is Remove Directory. When they’re used without specifying a location, the current location is assumed. Some examples include:
- MD BACKUPMakes a new directory called Backup in the current directory.
- CD C:SYSTEMChanges to the System directory.
- RD C:SYSTEMDeletes the System directory (assuming it is empty).
DELTREERemoves non-empty directories and everything in them, including subdirectories. Not supported in the latest versions of Windows.
DELDeletes specified files. Doesn’t work on folders (directories). Examples:
- DEL C:SYSTEMBACKUP.DOCDeletes the specified file in the specified location.
- DEL *.*Deletes all files in the current location.
| Note |
DEL does not act on hidden or read-only files. They will be ignored. |
RENRenames the specified file(s). You must specify both the old and new names. For example:
- REN MYFILE.DOC YOURFILE.DOCRenames MYFILE.DOC to YOURFILE.DOC.
- REN S*.PCX T*.PCXRenames all files that start with S and have a PCX extension so that their first letters are now T, but otherwise their names remain the same.
| Tip |
Windows does not let you rename a group of files in a single operation, as in the second example. This is one case where it is very helpful to use a command prompt instead of Windows. |
TYPEShows the text contained in the specified file on-screen. Useful for browsing through a group of text files without having to open them in an editing program. For example:
- TYPE CONFIG.SYSDisplays the complete contents of the file CONFIG.SYS on-screen.
ECHOUsed in batch files (such as AUTOEXEC.BAT) to display certain text on-screen. For example:
- ECHO Good Morning Friend!During startup, if you want the message Good Morning Friend! to appear on the screen, you can add this line to AUTOEXEC.BAT.
SETA command used mostly in AUTOEXEC.BAT to set a variable. Seldom used anymore except on older systems.
PINGAllows you to check a particular IP address or domain name on a network for reachability. For example:
- PING Microsoft.comTells you whether Microsoft’s website is up. (It probably is.)
- PING 127.0.0.1To check your own computer, ping the loopback address.
Exam Essentials
Know how to open a command prompt and enter text commands. Go through each of the commands listed in the objectives and read through their help screens. Find out which switches are available for each command, and what they do.
Creating, Viewing, and Managing Disks, Directories, and Files
The wording of this objective makes it sound like it’ll be testing end-user skills like moving, copying, and renaming files, but there’s much more to it than that. This objective addresses topics like disk partitioning and formatting, filesystems, directory structures, and file compression, encryption, and permissions.
Critical Information
This objective tests your ability to build up a filesystem from scratch, starting with a totally blank hard disk. You must be able to partition it, format it, create the directory structures, and apply attributes, compression, encryption, and permission settings to those structures.
Creating and Managing Partitions
Once the drives are in the machine and the controller is set up, you need to prepare the hard drives for use before an OS can be installed on the machine. This generally consists of two steps: partitioning and formatting.
Partitioning
Partitioning refers to establishing large allocations of hard-drive space. A partition is a continuous section of sectors that are next to each other. In DOS and Windows, a partition is referred to by a drive letter, such as C: or D:. Partitioning a drive into two or more parts gives it the appearance of being two or more physical hard drives.
When a drive is partitioned in DOS, the first partition you create is a primary partition. A primary partition is a bootable one. A disk can have more than one primary partition, but it is not customary.
Only one primary partition can be active. The active partition is the one that the system attempts to boot from. It is possible for no partitions to be marked active on a particular drive. In this case, the machine cannot boot to the drive, and you must use FDISK to set an active partition before you will be able to properly install Windows 9x.
If there is additional space, a second partition called an extended partition can be created. One or more logical partitions must be defined within the extended partition, and they can then have drive letters attached to them so users can access them. Due to limitations with the way that DOS and Windows 9x access partition structures, only one primary and one extended partition can be created per disk using the Windows 9x disk utility, FDISK.
Windows NT/2000/XP all have a partitioning utility built into their Setup programs. You can partition and format the drive as you install the OS. With Windows 9x, however, you must partition using the FDISK utility, and then format using the FORMAT utility, before you start Windows Setup. You run these from a startup floppy disk, which you can create on an existing Windows installation using Add/Remove Programs.
You cannot alter the partition that contains the OS after setup (except with third-party utilities), but you can create and manage other partitions on the system later. To do this from Windows 9x, you can go to a command prompt and rerun FDISK; to do it in Windows NT, use Disk Administrator; and in 2000/XP, use Disk Management.
Using FDISK
With FDISK, you can create partitions, delete partitions, mark a partition as active, or display available partitioning information. FDISK can be run off the Windows 9x startup disk, as discussed earlier, or from a command prompt within Windows 9x. Figure 7.5 shows an example of the FDISK interface.
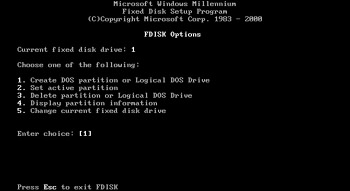
Figure 7.5: The FDISK utility (Windows Me version)
FDISK has a number of major functions:
Creating Partitions and Logical DrivesPartitions are created from unused space on the drive. Until the space has been partitioned, it is unusable by most systems.
Deleting Partitions and Logical DrivesIf a partition is no longer needed, and you need to make space on the drive for the creation of other partitions, deleting a partition removes all information about the partition and also deletes any information that had been stored on the partition. Think before you do this!
Setting a Partition as ActiveIn order to boot the system, the computer must know where to look for the bootstrap files that start the system load phase. Setting a partition as active identifies it as the place to look for these files.
Viewing the Partitions on a DiskFDISK also allows you to browse through the partition information on a disk. If the machine has more than one disk, you can choose which one to look at.
Disk Administrator/Disk Management
Windows NT and 2000/XP use different tools to manage partitions. Windows NT has an icon for Disk Administrator in its Administrative Tools folder, whereas Windows 2000 has a Disk Management tool within its Computer Management utility.
| Note |
Where’s Disk Management? In Windows 2000/XP, go to Control Panel, choose Administrative Tools, and choose Computer Management. One of the items on the folder tree in the window that appears is Disk Management. |
The two utilities are very similar; both allow you to modify partition information in a graphical manner. Figure 7.6 shows the Windows XP version of Disk Management.
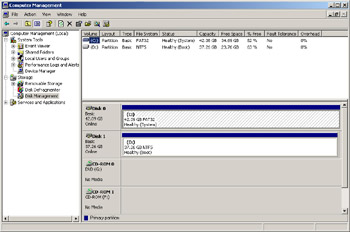
Figure 7.6: The Disk Management utility (Windows XP version)
Among the important differences between FDISK and these advanced disk tools is the ability of Disk Administrator and Computer Management to do the following:
- Format partitions
- Change drive letters
- Check other drive properties
- Create more than one primary partition per physical drive
Disk Formatting
The next step in the management of a hard drive is formatting, initiated by the FORMAT command or through the Windows interface. During a format, the surface of the hard-drive platter is briefly scanned to find any possible bad spots, and the areas surrounding a bad spot are marked as bad sectors. After this, magnetic tracks are laid down in concentric circles. These tracks are where information is eventually encoded.
Beyond this, there are a number of options regarding how the system will store information. Each of these methods of storing information is known as a filesystem, and you need to know about several of these for the test:
FATShort for File Allocation Table. The FAT keeps track of where information is stored and how to retrieve it.
FAT16Used with DOS and Windows 3.x, as well as early versions of Windows 95. FAT16 (generally just called FAT) has a number of advantages. First, it is extremely fast on small (under 500MB) drives. Second, it is a filesystem that nearly all OSs can agree on, making it excellent for dual-boot system. However, FAT also has limitations that began causing problems as Windows got bigger and faster. First, FAT has a limit of 4GB per partition. When you have hard drives that are 10GB to 30GB, this becomes a serious issue. Also, sectors on hard drives are arranged in what is called a cluster or allocation unit. In general, as a FAT16-formatted drive or drive partition increases in size, the number of sectors per cluster increases. A drive between 16MB and 128MB has four sectors per cluster, whereas a drive of up to 256MB has eight sectors per cluster, and drives of up to 512MB have 16 sectors per cluster.
| Tip |
Another aspect of FAT is so wonderfully obscure that test preparers rarely can resist it. The root of any FAT drive (C:, D:) has a hard-coded limit of 512 entries. This includes directories, files, and so on. Also, long filenames may take up more than one entry. If users reach this limit, they will be unable to save any other files in the root. This limit does not apply to subdirectories or to FAT32 or NTFS drives. |
FAT32Introduced with Windows 95 OSR2. FAT32 is similar to FAT but has a number of advantages. It supports larger drives and smaller allocation units. As a comparison of how the new system saves you space, a 2GB drive with FAT16 has clusters of 32KB; with FAT32, the clusters sizes are 4KB. If you save a 15KB file, FAT needs to allocate an entire 32KB cluster; FAT32 uses four 4KB clusters, for a total of 16KB. FAT32 wastes an unused 1KB, but FAT wastes 15 times as much!
The disadvantage of FAT32 is that it is not compatible with older DOS, Windows 3.x, and Windows 95 OSs. This means that when you boot a Windows 95 Rev B. or Windows 98 FAT32-formatted partition with a DOS boot floppy, you can’t read the partition.
Windows 98 includes the FAT32 Drive Converter tool (CVT1.EXE), which allows you to upgrade FAT disks to FAT32 without having to reformat them. This preserves all the information on the drive but allows you to take advantage of FAT32’s enhancements.
NTFS4Windows NT’s filesystem. NTFS4 includes enhanced attributes for compressing files or for setting file security. Updating a FAT drive to NTFS is relatively easy and can be done through a command called CONVERT. This conversion does not destroy any information but updates the filesystem. NTFS4 is used only with Windows NT 4.0.
NTFS5The NTFS system updated with Windows 2000. It includes enhancements such as file encryption. NTFS5 also includes support for larger drive sizes and a new feature called Dynamic Disks that does away with the whole concept of partitioning to improve drive performance. NTFS5 is used only with Windows 2000/XP.
Formatting a Drive
If you are installing Windows 9x, you need to use a boot disk to first partition and then format the drive. The FORMAT command is located on the boot disk and is simple to use. If you want to format the first partition on the system, type FORMAT C: to start the process. You will be reminded that this procedure destroys any information currently on the drive and will be asked to verify your decision to format. After the format is complete, you can start the install process.
Windows NT/2000/XP allow you to format as part of the install, so no advance preparation with FDISK or FORMAT is necessary when installing those OSs.
Once Windows is up and running, you can format or reformat drives by using FORMAT from a command prompt or graphically through the Windows interface, which also allows formatting through the Explorer or the My Computer icon. Just right-click on a drive icon in My Computer and choose Format. If the drive icon does not appear in My Computer, it may need to be partitioned; only partitioned drives show up as icons there.
Working with the Filesystem
After you have created and formatted your partitions, you can put information onto them. Generally, the first information to be put onto the drive is placed there by the OS installation program. Once this is done and the system is up and running, you can perform additional modifications as needed. This section of the chapter deals with how users can access and work with the Windows filesystem-management tools.
The Windows filesystem is arranged like a filing cabinet. In a filing cabinet, paper is placed in folders, which are inside dividers, which are in a drawer. In the filesystem, individual files are placed in subdirectories, which are inside directories, which are stored on different disks. Windows also protects against duplicate filenames, because no two files on the system can have exactly the same name and path. A path indicates the location of the file on the disk; it is composed of the logical drive letter the file is on and, if the file is located in a directory or subdirectory, the names of those directories. For instance, a file named AUTOEXEC.BAT is located in the root of the C: drive—meaning it is not within a directory—so the path to the file is C:AUTOEXEC.BAT. Another important file, FDISK.EXE, is located in the COMMAND directory under Windows under the root of C:, so the path to FDISK is C:WINDOWSCOMMANDFDISK.EXE (Windows 9x only). The root of any drive is the place where the hierarchy of that drive begins. On a C: drive, for instance, C: is the root directory of the drive.
File Naming Conventions (Most Common Extensions)
First, let’s look at some of the basics. Windows filenames are used to identify particular application, configuration, or data files. Each file must have a unique name within the directory it is created in and must obey certain rules. The following characters are not allowed in filenames in Windows: / : * ? " | < >.
Besides the filename itself, each file can also have an optional filename extension, which is one or more characters long and allows Windows to identify the file as being of a certain type. Text files are given a .txt extension, batch files are given a .bat extension, and executable files are given an .exe extension. Each type of file is then handled differently when it is accessed. The behavior of a file with a particular extension is determined by a process called association.
When a file extension is associated with a particular filename, the association defines what application will open the file and what the file’s default actions are. To check on a file association, use Windows Explorer. Click Tools Folder Options and go to the File Types tab. From there you can view and modify the extensions for that computer. Table 7.2 shows some of the most common filename extensions.
|
Extension |
File Type |
|---|---|
|
.bat |
Batch files |
|
.bmp |
Bitmap graphic files |
|
.dll |
Dynamic Link Library code files |
|
.doc |
MS Word document files |
|
.exe |
Executable files |
|
.inf |
Setup information files |
|
.ini |
DOS/Windows 3.x application initialization files |
|
.sys |
System files |
|
.txt |
Text files |
|
.xls |
MS Excel spreadsheet files |
Although there are many different file types, each with its own extension, the OS breaks them into two essential categories: text and binary. A text file contains only ASCII text characters (letters, numbers, symbols); a binary file contains program instructions or a mixture of programming and text.
All Windows filenames share the elements we have looked at so far. There are, however, two very different naming schemes in Windows:
Short FilenamesThese filenames come out of the DOS legacy. Files that are created using the short 8.3 naming convention are allowed a name of only one to eight characters, with an optional extension of one to three characters. Although this system works fine, it does not allow for names that make a great deal of sense. These names are seldom used anymore; however, both DOS and Windows 3.1 used this naming convention, so the DOS prompt and any Windows 16-bit applications still are likely to use 8.3 naming. Short names do not allow blank spaces.
Long FilenamesBeginning with Windows 95, Microsoft expanded the namespace by allowing names of up to 256 characters (215 in Windows 2000). All newer MS OSs support long filenames, which do allow blank spaces in the name.
File Attributes
In addition to their names, files also have a series of attributes that you can attach to them to further identify or categorize them. In DOS, Windows 3.x, and Windows 9x, there are four such attributes; Windows NT/2000/XP add additional attributes through NTFS (on NTFS-formatted disks only). These attributes are listed here, along with their functions:
Read OnlyPrevents the file from being modified or deleted.
ArchiveTells the system whether the file has been modified since it was last backed up and allows the backup program to know which files to process in an incremental or differential backup.
SystemIdentifies the file as one needed by the system. You will be warned if you attempt to delete a file labeled as System.
HiddenIndicates system files that are hidden to prevent them from showing up in normal searches of the hard drive. To see a list of hidden files in a directory, type DIR /ah at the command prompt.
CompressSpecifies that the file is to be compressed when not in use. This saves space on the drive but slows access to the file (NTFS disks only).
IndexAllows the Index Service to add the file to its indexes. This increases the speed of any searches you do on the system (NTFS5 disks only).
EncryptSecures a file through an encryption algorithm. This makes it extremely difficult for anyone other than the user to access the file by encoding it using a public/private key technology (NTFS5 disks only).
The ATTRIB command can be used to set and remove the four base RASH attributes (Read Only, Archive, System, Hidden). Windows Explorer can be used to set any of the attributes that are available by viewing a file’s properties.
File Permissions
You can assign two kinds of permissions: sharing permissions and NTFS permissions.
Sharing permissions are in effect when someone accesses your computer from the network. They determine which drives and folders outsiders have access to, and whether they can make changes to those folders. You set up such permissions from the Sharing tab of the Properties box for a folder or drive. You cannot set sharing permissions for an individual file.
NTFS permissions are in effect at the local level, and are based on the user who is logged in. They are set on the Security tab of the Properties box for a folder, drive, or file. NTFS permissions can be set for individual files, although doing so is not recommended because of the potential administrative headaches.
Folders and Files
Now that you understand the basics of file naming and attributes, you also need to know how to view, create, and manage files and folders for the test. File management is the process by which a computer stores data and retrieves it from storage. The process of managing files is similar across all current Windows platforms. Most folder and file management is done through a tool called Windows Explorer.
| Warning |
Watch out for all the “Explorers” when you’re reading test questions. There are three different Explorers in Windows: Internet Explorer, Windows Explorer, and EXPLORER.EXE (the Windows shell program). Make sure you know which one the question is asking you about. |
Although it is technically possible to use the command-line utilities provided within the command prompt to manage your files, this is not the most efficient way to accomplish most tasks. The ability to use drag-and-drop techniques and other graphical tools to manage the filesystem makes the process far simpler. Windows Explorer is a utility that allows you to accomplish a number of important file-related tasks from a single graphical interface. Figure 7.7 shows the Windows Explorer interface for Windows XP; other versions are similar.
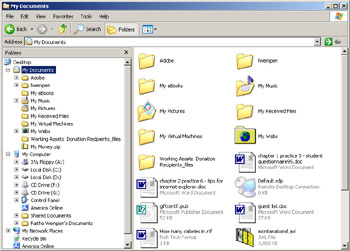
Figure 7.7: Windows Explorer (Windows XP version)
Using Windows Explorer is pretty simple. You need only a few basic instructions to start working with it. The Explorer interface has a number of parts, each of which serves a specific purpose. The top area of Explorer is dominated by a set of menus and toolbars that allow easy access to common commands. The main section of the window is divided into two panes: The left pane displays the drives and folders available to the user, and the right pane displays the contents of the currently selected folder. Along the bottom of the window, the status bar displays information about the used and free space on the current directory.
Some common actions in Explorer include the following:
Expanding a FolderYou can double-click a folder to expand it (show its subfolders in the left panel) and display its contents in the right pane. Clicking the plus sign (+) to the left of a folder expands the folder without changing it.
Collapsing a FolderClicking the minus sign (–) next to a folder collapses it.
Selecting a FileIf you click a file in the right pane, Windows highlights the file by marking it with a darker color.
Selecting Multiple FilesThe Ctrl and Shift keys allow you to select multiple files at once. Holding down Ctrl while clicking individual files selects each new file while leaving the currently selected file or files selected as well. Holding down Shift while selecting two files selects both of them and all files in between.
Opening a FileDouble-clicking a file in the right pane opens the program if it is an application; if it is a file, Explorer opens it using the file extension that is configured for it.
Changing the View TypeThere are four primary view types: Large Icons, Small Icons, List, and Details. You can move between these views by clicking the View menu and selecting the view you prefer.
Creating New ObjectsTo create a new file, folder, or other object, navigate to the location where you want to create the object, and then right-click in the right pane. In the menu that appears, select New and then choose the object you want to create.
Deleting ObjectsTo delete an object, select it and press the Delete key on the keyboard, or right-click the object and select Delete from the menu that appears. Doing so sends the file or folder to the Recycle Bin. To permanently delete the object, you must then empty the Recycle Bin. Alternatively, you can hold down Shift while deleting an object, and it will be permanently deleted immediately.
In addition to simplifying most file-management commands as shown here, Explorer also allows you to easily complete a number of disk-management tasks. You can format and label floppy disks, and copy the Windows system files to a floppy so that a disk may be used to boot a machine. Before you take the test, you should be extremely familiar with the Windows filesystem and how these tasks are accomplished.
| Note |
Labeling is an optional process of giving a name to a disk. You can label both hard drives and floppies. |
Exam Essentials
Be able to partition and format drives.You should be able to use both FDISK/FORMAT and Disk Management, as well as various versions of Windows Setup, to perform these tasks.
Know the filesystems.Make sure you can explain the differences between FAT16, FAT32, NTFS4, and NTFS5 and tell which OSs they are compatible with.
Know the file-naming conventions.Be able to explain the filename limitations for various OS versions.
Understand file attributes.You should be able to explain the major file attributes and how to set them.
Use Windows Explorer.This is somewhat of a no-brainer because it’s a basic end-user skill, but you should be thoroughly familiar with using Windows Explorer to manage files and folders.
Employing Major Operating System Utilities
This is a new objective, but its content is not new; it has been moved from other objectives. This objective covers a host of utility programs included in Windows that help technicians and experienced end-users manage their file storage.
Critical Information
The utilities covered under this objective can be organized into three categories: disk management, system management, and file management.
Disk Management Utilities
These utilities help you work with entire disks as a whole, or help you perform operations that can potentially affect an entire disk, such as backups and disk cleanup.
Disk Defragmenter (DEFRAG)
Disk Defragmenter reorganizes the file storage on a disk to reduce the number of files that are stored noncontiguously. This makes file retrieval faster, because the read/write heads on the disk have to move less.
There are two versions of Disk Defragmenter: a DOS version that comes on the startup floppy for Windows 9x and comes with MS-DOS, and a Windows version that runs from within Windows. The Windows version is located on the System Tools submenu on the Start menu.
The available switches for the DOS version (defrag.exe) include:
|
-a |
Analyze only |
|
-f |
Force defragmentation even if disk space is low |
|
-v |
Verbose output |
Fixed Disk Utility (FDISK)
This utility is only for MS-DOS and Windows 9x versions. It manages disk partitions (FAT and FAT32). It is located in the MSDOS folder under DOS, and on the startup floppy and in C:WindowsCommand for Windows 9x.
The switches are as follows:
|
/STATUS |
Displays partition information |
|
/S |
Ignores extended partition information |
Backup and Restore
Most versions of Windows come with a Backup program (Microsoft Backup). However, the Windows 95/98 utility was pretty rough, and bears little resemblance to the more robust backup utility in Windows 2000/XP.
You can access this utility from the System Tools menu, or from the Tools tab in a hard disk’s Properties box. Its purpose is to back up files in a compressed format, so the backups take up less space than the original files would if they were copied. To restore the backup, you must use the same utility again, but in Restore mode.
CHKDSK
CHKDSK is an old MS-DOS utility that predates ScanDisk. It’s used to correct logical errors in the FAT. The most common switch for CHKDSK is /F, which fixes the errors that it finds. Without /F, CHKDSK is an “information only” utility.
ScanDisk
ScanDisk is a graphical utility that does the same thing as CHKDSK, except that it also can check for physical errors in the storage media and relocate any readable data away from bad spots. There are two versions: a DOS version, which comes with MS-DOS 5.0 and higher and Windows 9x (used only at startup or from a startup floppy); and a 32-bit Windows version, found in Windows 9x (on the System Tools submenu).
The switches for the DOS version of ScanDisk include:
|
/ALL |
Checks and repairs all local drives |
|
/AUTOFIX |
Fixes damage without prompting |
|
/CHECKONLY |
Checks but does not repair |
|
/CUSTOM |
Configures and runs according to SCANDISK.INI settings |
|
/NOSAVE |
With /AUTOFIX, deletes lost clusters rather than saving them as files |
|
/NOSUMMARY |
With /CHECKONLY or /AUTOFIX, prevents Scandisk from stopping at summary screens |
|
/SURFACE |
Performs a surface scan after other checks |
|
/MONO |
Configures ScanDisk for use with a monochrome display |
Check Disk
Check Disk (not to be confused with CHKDSK) is a Windows NT/2000/XP graphical utility for doing basically the same thing as ScanDisk—finding and fixing logical errors in the FAT, and optionally also checking each sector of the disk physically and relocating any readable data from damaged spots.
Unlike ScanDisk, Check Disk is not a menu command on the Start menu. To run it, display the Properties box for a hard disk and then select Check Disk for Errors from the Tools tab.
Disk Cleanup
Disk Cleanup is a Windows-based utility found in versions 98 and higher; it helps the user recover disk space by offering to delete unneeded files. It can be run from the System Tools submenu. In some versions of Windows, it automatically runs (or offers to run) when free disk space gets low.
FORMAT
The FORMAT command can be used at a command prompt to format a disk. It is located in the C:WindowsCommand folder, but can be accessed from any prompt.
Its switches are as follows:
|
/V[:label] |
Specifies a volume label |
|
/Q |
Performs a quick format |
|
/F:size |
Specifies the formatted size; omit for default |
|
/B |
Allocates space on the formatted disk for system files to be added later |
|
/S |
Copies system files to the formatted disk |
|
/T:tracks |
Specifies the number of tracks per disk side |
|
/N:sectors |
Specifies the number of sectors per track |
|
/1 |
Formats a single side of a floppy disk |
|
/4 |
Formats a 5~QF~IN 360KB floppy disk |
|
/8 |
Formats eight sectors per track |
|
/C |
Tests clusters that are currently marked as bad |
You can also access a Windows-based Format utility by right-clicking a drive icon in Windows and selecting Format.
System Utilities
These utilities act upon the system in more ways than just disk storage. They affect the way Windows starts up, the way it runs, the way tasks are managed, the way events are logged, and so on.
Device Manager
Device Manager, which you will learn more about in objective 2.4 (Chapter 8), shows a list of all installed hardware and lets you add items, remove items, update drivers, and more. This is a Windows-only utility. In Windows 9x, it is a tab in the System Properties box. In Windows NT/2000/XP, you display the System Properties, click the Hardware tab, and then click the Device Manager button to display it.
Computer Management
The A+ objective lists this as Computer Manager, but the proper name for the utility is Computer Management. This utility, present in Windows NT/2000/XP, provides easy access to a variety of computer-management tools, including Disk Management (the tool for partitioning and formatting drives). Computer manager was not present in NT 4.0. To run Computer Management, go through Control Panel (Administrative Tools Computer Management).
System Configuration Editor (MSCONFIG)
This utility helps troubleshoot startup problems by allowing you to selectively disable individual items that normally are executed at startup. There is no menu command for this utility; you must run it with the Run command (on the Start menu). Choose Start Run and type MSCONFIG. It works in most versions of Windows, although the interface window is slightly different among versions.
Registry Editor (REGEDIT and REGEDT32)
Configuration information for Windows is stored in a special configuration database known as the Registry. This centralized database contains environmental settings for various Windows programs. It also contains what is known as registration information, which details the types of file extensions associated with applications. So, when you double-click a file in Windows Explorer, the associated application runs and opens the file you double-clicked.
The Registry Editor enables you to make changes to the large hierarchical database that contains all of Windows’ settings. These changes can potentially disable the entire system, so they should not be made lightly.
| Warning |
Changes made in the Registry Editor are implemented immediately; you do not have the opportunity to save or reject your changes. |
As with MSCONFIG, there is no menu command for the Registry Editor. You must run it with the Run command. REGEDIT is the name of the program.
In Windows NT 4.0 and 2000, there is a second Registry Editor program, called REGEDT32. This alternative program accesses the same Registry, but does it in a slightly different way; it shows each of the major key areas in a separate window.
| Note |
In Windows XP, the command REGEDT32 is still present, but running it launches REGEDIT; they have been rolled into a single utility. Windows 9x does not have a REGEDT32 command at all. |
System Editor (SYSEDIT)
System Editor is like Notepad except it automatically opens a separate pane for each of several important startup text files, such as AUTOEXEC.BAT, CONFIG.SYS, WIN.INI, and SYSTEM.INI. (Actually these are no longer important files, because they exist only for backward compatibility with MS-DOS and Windows 3.1, but they do still exist.) To run SYSEDIT, use the Run command on the Start menu. Depending on the Windows version, the files that it automatically opens may be slightly different.
Registry Scanner (SCANREG)
Windows 9x automatically makes backup copies of the two Registry files USER.DAT and SYSTEM.DAT. Each time Windows 9x restarts, your Registry is examined, and if problems are found, the backup copy of the Registry is located and is used to start Windows. The application used to do this is SCANREG.EXE. You can run this application separately from Windows if you want to verify the Registry at any time. SCANREG is great, as long as the automatic Registry backup is good. Just in case, though, it is always a good idea to back up the Registry files regularly. If both the current and backup copies of the Registry are corrupt, you can save a backup copy of the Registry files over the corrupt files and restart the system.
In Windows NT/2000, the situation is more complex. More files make up the Registry, and they are not backed up automatically. You can back up the Registry in NT/2000 using the Backup program or by creating an emergency repair disk (ERD). Note that when creating an ERD, you have to add the /s switch to back up the security information from the Registry. When the ERD is updated, the /REPAIR directory on the hard drive can also be updated with the same current configuration information that is written to the floppy disk.
Another option in all versions of Windows is to use REGEDIT or REGEDT32 to save the Registry out to a file, which can then be re-added later. This file can include all Registry information or only particular parts of the Registry’s hierarchy.
Command Prompt
To open a command prompt from within Windows 9x, use COMMAND. (Run it with the Run command.) To open a command prompt from within an NT-based Windows version (NT/2000/XP), use CMD instead.
Event Viewer
This utility provides information about what’s been going on system-wise, to help you troubleshoot problems. Event Viewer shows warnings, error messages, and records of things happening successfully. It’s found in NT versions of Windows only. You can access it through Computer Management, or you can access it directly from the Administrative Tools in Control Panel.
Task Manager
Task Manager shows running programs and the system resources they are consuming. It can be used for informational purposes, but it is most often used to shut down a nonresponsive application.
To display the Task Manager, press Ctrl+Alt+Delete. In Windows 9x, it appears immediately, under the guise of the Close Program box. In Windows NT/2000/XP, you must take one more step—click the Task Manager button.
A list of running tasks appears; you can click on one of them and then click End Task to shut it down. Because this shutdown method fails to close files gracefully, you should use it only as a last resort, not as a normal method of shutting down an application.
File Management Utilities
The utilities in this category are designed to help you work with individual files and folders.
EDIT
EDIT is the MS-DOS equivalent to Notepad in Windows. It is a plain text editor program that you might use when working at a command prompt. To run it, type EDIT at the command prompt.
|
/B |
Forces monochrome mode |
|
/H |
Displays the maximum number of lines possible for your hardware |
|
/R |
Loads the file(s) in read-only mode |
|
/S |
Forces the use of short filenames |
|
/<nnn> |
Loads binary file(s), wrapping lines to <nnn> characters wide |
|
[file] |
Specifies an initial file to load |
ATTRIB
This is the command-line utility for viewing, setting, and removing file attributes. You specify the attribute to remove or add, followed by the filename or wildcard specification. For example, ATTRIB +H Myfile.doc would apply the Hidden attribute to the Myfile.doc file.
The switches are as follows:
|
/S |
Processes all files in all the directories in the specified path |
|
+ |
Sets an attribute. Followed by R, A, S, or H |
|
- |
Removes an attribute. Followed by R, A, S, or H |
|
R |
Read-only |
|
A |
Archive |
|
S |
System |
|
H |
Hidden |
EXTRACT
This is a cabinet extraction tool. Its purpose is to extract one or more files from the compressed cabinet (CAB) archive files that Microsoft uses to ship the Windows software on the Setup CD. You can use this utility to replace a missing file in a Windows installation without having to completely reinstall Windows.
The syntax for the command is
EXTRACT x:pathcabinetfile x:pathfilename
Its switches are as follows:
|
/Y |
Does not prompt before overwriting an existing copy. |
|
/A |
Searches all CAB files in the specified location, starting with the one specified by the cabinetfile variable. |
|
/D |
Displays the cabinet directory. If you use this switch along with a filename, it displays the list only, and does not extract anything. |
|
/E |
Extract all. Can be used instead of *.* for the filename. |
|
/L dir |
Location to place the extracted files. The default is the current folder. |
You can also use EXTRACT to decompress a single compressed file on the Windows Setup CD. These are not CABs; they are just compressed files. They can be identified by the underscore character as the first letter in their file extension. The syntax is
EXTRACT /Y source [newname]
Windows Explorer
We discussed Windows Explorer earlier in this chapter; you should be familiar with its operation from your everyday usage of Windows.
Exam Essentials
Select the right utility for a scenario.The test is likely to provide you with a troubleshooting or management scenario and ask you to identify which utility you would use. Familiarize yourself with all the utilities presented in the objective list.
Know the tools available for maintaining the health of a filesystem.You need to know how and why you would use tools such as DEFRAG and SCANDISK.
Understand how the Registry works and how it is maintained.Know how REGEDIT and REGEDT32 work, and how the Registry is structured.
Review Questions
|
1. |
Which Windows versions do not support FAT32? |
|
|
2. |
With what Windows feature is a paging file associated? |
|
|
3. |
What is another name for the System Tray? |
|
|
4. |
To display a command-line interface in Windows XP, what would you execute from the Run command? |
|
|
5. |
Which Windows version uses USER.DAT and SYSTEM.DAT to hold the Registry settings? |
|
|
6. |
To select all files that have exactly four letters in their name and an extension that begins with D, what file specification would you use? |
|
|
7. |
Which type of disk must be partitioned prior to formatting? |
|
|
8. |
Which version of Windows supports NTFS encryption on NTFS5 drives? |
|
|
9. |
What utility in Windows 2000/XP takes the place of ScanDisk? |
|
|
10. |
Which Windows application most resembles the MS-DOS application EDIT? |
|

Answers
|
1. |
Windows 95a and Windows NT 4.0 do not support FAT32. |
|
2. |
Virtual memory creates a paging file, or swap file, and then moves data into and out of RAM to it. |
|
3. |
Microsoft uses the terms System Tray and notification area roughly synonymously to refer to the area where the clock and the icons for running background programs appear. |
|
4. |
In Windows NT/2000/XP you use CMD. COMMAND is used in 9x versions. |
|
5. |
Windows 95/98/Me use USER.DAT and SYSTEM.DAT. NT-based versions of Windows use SAM, SECURITY, SOFTWARE, SYSTEM, and DEFAULT. |
|
6. |
You would use ????.D*. The four letters in the name are represented by ????. The extension D* refers to any extension as long as it begins with D. |
|
7. |
Hard disks must be partitioned; removable disks such as CDs and floppy do not need this step. |
|
8. |
NTFS5 is used only with Windows 2000/XP. |
|
9. |
Check Disk is the equivalent of ScanDisk in NT-based versions of Windows. |
|
10. |
EDIT is a plain-text editor, so is the answer is Notepad. |
Part I - A+: Core Hardware Service Technician Exam
- Domain 1 Installation, Configuration, and Upgrading
- Domain 2 Diagnosing and Troubleshooting
- Domain 3 Preventive Maintenance
- Domain 4 Motherboard/Processors/Memory
- Domain 5 Printers
- Domain 6 Basic Networking
Part II - A+ Operating System Technologies Exam
