Configuration Steps
The configuration of a site-to-site IPSec tunnel is broken down into 10 steps:
|
Step 1. |
Enable ISAKMP. |
|
Step 2. |
Create ISAKMP policy. |
|
Step 3. |
Set the tunnel type. |
|
Step 4. |
Configure preshared keys. |
|
Step 5. |
Define the IPSec policy. |
|
Step 6. |
Specify interesting traffic. |
|
Step 7. |
Configure the crypto map. |
|
Step 8. |
Apply the crypto map to the interface. |
|
Step 9. |
Configure traffic filtering. |
|
Step 10. |
Bypass NAT (optional). |
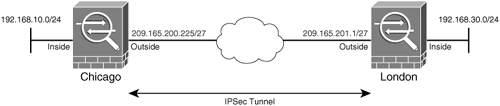
Figure 15-1 illustrates a network topology for SecureMe, Inc. It has two locationsone in Chicago and one in London. We will use its Chicago ASA device to demonstrate how it can be configured for a site-to-site tunnel.
Figure 15-1. Network Topology for SecureMe, Inc.
Step 1: Enable ISAKMP
IKE Phase 1 configuration starts by enabling ISAKMP on the interface that terminates the VPN tunnels. Typically, it is enabled on the Internet-facing or the outside interface. The command syntax to enable ISAKMP on an interface is
isakmp enable interface-name
Example 15-1 shows ISAKMP is enabled on the outside interface that is setup to terminate the VPN tunnels.
Example 15-1. Enabling ISAKMP on the Outside Interface
Chicago# configure terminal

Chicago(config)# isakmp enable outside
Note
IPSec VPN functionality is not available if the Cisco ASA is deployed in multiple mode. If site-to-site tunnels are required, then the Cisco ASA has to be set up in single mode. This functionality is considered for the future releases.
There are certain limitations on Cisco ASA's VPN feature, if it is deployed in transparent mode. Review Chapter 10, "Transparent Firewalls," for additional details.
Step 2: Create the ISAKMP Policy
After you enable ISAKMP on the interface, the next step is to create a Phase 1 policy that matches the other end of the VPN connection. The isakmp policy command accomplishes this task. Refer to the previous "Preconfiguration Checklist" section for a list of all the available options in Cisco ASA. The complete command syntax of isakmp policy is as follows:
isakmp policy priority authentication {dsa-sig | pre-share | rsa-sig}

isakmp policy priority encryption {3des | aes | aes-192 | aes-256 | des}

isakmp policy priority group {1 | 2 | 5 | 7}

isakmp policy priority hash {md5 | sha}

isakmp policy priority lifetime {120-2147483647}
If multiple ISAKMP policies are configured, the Cisco ASA checks the ISAKMP policy with the highest priority first. If there is no match, it checks the policy with the next higher priority, and so on until all policies have been evaluated. A priority value of 1 is the highest priority, while a priority value of 65535 is the lowest.
Note
If one of the ISAKMP attributes is not configured, the security Cisco ASA adds that attribute with its default value. Consult Table 15-1 for the ISAKMP attributes and the default values.
Example 15-2 illustrates how to configure an ISAKMP policy for AES-256 encryption, MD5 hashing, DH group 5, and preshared keys authentication with 28,800 seconds as the lifetime.
Example 15-2. Creating an ISAKMP Policy
Chicago# configure terminal

Chicago(config)# isakmp policy 10 authentication pre-share

Chicago(config)# isakmp policy 10 encryption aes-256

Chicago(config)# isakmp policy 10 hash md5

Chicago(config)# isakmp policy 10 group 5

Chicago(config)# isakmp policy 10 lifetime 28800
Note
If the VPN-3DES-AES feature is not enabled, the security Cisco ASA only allows DES encryption for the ISAKMP and IPSec policies.
Step 3: Set the Tunnel Type
An IPSec tunnel can be configured for two different types:
- Remote access
- Site to site
The remote-access tunnel type is used for Cisco IPSec VPN client, discussed in Chapter 16, "Remote Access VPNs." The following command sets up a tunnel type on the security Cisco ASA:
tunnel-group tunnel-group-name typetunnel_type
For a site-to-site connection, the tunnel type is set to ipsec-l2l, whereas the tunnel-group-name is the IP address of the peer. The tunnel group creates and manages a database of the static site-to-site tunnels and the remote-access groups.
Example 15-3 illustrates how to configure a site-to-site tunnel on the Cisco ASA if the peer's public IP address is 209.165.201.1.
Example 15-3. Tunnel Group Definition
Chicago(config)# tunnel-group 209.165.201.1 type ipsec-l2l
If a site-to-site tunnel is initiated by an IPSec device whose IP address is not defined as the tunnel group, then the security Cisco ASA tries to map the remote device to the default site-to-site group called DefaultL2LGroup, given that the preshared key between the two devices matches. DefaultL2LGroup does not appear in the configuration unless the default attributes within that tunnel-group are modified.
Note
The concept of tunnel group is taken from the VPN 3000 Series Concentrators.
Step 4: Configure ISAKMP Preshared Keys
If the ISAKMP policy is set up to use preshared keys as the authentication method, then a preshared key must be configured under the ipsec-attributes submenu of the tunnel-group command. The command syntax to map IPSec attributes to a peer is
tunnel-group tunnel-group-name ipsec-attributes
This takes you into an ipsec-attributes subconfiguration menu, where you can specify the key. Use the following command to set up a preshared key:
pre-shared-key preshared-key
As shown in Example 15-4, the Cisco ASA in Chicago is configured for a preshared key of cisco123 for the peer 209.165.201.1.
Example 15-4. Preshared Key Configuration
Chicago(config)# tunnel-group 209.165.201.1 ipsec-attributes

Chicago(config-ipsec)# pre-shared-key cisco123
Step 5: Define the IPSec Policy
An IPSec transform set specifies what type of encryption and hashing to use on the data packets after the tunnel is established. The IPSec transform set is negotiated during quick mode. To configure the transform set, use the following command syntax:
crypto ipsec transform-set transform-set-name {esp-3des | esp-aes | esp-aes-192 | esp-

aes-256 | esp-des | esp-md5-hmac | esp-null | esp-sha-hmac}
Table 15-3 lists the encryption and hashing algorithms that can be used in a transform set.
|
Type |
Available Options |
Default Option |
|---|---|---|
|
Encryption |
esp-3des esp-aes esp-aes-192 esp-aes-256 esp-des esp-null |
esp-3DES, or esp-des if 3DES, feature is not active |
|
Hashing |
esp-md5-hmac esp-sha-hmac esp-none |
esp-none |
Note
If the VPN-3DES-AES feature is not enabled, the security Cisco ASA allows DES encryption only for ISAKMP and IPSec policies.
If an IPSec policy is set up with a transform set to use an encryption algorithm such as esp-aes encryption, the security Cisco ASA adds esp-none as a default option for hashing. Additionally, if hashing is specified without an encryption algorithm, the Cisco ASA adds esp-3des as the default encryption algorithm. Example 15-5 shows that the Cisco ASA has been configured for AES-256 encryption and SHA hashing for data packets. The transform-set name is myset.
Example 15-5. Transform-Set Configuration
Chicago(config)# crypto ipsec transform-set myset esp-aes-256 esp-sha-hmac
Note
Cisco ASA supports only ESP as the encapsulation protocol. The support for AH currently is not planned.
Step 6: Specify Interesting Traffic
Cisco ASA uses an access control list (ACL) to define interesting traffic that it needs to encrypt. When a packet enters the security Cisco ASA, it gets routed based on the destination IP address. When it leaves the interface, which is set up for a site-to-site tunnel, the encryption engine intercepts that packet and matches it against the crypto access control entries (ACEs) to determine if it needs to be encrypted. If a match is found, the packet is encrypted and then sent out to the VPN peer.
An ACL can be as simple as permitting all IP traffic from one network to another or as complicated as permitting traffic originating from a unique source IP address on a particular port destined to a specific port on the destination address.
Note
Deploying complicated crypto ACLs using TCP or UDP ports is not recommended. Many IPSec devices do not support port-level crypto ACLs.
The command syntax for creating a crypto access list is as follows:
access-list id [line line-num] [extended] {deny | permit}{protocol | object-group

 protocol_obj_grp_id {source_addr source_mask} | object-group network_obj_grp_id |

 host src_host_addr [operator port [port] | object-group service_obj_grp_id]

 {destination_addr destination_mask} | object-group network_obj_grp_id | host

 dst_host_addr [operator port [port] | object-group service_obj_grp_id]}
For more details on the arguments used in an access control entry (ACE), consult Table 5-2 in Chapter 5, "Network Access Control."
Access lists also perform a security check for the inbound encrypted traffic. If a clear-text packet matches one of the crypto ACEs, the security Cisco ASA drops that packet and generates a syslog message indicating this incident.
Note
Each ACE creates two unidirectional IPSec SAs. If you have 100 entries in your ACL, then the ASA will create 200 IPSec SAs. Using host-based crypto ACEs is not recommended because Cisco ASA uses system resources to maintain the SAs which may affect system performance.
As shown in Example 15-6, the Chicago ASA is set up to protect all IP traffic sourced from 192.168.10.0 with a mask of 255.255.255.0 and destined to 192.168.30.0 with a mask of 255.255.255.0. The ACL name is encrypt-acl.
Example 15-6. Encryption ACL
Chicago# configure terminal

Chicago(config)# access-list encrypt-acl extended permit ip 192.168.10.0

 255.255.255.0 192.168.30.0 255.255.255.0
The security Cisco ASA does not allow access to the inside interface if the traffic is coming over the VPN tunnel. This is true even if the inside network is included in the encryption ACL. You can enable management on the inside interface for the VPN traffic by using the management-access command followed by the name of the interface. Management applications such as SNMP polls, HTTPS requests, ASDM access, Telnet access, SSH access, ping, syslog polls, and NTP requests are allowed when management-access is enabled. In Example 15-7, the inside interface is being set up for management access.
Example 15-7. Management Access on the Inside Interface
Chicago(config)# management-access inside
Note
You can make only one interface as the management-access interface.
Step 7: Configure a Crypto Map
Once you have configured both Phase 1 and Phase 2 policies, the next step is to create a crypto map to use these policies. A crypto map is considered complete when it has the following parameters:
- At least one transform set
- At least one VPN peer
- A crypto ACL
The command syntax to configure a crypto map is
crypto map map-name seq-num set transform-set transform-set-name1

 [... transform-set-name9]

crypto map map-name seq-num set peer {ip_address | hostname} [..{ip_address10|

 hostname10}]

crypto mapmap-name seq-num match address acl_name
Table 15-4 lists and defines the arguments used in a crypto map.
|
Syntax |
Syntax Description |
|---|---|
|
map-name |
Alphanumeric name of this crypto map. |
|
seq-num |
The number you assign to the crypto map entry. It can range from 1 to 65,535. The crypto map with the lowest sequence number is checked first. |
|
set transform-set |
Used to specify which transform sets can be used with the crypto map entry. |
|
transform-set-name1 |
Name of the transform set. You can specify up to nine transform sets in a single crypto map instance. |
|
set peer |
Used to specify an IPSec peer in a crypto map entry. |
|
ip_address |
Used to specify a peer by its IP address. You can have up to ten peers if the connection type is set as originate-only. Connection types are discussed later in this chapter. |
|
hostname |
Used to specify a peer by its host name as defined by the ASA's name command. |
|
match address |
Used to specify an access list for a crypto map entry. |
|
acl_name |
Alphanumeric name of the encryption ACL. |
Example 15-8 shows crypto map configuration on the Chicago ASA. The crypto map name is IPsec_map and the sequence number used is 10.
Example 15-8. Crypto Map Configuration
Chicago# configure terminal

Chicago(config)# crypto map IPsec_map 10 set peer 209.165.201.1

Chicago(config)# crypto map IPsec_map 10 set transform-set myset

Chicago(config)# crypto map IPsec_map 10 match address encrypt-acl
The crypto map sequence number is used to define multiple IPSec tunnels destined to different peers. If the security Cisco ASA terminates an IPSec tunnel from another VPN peer, the second VPN tunnel can be defined using the existing crypto map name with a different sequence number. Each sequence number uniquely identifies a site-to-site tunnel. However, the security Cisco ASA evaluates the site-to-site tunnel with the lowest sequences number first.
Note
Cisco ASA does not support manual keying for IPSec tunnels. Manual keying is vulnerable to security flaws because the VPN peers always use the same encryption and authentication keys.
Step 8: Apply the Crypto Map to an Interface
After successfully configuring a crypto map, the final step is to bind it to an interface. Typically, it is applied to the Internet-facing interface that terminates the VPN connections. The command syntax is as follows:
crypto map map-name interface interface-name
Cisco ASA limits applying more than one crypto map per interface. If there is a need to configure multiple site-to-site tunnels, use the same crypto map name with different sequence numbers. Please consult deployment scenario 2 "fully meshed topology with RRI" for an example of multiple crypto map sequence numbers.
Example 15-9 shows how a crypto map is applied to the outside interface.
Example 15-9. Applying a Crypto Map on the Outside Interface
Chicago# configure terminal

Chicago(config)# crypto map IPsec_map interface outside
Step 9: Configuring Traffic Filtering
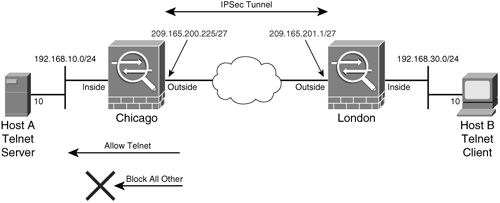
Like a traditional firewall, the Cisco ASA protects the trusted network from outside traffic, unless the ACLs explicitly permit traffic to pass through it. The same concept is applied when the packets are decrypted by the IPSec engine. If there are no permits in the outside interface access list, the security Cisco ASA drops the decrypted packets as its default behavior. In Figure 15-2, Host B is only allowed to send traffic to Host A, located across the VPN tunnel, on TCP port 23. The Chicago ASA has an inbound access list called outside_acl applied to its outside interface, illustrated in Example 15-10.
Figure 15-2. Filtering Traffic Across a VPN Tunnel
Example 15-10. Access List to Allow Decrypted Traffic to Pass Through the ASA
Chicago(config)# access-list outside_acl extended permit tcp host 192.168.30.10 host

 192.168.10.10 eq 23

Chicago(config)# access-group outside_acl in interface outside
In most VPN implementations, the remote private network is completely trusted, and it becomes cumbersome to create multiple entries in the outside interface ACL to allow the decrypted IPSec traffic. For the ease of configuration, Cisco ASA allows you to configure an IPSec sysopt, which permits all decrypted IPSec packets to go through it without inspecting them against the interface ACL. Example 15-11 illustrates that Chicago ASA is allowing all decrypted traffic by configuring the IPSec sysopt.
Example 15-11. Sysopt Configuration to Bypass Traffic Filtering
Chicago(config)# sysopt connection permit-ipsec
Note
The sysopt connection permit-ipsec command is a global command. If enabled, the security Cisco ASA bypasses the ACL check for all the IPSec tunnels.
Step 10: Bypassing NAT (Optional)
In most cases, you do not want to change the IP addresses for the traffic going over the tunnel. If NAT is configured on the security Cisco ASA to change the source or destination IP addresses, you can set up the NAT exempt rules to bypass address translation, as discussed in Chapter 5.
You need to create an ACL to specify what traffic needs to be bypassed by the NAT engine. Example 15-12 shows an access list, named nonat, to match the VPN traffic from 192.168.10.0/24 to 192.168.30.0/24.
Example 15-12. Access List to Bypass NAT
Chicago(config)# access-list nonat extended permit ip 192.168.10.0 255.255.255.0

 192.168.30.0 255.255.255.0
Once the access list is defined, the next step is to configure the nat 0 command. Example 15-13 demonstrates how to configure nat 0 statement if the protected private LAN is toward the inside interface.
Example 15-13. Configutration of nat 0 ACL
Chicago(config)# nat (inside) 0 access-list nonat
Example 15-14 shows a complete IPSec site-to-site configuration on the Chicago ASA for peer 209.165.201.1.
Example 15-14. Complete Site-to-Site IPSec Configuration
access-list encrypt-acl extended permit ip 192.168.10.0 255.255.255.0 192.168.30.0

 255.255.255.0

access-list nonat extended permit ip 192.168.10.0 255.255.255.0 192.168.30.0

 255.255.255.0

nat (inside) 0 access-list nonat

crypto ipsec transform-set myset esp-aes-256 esp-sha-hmac

crypto map IPSec_map 10 match address encrypt-acl

crypto map IPSec_map 10 set peer 209.165.201.1

crypto map IPSec_map 10 set transform-set myset

crypto map IPSec_map interface outside

isakmp enable outside

isakmp policy 10 authentication pre-share

isakmp policy 10 encryption aes-256

isakmp policy 10 hash sha

isakmp policy 10 group 2

isakmp policy 10 lifetime 28800

tunnel-group 209.165.201.1 type ipsec-l2l

tunnel-group 209.165.201.1 ipsec-attributes

 pre-shared-key cisco123

sysopt connection permit-ipsec
Part I: Product Overview
Introduction to Network Security
- Introduction to Network Security
- Firewall Technologies
- Intrusion Detection and Prevention Technologies
- Network-Based Attacks
- Virtual Private Networks
- Summary
Product History
- Product History
- Cisco Firewall Products
- Cisco IDS Products
- Cisco VPN Products
- Cisco ASA All-in-One Solution
- Summary
Hardware Overview
Part II: Firewall Solution
Initial Setup and System Maintenance
- Initial Setup and System Maintenance
- Accessing the Cisco ASA Appliances
- Managing Licenses
- Initial Setup
- IP Version 6
- Setting Up the System Clock
- Configuration Management
- Remote System Management
- System Maintenance
- System Monitoring
- Summary
Network Access Control
- Network Access Control
- Packet Filtering
- Advanced ACL Features
- Content and URL Filtering
- Deployment Scenarios Using ACLs
- Monitoring Network Access Control
- Understanding Address Translation
- DNS Doctoring
- Monitoring Address Translations
- Summary
IP Routing
Authentication, Authorization, and Accounting (AAA)
- Authentication, Authorization, and Accounting (AAA)
- AAA Protocols and Services Supported by Cisco ASA
- Defining an Authentication Server
- Configuring Authentication of Administrative Sessions
- Authenticating Firewall Sessions (Cut-Through Proxy Feature)
- Configuring Authorization
- Configuring Accounting
- Deployment Scenarios
- Troubleshooting AAA
- Summary
Application Inspection
- Application Inspection
- Enabling Application Inspection Using the Modular Policy Framework
- Selective Inspection
- Computer Telephony Interface Quick Buffer Encoding Inspection
- Domain Name System
- Extended Simple Mail Transfer Protocol
- File Transfer Protocol
- General Packet Radio Service Tunneling Protocol
- H.323
- HTTP
- ICMP
- ILS
- MGCP
- NetBIOS
- PPTP
- Sun RPC
- RSH
- RTSP
- SIP
- Skinny
- SNMP
- SQL*Net
- TFTP
- XDMCP
- Deployment Scenarios
- Summary
Security Contexts
- Security Contexts
- Architectural Overview
- Configuration of Security Contexts
- Deployment Scenarios
- Monitoring and Troubleshooting the Security Contexts
- Summary
Transparent Firewalls
- Transparent Firewalls
- Architectural Overview
- Transparent Firewalls and VPNs
- Configuration of Transparent Firewall
- Deployment Scenarios
- Monitoring and Troubleshooting the Transparent Firewall
- Summary
Failover and Redundancy
- Failover and Redundancy
- Architectural Overview
- Failover Configuration
- Deployment Scenarios
- Monitoring and Troubleshooting Failovers
- Summary
Quality of Service
- Quality of Service
- Architectural Overview
- Configuring Quality of Service
- QoS Deployment Scenarios
- Monitoring QoS
- Summary
Part III: Intrusion Prevention System (IPS) Solution
Intrusion Prevention System Integration
- Intrusion Prevention System Integration
- Adaptive Inspection Prevention Security Services Module Overview (AIP-SSM)
- Directing Traffic to the AIP-SSM
- AIP-SSM Module Software Recovery
- Additional IPS Features
- Summary
Configuring and Troubleshooting Cisco IPS Software via CLI
- Configuring and Troubleshooting Cisco IPS Software via CLI
- Cisco IPS Software Architecture
- Introduction to the CIPS 5.x Command-Line Interface
- User Administration
- AIP-SSM Maintenance
- Advanced Features and Configuration
- Summary
Part IV: Virtual Private Network (VPN) Solution
Site-to-Site IPSec VPNs
- Site-to-Site IPSec VPNs
- Preconfiguration Checklist
- Configuration Steps
- Advanced Features
- Optional Commands
- Deployment Scenarios
- Monitoring and Troubleshooting Site-to-Site IPSec VPNs
- Summary
Remote Access VPN
- Remote Access VPN
- Cisco IPSec Remote Access VPN Solution
- Advanced Cisco IPSec VPN Features
- Deployment Scenarios of Cisco IPSec VPN
- Monitoring and Troubleshooting Cisco Remote Access VPN
- Cisco WebVPN Solution
- Advanced WebVPN Features
- Deployment Scenarios of WebVPN
- Monitoring and Troubleshooting WebVPN
- Summary
Public Key Infrastructure (PKI)
- Public Key Infrastructure (PKI)
- Introduction to PKI
- Enrolling the Cisco ASA to a CA Using SCEP
- Manual (Cut-and-Paste) Enrollment
- Configuring CRL Options
- Configuring IPSec Site-to-Site Tunnels Using Certificates
- Configuring the Cisco ASA to Accept Remote-Access VPN Clients Using Certificates
- Troubleshooting PKI
- Summary
Part V: Adaptive Security Device Manager
Introduction to ASDM
- Introduction to ASDM
- Setting Up ASDM
- Initial Setup
- Functional Screens
- Interface Management
- System Clock
- Configuration Management
- Remote System Management
- System Maintenance
- System Monitoring
- Summary
Firewall Management Using ASDM
- Firewall Management Using ASDM
- Access Control Lists
- Address Translation
- Routing Protocols
- AAA
- Application Inspection
- Security Contexts
- Transparent Firewalls
- Failover
- QoS
- Summary
IPS Management Using ASDM
- IPS Management Using ASDM
- Accessing the IPS Device Management Console from ASDM
- Configuring Basic AIP-SSM Settings
- Advanced IPS Configuration and Monitoring Using ASDM
- Summary
VPN Management Using ASDM
- VPN Management Using ASDM
- Site-to-Site VPN Setup Using Preshared Keys
- Site-to-Site VPN Setup Using PKI
- Cisco Remote-Access IPSec VPN Setup
- WebVPN
- VPN Monitoring
- Summary
Case Studies
EAN: 2147483647
Pages: 231
