WebVPN
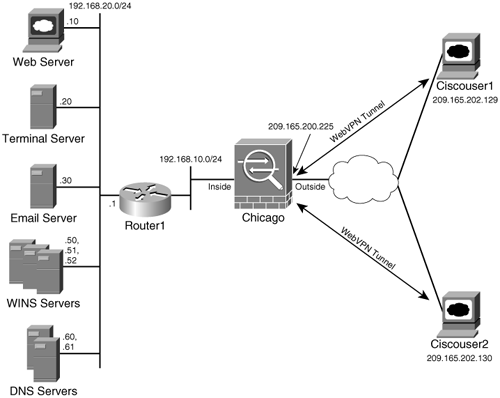
As discussed in Chapter 16, "Remote Access VPNs," Cisco ASA allows mobile and home users to create a secure WebVPN tunnel to access corporate resources. ASDM allows you to configure and customize the WebVPN service. In this section, Figure 21-32 is used as a reference topology in which a Cisco ASA is being set up to accept the WebVPN connections on the outside interface from the web clients. The inside interface of Cisco ASA in Chicago is directly connected to the 192.168.10.0/24 subnet, while another inside network, 192.168.20.0/24, is behind Router1. The public interface's IP address is 209.165.200.225/27, and the default route sends all traffic to the next-hop router toward the Internet.
Figure 21-32. WebVPN Topology
By setting up WebVPN, SecureMe wants to accomplish the following:
- Customize the WebVPN page and include SecureMe's name and logo.
- Allow access to a web server behind Cisco ASA at 192.168.20.10.
- Allow access to a Telnet server located at 192.168.20.20.
- Allow access to an e-mail server running the IMAP, POP3, and SMTP services. The server is located at 192.168.20.30.
- Set up DNS and WINS servers to permit access to the inside hosts by the domain and NetBIOS names.
The following steps guide you through configuring the ASA to meet the preceding objectives:
|
Step 1. |
Enable WebVPN. Figure 21-33. Enabling WebVPN 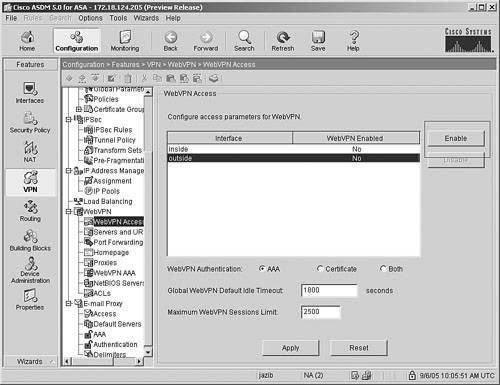
Note ASDM and WebVPN are not supported on the same interface. |
|
Step 2. |
Customize the look and feel. Figure 21-34. Customizing Look and Feel 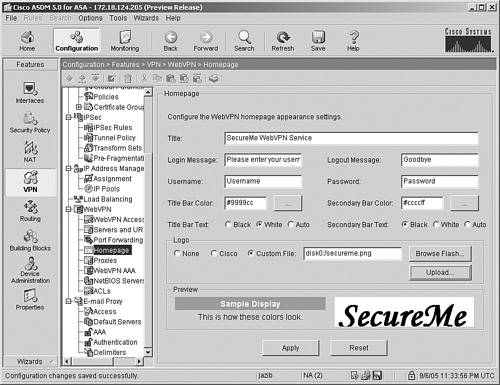
|
|
Step 3. |
Set up WebVPN group attributes. Figure 21-35. Creating a Group Policy 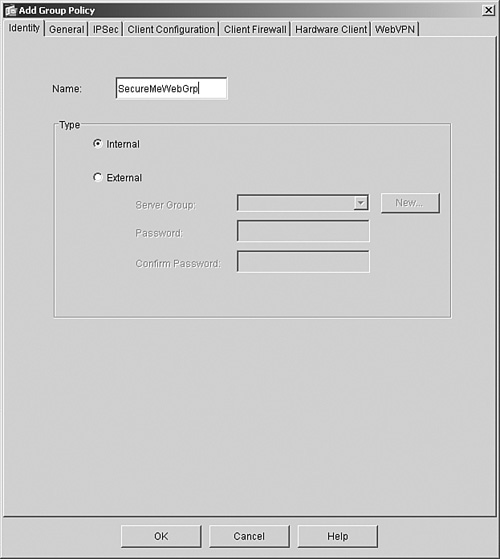
By default, a new group policy inherits all values from the default group policy, which allows both IPSec and WebVPN as the tunneling protocols. In Figure 21-36, the administrator has disabled policy inheritance for tunneling protocols and has selected WebVPN as the tunneling protocol under the General tab. Figure 21-36. Selecting WebVPN as the Tunneling Protocol 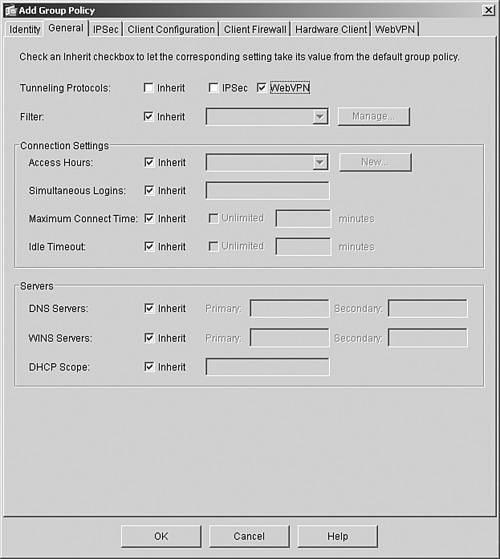
ASDM can restrict users to use certain functions such as port forwarding and Windows file browsing. These functions can be enabled under the WebVPN tab, as shown in Figure 21-37. Figure 21-37. Setting Up WebVPN Functions 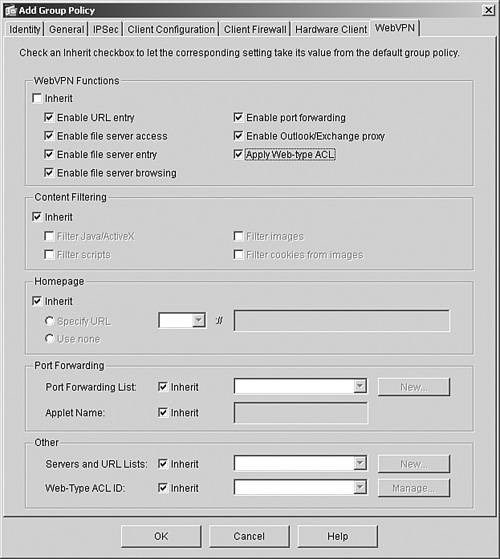
|
|
Step 4. |
Set up URL mangling. Figure 21-38. Creating a URL List 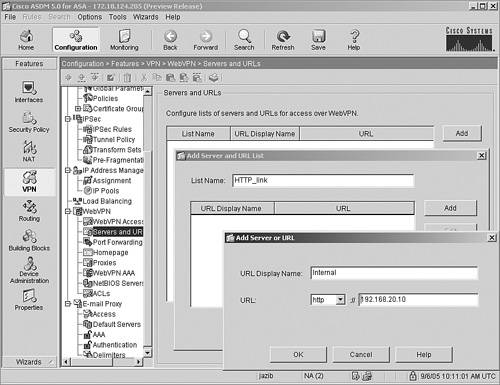
After you create a list, you map it to a group policy under the WebVPN tab, as shown in Figure 21-39. Click OK to submit these changes. Figure 21-39. Applying the URL List 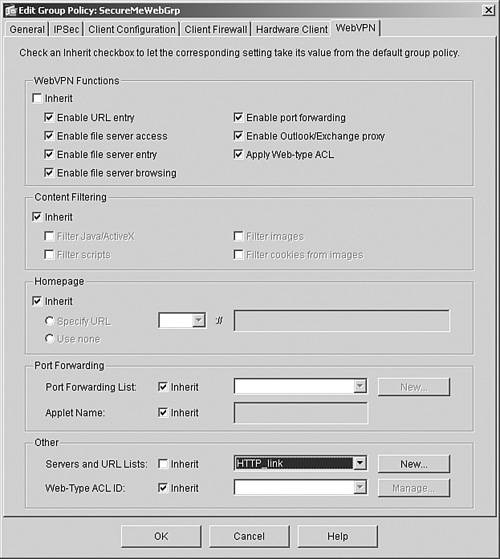
|
|
Step 5. |
Configure port forwarding. Figure 21-40. Creating a Port-Forwarding List 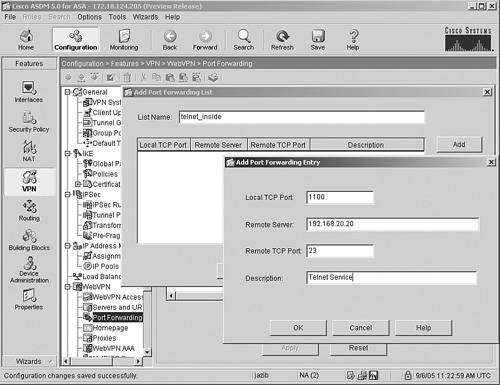
After you create a port-forwarding list, you apply it to the group policy, as shown in Figure 21-41. Click the WebVPN tab and select the list from the drop-down menu under Port Forwarding. Figure 21-41. Applying a Port-Forwarding List 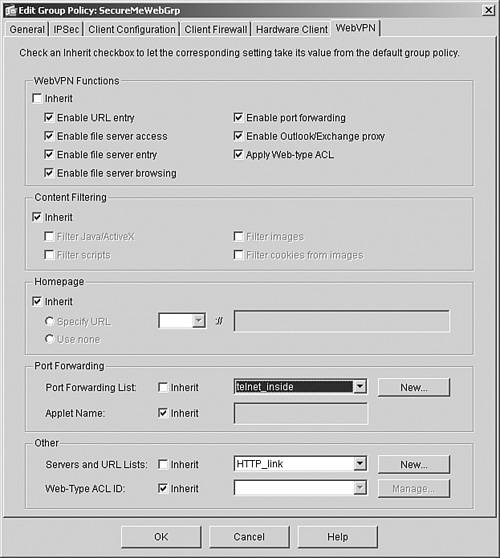
|
|
Step 6. |
Specify WINS and DNS servers. Figure 21-42. Setting Up WINS Servers 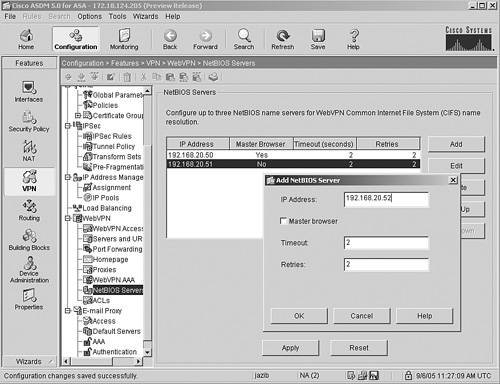
DNS servers resolve the domain names of the network devices to their configured IP addresses. To specify DNS servers, choose Configuration > Features > Properties > DNS Client. Cisco ASA allows up to six DNS server for name resolution. You have to instruct Cisco ASA which interface to use to send the DNS requests. Figure 21-43 illustrates that two DNS servers, located at 192.168.20.60 and 192.168.20.61, are set up for name resolution on the inside interface. You click Apply to submit the changes to Cisco ASA. Figure 21-43. Setting Up DNS Servers 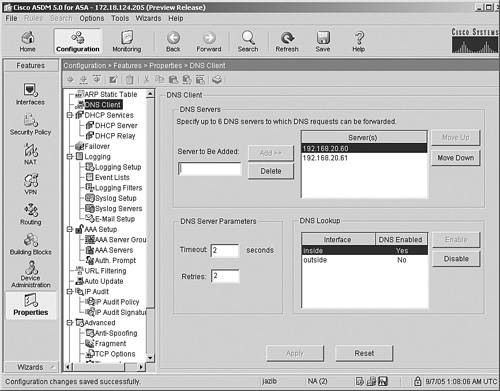
|
|
Step 7. |
Configure e-mail proxy functionality. Figure 21-44. Enabling E-Mail Proxy 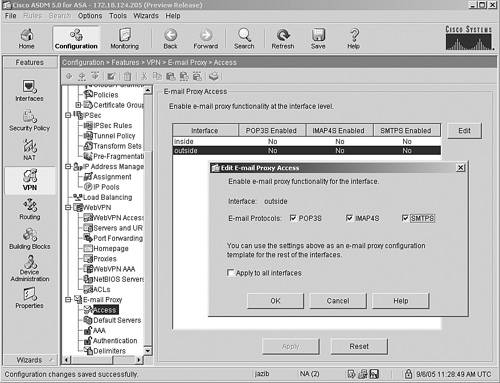
Cisco ASA needs to know where the e-mail server(s) resides. To specify the host name or the IP addresses of the servers, choose Configuration > Features > VPN > E-mail Proxy > Default Servers. Figure 21-45 illustrates that Cisco ASA is being configured for secureme-email as the POP3S, IMAPS, and SMTPS servers using the default TCP ports of 995, 993, and 988, respectively. The DNS server resolves secureme-email as 192.168.20.30. Figure 21-45. Setting Up the E-Mail Proxy Servers 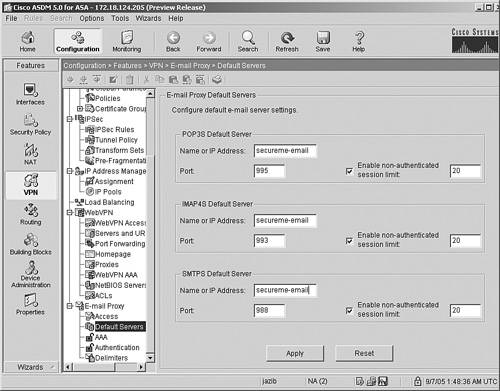
|
Cisco ASA allows the use of three different types of authentication:
- AAA
- Piggyback HTTPS
- Certificate
E-mail authentication methods are configured under Configuration > Features > VPN > E-mail Proxy > Authentication. In Figure 21-46, Cisco ASA is being configured to use AAA authentication for all three supported e-mail protocols.
Figure 21-46. E-Mail Proxy Authentication

Because AAA has been selected as the authentication method, ASDM needs to map an authentication server to the e-mail protocol. In Figure 21-47, a predefined authentication group called Rad, which is using RADIUS authentication, is linked to the protocols. A group policy, called SecureMeWebGrp, is also applied to the e-mail users when they establish a connection using any one of the three e-mail protocols.
Figure 21-47. E-Mail Proxy AAA Servers
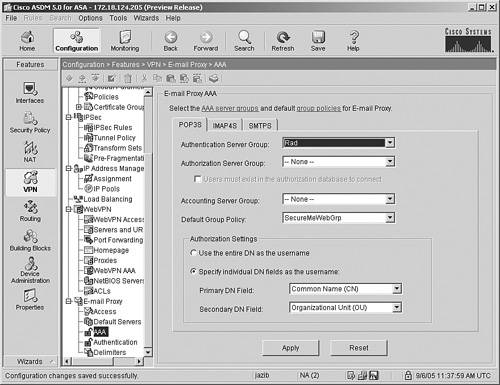
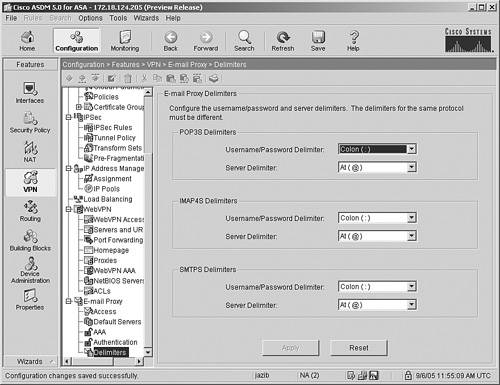
Figure 21-48 shows the username and server delimiters for the three supported e-mail protocols, which are set to their default values of colon (:) and at (@), respectively.
Figure 21-48. E-Mail Proxy Delimiters
Example 21-3 shows the complete WebVPN configuration generated by ASDM.
Example 21-3. Complete WebVPN Configuration Created by ASDM
!DNS server configuration for hostname resolution

dns domain-lookup inside

dns name-server 192.168.20.60

dns name-server 192.168.20.61

!URL-List for URL-Mangling

url-list HTTP_link "Internal" http://192.168.20.10

!Port-forward List for Port Forwarding

port-forward telnet_inside 1100 192.168.20.20 telnet Telnet Service

!AAA server configuration for Email Proxy authentication

aaa-server Rad protocol radius

aaa-server Rad host 192.168.20.40

 key cisco123

!Group-policy configuration for WebVPN users

group-policy SecureMeWebGrp internal

group-policy SecureMeWebGrp attributes

!Allowed tunneling protocol is WebVPN

 vpn-tunnel-protocol webvpn

 webvpn

!Allowed functions for WebVPN

 functions url-entry file-access file-entry file-browsing mapi port-forward filter

!URL-List is applied to the group-policy

 url-list value HTTP_link

!Port-forward List is applied to the group-policy

 port-forward value telnet_inside

!WebVPN global configuration

webvpn

!WebVPN is enabled on the outside interface

 enable outside

!WebVPN homepage title and logo are modified

 title SecureMe WebVPN Service

 logo file disk0:/secureme.png

!WINS servers are setup for NetBIOS name resolution

nbns-server 192.168.20.50 master timeout 2 retry 2

nbns-server 192.168.20.51 timeout 2 retry 2

nbns-server 192.168.50.52 timeout 2 retry 2

!Email Proxy for IMAP protocol is setup on the outside interface

imap4s

 enable outside

!Declaration of IMAP Email Server

 server secureme-email

!AAA authentication for IMAP users

 authentication-server-group Rad

 authentication aaa

!Group-policy is applied to the IMAP users

 default-group-policy SecureMeWebGrp

!Email Proxy for POP3 protocol is setup on the outside interface

pop3s

 enable outside

!Declaration of POP3 Email Server

 server secureme-email

!AAA authentication for POP3 users

 authentication-server-group Rad

 authentication aaa

!Group-policy is applied to the POP3 users

 default-group-policy SecureMeWebGrp

!Email Proxy for SMTP protocol is setup on the outside interface

smtps

 enable outside

!Declaration of SMTP Email Server

 server secureme-email

!AAA authentication for SMTP users

 authentication-server-group Rad

 authentication aaa

!Group-policy is applied to the SMTP users

 default-group-policy SecureMeWebGrp
Part I: Product Overview
Introduction to Network Security
- Introduction to Network Security
- Firewall Technologies
- Intrusion Detection and Prevention Technologies
- Network-Based Attacks
- Virtual Private Networks
- Summary
Product History
- Product History
- Cisco Firewall Products
- Cisco IDS Products
- Cisco VPN Products
- Cisco ASA All-in-One Solution
- Summary
Hardware Overview
Part II: Firewall Solution
Initial Setup and System Maintenance
- Initial Setup and System Maintenance
- Accessing the Cisco ASA Appliances
- Managing Licenses
- Initial Setup
- IP Version 6
- Setting Up the System Clock
- Configuration Management
- Remote System Management
- System Maintenance
- System Monitoring
- Summary
Network Access Control
- Network Access Control
- Packet Filtering
- Advanced ACL Features
- Content and URL Filtering
- Deployment Scenarios Using ACLs
- Monitoring Network Access Control
- Understanding Address Translation
- DNS Doctoring
- Monitoring Address Translations
- Summary
IP Routing
Authentication, Authorization, and Accounting (AAA)
- Authentication, Authorization, and Accounting (AAA)
- AAA Protocols and Services Supported by Cisco ASA
- Defining an Authentication Server
- Configuring Authentication of Administrative Sessions
- Authenticating Firewall Sessions (Cut-Through Proxy Feature)
- Configuring Authorization
- Configuring Accounting
- Deployment Scenarios
- Troubleshooting AAA
- Summary
Application Inspection
- Application Inspection
- Enabling Application Inspection Using the Modular Policy Framework
- Selective Inspection
- Computer Telephony Interface Quick Buffer Encoding Inspection
- Domain Name System
- Extended Simple Mail Transfer Protocol
- File Transfer Protocol
- General Packet Radio Service Tunneling Protocol
- H.323
- HTTP
- ICMP
- ILS
- MGCP
- NetBIOS
- PPTP
- Sun RPC
- RSH
- RTSP
- SIP
- Skinny
- SNMP
- SQL*Net
- TFTP
- XDMCP
- Deployment Scenarios
- Summary
Security Contexts
- Security Contexts
- Architectural Overview
- Configuration of Security Contexts
- Deployment Scenarios
- Monitoring and Troubleshooting the Security Contexts
- Summary
Transparent Firewalls
- Transparent Firewalls
- Architectural Overview
- Transparent Firewalls and VPNs
- Configuration of Transparent Firewall
- Deployment Scenarios
- Monitoring and Troubleshooting the Transparent Firewall
- Summary
Failover and Redundancy
- Failover and Redundancy
- Architectural Overview
- Failover Configuration
- Deployment Scenarios
- Monitoring and Troubleshooting Failovers
- Summary
Quality of Service
- Quality of Service
- Architectural Overview
- Configuring Quality of Service
- QoS Deployment Scenarios
- Monitoring QoS
- Summary
Part III: Intrusion Prevention System (IPS) Solution
Intrusion Prevention System Integration
- Intrusion Prevention System Integration
- Adaptive Inspection Prevention Security Services Module Overview (AIP-SSM)
- Directing Traffic to the AIP-SSM
- AIP-SSM Module Software Recovery
- Additional IPS Features
- Summary
Configuring and Troubleshooting Cisco IPS Software via CLI
- Configuring and Troubleshooting Cisco IPS Software via CLI
- Cisco IPS Software Architecture
- Introduction to the CIPS 5.x Command-Line Interface
- User Administration
- AIP-SSM Maintenance
- Advanced Features and Configuration
- Summary
Part IV: Virtual Private Network (VPN) Solution
Site-to-Site IPSec VPNs
- Site-to-Site IPSec VPNs
- Preconfiguration Checklist
- Configuration Steps
- Advanced Features
- Optional Commands
- Deployment Scenarios
- Monitoring and Troubleshooting Site-to-Site IPSec VPNs
- Summary
Remote Access VPN
- Remote Access VPN
- Cisco IPSec Remote Access VPN Solution
- Advanced Cisco IPSec VPN Features
- Deployment Scenarios of Cisco IPSec VPN
- Monitoring and Troubleshooting Cisco Remote Access VPN
- Cisco WebVPN Solution
- Advanced WebVPN Features
- Deployment Scenarios of WebVPN
- Monitoring and Troubleshooting WebVPN
- Summary
Public Key Infrastructure (PKI)
- Public Key Infrastructure (PKI)
- Introduction to PKI
- Enrolling the Cisco ASA to a CA Using SCEP
- Manual (Cut-and-Paste) Enrollment
- Configuring CRL Options
- Configuring IPSec Site-to-Site Tunnels Using Certificates
- Configuring the Cisco ASA to Accept Remote-Access VPN Clients Using Certificates
- Troubleshooting PKI
- Summary
Part V: Adaptive Security Device Manager
Introduction to ASDM
- Introduction to ASDM
- Setting Up ASDM
- Initial Setup
- Functional Screens
- Interface Management
- System Clock
- Configuration Management
- Remote System Management
- System Maintenance
- System Monitoring
- Summary
Firewall Management Using ASDM
- Firewall Management Using ASDM
- Access Control Lists
- Address Translation
- Routing Protocols
- AAA
- Application Inspection
- Security Contexts
- Transparent Firewalls
- Failover
- QoS
- Summary
IPS Management Using ASDM
- IPS Management Using ASDM
- Accessing the IPS Device Management Console from ASDM
- Configuring Basic AIP-SSM Settings
- Advanced IPS Configuration and Monitoring Using ASDM
- Summary
VPN Management Using ASDM
- VPN Management Using ASDM
- Site-to-Site VPN Setup Using Preshared Keys
- Site-to-Site VPN Setup Using PKI
- Cisco Remote-Access IPSec VPN Setup
- WebVPN
- VPN Monitoring
- Summary
Case Studies
EAN: 2147483647
Pages: 231
- ERP System Acquisition: A Process Model and Results From an Austrian Survey
- The Effects of an Enterprise Resource Planning System (ERP) Implementation on Job Characteristics – A Study using the Hackman and Oldham Job Characteristics Model
- Context Management of ERP Processes in Virtual Communities
- Distributed Data Warehouse for Geo-spatial Services
- A Hybrid Clustering Technique to Improve Patient Data Quality
- Step 2.1 Use the OpenSSH Tool Suite to Replace Clear-Text Programs
- Step 3.1 Use PuTTY as a Graphical Replacement for telnet and rlogin
- Step 3.2 Use PuTTY / plink as a Command Line Replacement for telnet / rlogin
- Step 4.7 Using Public Key Authentication for Automated File Transfers
- Step 6.3 X11 Forwarding
